Resize a Cloud PC

The Resize remote action, which preserves user and disk data, lets you:

  • Upgrade the RAM, CPU, and storage size of a Cloud PC.
  • Downgrade the RAM and CPU of Cloud PC. Resizing doesn't let you downsize disk space.

These operations don't require reprovisioning of the Cloud PC.

You might consider resizing a Cloud PC when a user needs:

  • Higher RAM and VCPU cores to run CPU intensive applications.
  • More disk space for file storing.
  • Less RAM and vCPU cores to run their current workload applications.

Resizing supports:

  • Direct and group-based licenses.
  • Paid, preview, and trial licenses.
  • Bulk and single device operations.

Resizing doesn't support:

  • GPU Cloud PCs. GPU Cloud PCs might show up in the resize flow, but trying to resize a GPU Cloud PC will result in an error.

Resizing automatically disconnects the user from their session and any unsaved work might be lost. Therefore, it's best to coordinate any resizing with the user before you begin. Contact your end users and have them save their work and sign out before you begin resizing.

Downsizing may impact support for nested virtualization. For more information, see Set up virtualization-based workloads support.

Requirements

Role requirements

To resize a Cloud PC, the admin must have certain built-in Microsoft Entra roles.

  • For a Cloud PC provisioned with a direct assigned license, at least one of the following roles
    • Global Admin
    • Intune Service Admin
    • Intune Reader + Cloud PC Admin roles
    • Intune Reader + Windows 365 Admin
  • For a Cloud PC provisioned with a group-based license, at least one of the following roles
    • Global Admin
    • Intune Service Admin
    • Intune Reader + Windows 365 Admin
    • In addition to one of the previous three roles, a role with Microsoft Entra group read/write membership and licensing permissions, like the Windows 365 Admin role.

Alternatively, you can assign a custom role that includes the permissions of these built-in roles.

IP address requirements

When resizing a Microsoft Entra hybrid join bring-your-own-network Cloud PC, a second IP address must be available in the subnet for the Cloud PC to be resized.

During the resizing operation, a second IP address is used when moving to the new size. This precaution makes sure that the Cloud PC can be rolled back to the original should an issue occur.

To account for this precaution, you can:

  • Make sure that adequate IP addresses are available in the vNET for all Cloud PCs to be resized, or
  • Stagger your resize operations to make sure that the address scope is maintained.

If inadequate addresses are available, resize failures can occur.

Other requirements

In order to use Resize there must be available licenses in inventory for the resized Cloud PC configuration.

To Resize a Cloud PC, it must have a status of Provisioned in the Windows 365 provisioning node.

Resize a single Cloud PC provisioned with a direct assigned license

When resizing Cloud PCs provisioned through direct assigned licenses the Windows 365 service automatically takes care of:

  • Unassigning the original license.
  • Assigning the new license on behalf of the admin.
  1. Sign in to the Microsoft Intune admin center, select Devices > All Devices > choose a device > Resize. Screenshot of resize a Cloud PC
  2. Under Resize, there's a list of the sizes that you can upgrade or downsize to based on the licenses available in your inventory. You can upgrade/downgrade a Cloud PC’s RAM and vCPU. You can only upgrade the OS disk storage. If you're downgrading a user’s Cloud PC, options with lower storage are grayed out. Select one of the available options.
  3. Select Resize.

If there are available licenses, the resizing starts.

Resize a single Cloud PC provisioned with a group-based license

  1. Create a new target Microsoft Entra group. Add the users from the source Microsoft Entra group that you want to resize. Alternately, you can use existing Microsoft Entra groups if you're mapping the groups to individual Windows 365 license types.
  2. Assign the existing provisioning policy targeting the original source Microsoft Entra group to the new target Microsoft Entra group. You only need to do this if you don't have a discrete Microsoft Entra group for your provisioning policy assignment. If you have discrete Microsoft Entra groups to manage your provisioning policy assignments, you can omit this step.
  3. Sign in to the Microsoft Intune admin center, select Devices > All Devices > choose the device that you want added to the Microsoft Entra target group > Resize. Screenshot of resize a Cloud PC
  4. You’ll see a list with all the possible SKUs that you can upgrade or downsize to based on the licenses that you have available in your inventory. You can upgrade/downgrade a Cloud PC’s RAM and vCPU. You can only upgrade the OS disk storage. If you're downsizing a user’s Cloud PC, options with lower storage will be grayed out. Select one of the available options.
  5. Select Resize.
  6. The user’s Cloud PC is placed in the Resize pending license state as can be seen in the Windows 365 provisioning blade.
  7. Select Users > search for the user name assigned to the Cloud PC and select it > Groups.
  8. Remove the users from the original source Microsoft Entra group to retrieve the old license. If you don’t perform this step, a new Cloud PC will be provisioned with the original source license after you assign the target license.
  9. Assign the target license to the new target Microsoft Entra group. The resizing process now begins.

Bulk resizing Cloud PCs

Resizing in bulk can have large scale impact. Before resizing a large group of Cloud PCs, try resizing a small group. This will help familiarize you with the process.

Up to 5000 Cloud PCs can be resized at a time.

Bulk resize Cloud PCs originally provisioned with directly assigned licenses

  1. Sign in to the Microsoft Intune admin center, select Devices > All Devices > Bulk device actions > OS (Windows) > Select device type (Cloud PCs) > Device action (Resize).
  2. On the Basics page, select the Source size for the Cloud PCs to be resized.
  3. Select the Target size for the resized Cloud PCs > Next.
  4. On the Devices page, choose Select individual devices across your environment > Next.
  5. Under Select devices, choose the devices that you want to resize > Next.
  6. On the Review + create page, select Create.

Bulk resize Cloud PCs originally provisioned with group-based licenses

  1. Sign in to the Microsoft Intune admin center, select Devices > All Devices > Bulk device actions > OS (Windows) > Select device type (Cloud PCs) > Device action (Resize).
  2. On the Basics page, select the Source size for the Cloud PCs to be resized.
  3. Select the Target size for the resized Cloud PCs > Next.
  4. On the Devices page, choose Apply this action to the devices registered to its group members > Next.
  5. Under Select groups to include, choose the groups containing the users who own the devices that you want to resize > Next.
  6. On the Review + create page, select Create. The user’s Cloud PC is placed in the Resize pending license state as can be seen in the Windows 365 provisioning blade.
  7. Select Groups > select the group that your changing > Licenses > select the old license > Remove license > Yes > Save. Repeat this step for each group that you want to change.
  8. Select Assignments > select the license that you want to resize the Cloud PCs to > Save. The users' Cloud PC starts resizing, which you can check in the Windows 365 provisioning blade.

Bulk resize a subset of Cloud PCs originally provisioned using group-based licenses

  1. Create a new target Microsoft Entra group. Add the users from the source Microsoft Entra group that you want to resize. Alternately, you can use existing Microsoft Entra groups if you're mapping the groups to individual Windows 365 license types.
  2. Assign the existing provisioning policy targeting the original source Microsoft Entra group to the new target Microsoft Entra group. You only need to do this if you don't have a discrete Microsoft Entra group for your provisioning policy assignment. If you have discrete Microsoft Entra groups to manage your provisioning policy assignments, you can omit this step.
  3. Sign in to the Microsoft Intune admin center, select Devices > All Devices > Bulk device actions > OS (Windows) > Select device type (Cloud PCs) > Device action (Resize).
  4. On the Basics page, select the Source size for the Cloud PCs to be resized.
  5. Select the Target size for the resized Cloud PCs > Next.
  6. On the Devices page, choose Apply this action to the devices registered to its group members > Next.
  7. Under Select groups to include, choose the groups containing the users who own the devices that you want to resize > Next.
  8. On the Review + create page, select Create. The user’s Cloud PC is placed in the Resize pending license state as can be seen in the Windows 365 provisioning blade.
  9. Remove the users from the original source Microsoft Entra group to retrieve the old license. If you don’t perform this step, a new Cloud PC will be provisioned with the original source license after you assign the target license.
  10. Assign the target license to the new target Microsoft Entra group. The resizing process now begins.

Resizing details

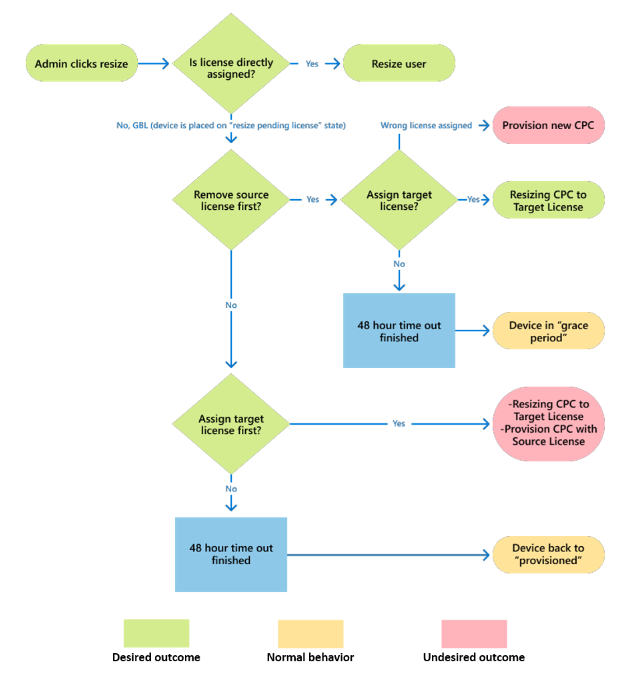
The Resize pending license state has a duration of 48 hours. If the original license is removed but the new license isn't assigned within 48 hours, the device goes into a grace period.

If the wrong target license is chosen, the Cloud PC is provisioned matching the configuration of that wrong license.

If the source license isn't removed first, and the new license is assigned to the user, the new license is used to resize the current Cloud PC. In addition, the original license is used to provision another, new Cloud PC for the user.

If the source license isn't removed, and the target license isn't assigned within 48 hours, the device returns to the Provisioned state.

When resizing starts, the user is automatically disconnected from their Cloud PC and any unsaved work might be lost.

Resizing can take from 15 to 20 minutes before the user can access their Cloud PC again. You can monitor the status in the Windows 365 provisioning blade. Users can see their Cloud PC status at https://windows365.microsoft.com.

If you have a combination of paid and trial licenses, the resize feature uses your paid licenses first. After these licenses run out, the resize operation uses your trial licenses.

If there are no licenses in your inventory, the resizing will fail. Contact your procurement admin to request more licenses. After the license has been purchased and added to the inventory in the Microsoft 365 admin center, you can retry the resize operation. Licenses can be purchased from various channels: EA, CSP, MCA, and Web Direct.

Devices with a state of Resize not supported won't be resized. The status message and details can help you identify the issue. You can still proceed with a bulk resize even if you have devices in the list that are marked as Resize not supported.

Resize with Step-up Licenses

The Windows 365 step-up licenses are lead status licenses available for Enterprise admins that have a direct Enterprise Agreement. A step-up SKU makes it easier for admins to migrate users from a lower-configuration license to a higher-configuration license without incurring the full cost of licensing two separate subscriptions of the product. For Windows 365, step-ups are available for compute (RAM/CPU) and storage and scoped to upgrades and not downgrades of licenses.

If you converted a Windows 365 Enterprise license subscription by purchasing Microsoft Step-up Licenses, you can migrate your users to the new license and preserve all user data by performing a bulk resize for those users.

For example, let's say that you used a Step-up purchase to convert licenses from a Windows 365 Enterprise 2vCPU/4 GB/128 GB subscription to a Windows 365 Enterprise 4vCPU/16GB/128 GB subscription. In this case, follow the steps under Bulk resize Cloud PCs originally provisioned with group-based licenses. The Windows 365 2vCPU, 4GB, 128 GB is your base license, and the Windows 365 4vCPU/16GB/128 GB is your target license.

When a Step-up conversion takes place, the stepped-up licenses show up in your inventory equaling the number of old licenses you chose to convert. If you Step-up 10 licenses of Windows 365 Enterprise 2vCPU/4GB/128 GB to 4vCPU/16 GB/128 GB, you end up with 10 more licenses of 4vCPU/16 GB/128 GB and 10 fewer licenses of 2vCPU/4GB/128 GB. These changes appear on the Your Products page in the Microsoft admin center.

You have 90 days to migrate your users to the new 4vCPU/16 GB/128 GB licenses before they lose access to the Cloud PC provisioned with the original license. For more information about license life cycle states, see What happens to my data and access when my subscription ends?

Resize a Cloud PC flow diagram

Flowchart of actions for an admin to resize a Cloud PC.

Next steps

For more information on Cloud PC sizes, see Cloud PC size recommendations.