Note
Access to this page requires authorization. You can try signing in or changing directories.
Access to this page requires authorization. You can try changing directories.
When you add a new disk to your computer, the disk isn't immediately available in Windows File Explorer. First, you need to initialize the disk so it's ready for use by Windows. You might also need to assign a drive letter to the disk. After you initialize the disk, you can format it and store files on the disk.
This article describes how to initialize a new disk that has no existing data. If you want to use a USB drive for this procedure, keep in mind that some types of USB drives can't be initialized. The USB drives are only formatted and then assigned a drive letter.
Prerequisites
To complete the procedures in this article, the following prerequisites must be met:
The user account must be a member of the Backup Operators or Administrators group.
A new, uninitialized disk that has no existing data.
Warning
If you want to initialize a disk already in use, first save the existing files to a backup location. The initialization process erases all data on the disk.
If the existing disk has errors, try troubleshooting the disk to see if you can read the files. For more information, see Troubleshoot Disk Management > Disks that are missing or not initialized.
Initialize a new disk
The following steps show how to initialize a new disk with Disk Management. If you prefer to use PowerShell, run the Initialize-Disk cmdlet.
Open Disk Management with Administrator permissions. From the Windows Start menu, enter Create and format hard disk partitions.
In the results list, right-click Create and format hard disk partitions and select Run as administrator > Yes.
If you can't open Disk Management with Administrator permissions, follow these steps:
In the Search box on the taskbar, enter Computer Management.
In the results list, right-click Computer Management and select Run as administrator > Yes.
In the Computer Management dialog, go to the Storage > Disk Management section.
In Disk Management, locate the disk to initialize. If the disk is Offline, right-click the disk and select Online.
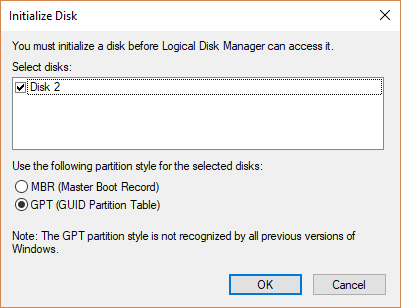
Right-click the disk and select Initialize Disk:

In the Initialize Disk dialog, confirm the correct disk is selected, check the partition style, and select OK.
The default partition style is GUID Partition Table (GPT). For more information, see Partition styles (GPT and MBR).
The disk status briefly changes to Initializing. After disk initialization completes, the disk status changes to Online.
If disk initialization fails, see Troubleshoot Disk Management > Disks that are missing or not initialized.
In Disk Management, locate the initialized disk and configure the disk:
Right-click the Unallocated space on the drive, select New Simple Volume, and select Next.
Specify the volume size, and select Next.
The common approach is to accept the default size, which uses the entire drive. To learn more about supported drive capacities, see Windows support for hard disks that are larger than 2 TB.
Specify the drive letter to assign to the volume, and select Next.
Specify the file system to use (usually NTFS), and select Next.
Select Finish to prepare the new disk.
Partition styles (GPT and MBR)
Disks can be divided into chunks called partitions. Each partition has a partition style, even when the disk has only one partition.
Windows uses two partition styles to understand how to access the data on the disk:
| Partition style | Usage |
|---|---|
| GUID Partition Table (GPT) | Most computers use the GPT disk type for hard drives and solid-state drives (SSDs). GPT is more robust and allows for volumes larger than 2 terabytes (TB). |
| Master Boot Record (MBR) | The MBR style is an older disk type. This style is used by 32-bit computers, older computers, and removable drives like memory cards. |
You don't usually have to worry about assigning the partition style. Windows automatically uses the appropriate disk type.