你当前正在访问 Microsoft Azure Global Edition 技术文档网站。 如果需要访问由世纪互联运营的 Microsoft Azure 中国技术文档网站,请访问 https://docs.azure.cn。
将数据移到 vFXT 群集 - 并行数据引入
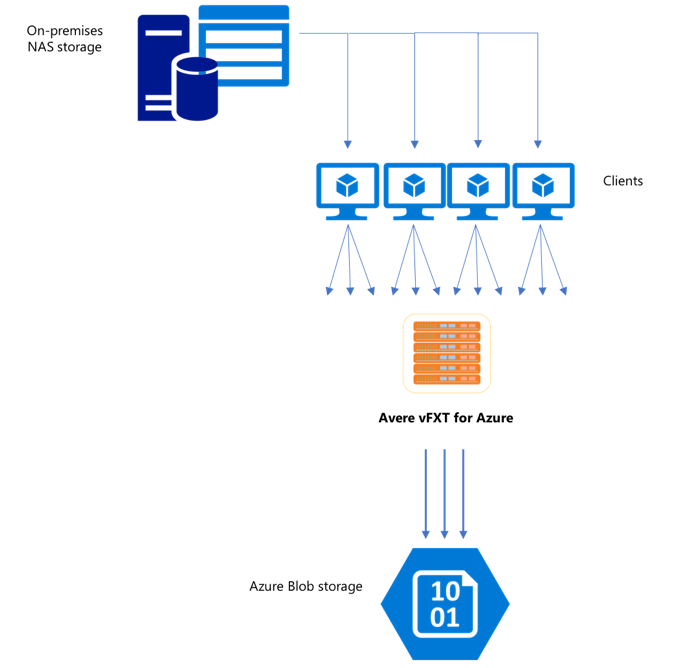
创建新的 vFXT 群集后,第一项任务可能是将数据移到 Azure 中的新存储卷。 但是,如果你移动数据的常用方法从一台客户端发出简单的复制命令,则复制性能可能会变慢。 单线程复制并不是很适合用于将数据复制到 Avere vFXT 群集的后端存储。
由于 Avere vFXT for Azure 群集是一个可缩放的多客户端缓存,复制数据的最快、最有效方法是使用多个客户端。 此方法可将文件和对象的引入并行化。
经常用于将数据从一个存储系统传输到另一个存储系统的 cp 和 copy 命令是单线程进程,它们每次只复制一个文件。 这意味着,文件服务器每次只会引入一个文件 - 这给群集资源造成了浪费。
本文将会介绍有关创建多客户端、多线程文件复制系统,以便将数据移到 Avere vFXT 群集的策略。 其中解释了文件传输的概念,以及可用于有效通过多个客户端和简单复制命令来复制数据的决策点。
此外,本文还介绍了一些有用的实用工具。 msrsync 实用工具可用于部分自动化将数据集分割成桶和使用 rsync 命令的过程。 parallelcp 脚本是可以读取源目录和自动发出复制命令的另一个实用工具。 此外,还可以在两个阶段中使用 rsync 工具,便于更快地复制,但仍可保持数据一致性。
请单击链接跳转到相关部分:
- 手动复制示例 - 有关使用复制命令的完整说明
- 两阶段 rsync 示例
- 部分自动化 (msrsync) 示例
- 并行复制示例
数据引入器 VM 模板
GitHub 上提供了一个资源管理器模板,用于通过本文中所述的并行数据引入工具自动创建 VM。
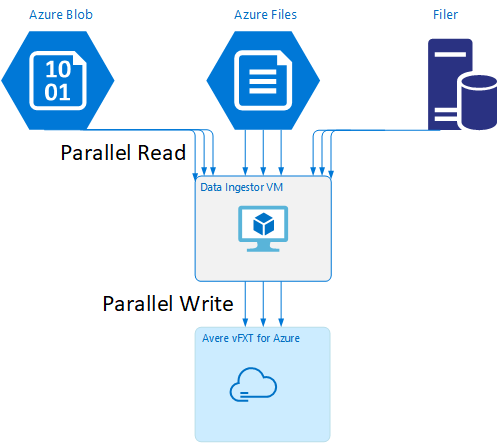
某篇教程介绍了数据引入器 VM,其中,新建的 VM 会装载 Avere vFXT 群集,并从群集下载其启动脚本。 有关详细信息,请阅读启动数据引入器 VM。
策略规划
在设计并行复制数据的策略时,应该知道如何在文件大小、文件计数和目录深度方面做出取舍。
- 如果文件较小,应该关注的指标是每秒文件数。
- 如果文件较大(10MiBi 或更大),则应该关注的指标是每秒字节数。
每个复制进程都有相关的吞吐率和文件传输速率,可以通过计量复制命令的时长和分解文件大小与文件计数来测量这些参数。 说明如何测量速率是否超出了本文档的范畴,但重要的一点是了解要处理的是小型还是大型文件。
手动复制示例
可以通过针对预定义的文件或路径集在后台一次性运行多个复制命令,在客户端上手动创建多线程复制。
Linux/UNIX cp 命令包含用于保留所有权和 mtime 元数据的 -p 参数。 可以选择性地将此参数添加到以下命令。 (添加该参数会增加客户端为了修改元数据而发送到目标文件系统的文件系统调用数。)
此简单示例将并行复制两个文件:
cp /mnt/source/file1 /mnt/destination1/ & cp /mnt/source/file2 /mnt/destination1/ &
发出此命令后,jobs 命令将显示有两个线程正在运行。
可预测的文件名结构
如果文件名可预测,则可以使用表达式来创建并行复制线程。
例如,如果目录包含 1000 个按顺序从 0001 到 1000 编号的文件,则你可以使用以下表达式创建 10 个并行线程,其中每个线程可以复制 100 个文件:
cp /mnt/source/file0* /mnt/destination1/ & \
cp /mnt/source/file1* /mnt/destination1/ & \
cp /mnt/source/file2* /mnt/destination1/ & \
cp /mnt/source/file3* /mnt/destination1/ & \
cp /mnt/source/file4* /mnt/destination1/ & \
cp /mnt/source/file5* /mnt/destination1/ & \
cp /mnt/source/file6* /mnt/destination1/ & \
cp /mnt/source/file7* /mnt/destination1/ & \
cp /mnt/source/file8* /mnt/destination1/ & \
cp /mnt/source/file9* /mnt/destination1/
未知文件名结构
如果文件命名结构不可预测,则可以按目录名称将文件分组。
此示例收集要发送到作为后台任务运行的 cp 命令的整个目录:
/root
|-/dir1
| |-/dir1a
| |-/dir1b
| |-/dir1c
   |-/dir1c1
|-/dir1d
收集文件后,可以运行并行复制命令,以递归方式复制子目录及其所有内容:
cp /mnt/source/* /mnt/destination/
mkdir -p /mnt/destination/dir1 && cp /mnt/source/dir1/* mnt/destination/dir1/ &
cp -R /mnt/source/dir1/dir1a /mnt/destination/dir1/ &
cp -R /mnt/source/dir1/dir1b /mnt/destination/dir1/ &
cp -R /mnt/source/dir1/dir1c /mnt/destination/dir1/ & # this command copies dir1c1 via recursion
cp -R /mnt/source/dir1/dir1d /mnt/destination/dir1/ &
何时添加装入点
针对单个目标文件系统装入点运行足够多的并行线程后,在某个时间点,添加更多的线程并不能提高吞吐量。 (将会根据每秒文件数或每秒字节数来测量吞吐量,具体取决于数据类型。)更糟糕的是,过多的线程有时会导致吞吐量下降。
如果发生这种情况,可以使用相同的远程文件系统装载路径,将客户端装入点添加到其他 vFXT 群集 IP 地址:
10.1.0.100:/nfs on /mnt/sourcetype nfs (rw,vers=3,proto=tcp,addr=10.1.0.100)
10.1.1.101:/nfs on /mnt/destination1type nfs (rw,vers=3,proto=tcp,addr=10.1.1.101)
10.1.1.102:/nfs on /mnt/destination2type nfs (rw,vers=3,proto=tcp,addr=10.1.1.102)
10.1.1.103:/nfs on /mnt/destination3type nfs (rw,vers=3,proto=tcp,addr=10.1.1.103)
添加客户端装入点可将附加的复制命令分叉到其他 /mnt/destination[1-3] 装入点,从而实现更高的并行度。
例如,如果文件极大,可将复制命令定义为使用不同的目标路径,并从客户端并行发出更多的命令来执行复制。
cp /mnt/source/file0* /mnt/destination1/ & \
cp /mnt/source/file1* /mnt/destination2/ & \
cp /mnt/source/file2* /mnt/destination3/ & \
cp /mnt/source/file3* /mnt/destination1/ & \
cp /mnt/source/file4* /mnt/destination2/ & \
cp /mnt/source/file5* /mnt/destination3/ & \
cp /mnt/source/file6* /mnt/destination1/ & \
cp /mnt/source/file7* /mnt/destination2/ & \
cp /mnt/source/file8* /mnt/destination3/ & \
在以上示例中,所有三个目标装入点都是客户端文件复制进程的目标。
何时添加客户端
最后,当客户端的处理能力达到极限时,添加更多的复制线程或装入点不会进一步提高每秒文件数或每秒字节数。 在这种情况下,可以部署包含相同装入点集、运行自身文件复制进程集的另一个客户端。
示例:
Client1: cp -R /mnt/source/dir1/dir1a /mnt/destination/dir1/ &
Client1: cp -R /mnt/source/dir2/dir2a /mnt/destination/dir2/ &
Client1: cp -R /mnt/source/dir3/dir3a /mnt/destination/dir3/ &

Client2: cp -R /mnt/source/dir1/dir1b /mnt/destination/dir1/ &
Client2: cp -R /mnt/source/dir2/dir2b /mnt/destination/dir2/ &
Client2: cp -R /mnt/source/dir3/dir3b /mnt/destination/dir3/ &

Client3: cp -R /mnt/source/dir1/dir1c /mnt/destination/dir1/ &
Client3: cp -R /mnt/source/dir2/dir2c /mnt/destination/dir2/ &
Client3: cp -R /mnt/source/dir3/dir3c /mnt/destination/dir3/ &

Client4: cp -R /mnt/source/dir1/dir1d /mnt/destination/dir1/ &
Client4: cp -R /mnt/source/dir2/dir2d /mnt/destination/dir2/ &
Client4: cp -R /mnt/source/dir3/dir3d /mnt/destination/dir3/ &
创建文件清单
了解上述方法(每个目标有多个复制线程,每个客户端有多个目标,每个可通过网络访问的源文件系统有多个客户端)之后,请考虑以下建议:生成文件清单,然后在多个客户端中将这些清单用于复制命令。
此方案使用 UNIX find 命令创建文件或目录的清单:
user@build:/mnt/source > find . -mindepth 4 -maxdepth 4 -type d
./atj5b55c53be6-01/support/gsi/2018-07-22T21:12:06EDT
./atj5b55c53be6-01/support/pcap/2018-07-23T01:34:57UTC
./atj5b55c53be6-01/support/trace/rolling
./atj5b55c53be6-03/support/gsi/2018-07-22T21:12:06EDT
./atj5b55c53be6-03/support/pcap/2018-07-23T01:34:57UTC
./atj5b55c53be6-03/support/trace/rolling
./atj5b55c53be6-02/support/gsi/2018-07-22T21:12:06EDT
./atj5b55c53be6-02/support/pcap/2018-07-23T01:34:57UTC
./atj5b55c53be6-02/support/trace/rolling
将此结果重定向到文件 find . -mindepth 4 -maxdepth 4 -type d > /tmp/foo
然后,可以循环访问清单,并使用 BASH 命令来统计文件数目和确定子目录的大小:
ben@xlcycl1:/sps/internal/atj5b5ab44b7f > for i in $(cat /tmp/foo); do echo " `find ${i} |wc -l` `du -sh ${i}`"; done
244    3.5M    ./atj5b5ab44b7f-02/support/gsi/2018-07-18T00:07:03EDT
9      172K    ./atj5b5ab44b7f-02/support/gsi/stats_2018-07-18T05:01:00UTC
124    5.8M    ./atj5b5ab44b7f-02/support/gsi/stats_2018-07-19T01:01:01UTC
152    15M     ./atj5b5ab44b7f-02/support/gsi/stats_2018-07-20T01:01:00UTC
131    13M     ./atj5b5ab44b7f-02/support/gsi/stats_2018-07-20T21:59:41UTC_partial
789    6.2M    ./atj5b5ab44b7f-02/support/gsi/2018-07-20T21:59:41UTC
134    12M     ./atj5b5ab44b7f-02/support/gsi/stats_2018-07-20T22:22:55UTC_vfxt_catchup
7      16K     ./atj5b5ab44b7f-02/support/pcap/2018-07-18T17:12:19UTC
8      83K     ./atj5b5ab44b7f-02/support/pcap/2018-07-18T17:17:17UTC
575    7.7M    ./atj5b5ab44b7f-02/support/cores/armada_main.2000.1531980253.gsi
33     4.4G    ./atj5b5ab44b7f-02/support/trace/rolling
281    6.6M    ./atj5b5ab44b7f-01/support/gsi/2018-07-18T00:07:03EDT
15     182K    ./atj5b5ab44b7f-01/support/gsi/stats_2018-07-18T05:01:00UTC
244    17M     ./atj5b5ab44b7f-01/support/gsi/stats_2018-07-19T01:01:01UTC
299    31M     ./atj5b5ab44b7f-01/support/gsi/stats_2018-07-20T01:01:00UTC
256    29M     ./atj5b5ab44b7f-01/support/gsi/stats_2018-07-20T21:59:41UTC_partial
889    7.7M    ./atj5b5ab44b7f-01/support/gsi/2018-07-20T21:59:41UTC
262    29M     ./atj5b5ab44b7f-01/support/gsi/stats_2018-07-20T22:22:55UTC_vfxt_catchup
11     248K    ./atj5b5ab44b7f-01/support/pcap/2018-07-18T17:12:19UTC
11     88K     ./atj5b5ab44b7f-01/support/pcap/2018-07-18T17:17:17UTC
645    11M     ./atj5b5ab44b7f-01/support/cores/armada_main.2019.1531980253.gsi
33     4.0G    ./atj5b5ab44b7f-01/support/trace/rolling
244    2.1M    ./atj5b5ab44b7f-03/support/gsi/2018-07-18T00:07:03EDT
9      158K    ./atj5b5ab44b7f-03/support/gsi/stats_2018-07-18T05:01:00UTC
124    5.3M    ./atj5b5ab44b7f-03/support/gsi/stats_2018-07-19T01:01:01UTC
152    15M     ./atj5b5ab44b7f-03/support/gsi/stats_2018-07-20T01:01:00UTC
131    12M     ./atj5b5ab44b7f-03/support/gsi/stats_2018-07-20T21:59:41UTC_partial
789    8.4M    ./atj5b5ab44b7f-03/support/gsi/2018-07-20T21:59:41UTC
134    14M     ./atj5b5ab44b7f-03/support/gsi/stats_2018-07-20T22:25:58UTC_vfxt_catchup
7      159K    ./atj5b5ab44b7f-03/support/pcap/2018-07-18T17:12:19UTC
7      157K    ./atj5b5ab44b7f-03/support/pcap/2018-07-18T17:17:17UTC
576    12M     ./atj5b5ab44b7f-03/support/cores/armada_main.2013.1531980253.gsi
33     2.8G    ./atj5b5ab44b7f-03/support/trace/rolling
最后,必须在客户端中编写实际的文件复制命令。
如果有四个客户端,请使用以下命令:
for i in 1 2 3 4 ; do sed -n ${i}~4p /tmp/foo > /tmp/client${i}; done
如果有五个客户端,请使用如下所示的命令:
for i in 1 2 3 4 5; do sed -n ${i}~5p /tmp/foo > /tmp/client${i}; done
如果有六个,按需做出推断。
for i in 1 2 3 4 5 6; do sed -n ${i}~6p /tmp/foo > /tmp/client${i}; done
你将获得 N 个生成的文件,包含 find 命令输出中获取的四级目录的路径名称的每个(共 N 个)客户端各有一个生成的文件。
使用每个文件生成复制命令:
for i in 1 2 3 4 5 6; do for j in $(cat /tmp/client${i}); do echo "cp -p -R /mnt/source/${j} /mnt/destination/${j}" >> /tmp/client${i}_copy_commands ; done; done
上述命令会返回 N 个文件,每个文件的每行包含一个可在客户端上作为 BASH 脚本运行的复制命令。
目标是在多个客户端的每个客户端上并行运行这些脚本的多个线程。
使用两阶段 rsync 过程
标准 rsync 实用程序无法很好地通过 Avere vFXT for Azure 系统填充云存储,因为它会生成大量文件创建和重命名操作来保证数据的完整性。 但是,如果在第二次运行时检查文件完整性,则可以安全地将 --inplace 选项与 rsync 结合使用,跳过更谨慎的复制过程。
标准 rsync 复制操作会创建一个临时文件并使用数据填充它。 如果数据传输成功完成,临时文件将重命名为原始文件名。 即使在复制过程中访问该文件,此方法仍可保证一致性。 但此方法会产生更多的写入操作,从而减慢了文件在缓存中的移动。
选项 --inplace 直接在其最终位置写入新文件。 在传输过程中不能保证文件保持一致,但如果你为以后使用的存储系统做准备,则这一点就并不重要了。
第二个 rsync 操作用于检查第一次操作的一致性。 由于文件已复制,因此第二个阶段是一次快速扫描,确保目标上的文件与源上的文件相匹配。 如果发现有文件不匹配,则会重新复制。
可以在一个命令中同时发出两个阶段:
rsync -azh --inplace <source> <destination> && rsync -azh <source> <destination>
对于具有内部目录管理器所能处理的最大文件数的数据集,这种方法既简单又省时。 (通常 3 节点群集最多文件数为 2 亿个文件,6 节点群集为 5 亿个文件,以此类推。)
使用 msrsync 实用工具
此外,也可以使用 msrsync 工具将数据移到 Avere 群集的后端核心文件管理器。 此工具旨在通过运行多个并行 rsync 进程来优化带宽的使用。 可从 GitHub 获取此工具:https://github.com/jbd/msrsync。
msrsync 将源目录分解成独立的“桶”,然后针对每个桶运行单个 rsync 进程。
使用四核 VM 进行的初步测试表明,使用 64 个进程时效率最高。 使用 msrsync 选项 -p 将进程数设置为 64。
还可以使用 msrsync 命令的 --inplace 参数。 如果使用此选项,则考虑运行第二个命令(如上面所述的 rsync),以确保数据完整性。
msrsync 只能与本地卷相互写入。 必须可将源和目标作为群集虚拟网络中的本地装入点进行访问。
若要使用 msrsync 在 Azure 云卷中填充 Avere 群集,请遵照以下说明操作:
安装
msrsync及其必备组件(rsync 和 Python 2.6 或更高版本)确定要复制的文件和目录总数。
例如,结合参数
prime.py --directory /path/to/some/directory使用 Avere 实用工具prime.py(可通过 URL https://github.com/Azure/Avere/blob/master/src/clientapps/dataingestor/prime.py 下载)。如果不使用
prime.py,则可以使用 Gnufind工具计算项数,如下所示:find <path> -type f |wc -l # (counts files) find <path> -type d |wc -l # (counts directories) find <path> |wc -l # (counts both)将项数除以 64 即可得出每个进程的项数。 运行该命令时,在
-f选项中使用此数字可以设置桶的大小。发出
msrsync命令以复制文件:msrsync -P --stats -p 64 -f <ITEMS_DIV_64> --rsync "-ahv" <SOURCE_PATH> <DESTINATION_PATH>如果使用
--inplace,添加第二次执行,但不提供选项用于检查数据是否正确复制:msrsync -P --stats -p 64 -f <ITEMS_DIV_64> --rsync "-ahv --inplace" <SOURCE_PATH> <DESTINATION_PATH> && msrsync -P --stats -p 64 -f <ITEMS_DIV_64> --rsync "-ahv" <SOURCE_PATH> <DESTINATION_PATH>例如,此命令可将 64 进程中的 11,000 文件从 /test/source-repository 移到 /mnt/vfxt/repository:
msrsync -P --stats -p 64 -f 170 --rsync "-ahv --inplace" /test/source-repository/ /mnt/vfxt/repository && msrsync -P --stats -p 64 -f 170 --rsync "-ahv --inplace" /test/source-repository/ /mnt/vfxt/repository
使用并行复制脚本
parallelcp 脚本还可用于将数据移到 vFXT 群集的后端存储。
以下脚本将添加可执行文件 parallelcp。 (此脚本适用于 Ubuntu;如果使用其他分发版,则必须单独安装 parallel。)
sudo touch /usr/bin/parallelcp && sudo chmod 755 /usr/bin/parallelcp && sudo sh -c "/bin/cat >/usr/bin/parallelcp" <<EOM
#!/bin/bash

display_usage() {
    echo -e "\nUsage: \$0 SOURCE_DIR DEST_DIR\n"
}

if [  \$# -le 1 ] ; then
    display_usage
    exit 1
fi

if [[ ( \$# == "--help") ||  \$# == "-h" ]] ; then
    display_usage
    exit 0
fi

SOURCE_DIR="\$1"
DEST_DIR="\$2"

if [ ! -d "\$SOURCE_DIR" ] ; then
    echo "Source directory \$SOURCE_DIR does not exist, or is not a directory"
    display_usage
    exit 2
fi

if [ ! -d "\$DEST_DIR" ] && ! mkdir -p \$DEST_DIR ; then
    echo "Destination directory \$DEST_DIR does not exist, or is not a directory"
    display_usage
    exit 2
fi

if [ ! -w "\$DEST_DIR" ] ; then
    echo "Destination directory \$DEST_DIR is not writeable, or is not a directory"
    display_usage
    exit 3
fi

if ! which parallel > /dev/null ; then
    sudo apt-get update && sudo apt install -y parallel
fi

DIRJOBS=225
JOBS=225
find \$SOURCE_DIR -mindepth 1 -type d -print0 | sed -z "s/\$SOURCE_DIR\///" | parallel --will-cite -j\$DIRJOBS -0 "mkdir -p \$DEST_DIR/{}"
find \$SOURCE_DIR -mindepth 1 ! -type d -print0 | sed -z "s/\$SOURCE_DIR\///" | parallel --will-cite -j\$JOBS -0 "cp -P \$SOURCE_DIR/{} \$DEST_DIR/{}"
EOM
并行复制示例
此示例中使用并行复制脚本和 Avere 群集中的源文件来编译 glibc。
源文件存储在 Avere 群集装入点上,对象文件存储在本地硬盘上。
此脚本使用上述并行复制脚本。 选项 -j 与 parallelcp 和 make 配合使用,以实现并行化。
sudo apt-get update
sudo apt install -y gcc bison gcc binutils make parallel
cd
wget https://mirrors.kernel.org/gnu/libc/glibc-2.27.tar.bz2
tar jxf glibc-2.27.tar.bz2
ln -s /nfs/node1 avere
time parallelcp glibc-2.27 avere/glibc-2.27
cd
mkdir obj
mkdir usr
cd obj
/home/azureuser/avere/glibc-2.27/configure --prefix=/home/azureuser/usr
time make -j