你当前正在访问 Microsoft Azure Global Edition 技术文档网站。 如果需要访问由世纪互联运营的 Microsoft Azure 中国技术文档网站,请访问 https://docs.azure.cn。
教程:将日志从 Azure 事件中心引入 Azure Monitor 日志(公共预览版)
Azure 事件中心是一个大数据流式处理平台,可从多个源收集事件供 Azure 和外部服务引入。 本文介绍如何将数据直接从事件中心引入 Log Analytics 工作区。
在本教程中,你将了解如何执行以下操作:
- 在 Log Analytics 工作区中创建事件中心数据的目标表
- 创建数据收集终结点
- 创建数据收集规则
- 向事件中心授予数据收集规则权限
- 将数据收集规则与事件中心关联
先决条件
若要将事件从 Azure 事件中心发送到 Azure Monitor 日志,需要以下资源(它们全部位于同一区域中):
- Log Analytics 工作区,你在其中至少拥有参与者权限。
- Log Analytics 工作区需要链接到专用群集或具有承诺层级。
- 允许公用网络访问的事件中心命名空间。 目前不支持专用链接和网络安全外围 (NSP)。
- 包含事件的事件中心。 可按照“在Azure 事件中心发送和接收事件”教程中的步骤,或者通过配置 Azure 资源的诊断设置,将事件发送到事件中心。
支持的区域
Azure Monitor 目前在以下区域支持从事件中心引入数据:
| 美洲 | 欧洲 | 中东 | 非洲 | 亚太区 |
|---|---|---|---|---|
| 巴西南部 | 法国中部 | 阿拉伯联合酋长国北部 | 南非北部 | 澳大利亚中部 |
| 巴西东南部 | 北欧 | 澳大利亚东部 | ||
| 加拿大中部 | 挪威东部 | 澳大利亚东南部 | ||
| 加拿大东部 | 瑞士北部 | 印度中部 | ||
| 美国东部 | 瑞士西部 | 东亚 | ||
| 美国东部 2 | 英国南部 | 日本东部 | ||
| 美国中南部 | 英国西部 | Jio 印度西部 | ||
| 美国西部 | 西欧 | 韩国中部 | ||
| 美国西部 3 | 东南亚 |
收集所需信息
后续步骤需要订阅 ID、资源组名称、工作区名称、工作区资源 ID 和事件中心实例资源 ID:
在“Log Analytics 工作区”菜单中导航到你的工作区,选择“属性”,然后复制订阅 ID、资源组和工作区名称。 在本教程中创建资源需要这些详细信息。

选择“JSON”来打开“资源 JSON”屏幕,然后复制工作区的资源 ID。 需要工作区资源 ID 才能创建数据收集规则。

导航到事件中心实例,选择“JSON”来打开“资源 JSON”屏幕,然后复制事件中心实例的资源 ID。 需要事件中心实例的资源 ID 才能将数据收集规则与事件中心相关联。


在 Log Analytics 工作区中创建目标表
需要设置目标表,然后才能引入数据。 可将数据引入自定义表和受支持的 Azure 表。
若要创建要将事件引入到的自定义表,请在 Azure 门户中:
选择“Cloud Shell”按钮,确保环境设置为“PowerShell”。
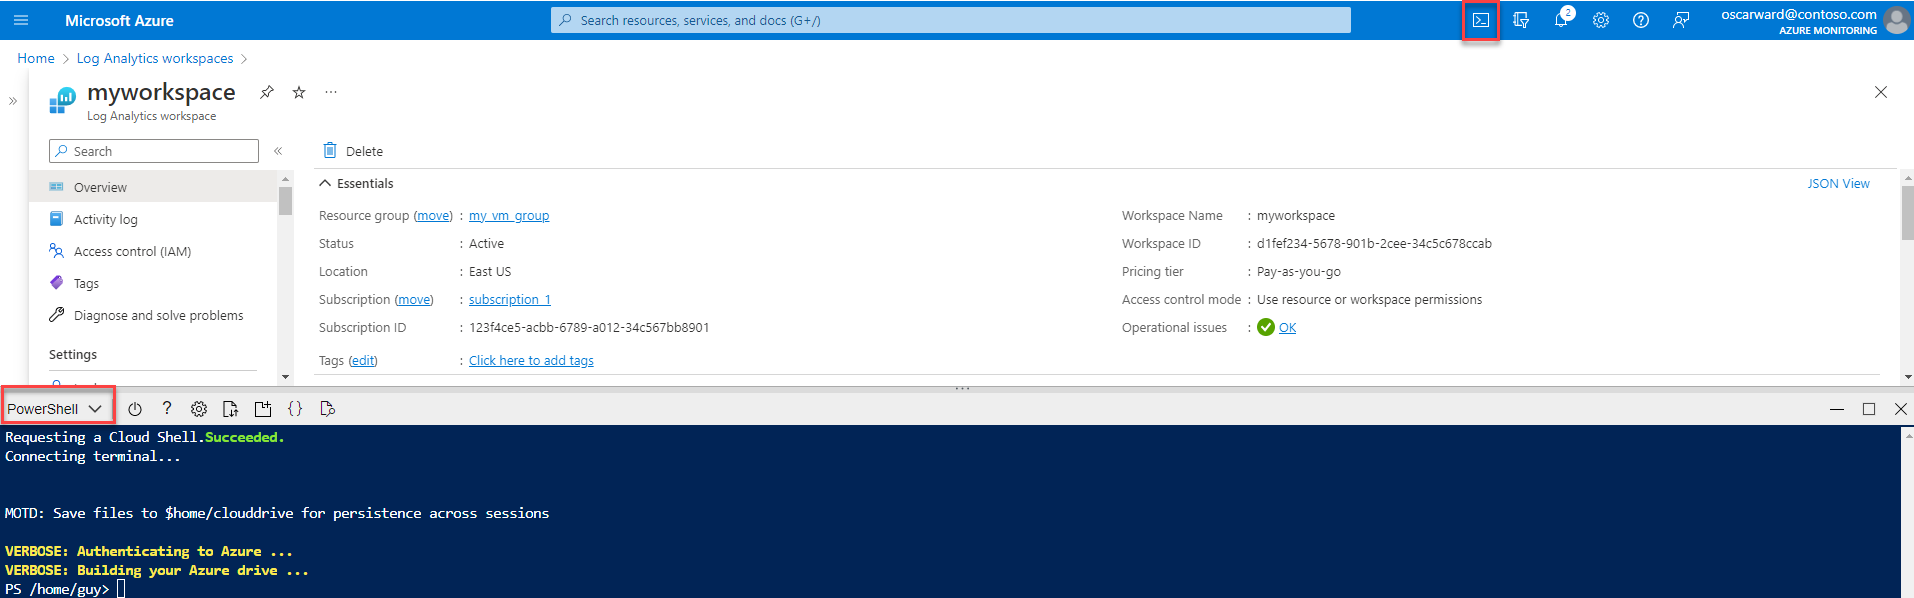
运行此 PowerShell 命令以创建表,在 JSON 中提供表名称 (
<table_name>)(如果是自定义表,则加上后缀 _CL),并在Invoke-AzRestMethod -Path命令中设置<subscription_id>、<resource_group_name>、<workspace_name>和<table_name>值:$tableParams = @' { "properties": { "schema": { "name": "<table_name>", "columns": [ { "name": "TimeGenerated", "type": "datetime", "description": "The time at which the data was ingested." }, { "name": "RawData", "type": "string", "description": "Body of the event." }, { "name": "Properties", "type": "dynamic", "description": "Additional message properties." } ] } } } '@ Invoke-AzRestMethod -Path "/subscriptions/<subscription_id>/resourcegroups/<resource_group_name>/providers/microsoft.operationalinsights/workspaces/<workspace_name>/tables/<table_name>?api-version=2021-12-01-preview" -Method PUT -payload $tableParams

重要
- 列名必须以字母开头,最多可包含 45 个字母数字字符和下划线 (
_)。 _ResourceId、id、_ResourceId、_SubscriptionId、TenantId、Type、UniqueId和Title是保留的列名。- 列名区分大小写。 请确保在数据收集规则中使用正确的大小写。
创建数据收集终结点
若要使用数据收集规则收集数据,需要具有数据收集终结点:
-
重要
在 Log Analytics 工作区所在的同一区域中创建数据收集终结点。
在数据收集终结点的“概述”屏幕中,选择“JSON 视图”。

复制数据收集规则的“资源 ID”。 在下一步中需要用到此信息。


创建数据收集规则
Azure Monitor 使用数据收集规则来定义要收集哪些数据、如何转换该数据以及将数据发送到何处。
若要在 Azure 门户中创建数据收集规则,请执行以下操作:
在门户的搜索框中,输入“模板”,然后选择“部署自定义模板”。

选择“在编辑器中生成自己的模板”。

将下面的资源管理器模板粘贴到编辑器中,然后选择“保存”。

请注意下列数据收集规则中的以下详细信息:
identity- 定义要使用的托管标识类型。 在我们的示例中,我们使用系统分配的标识。 你也可配置用户分配的托管标识。dataCollectionEndpointId- 数据收集终结点的资源 ID。streamDeclarations- 定义要从事件中心引入哪些数据(传入数据)。 无法修改流声明。datasources- 指定事件中心使用者组以及要将数据引入到的流。destinations- 指定要将数据发送到的所有目标。 可以将数据引入到一个或多个 Log Analytics 工作区。dataFlows- 将流与目标工作区匹配,并指定转换查询和目标表。 在我们的示例中,我们将数据引入到之前创建的自定义表中。 还可以引入到受支持的 Azure 表中。transformKql- 指定在将传入的数据发送到工作区之前对此数据应用的转换(流声明)。 在我们的示例中,我们将transformKql设置为source,这不会以任何方式修改源中的数据,因为我们将传入的数据映射到我们专门使用相应架构创建的自定义表中。 如果要将数据引入到具有其他架构的表中,或者在引入之前筛选数据,请定义数据收集转换。
{
    "$schema": "https://schema.management.azure.com/schemas/2019-04-01/deploymentTemplate.json#",
    "contentVersion": "1.0.0.0",
    "parameters": {
        "dataCollectionRuleName": {
            "type": "string",
            "metadata": {
                "description": "Specifies the name of the data collection Rule to create."
            }
        },
        "workspaceResourceId": {
            "type": "string",
            "metadata": {
                "description": "Specifies the Azure resource ID of the Log Analytics workspace to use."
            }
        },
        "endpointResourceId": {
            "type": "string",
            "metadata": {
                "description": "Specifies the Azure resource ID of the data collection endpoint to use."
            }
        },
        "tableName": {
            "type": "string",
            "metadata": {
                "description": "Specifies the name of the table in the workspace."
            }
        },
        "consumerGroup": {
            "type": "string",
            "metadata": {
                "description": "Specifies the consumer group of event hub."
            },
            "defaultValue": "$Default"
        }
    },
    "resources": [
        {
            "type": "Microsoft.Insights/dataCollectionRules",
            "name": "[parameters('dataCollectionRuleName')]",
            "location": "[resourceGroup().location]",
            "apiVersion": "2022-06-01",
            "identity": {
                             "type": "systemAssigned"
              },
            "properties": {
                "dataCollectionEndpointId": "[parameters('endpointResourceId')]",
                "streamDeclarations": {
                    "Custom-MyEventHubStream": {
                        "columns": [
                {
                    "name": "TimeGenerated",
                    "type": "datetime"
                },
                {
                    "name": "RawData",
                    "type": "string"
                },
                {
                    "name": "Properties",
                    "type": "dynamic"
                }
            ]
                    }
                },
                "dataSources": {
                    "dataImports": {
                         "eventHub": {
                                    "consumerGroup": "[parameters('consumerGroup')]",
                                    "stream": "Custom-MyEventHubStream",
                                    "name": "myEventHubDataSource1"
                                                          }
                                           }
               },
                "destinations": {
                    "logAnalytics": [
                        {
                            "workspaceResourceId": "[parameters('workspaceResourceId')]",
                            "name": "MyDestination"
                        }
                    ]
                },
                "dataFlows": [
                    {
                        "streams": [
                            "Custom-MyEventHubStream"
                        ],
                        "destinations": [
                            "MyDestination"
                        ],
                        "transformKql": "source",
                        "outputStream": "[concat('Custom-', parameters('tableName'))]"
                    }
                ]
            }
        }
    ]
}
在“自定义部署”屏幕上,指定用于存储数据收集规则的订阅和资源组,然后提供在模板中定义的参数的值,这些参数包括:
- 区域 - 数据收集规则所在区域。 根据所选资源组自动填充。
- 数据收集规则名称 - 为规则指定一个名称。
- 工作区资源 ID - 请参阅收集所需信息。
- 终结点资源 ID - 在创建数据收集终结点时生成。
- 表名称 - 目标表的名称。 在我们的示例中,只要使用自定义表,表名称都必须以 _CL 后缀结尾。 如果要将数据引入 Azure 表,请输入表名称(例如
Syslog),不带后缀。 - 使用者组 - 默认情况下,使用者组设置为
$Default。 如果需要,请将该值更改为其他事件中心使用者组。

查看详细信息时,选择“查看 + 创建”,然后选择“创建”。
部署完成后,展开“部署详细信息”框,并选择数据收集规则来查看其详细信息。 选择“JSON 视图”。

复制数据收集规则的“资源 ID”。 在下一步中需要用到此信息。


配置用户分配的托管标识(可选)
若要配置数据收集规则以支持用户分配的标识,请在上面的示例中替换:
    "identity": {
                        "type": "systemAssigned"
        },
替换为:
    "identity": {
            "type": "userAssigned",
            "userAssignedIdentities": {
                "<identity_resource_Id>": {
                }
            }
        },
若要查找 <identity_resource_Id> 值,请在 Azure 门户导航到用户分配的托管标识资源,选择“JSON”来打开“资源 JSON”屏幕,然后复制托管标识的资源 ID。

将日志数据引入 Azure 表(可选)
若要将数据引入受支持的 Azure 表,请执行以下操作:
在数据收集规则中,更改
outputStream:原名称:
"outputStream": "[concat('Custom-', parameters('tableName'))]"收件人:
"outputStream": "outputStream": "[concat(Microsoft-', parameters('tableName'))]"在
transformKql中定义一个转换,用于将引入的数据发送到目标 Azure 表中的目标列。
向数据收集规则授予事件中心权限
使用托管标识,可以向任何事件中心或事件中心命名空间授予将事件发送到你创建的数据收集规则和数据收集终结点的权限。 向事件中心命名空间授予权限时,该命名空间中的所有事件中心都会继承这些权限。
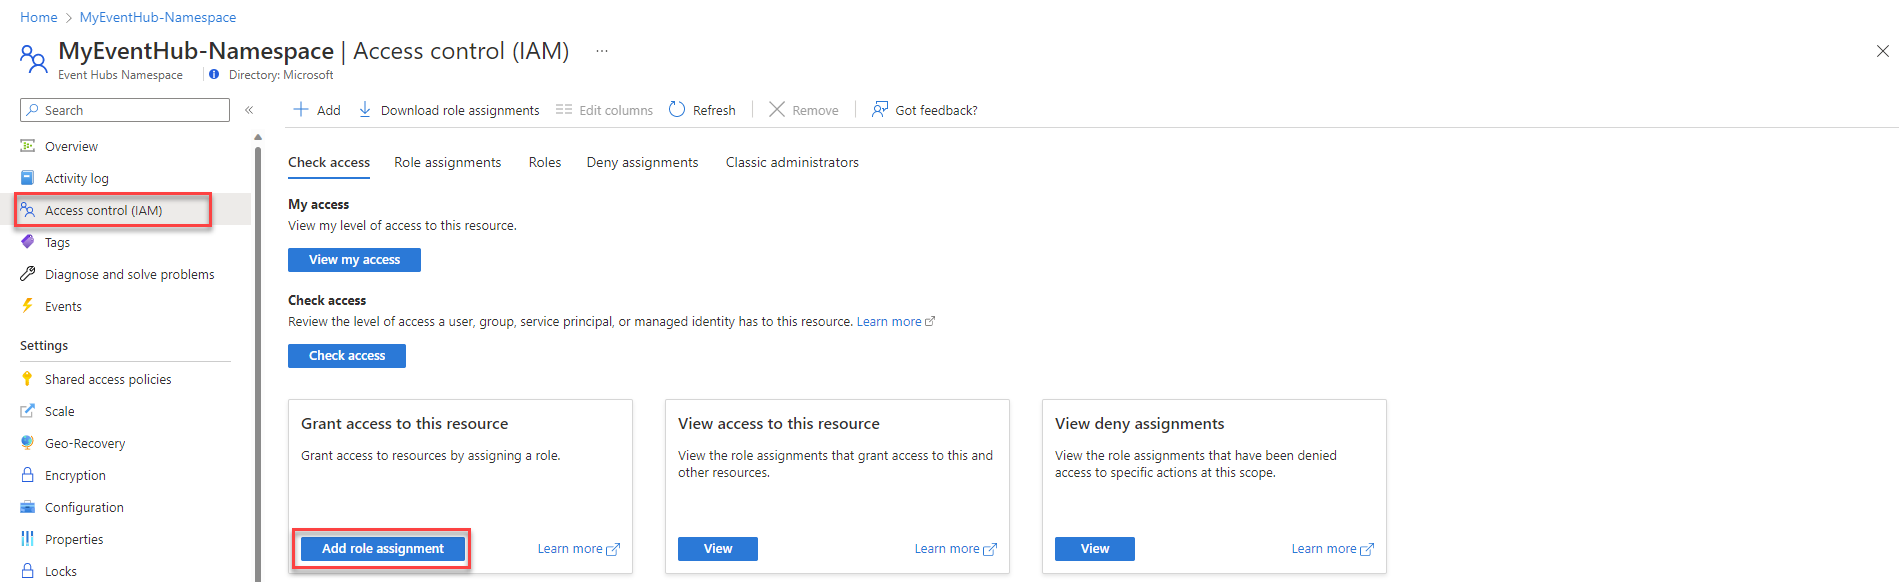
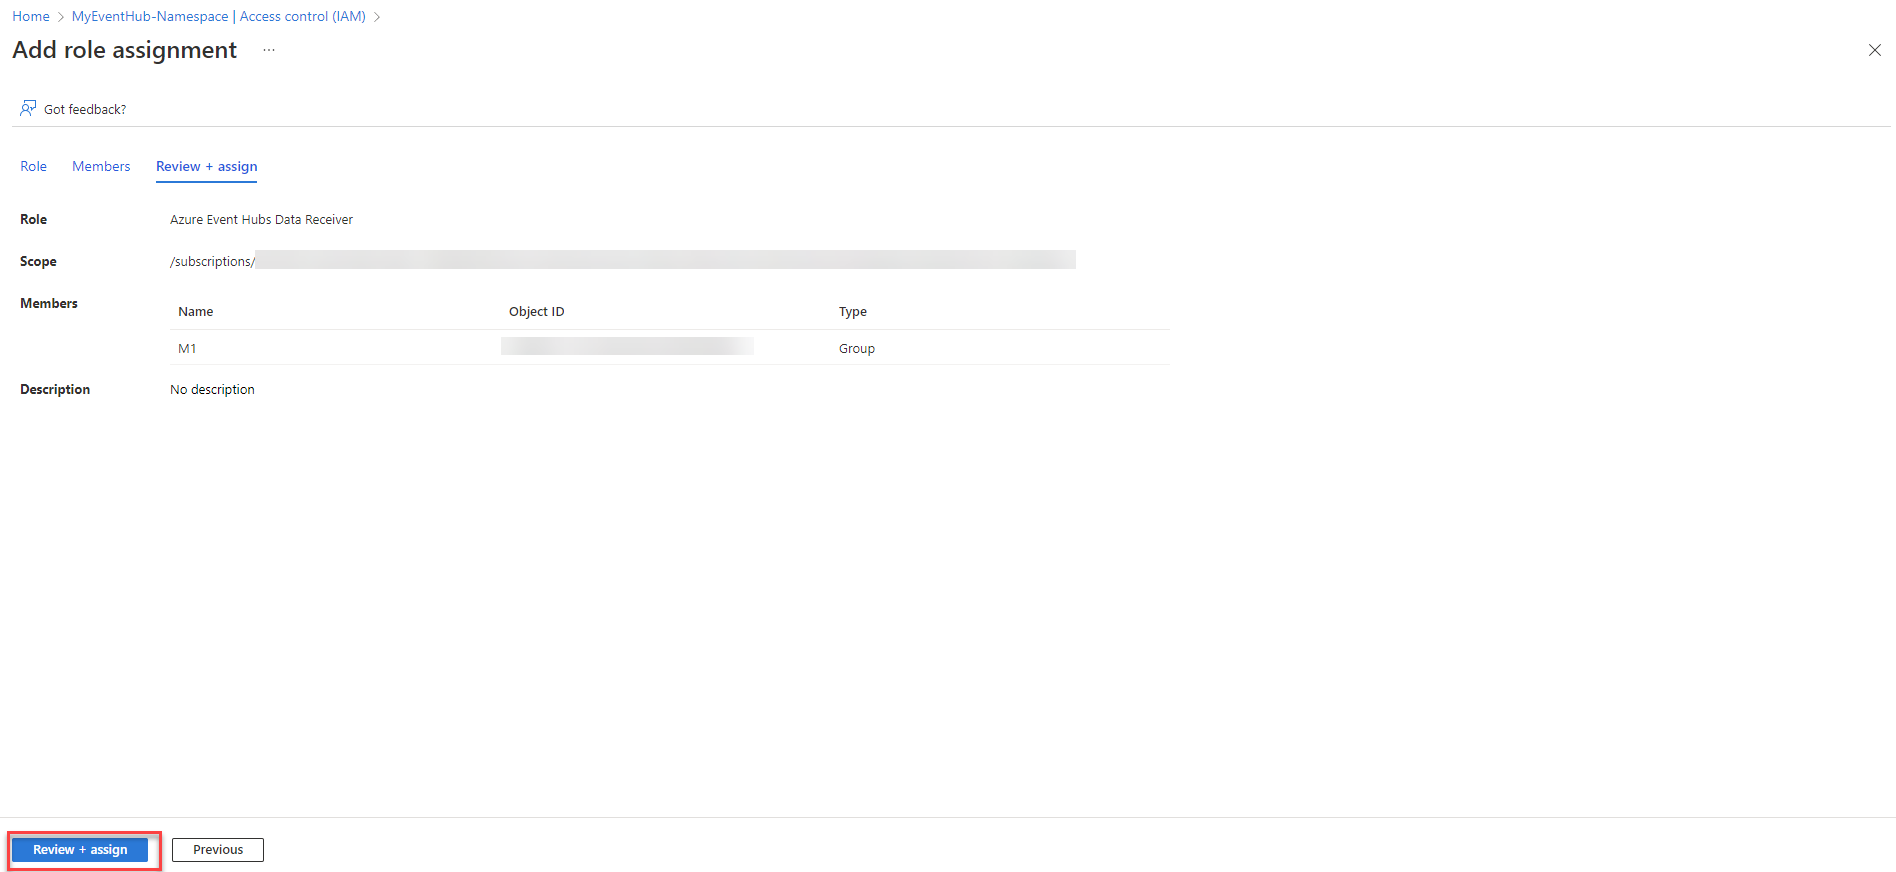
在 Azure 门户的事件中心或事件中心命名空间中,选择“访问控制(IAM)”>“添加角色分配”。
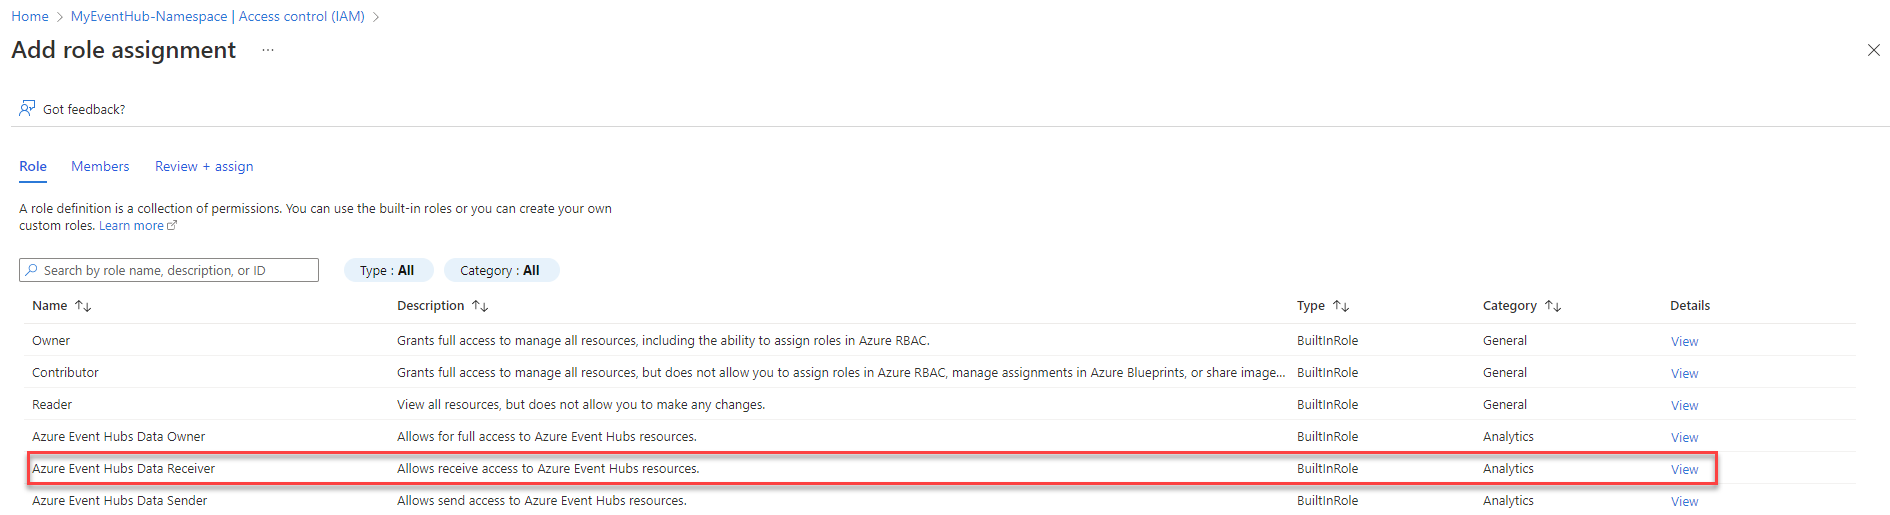
选择“Azure 事件中心数据接收者”,然后选择“下一步”。
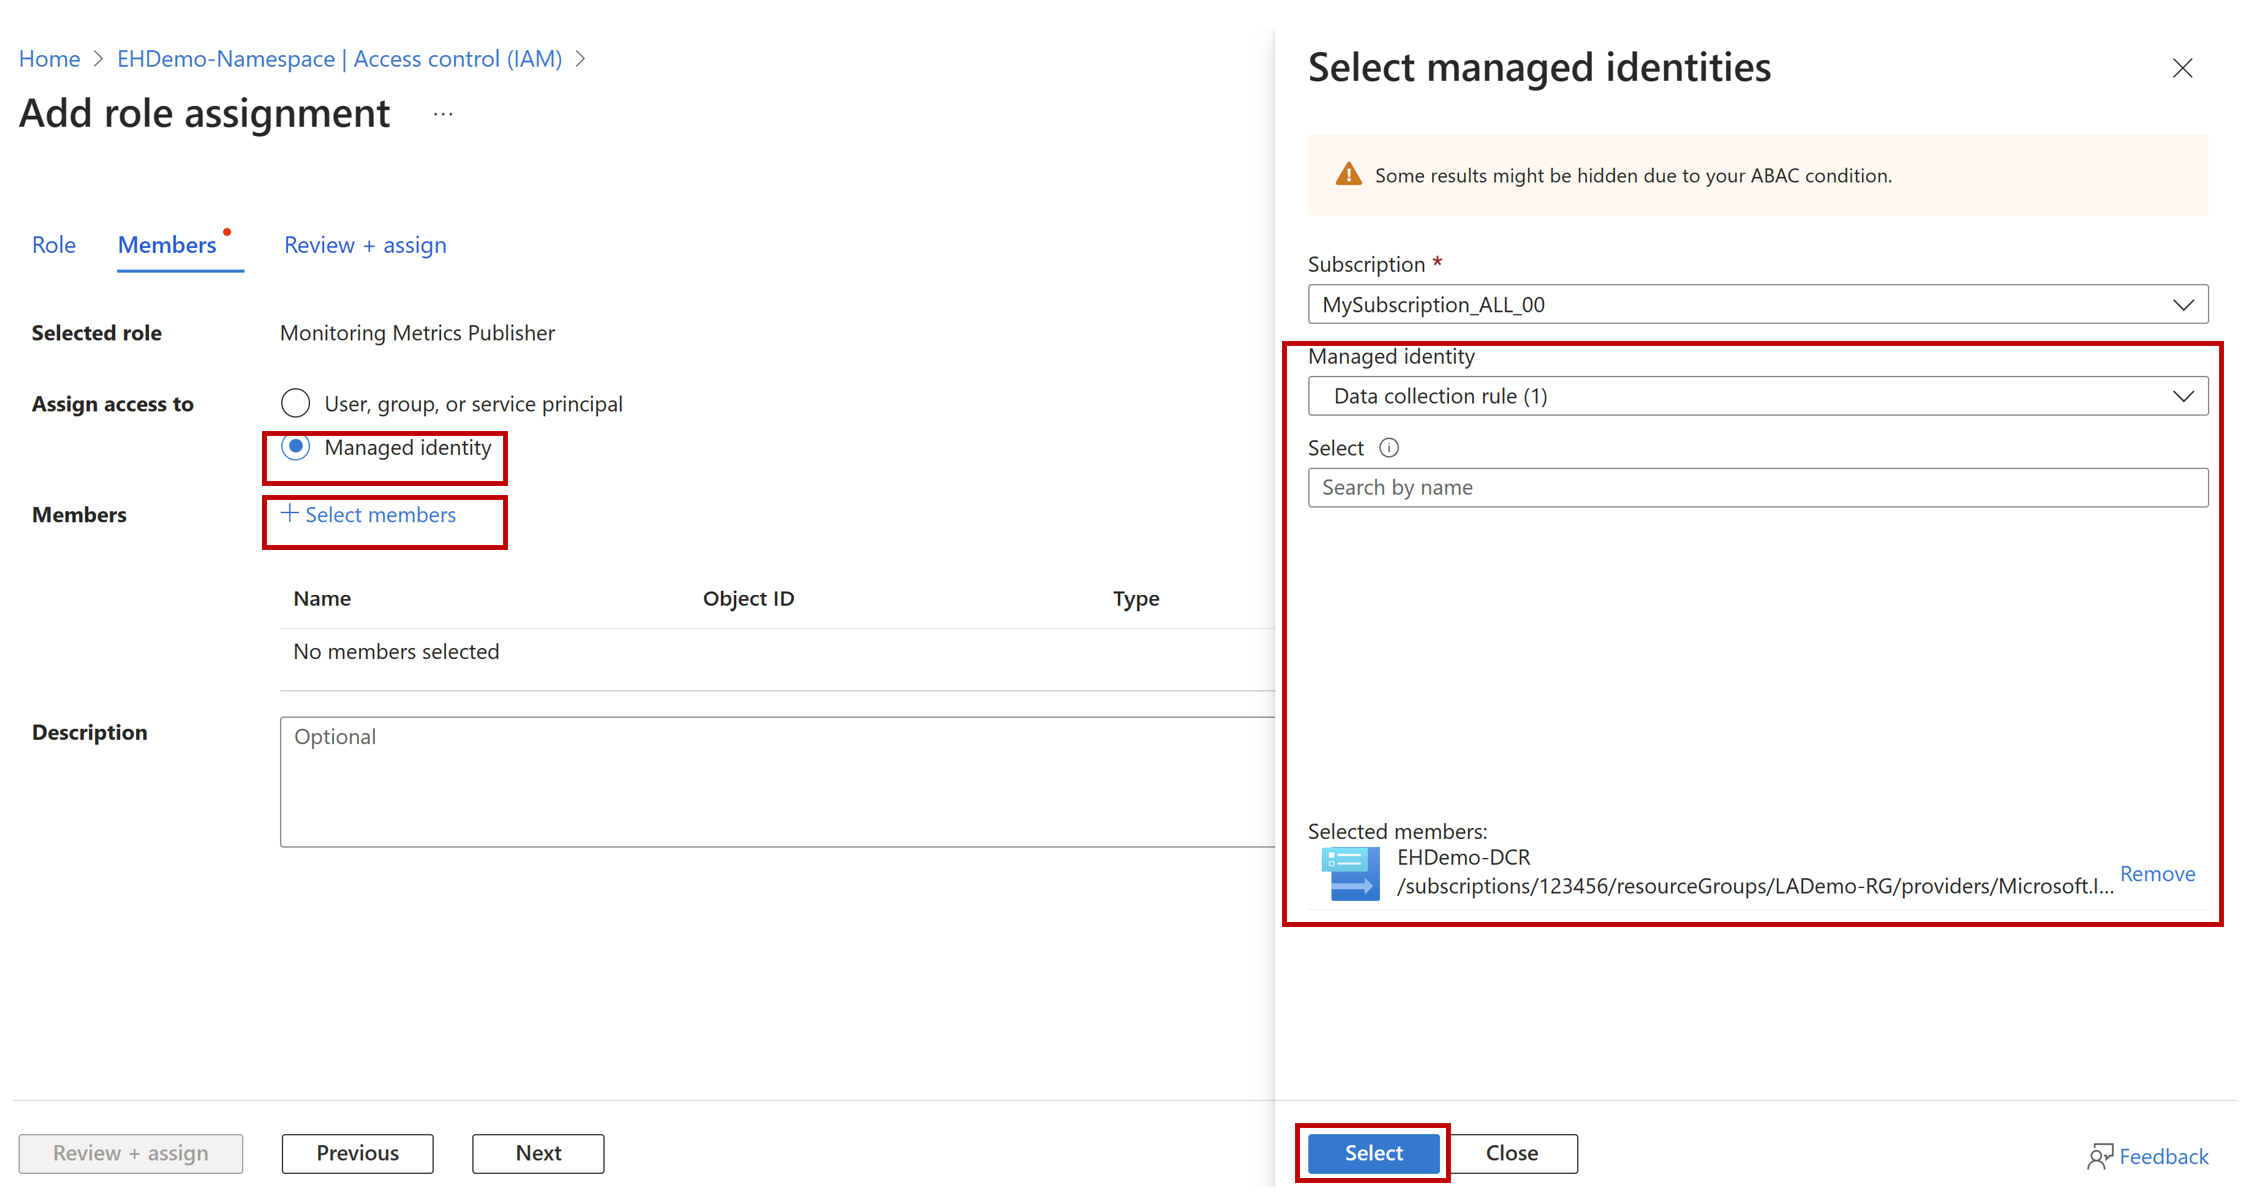
对于“将访问权限分配给”选择“托管标识”,然后单击“选择成员”。 选择“数据收集规则”,按名称搜索数据收集规则,然后单击“选择”。
在保存角色分配之前,选择“查看 + 分配”并验证详细信息。


将数据收集规则与事件中心关联
最后一步是将数据收集规则关联到要从中收集事件的事件中心。
可以将单个数据收集规则与共享同一使用者组并将数据引入同一流的多个事件中心相关联。 或者,可以对每个事件中心关联唯一的数据收集规则。
重要
必须至少将一个数据收集规则关联到事件中心,以便从事件中心引入数据。 删除与事件中心相关的所有数据收集规则关联时,将停止从事件中心引入数据。
若要在 Azure 门户中创建数据收集规则关联,请执行以下操作:
在 Azure 门户的搜索框中,输入“模板”,然后选择“部署自定义模板”。
选择“在编辑器中生成自己的模板”。
将下面的资源管理器模板粘贴到编辑器中,然后选择“保存”。
{
  "$schema": "https://schema.management.azure.com/schemas/2019-04-01/deploymentTemplate.json#",
  "contentVersion": "1.0.0.0",
  "parameters": {
    "eventHubResourceID": {
      "type": "string",
      "metadata": {
        "description": "Specifies the Azure resource ID of the event hub to use."
      }
    },
    "associationName": {
      "type": "string",
      "metadata": {
        "description": "The name of the association."
      }
    },
    "dataCollectionRuleID": {
      "type": "string",
      "metadata": {
        "description": "The resource ID of the data collection rule."
      }
    }
  },
  "resources": [
    {
      "type": "Microsoft.Insights/dataCollectionRuleAssociations",
      "apiVersion": "2021-09-01-preview",
      "scope": "[parameters('eventHubResourceId')]",
      "name": "[parameters('associationName')]",
      "properties": {
        "description": "Association of data collection rule. Deleting this association will break the data collection for this event hub.",
        "dataCollectionRuleId": "[parameters('dataCollectionRuleId')]"
      }
    }
  ]
}
在“自定义部署”屏幕上,指定用于存储数据收集规则关联的订阅和资源组,然后提供在模板中定义的参数的值,这些参数包括:
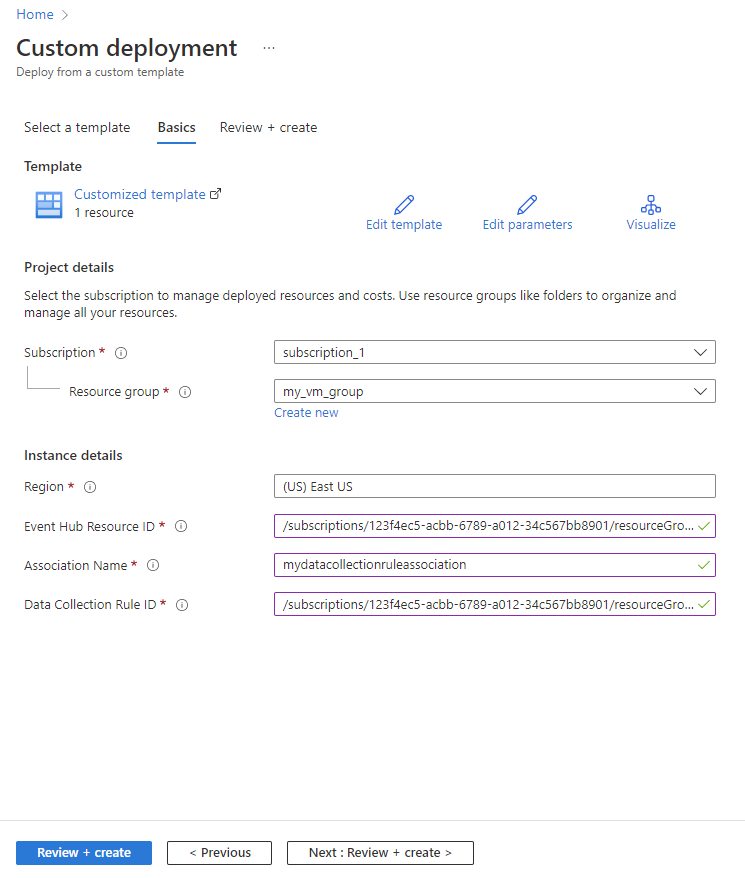
查看详细信息时,选择“查看 + 创建”,然后选择“创建”。

在目标表中检查引入的事件
现在,你已将数据收集规则与事件中心相关联,接下来 Azure Monitor 日志将引入其保持期尚未过期的所有现有事件和所有新事件。
若要在目标表中检查引入的事件,请执行以下操作:
导航到你的工作区,选择“日志”。
在查询编辑器中编写一个简单的查询,然后选择“运行”:
<table_name>你应该会看到来自事件中心的事件。

清理资源
在本教程中,你创建了以下资源:
- 自定义表
- 数据收集终结点
- 数据收集规则
- 数据收集规则关联
评估是否仍然需要这些资源。 单独删除不需要的资源,或者通过删除资源组来一次性删除所有这些资源。 让资源保持运行状态会耗费成本。
若要停止从事件中心引入数据,请删除与事件中心相关的所有数据收集规则关联,或者删除数据收集规则本身。 这些操作还会重置事件中心检查点。
已知问题和限制
- 如果在 Microsoft Entra 目录之间转移订阅,需要按照 Azure 资源的托管标识已知问题中所述的步骤继续引入数据。
- 最多可将 64 KB 的消息从事件中心引入到 Azure Monitor 日志。
后续步骤
详细了解如何: