教學課程:在電子桌面應用程式中登入使用者並呼叫 Microsoft Graph API
在本教學課程中,您會建置一個電子桌面應用程式,以使用授權碼流程搭配 PKCE 來登入使用者並呼叫 Microsoft Graph。 您建置的桌面應用程式會使用適用于 Node.js 的 Microsoft 驗證程式庫 (MSAL)。
請遵循本教學課程中的步驟來:
- 在Azure 入口網站中註冊應用程式
- 建立電子桌面應用程式專案
- 將驗證邏輯新增至您的應用程式
- 新增方法以呼叫 Web API
- 新增應用程式註冊詳細資料
- 測試應用程式
必要條件
- Node.js
- 電子
- Visual Studio Code 或其他程式碼編輯器
註冊應用程式
首先,完成向 Microsoft 身分識別平臺 註冊應用程式中的 步驟,以註冊您的應用程式。
針對您的應用程式註冊使用下列設定:
- 名稱:
ElectronDesktopApp(建議) - 支援的帳戶類型: 僅限我的組織目錄中的帳戶(單一租使用者)
- 平臺類型: 行動裝置和桌面應用程式
- 重新導向 URI:
http://localhost
建立專案
建立資料夾來裝載您的應用程式,例如 ElectronDesktopApp 。
首先,變更至終端機中的專案目錄,然後執行下列
npm命令:npm init -y npm install --save @azure/msal-node @microsoft/microsoft-graph-client isomorphic-fetch bootstrap jquery popper.js npm install --save-dev electron@20.0.0然後,建立名為 App 的資料夾。 在此資料夾內,建立名為 index.html 的檔案,做為 UI。 在那裡新增下列程式碼:
<!DOCTYPE html>
<html lang="en">

<head>
    <meta charset="UTF-8">
    <meta name="viewport" content="width=device-width, initial-scale=1.0, shrink-to-fit=no">
    <meta http-equiv="Content-Security-Policy" content="script-src 'self'" />
    <title>MSAL Node Electron Sample App</title>

    <!-- adding Bootstrap 4 for UI components  -->
    <link rel="stylesheet" href="../node_modules/bootstrap/dist/css/bootstrap.min.css">
</head>

<body>
    <nav class="navbar navbar-expand-lg navbar-dark bg-primary">
        <a class="navbar-brand">Microsoft identity platform</a>
        <div class="btn-group ml-auto dropleft">
            <button type="button" id="signIn" class="btn btn-secondary" aria-expanded="false">
                Sign in
            </button>
            <button type="button" id="signOut" class="btn btn-success" hidden aria-expanded="false">
                Sign out
            </button>
        </div>
    </nav>
    <br>
    <h5 class="card-header text-center">Electron sample app calling MS Graph API using MSAL Node</h5>
    <br>
    <div class="row" style="margin:auto">
        <div id="cardDiv" class="col-md-6" style="display:none; margin:auto">
            <div class="card text-center">
                <div class="card-body">
                    <h5 class="card-title" id="WelcomeMessage">Please sign-in to see your profile and read your mails
                    </h5>
                    <div id="profileDiv"></div>
                    <br>
                    <br>
                    <button class="btn btn-primary" id="seeProfile">See Profile</button>
                </div>
            </div>
        </div>
    </div>

    <!-- importing bootstrap.js and supporting js libraries -->
    <script src="../node_modules/jquery/dist/jquery.js"></script>
    <script src="../node_modules/popper.js/dist/umd/popper.js"></script>
    <script src="../node_modules/bootstrap/dist/js/bootstrap.js"></script>

    <!-- importing app scripts | load order is important -->
    <script src="./renderer.js"></script>

</body>

</html>
接下來,建立名為 main.js 的檔案,並新增下列程式碼:
/*
 * Copyright (c) Microsoft Corporation. All rights reserved.
 * Licensed under the MIT License.
 */

const path = require("path");
const { app, ipcMain, BrowserWindow } = require("electron");

const AuthProvider = require("./AuthProvider");
const { IPC_MESSAGES } = require("./constants");
const { protectedResources, msalConfig } = require("./authConfig");
const getGraphClient = require("./graph");

let authProvider;
let mainWindow;

function createWindow() {
    mainWindow = new BrowserWindow({
        width: 800,
        height: 600,
        webPreferences: { preload: path.join(__dirname, "preload.js") },
    });

    authProvider = new AuthProvider(msalConfig);
}

app.on("ready", () => {
    createWindow();
    mainWindow.loadFile(path.join(__dirname, "./index.html"));
});

app.on("window-all-closed", () => {
    app.quit();
});

app.on('activate', () => {
    // On OS X it's common to re-create a window in the app when the
    // dock icon is clicked and there are no other windows open.
    if (BrowserWindow.getAllWindows().length === 0) {
        createWindow();
    }
});


// Event handlers
ipcMain.on(IPC_MESSAGES.LOGIN, async () => {
    const account = await authProvider.login();

    await mainWindow.loadFile(path.join(__dirname, "./index.html"));

    mainWindow.webContents.send(IPC_MESSAGES.SHOW_WELCOME_MESSAGE, account);
});

ipcMain.on(IPC_MESSAGES.LOGOUT, async () => {
    await authProvider.logout();

    await mainWindow.loadFile(path.join(__dirname, "./index.html"));
});

ipcMain.on(IPC_MESSAGES.GET_PROFILE, async () => {
    const tokenRequest = {
        scopes: protectedResources.graphMe.scopes
    };

    const tokenResponse = await authProvider.getToken(tokenRequest);
    const account = authProvider.account;

    await mainWindow.loadFile(path.join(__dirname, "./index.html"));

    const graphResponse = await getGraphClient(tokenResponse.accessToken)
        .api(protectedResources.graphMe.endpoint).get();

    mainWindow.webContents.send(IPC_MESSAGES.SHOW_WELCOME_MESSAGE, account);
    mainWindow.webContents.send(IPC_MESSAGES.SET_PROFILE, graphResponse);
});
在上述程式碼片段中,我們會初始化電子主視窗物件,並建立一些事件處理常式來與電子視窗互動。 我們也匯入組態參數、具現化 authProvider 類別來處理登入、登出和權杖取得,以及呼叫 Microsoft Graph API。
在相同的資料夾中, 建立另一個名為 renderer.js 的檔案,並新增下列程式碼:
// Copyright (c) Microsoft Corporation. All rights reserved.
// Licensed under the MIT License

/**
 * The renderer API is exposed by the preload script found in the preload.ts
 * file in order to give the renderer access to the Node API in a secure and
 * controlled way
 */
const welcomeDiv = document.getElementById('WelcomeMessage');
const signInButton = document.getElementById('signIn');
const signOutButton = document.getElementById('signOut');
const seeProfileButton = document.getElementById('seeProfile');
const cardDiv = document.getElementById('cardDiv');
const profileDiv = document.getElementById('profileDiv');

window.renderer.showWelcomeMessage((event, account) => {
    if (!account) return;

    cardDiv.style.display = 'initial';
    welcomeDiv.innerHTML = `Welcome ${account.name}`;
    signInButton.hidden = true;
    signOutButton.hidden = false;
});

window.renderer.handleProfileData((event, graphResponse) => {
    if (!graphResponse) return;

    console.log(`Graph API responded at: ${new Date().toString()}`);
    setProfile(graphResponse);
});

// UI event handlers
signInButton.addEventListener('click', () => {
    window.renderer.sendLoginMessage();
});

signOutButton.addEventListener('click', () => {
    window.renderer.sendSignoutMessage();
});

seeProfileButton.addEventListener('click', () => {
    window.renderer.sendSeeProfileMessage();
});

const setProfile = (data) => {
    if (!data) return;

    profileDiv.innerHTML = '';

    const title = document.createElement('p');
    const email = document.createElement('p');
    const phone = document.createElement('p');
    const address = document.createElement('p');

    title.innerHTML = '<strong>Title: </strong>' + data.jobTitle;
    email.innerHTML = '<strong>Mail: </strong>' + data.mail;
    phone.innerHTML = '<strong>Phone: </strong>' + data.businessPhones[0];
    address.innerHTML = '<strong>Location: </strong>' + data.officeLocation;

    profileDiv.appendChild(title);
    profileDiv.appendChild(email);
    profileDiv.appendChild(phone);
    profileDiv.appendChild(address);
}
轉譯器方法是由 preload.js 檔案中找到的 預先載入腳本公開,以便讓轉譯器以安全且受控制的方式存取 Node API 。
然後,建立新的檔案 preload.js ,並新增下列程式碼:
// Copyright (c) Microsoft Corporation. All rights reserved.
// Licensed under the MIT License

const { contextBridge, ipcRenderer } = require('electron');

/**
 * This preload script exposes a "renderer" API to give
 * the Renderer process controlled access to some Node APIs
 * by leveraging IPC channels that have been configured for
 * communication between the Main and Renderer processes.
 */
contextBridge.exposeInMainWorld('renderer', {
    sendLoginMessage: () => {
        ipcRenderer.send('LOGIN');
    },
    sendSignoutMessage: () => {
        ipcRenderer.send('LOGOUT');
    },
    sendSeeProfileMessage: () => {
        ipcRenderer.send('GET_PROFILE');
    },
    handleProfileData: (func) => {
        ipcRenderer.on('SET_PROFILE', (event, ...args) => func(event, ...args));
    },
    showWelcomeMessage: (func) => {
        ipcRenderer.on('SHOW_WELCOME_MESSAGE', (event, ...args) => func(event, ...args));
    },
});
此預先載入腳本會公開轉譯器 API,藉由套用已設定用於主要和轉譯器進程之間通訊的 IPC 通道,讓轉譯器進程式控制制存取部分 Node APIs 。
最後,建立名為 constants.js 的檔案,以儲存字串常數來描述應用程式 事件 :
/*
 * Copyright (c) Microsoft Corporation. All rights reserved.
 * Licensed under the MIT License.
 */

const IPC_MESSAGES = {
    SHOW_WELCOME_MESSAGE: 'SHOW_WELCOME_MESSAGE',
    LOGIN: 'LOGIN',
    LOGOUT: 'LOGOUT',
    GET_PROFILE: 'GET_PROFILE',
    SET_PROFILE: 'SET_PROFILE',
}

module.exports = {
    IPC_MESSAGES: IPC_MESSAGES,
}
您現在有一個簡單的 GUI 和電子應用程式的互動。 完成本教學課程的其餘部分之後,專案的檔案和資料夾結構看起來應該如下所示:
ElectronDesktopApp/
├── App
│   ├── AuthProvider.js
│   ├── constants.js
│   ├── graph.js
│   ├── index.html
|   ├── main.js
|   ├── preload.js
|   ├── renderer.js
│   ├── authConfig.js
├── package.json
將驗證邏輯新增至您的應用程式
在 [應用程式 ] 資料夾中,建立名為 AuthProvider.js 的檔案。 AuthProvider.js 檔案將包含驗證提供者類別,該類別會使用 MSAL 節點來處理登入、登出、權杖擷取、帳戶選取和相關驗證工作。 在那裡新增下列程式碼:
/*
 * Copyright (c) Microsoft Corporation. All rights reserved.
 * Licensed under the MIT License.
 */

const { PublicClientApplication, InteractionRequiredAuthError } = require('@azure/msal-node');
const { shell } = require('electron');

class AuthProvider {
    msalConfig
    clientApplication;
    account;
    cache;

    constructor(msalConfig) {
        /**
         * Initialize a public client application. For more information, visit:
         * https://github.com/AzureAD/microsoft-authentication-library-for-js/blob/dev/lib/msal-node/docs/initialize-public-client-application.md
         */
        this.msalConfig = msalConfig;
        this.clientApplication = new PublicClientApplication(this.msalConfig);
        this.cache = this.clientApplication.getTokenCache();
        this.account = null;
    }

    async login() {
        const authResponse = await this.getToken({
            // If there are scopes that you would like users to consent up front, add them below
            // by default, MSAL will add the OIDC scopes to every token request, so we omit those here
            scopes: [],
        });

        return this.handleResponse(authResponse);
    }

    async logout() {
        if (!this.account) return;

        try {
            /**
             * If you would like to end the session with AAD, use the logout endpoint. You'll need to enable
             * the optional token claim 'login_hint' for this to work as expected. For more information, visit:
             * https://learn.microsoft.com/azure/active-directory/develop/v2-protocols-oidc#send-a-sign-out-request
             */
            if (this.account.idTokenClaims.hasOwnProperty('login_hint')) {
                await shell.openExternal(`${this.msalConfig.auth.authority}/oauth2/v2.0/logout?logout_hint=${encodeURIComponent(this.account.idTokenClaims.login_hint)}`);
            }

            await this.cache.removeAccount(this.account);
            this.account = null;
        } catch (error) {
            console.log(error);
        }
    }

    async getToken(tokenRequest) {
        let authResponse;
        const account = this.account || (await this.getAccount());

        if (account) {
            tokenRequest.account = account;
            authResponse = await this.getTokenSilent(tokenRequest);
        } else {
            authResponse = await this.getTokenInteractive(tokenRequest);
        }

        return authResponse || null;
    }

    async getTokenSilent(tokenRequest) {
        try {
            return await this.clientApplication.acquireTokenSilent(tokenRequest);
        } catch (error) {
            if (error instanceof InteractionRequiredAuthError) {
                console.log('Silent token acquisition failed, acquiring token interactive');
                return await this.getTokenInteractive(tokenRequest);
            }

            console.log(error);
        }
    }

    async getTokenInteractive(tokenRequest) {
        try {
            const openBrowser = async (url) => {
                await shell.openExternal(url);
            };

            const authResponse = await this.clientApplication.acquireTokenInteractive({
                ...tokenRequest,
                openBrowser,
                successTemplate: '<h1>Successfully signed in!</h1> <p>You can close this window now.</p>',
                errorTemplate: '<h1>Oops! Something went wrong</h1> <p>Check the console for more information.</p>',
            });

            return authResponse;
        } catch (error) {
            throw error;
        }
    }

    /**
     * Handles the response from a popup or redirect. If response is null, will check if we have any accounts and attempt to sign in.
     * @param response
     */
    async handleResponse(response) {
        if (response !== null) {
            this.account = response.account;
        } else {
            this.account = await this.getAccount();
        }

        return this.account;
    }

    /**
     * Calls getAllAccounts and determines the correct account to sign into, currently defaults to first account found in cache.
     * https://github.com/AzureAD/microsoft-authentication-library-for-js/blob/dev/lib/msal-common/docs/Accounts.md
     */
    async getAccount() {
        const currentAccounts = await this.cache.getAllAccounts();

        if (!currentAccounts) {
            console.log('No accounts detected');
            return null;
        }

        if (currentAccounts.length > 1) {
            // Add choose account code here
            console.log('Multiple accounts detected, need to add choose account code.');
            return currentAccounts[0];
        } else if (currentAccounts.length === 1) {
            return currentAccounts[0];
        } else {
            return null;
        }
    }
}

module.exports = AuthProvider;
在上述程式碼片段中,我們先傳遞組態物件 ( msalConfig ) 來初始化 MSAL 節點 PublicClientApplication 。 然後,我們公開 login 了 , logout 以及 getToken 由 main 模組 ( main.js ) 呼叫的方法。 在 和 getToken 中 login ,我們會使用 MSAL 節點 acquireTokenInteractive 公用 API 取得識別碼和存取權杖。
新增 Microsoft Graph SDK
建立名為 graph.js 的檔案。 graph.js 檔案會包含 Microsoft Graph SDK 用戶端的實例,以利使用 MSAL 節點取得的存取權杖,協助存取 Microsoft Graph API 上的資料:
const { Client } = require('@microsoft/microsoft-graph-client');
require('isomorphic-fetch');

/**
 * Creating a Graph client instance via options method. For more information, visit:
 * https://github.com/microsoftgraph/msgraph-sdk-javascript/blob/dev/docs/CreatingClientInstance.md#2-create-with-options
 * @param {String} accessToken
 * @returns
 */
const getGraphClient = (accessToken) => {
    // Initialize Graph client
    const graphClient = Client.init({
        // Use the provided access token to authenticate requests
        authProvider: (done) => {
            done(null, accessToken);
        },
    });

    return graphClient;
};

module.exports = getGraphClient;
新增應用程式註冊詳細資料
建立環境檔案來儲存取得權杖時將使用的應用程式註冊詳細資料。 若要這樣做,請在範例 ( ElectronDesktopApp ) 的根資料夾內建立名為 authConfig.js 的檔案,並新增下列程式碼:
/*
 * Copyright (c) Microsoft Corporation. All rights reserved.
 * Licensed under the MIT License.
 */

const { LogLevel } = require("@azure/msal-node");

/**
 * Configuration object to be passed to MSAL instance on creation.
 * For a full list of MSAL.js configuration parameters, visit:
 * https://github.com/AzureAD/microsoft-authentication-library-for-js/blob/dev/lib/msal-node/docs/configuration.md
 */
const AAD_ENDPOINT_HOST = "Enter_the_Cloud_Instance_Id_Here"; // include the trailing slash

const msalConfig = {
    auth: {
        clientId: "Enter_the_Application_Id_Here",
        authority: `${AAD_ENDPOINT_HOST}Enter_the_Tenant_Info_Here`,
    },
    system: {
        loggerOptions: {
            loggerCallback(loglevel, message, containsPii) {
                console.log(message);
            },
            piiLoggingEnabled: false,
            logLevel: LogLevel.Verbose,
        },
    },
};

/**
 * Add here the endpoints and scopes when obtaining an access token for protected web APIs. For more information, see:
 * https://github.com/AzureAD/microsoft-authentication-library-for-js/blob/dev/lib/msal-browser/docs/resources-and-scopes.md
 */
const GRAPH_ENDPOINT_HOST = "Enter_the_Graph_Endpoint_Here"; // include the trailing slash

const protectedResources = {
    graphMe: {
        endpoint: `${GRAPH_ENDPOINT_HOST}v1.0/me`,
        scopes: ["User.Read"],
    }
};


module.exports = {
    msalConfig: msalConfig,
    protectedResources: protectedResources,
};
以您從 Azure 應用程式註冊入口網站取得的值填入這些詳細資料:
Enter_the_Tenant_Id_here應該是下列其中一項:- 如果您的應用程式支援 此組織目錄中 的帳戶,請將此值取代為 租使用者識別碼 或 租使用者名稱 。 例如:
contoso.microsoft.com。 - 如果您的應用程式支援 任何組織目錄中 的帳戶,請將此值取代為
organizations。 - 如果您的應用程式支援 任何組織目錄和個人 Microsoft 帳戶中的帳戶 ,請將此值取代為
common。 - 若要限制僅 對個人 Microsoft 帳戶的支援 ,請將此值取代為
consumers。
- 如果您的應用程式支援 此組織目錄中 的帳戶,請將此值取代為 租使用者識別碼 或 租使用者名稱 。 例如:
Enter_the_Application_Id_Here:您註冊之應用程式的應用程式(用戶端)識別碼 。Enter_the_Cloud_Instance_Id_Here:註冊應用程式的 Azure 雲端實例。- 針對主要(或 全域 )Azure 雲端,輸入
https://login.microsoftonline.com/。 - 針對 國家 雲端(例如中國),您可以在國家雲端 中找到 適當的值。
- 針對主要(或 全域 )Azure 雲端,輸入
Enter_the_Graph_Endpoint_Here是應用程式應該與其通訊的 Microsoft Graph API 實例。- 針對全域 Microsoft Graph API 端點,請將此字串的兩個實例取代為
https://graph.microsoft.com/。 - 如需國家雲端部署中的 端點,請參閱 Microsoft Graph 檔中的國家 雲端部署 。
- 針對全域 Microsoft Graph API 端點,請將此字串的兩個實例取代為
測試應用程式
您已完成應用程式的建立,現在已準備好啟動電子桌面應用程式並測試應用程式的功能。
- 從專案資料夾的根目錄中執行下列命令,以啟動應用程式:
electron App/main.js
- 在應用程式主視窗中,您應該會看到 index.html 檔案的內容 和 [ 登入 ] 按鈕。
測試登入和登出
載入 index.html 檔案之後,選取 [ 登入 ]。 系統會提示您使用Microsoft 身分識別平臺登入:
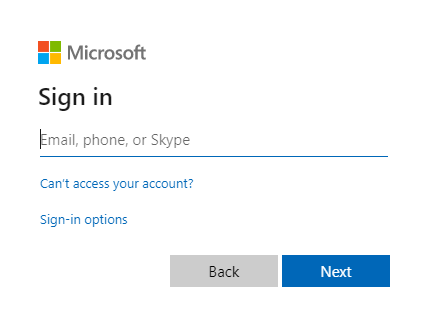
如果您同意要求的許可權,Web 應用程式會顯示您的使用者名稱,表示登入成功:
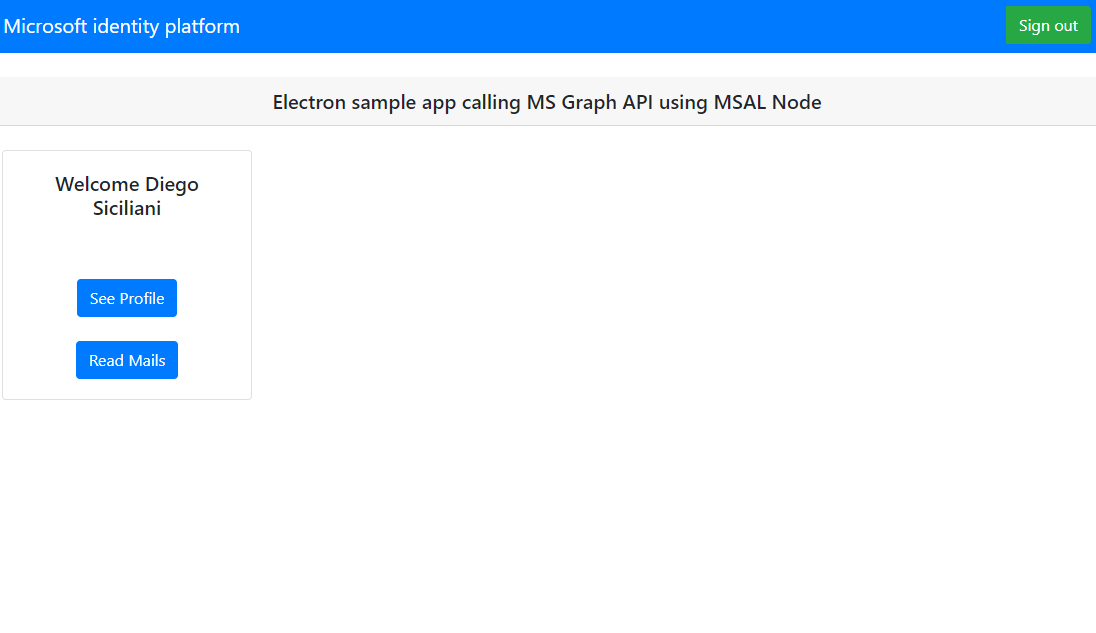
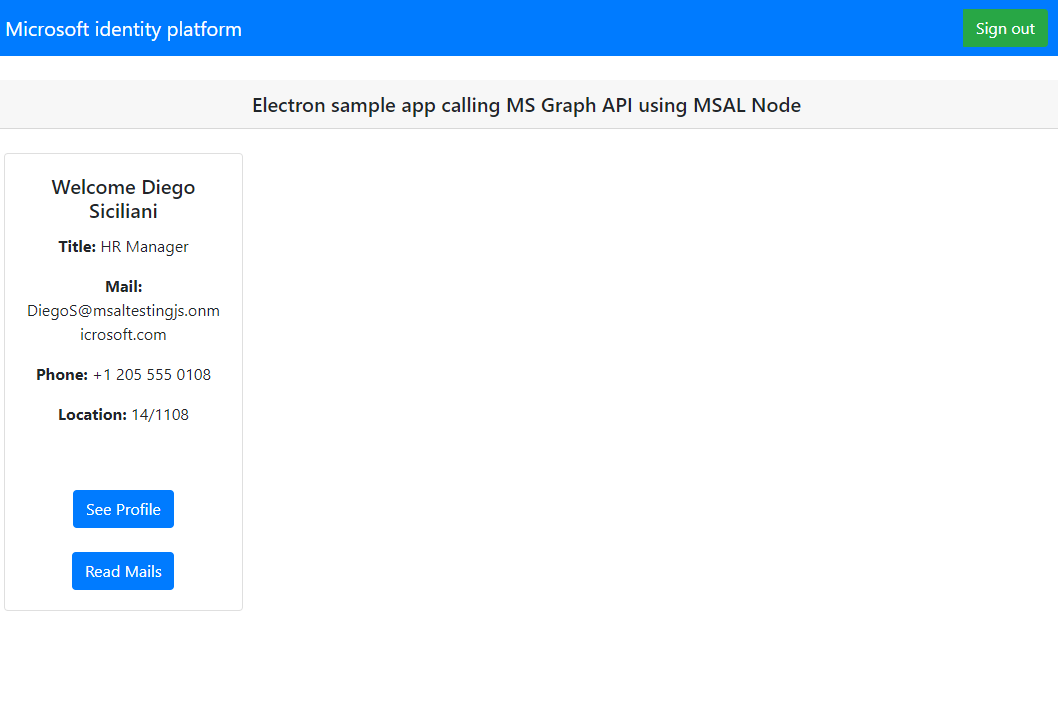
測試 Web API 呼叫
登入之後,選取 [ 查看設定檔 ] 以檢視從 Microsoft Graph API 呼叫回應中傳回的使用者設定檔資訊。 同意之後,您將檢視回應中傳回的設定檔資訊:
應用程式的運作方式
當使用者第一次選取 [登入 ] 按鈕時, acquireTokenInteractive MSAL 節點的 方法。 此方法會將使用者重新導向至使用Microsoft 身分識別平臺端點登入,並驗證使用者的認證、取得 授權碼,然後交換識別碼權杖、存取權杖和重新整理權杖的程式碼 。 MSAL 節點也會快取這些權杖以供日後使用。
識別碼權杖包含使用者的基本資訊,例如其顯示名稱。 存取權杖的存留期有限,並在 24 小時後到期。 如果您打算使用這些權杖來存取受保護的資源,後端伺服器 必須 驗證它,以確保權杖已發行給應用程式的有效使用者。
您在本教學課程中建立的桌面應用程式會使用存取權杖作為要求標頭中的持有人權杖( RFC 6750 )對 Microsoft Graph API 進行 REST 呼叫。
Microsoft Graph API 需要 user.read 範圍才能讀取使用者設定檔。 根據預設,此範圍會自動新增至Azure 入口網站中註冊的每個應用程式中。 Microsoft Graph 的其他 API,以及後端伺服器的自訂 API,可能需要額外的範圍。 例如,Microsoft Graph API 需要 Mail.Read 範圍,才能列出使用者的電子郵件。
當您新增範圍時,系統可能會提示使用者為新增的範圍提供另一個同意。
說明與支援
如果您需要協助、想要回報問題,或想要瞭解支援選項,請參閱 開發人員 的說明和支援。
下一步
如果您想要深入瞭解 Microsoft 身分識別平臺 上的 Node.js 和 Electron 傳統型應用程式開發,請參閱我們的多部分案例系列: