準備 Active Directory 輕量型目錄服務,以從 Microsoft Entra ID 布建
下列檔提供教學課程資訊,示範如何準備 Active Directory 羽量型目錄服務 (AD LDS) 安裝。 這可用來作為疑難解答的範例 LDAP 目錄,或示範 如何將使用者從 Microsoft Entra ID 布建到 LDAP 目錄。
準備LDAP目錄
如果您還沒有目錄伺服器,則會提供下列資訊來協助建立測試 AD LDS 環境。 此設定會使用PowerShell和ADAMInstall.exe搭配答案檔案。 本檔未涵蓋AD LDS的深入資訊。 如需詳細資訊,請參閱 Active Directory 輕量型目錄服務。
如果您已經有 AD LDS 或其他目錄伺服器,您可以略過此內容,然後繼續進行教學課程:ECMA 連線 or 主機一般 LDAP 連接器,以安裝及設定 ECMA 連接器主機。
建立 SSL 憑證、測試目錄並安裝 AD LDS。
使用附錄 A 的 PowerShell 腳本。文稿會執行下列動作:
- 建立LDAP連接器將使用的自我簽署憑證。
- 建立功能安裝記錄檔的目錄。
- 將個人存放區中的憑證匯出至目錄。
- 將憑證匯入本機計算機的受信任根目錄。
- 在我們的虛擬機上安裝AD LDS角色。
在您用來測試 LDAP 連接器的 Windows Server 虛擬機上,編輯腳本以符合電腦名稱,然後使用具有系統管理許可權的 Windows PowerShell 執行腳本。
建立 AD LDS 的實例
現在已安裝角色,您必須建立AD LDS的實例。 若要建立實例,您可以使用下列提供的響應檔案。 此檔案會在不使用UI的情況下,以無訊息方式安裝實例。
將附錄 B 的內容複製到記事本,並將它儲存為 「C:\Windows\ADAM」 中的 answer.txt。
現在以系統管理權限開啟 Cmd 提示字元,然後執行下列可執行檔:
C:\Windows\ADAM> ADAMInstall.exe /answer:answer.txt
建立AD LDS的容器和服務帳戶
使用附錄 C 中的 PowerShell 腳本。文稿會執行下列動作:
- 建立將搭配LDAP連接器使用之服務帳戶的容器。
- 建立雲端使用者的容器,其中會布建使用者。
- 在AD LDS中建立服務帳戶。
- 啟用服務帳戶。
- 將服務帳戶新增至AD LDS 管理員 istrators角色。
在 Windows Server 虛擬機上,您會使用具有系統管理許可權的 Windows PowerShell 來測試 LDAP 連接器執行腳本。
將網路服務讀取許可權授與 SSL 憑證
若要讓 SSL 能夠運作,您必須將網路服務讀取許可權授與新建立的憑證。 若要授與許可權,請使用下列步驟。
- 流覽至 C:\Program Data\Microsoft\Crypto\Keys。
- 以滑鼠右鍵按兩下位於這裡的系統檔案。 這將是 guid。 此容器會儲存我們的憑證。
- 選取屬性。
- 在頂端,選取 [ 安全性] 索引 標籤。
- 選取編輯。
- 按一下新增。
- 在方塊中,輸入 網路服務 ,然後選取 [ 檢查名稱]。
- 從清單中選取 [ 網络服務 ],然後按兩下 [ 確定]。
- 按一下 [確定] 。
- 確定網路服務帳戶具有讀取和讀取和執行許可權,然後按兩下 [套用] 和 [確定]。
使用 AD LDS 確認 SSL 連線能力
既然我們已設定憑證並授與網路服務帳戶許可權,請測試連線能力以確認它是否正常運作。
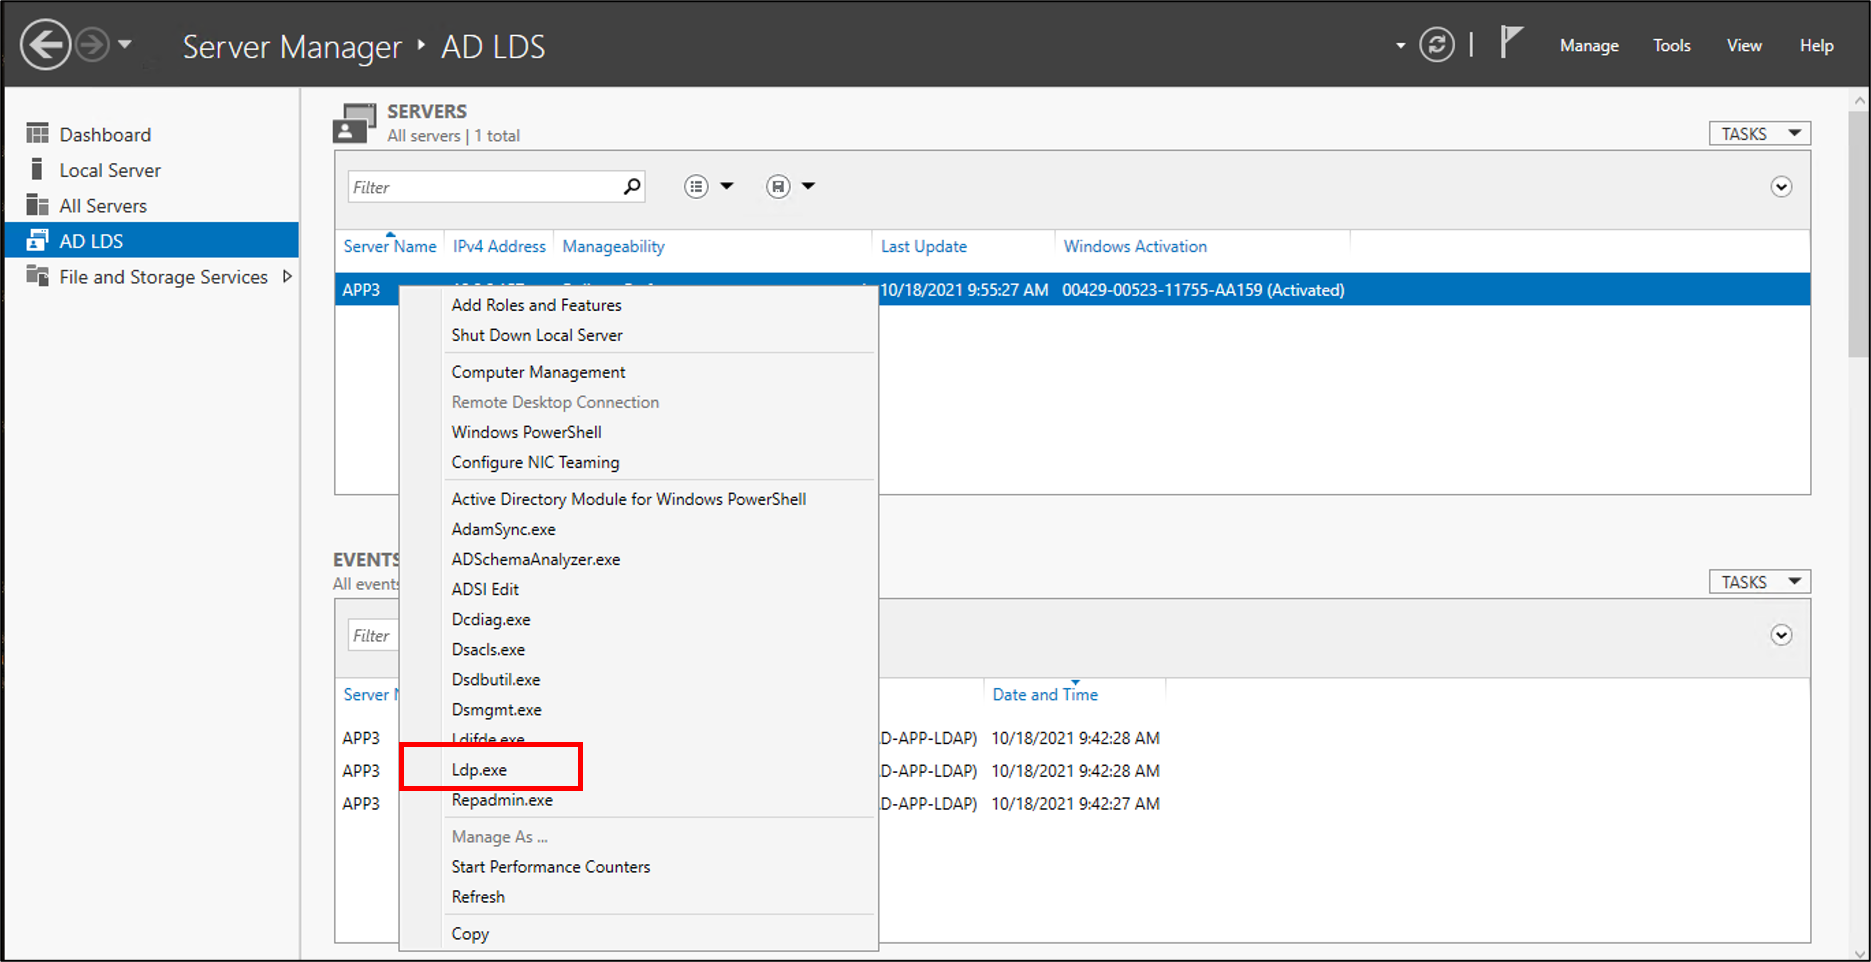
- 開啟 伺服器管理員,然後選取左側的AD LDS
- 以滑鼠右鍵按兩下AD LDS的實例,然後從彈出視窗中選取ldp.exe。

- 在ldp.exe頂端,選取 [連線 ion] 和 [連線]。
- 輸入下列資訊,然後按兩下列資訊,然後按
- 您應該會看到類似以下螢幕快照的回應。

- 在頂端的 [連線 ion] 下,選取 [系結]。
- 保留預設值,然後按兩下 [ 確定]。

- 您現在應該會成功系結至 實例。

停用本機密碼原則
LDAP 連接器目前會以空白密碼布建使用者。 此布建將無法滿足伺服器上的本機密碼原則,因此我們將停用它以供測試之用。 若要停用密碼複雜性,請在未加入網域的伺服器上,使用下列步驟。
重要
由於進行中的密碼同步不是內部部署LDAP布建的功能,因此Microsoft建議AD LDS與同盟應用程式特別搭配使用、與AD DS搭配使用,或更新AD LDS實例中的現有使用者時。
- 在伺服器上,按兩下 [開始]、 [執行],然後按兩下 gpedit.msc
- 在 [本地組原則] 編輯器上,流覽至 [計算機設定>] [Windows 設定 安全性 設定 >> 帳戶原則>密碼原則]
- 在右側,按兩下 [密碼必須符合複雜性需求],然後選取 [已停用]。

- 按兩下 [套用] 和 [確定]
- 關閉本地組原則編輯器
接下來,繼續進行指引,將 使用者從 Microsoft Entra ID 布建到 LDAP 目錄 ,以下載及設定布建代理程式。
附錄 A - 安裝 AD LDS PowerShell 腳本
下列 PowerShell 腳本可用來自動安裝 Active Directory 輕量型目錄服務。 您必須編輯文本以符合您的環境;特別是,變更 APP3 為計算機的主機名。
# Filename:    1_SetupADLDS.ps1
# Description: Creates a certificate that will be used for SSL and installs Active Directory Lighetweight Directory Services.
#
# DISCLAIMER:
# Copyright (c) Microsoft Corporation. All rights reserved. This
# script is made available to you without any express, implied or
# statutory warranty, not even the implied warranty of
# merchantability or fitness for a particular purpose, or the
# warranty of title or non-infringement. The entire risk of the
# use or the results from the use of this script remains with you.
#
#
#
#
#Declare variables
$DNSName = 'APP3'
$CertLocation = 'cert:\LocalMachine\MY'
$logpath = "c:\"
$dirname = "test"
$dirtype = "directory"
$featureLogPath = "c:\test\featurelog.txt"

#Create a new self-signed certificate
New-SelfSignedCertificate -DnsName $DNSName -CertStoreLocation $CertLocation

#Create directory
New-Item -Path $logpath -Name $dirname -ItemType $dirtype

#Export the certificate from the local machine personal store
Get-ChildItem -Path cert:\LocalMachine\my | Export-Certificate -FilePath c:\test\allcerts.sst -Type SST

#Import the certificate in to the trusted root
Import-Certificate -FilePath "C:\test\allcerts.sst" -CertStoreLocation cert:\LocalMachine\Root


#Install AD LDS
start-job -Name addFeature -ScriptBlock {
Add-WindowsFeature -Name "ADLDS" -IncludeAllSubFeature -IncludeManagementTools
 }
Wait-Job -Name addFeature
Get-WindowsFeature | Where installed >>$featureLogPath
附錄 B - 回應檔案
此檔案可用來自動化並建立AD LDS的實例。 您將編輯此檔案以符合您的環境;特別是,變更 APP3 為伺服器的主機名。
重要
此腳本會使用AD LDS服務帳戶的本機系統管理員,並在答案中硬式編碼其密碼。 此動作 僅供 測試使用,且不應該用於生產環境。
如果您要在域控制器上安裝AD LDS,而不是成員或獨立伺服器,則必須將LocalLDAPPortToListenOn和LocalSSLPortToListon 變更為LDAP和LDAP over SSL的已知埠以外的埠。 例如,LocalLDAPPortToListenOn=51300 和 LocalSSLPortToListenOn=51301。
 [ADAMInstall]
 InstallType=Unique
 InstanceName=AD-APP-LDAP
 LocalLDAPPortToListenOn=389
 LocalSSLPortToListenOn=636
 NewApplicationPartitionToCreate=CN=App,DC=contoso,DC=lab
 DataFilesPath=C:\Program Files\Microsoft ADAM\AD-APP-LDAP\data
 LogFilesPath=C:\Program Files\Microsoft ADAM\AD-APP-LDAP\data
 ServiceAccount=APP3\Administrator
 ServicePassword=Pa$$Word1
 AddPermissionsToServiceAccount=Yes
 Administrator=APP3\Administrator
 ImportLDIFFiles="MS-User.LDF"
 SourceUserName=APP3\Administrator
 SourcePassword=Pa$$Word1
附錄 C - 填入 AD LDS PowerShell 腳本
PowerShell 腳本,以容器和服務帳戶填入 AD LDS。
# Filename:    2_PopulateADLDS.ps1
# Description: Populates our AD LDS environment with 2 containers and a service account

# DISCLAIMER:
# Copyright (c) Microsoft Corporation. All rights reserved. This
# script is made available to you without any express, implied or
# statutory warranty, not even the implied warranty of
# merchantability or fitness for a particular purpose, or the
# warranty of title or non-infringement. The entire risk of the
# use or the results from the use of this script remains with you.
#
#
#
#
# Create service accounts container
New-ADObject -Name "ServiceAccounts" -Type "container" -Path "CN=App,DC=contoso,DC=lab" -Server "APP3:389"
Write-Output "Creating ServiceAccounts container"

# Create cloud users container
New-ADObject -Name "CloudUsers" -Type "container" -Path "CN=App,DC=contoso,DC=lab" -Server "APP3:389"
Write-Output "Creating CloudUsers container"

# Create a new service account
New-ADUser -name "svcAccountLDAP" -accountpassword  (ConvertTo-SecureString -AsPlainText 'Pa$$1Word' -Force) -Displayname "LDAP Service Account" -server 'APP3:389' -path "CN=ServiceAccounts,CN=App,DC=contoso,DC=lab"
Write-Output "Creating service account"

# Enable the new service account
Enable-ADAccount -Identity "CN=svcAccountLDAP,CN=ServiceAccounts,CN=App,DC=contoso,DC=lab" -Server "APP3:389"
Write-Output "Enabling service account"

# Add the service account to the Administrators role
Get-ADGroup -Server "APP3:389" -SearchBase "CN=Administrators,CN=Roles,CN=App,DC=contoso,DC=lab" -Filter "name -like 'Administrators'" | Add-ADGroupMember -Members "CN=svcAccountLDAP,CN=ServiceAccounts,CN=App,DC=contoso,DC=lab"
Write-Output "Adding service accounnt to Administrators role"
