Unity 目錄範例中的模型
此範例說明如何使用 Unity 目錄中的模型來建置機器學習應用程式,以預測風力發電廠的每日電力輸出。 此範例示範如何:
- 使用 MLflow 追蹤和記錄模型
- 向 Unity 目錄註冊模型
- 描述模型,並使用別名進行推斷
- 整合已註冊的模型與生產應用程式
- 在 Unity 目錄中搜尋和探索模型
- 封存和刪除模型
本文說明如何使用 Unity 目錄 UI 和 API 中的 MLflow 追蹤和模型來執行這些步驟。
需求
請確定您符合需求中的所有需求。 此外,本文中的程式碼範例假設您具有下列許可權:
USE CATALOG目錄的許可權main。CREATE MODEL和USE SCHEMA架構的許可權main.default。
Notebook
本文中的所有程式代碼都會在下列筆記本中提供。
Unity 目錄範例筆記本中的模型
安裝 MLflow Python 用戶端
此範例需要 MLflow Python 用戶端 2.5.0 版或更新版本和 TensorFlow。 在筆記本頂端新增下列命令,以安裝這些相依性。
%pip install --upgrade "mlflow-skinny[databricks]>=2.5.0" tensorflow
dbutils.library.restartPython()
載入數據集、定型模型,並註冊至 Unity 目錄
本節說明如何載入風力發電場數據集、定型模型,以及向 Unity 目錄註冊模型。 模型定型回合和計量會在實驗回合中追蹤。
載入數據集
下列程式代碼會載入數據集,其中包含 美國 中風力發電廠的天氣數據和電力輸出資訊。 數據集包含 、、 和 air temperature 特徵,每隔六小時取樣一次(一次,一次08:0000:00,一次在 16:00),以及數年內的每日匯總電源輸出 (power)。 wind speedwind direction
import pandas as pd
wind_farm_data = pd.read_csv("https://github.com/dbczumar/model-registry-demo-notebook/raw/master/dataset/windfarm_data.csv", index_col=0)

def get_training_data():
  training_data = pd.DataFrame(wind_farm_data["2014-01-01":"2018-01-01"])
  X = training_data.drop(columns="power")
  y = training_data["power"]
  return X, y

def get_validation_data():
  validation_data = pd.DataFrame(wind_farm_data["2018-01-01":"2019-01-01"])
  X = validation_data.drop(columns="power")
  y = validation_data["power"]
  return X, y

def get_weather_and_forecast():
  format_date = lambda pd_date : pd_date.date().strftime("%Y-%m-%d")
  today = pd.Timestamp('today').normalize()
  week_ago = today - pd.Timedelta(days=5)
  week_later = today + pd.Timedelta(days=5)

  past_power_output = pd.DataFrame(wind_farm_data)[format_date(week_ago):format_date(today)]
  weather_and_forecast = pd.DataFrame(wind_farm_data)[format_date(week_ago):format_date(week_later)]
  if len(weather_and_forecast) < 10:
    past_power_output = pd.DataFrame(wind_farm_data).iloc[-10:-5]
    weather_and_forecast = pd.DataFrame(wind_farm_data).iloc[-10:]

  return weather_and_forecast.drop(columns="power"), past_power_output["power"]
設定 MLflow 用戶端以存取 Unity 目錄中的模型
根據預設,MLflow Python 用戶端會在 Azure Databricks 上的工作區模型登錄中建立模型。 若要升級至 Unity 目錄中的模型,請將用戶端設定為存取 Unity 目錄中的模型:
import mlflow
mlflow.set_registry_uri("databricks-uc")
定型和註冊模型
下列程式代碼會使用 TensorFlow Keras 來定型神經網路,以根據數據集中的天氣特徵預測電源輸出,並使用 MLflow API 向 Unity 目錄註冊適合的模型。
from tensorflow.keras.models import Sequential
from tensorflow.keras.layers import Dense

MODEL_NAME = "main.default.wind_forecasting"

def train_and_register_keras_model(X, y):
  with mlflow.start_run():
    model = Sequential()
    model.add(Dense(100, input_shape=(X.shape[-1],), activation="relu", name="hidden_layer"))
    model.add(Dense(1))
    model.compile(loss="mse", optimizer="adam")

    model.fit(X, y, epochs=100, batch_size=64, validation_split=.2)
    example_input = X[:10].to_numpy()
    mlflow.tensorflow.log_model(
        model,
        artifact_path="model",
        input_example=example_input,
        registered_model_name=MODEL_NAME
    )
  return model

X_train, y_train = get_training_data()
model = train_and_register_keras_model(X_train, y_train)
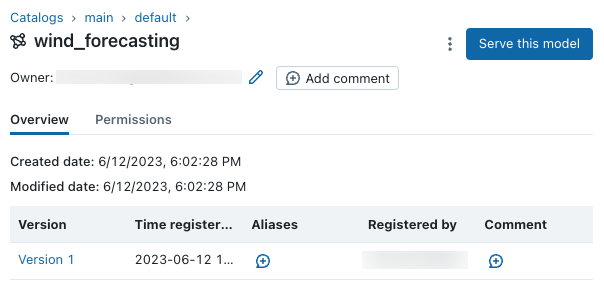
在UI中檢視模型
您可以使用目錄總管,在 Unity 目錄中檢視和管理已註冊的模型和模型版本。 尋找您剛才在目錄和default架構下建立的main模型。
部署模型版本以進行推斷
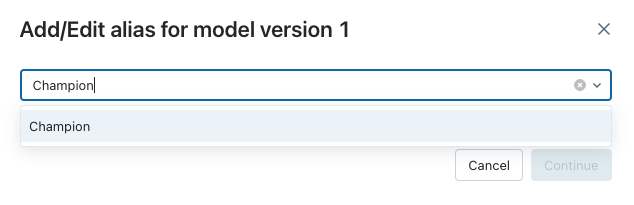
Unity 目錄中的模型支援 模型部署的 別名。 別名會將可變的具名參考(例如「冠軍」或「挑戰者」)提供給特定版本的已註冊模型。 您可以在下游推斷工作流程中使用這些別名來參考和目標模型版本。
在目錄總管中流覽至已註冊的模型之後,請按兩下 [別名] 資料行底下,將 「冠軍」別名指派給最新的模型版本,然後按 [繼續] 以儲存變更。
使用 API 載入模型版本
MLflow 模型元件會定義函式,以從數個機器學習架構載入模型。 例如, mlflow.tensorflow.load_model() 用來載入以 MLflow 格式儲存的 TensorFlow 模型,並 mlflow.sklearn.load_model() 用來載入以 MLflow 格式儲存的 scikit-learn 模型。
這些函式可以從 Unity 目錄中的模型載入模型。
import mlflow.pyfunc

model_version_uri = "models:/{model_name}/1".format(model_name=MODEL_NAME)

print("Loading registered model version from URI: '{model_uri}'".format(model_uri=model_version_uri))
model_version_1 = mlflow.pyfunc.load_model(model_version_uri)

model_champion_uri = "models:/{model_name}@Champion".format(model_name=MODEL_NAME)

print("Loading registered model version from URI: '{model_uri}'".format(model_uri=model_champion_uri))
champion_model = mlflow.pyfunc.load_model(model_champion_uri)
使用冠軍模型預測電源輸出
在本節中,冠軍模型用於評估風力發電場的天氣預報數據。 應用程式 forecast_power() 會從指定的階段載入最新版的預測模型,並用它來預測未來五天的電力生產。
from mlflow.tracking import MlflowClient

def plot(model_name, model_alias, model_version, power_predictions, past_power_output):
  import matplotlib.dates as mdates
  from matplotlib import pyplot as plt
  index = power_predictions.index
  fig = plt.figure(figsize=(11, 7))
  ax = fig.add_subplot(111)
  ax.set_xlabel("Date", size=20, labelpad=20)
  ax.set_ylabel("Power\noutput\n(MW)", size=20, labelpad=60, rotation=0)
  ax.tick_params(axis='both', which='major', labelsize=17)
  ax.xaxis.set_major_formatter(mdates.DateFormatter('%m/%d'))
  ax.plot(index[:len(past_power_output)], past_power_output, label="True", color="red", alpha=0.5, linewidth=4)
  ax.plot(index, power_predictions.squeeze(), "--", label="Predicted by '%s'\nwith alias '%s' (Version %d)" % (model_name, model_alias, model_version), color="blue", linewidth=3)
  ax.set_ylim(ymin=0, ymax=max(3500, int(max(power_predictions.values) * 1.3)))
  ax.legend(fontsize=14)
  plt.title("Wind farm power output and projections", size=24, pad=20)
  plt.tight_layout()
  display(plt.show())

def forecast_power(model_name, model_alias):
  import pandas as pd
  client = MlflowClient()
  model_version = client.get_model_version_by_alias(model_name, model_alias).version
  model_uri = "models:/{model_name}@{model_alias}".format(model_name=MODEL_NAME, model_alias=model_alias)
  model = mlflow.pyfunc.load_model(model_uri)
  weather_data, past_power_output = get_weather_and_forecast()
  power_predictions = pd.DataFrame(model.predict(weather_data))
  power_predictions.index = pd.to_datetime(weather_data.index)
  print(power_predictions)
  plot(model_name, model_alias, int(model_version), power_predictions, past_power_output)

forecast_power(MODEL_NAME, "Champion")
使用 API 新增模型和模型版本描述
本節中的程序代碼示範如何使用 MLflow API 來新增模型和模型版本描述。
client = MlflowClient()
client.update_registered_model(
  name=MODEL_NAME,
  description="This model forecasts the power output of a wind farm based on weather data. The weather data consists of three features: wind speed, wind direction, and air temperature."
)

client.update_model_version(
  name=MODEL_NAME,
  version=1,
  description="This model version was built using TensorFlow Keras. It is a feed-forward neural network with one hidden layer."
)
建立新的模型版本
傳統機器學習技術也適用於電源預測。 下列程式代碼會使用 scikit-learn 將隨機樹系模型定型,並使用 函式向 Unity 目錄 mlflow.sklearn.log_model() 註冊。
import mlflow.sklearn
from sklearn.ensemble import RandomForestRegressor
from sklearn.metrics import mean_squared_error

with mlflow.start_run():
  n_estimators = 300
  mlflow.log_param("n_estimators", n_estimators)

  rand_forest = RandomForestRegressor(n_estimators=n_estimators)
  rand_forest.fit(X_train, y_train)

  val_x, val_y = get_validation_data()
  mse = mean_squared_error(rand_forest.predict(val_x), val_y)
  print("Validation MSE: %d" % mse)
  mlflow.log_metric("mse", mse)

  example_input = val_x.iloc[[0]]

  # Specify the `registered_model_name` parameter of the `mlflow.sklearn.log_model()`
  # function to register the model to <UC>. This automatically
  # creates a new model version
  mlflow.sklearn.log_model(
    sk_model=rand_forest,
    artifact_path="sklearn-model",
    input_example=example_input,
    registered_model_name=MODEL_NAME
  )
擷取新的模型版本號碼
下列程式代碼示範如何擷取模型名稱的最新模型版本號碼。
client = MlflowClient()
model_version_infos = client.search_model_versions("name = '%s'" % MODEL_NAME)
new_model_version = max([model_version_info.version for model_version_info in model_version_infos])
將描述新增至新的模型版本
client.update_model_version(
  name=MODEL_NAME,
  version=new_model_version,
  description="This model version is a random forest containing 100 decision trees that was trained in scikit-learn."
)
將新的模型版本標示為挑戰者並測試模型
在部署模型以提供生產流量之前,最佳做法是在生產數據範例中測試模型。 先前,您已使用“Champion” 別名來表示服務大部分生產工作負載的模型版本。 下列程式代碼會將 「Challenger」 別名指派給新的模型版本,並評估其效能。
client.set_registered_model_alias(
  name=MODEL_NAME,
  alias="Challenger",
  version=new_model_version
)

forecast_power(MODEL_NAME, "Challenger")
將新的模型版本部署為冠軍模型版本
在確認新模型版本在測試中執行良好之後,下列程式代碼會將「冠軍」別名指派給新的模型版本,並使用來自預測電源輸出與冠軍模型區段完全相同的應用程式程式代碼來產生電源預測。
client.set_registered_model_alias(
  name=MODEL_NAME,
  alias="Champion",
  version=new_model_version
)

forecast_power(MODEL_NAME, "Champion")
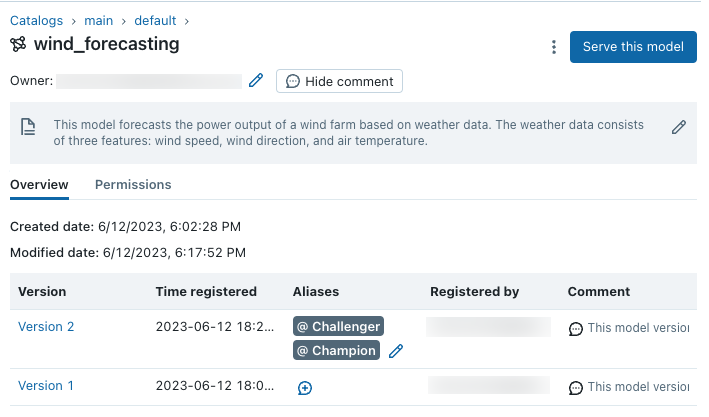
現在有兩個模型版本的預測模型:以 Keras 模型定型的模型版本,以及以 scikit-learn 定型的版本。 請注意,「挑戰者」別名仍會指派給新的 scikit-learn 模型版本,因此任何以「挑戰者」模型版本為目標的下游工作負載都會繼續順利執行:
封存和刪除模型
不再使用模型版本時,您可以將其刪除。 您也可以刪除整個已註冊的模型;這會移除所有相關聯的模型版本。 請注意,刪除模型版本會清除指派給模型版本的任何別名。
使用 MLflow API 刪除Version 1
client.delete_model_version(
   name=MODEL_NAME,
   version=1,
)
使用 MLflow API 刪除模型
client = MlflowClient()
client.delete_registered_model(name=MODEL_NAME)
意見反應
即將登場:在 2024 年,我們將逐步淘汰 GitHub 問題作為內容的意見反應機制,並將它取代為新的意見反應系統。 如需詳細資訊,請參閱:https://aka.ms/ContentUserFeedback。
提交並檢視相關的意見反應