教學課程:從後端服務設定您的裝置
在裝置生命週期中,您可能需要從後端服務設定IoT裝置。 當您將所需的設定傳送至裝置時,也想要從這些裝置接收狀態和合規性更新。 例如,您可以設定裝置的目標操作溫度範圍,或從您的裝置收集韌體版本資訊。
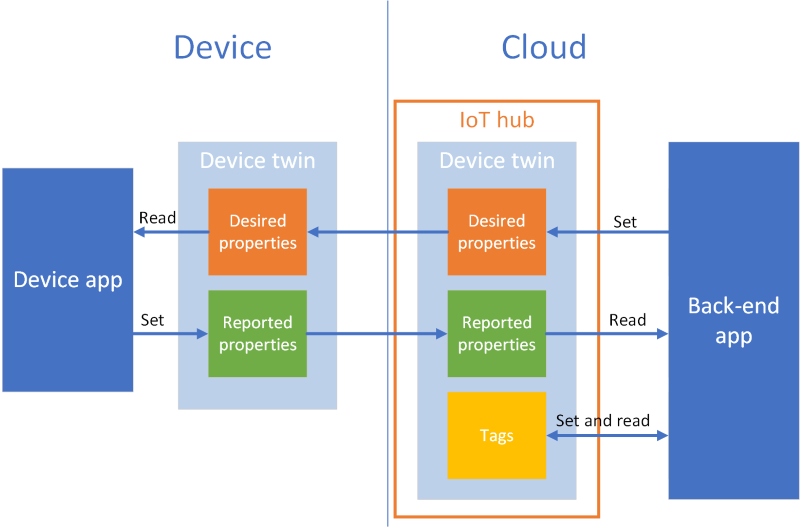
若要同步處理裝置與IoT中樞之間的狀態資訊,請使用 裝置對應項。 裝置對應項是 JSON 檔,與特定裝置相關聯,並由 IoT 中樞 儲存在雲端中,您可以在其中查詢它們。 裝置對應項包含所需的屬性、回報的屬性和標籤。
- 所需的屬性是由後端應用程式所設定,並由裝置讀取。
- 回報 的屬性 是由裝置所設定,並由後端應用程式讀取。
- 標記是由後端應用程式所設定,且永遠不會傳送至裝置。 您可以使用標籤來組織裝置。
本教學課程說明如何使用所需和報告的屬性來同步處理狀態資訊。
在本教學課程中,您會執行下列工作:
- 建立IoT中樞,並將測試裝置新增至身分識別登錄。
- 使用所需的屬性,將狀態資訊傳送至模擬裝置。
- 使用報告屬性從模擬裝置接收狀態資訊。
如果您沒有 Azure 訂用帳戶,請在開始前建立免費帳戶。
必要條件
本教學課程使用 Azure CLI 來建立雲端資源。 如果您已經有已註冊裝置的IoT中樞,您可以略過這些步驟。 有兩種方式可執行 CLI 命令:
在 Azure Cloud Shell 中使用 Bash 環境。 如需詳細資訊,請參閱 Azure Cloud Shell 快速入門 - Bash。

若要在本地執行 CLI 參考命令,請安裝 Azure CLI。 若您在 Windows 或 macOS 上執行,請考慮在 Docker 容器中執行 Azure CLI。 如需詳細資訊,請參閱〈如何在 Docker 容器中執行 Azure CLI〉。
- 使用 az login 命令來登入 Azure CLI。
- 出現提示時,請在第一次使用時安裝 Azure CLI 擴充功能。 如需擴充功能詳細資訊,請參閱使用 Azure CLI 擴充功能。
- 執行 az version 以尋找已安裝的版本和相依程式庫。 若要升級至最新版本,請執行 az upgrade。
您在本教學課程中執行的兩個範例應用程式是使用 Node.js 撰寫。 您需要在開發電腦上Node.js v10.x.x 或更新版本。
您可以從 nodejs.org 下載多個平臺 的Node.js。
您可以使用下列命令,在開發電腦上驗證目前版本的Node.js:
node --version
請確定您的防火牆中已開啟埠 8883。 本教學課程中的裝置範例會使用透過埠 8883 通訊的 MQTT 通訊協定。 某些公司和教育網路環境可能會封鎖此連接埠。 如需此問題的詳細資訊和解決方法,請參閱連線至 IoT 中樞 (MQTT)。
設定 Azure 資源
若要完成本教學課程,您的 Azure 訂用帳戶必須包含 IoT 中樞,且裝置已新增至裝置身分識別登錄。 裝置身分識別登錄中的專案可讓您在本教學課程中執行的模擬裝置連線到中樞。
如果您尚未在訂用帳戶中設定IoT中樞,您可以使用下列 CLI 腳本來設定一個。 此腳本會使用 name tutorial-iot-hub ,並將隨機數位附加至 IoT 中樞名稱。 當您執行此名稱時,您可以將此名稱取代為您自己的全域唯一名稱。 腳本會在美國中部區域建立資源群組和中樞,您可以變更為更接近您的區域。 腳本會擷取 IoT 中樞服務 連接字串,您在後端範例中用來連線到 IoT 中樞:
let "randomIdentifier=$RANDOM*$RANDOM"
hubname="tutorial-iot-hub-$randomIdentifier"
location=centralus

# Install the IoT extension if it's not already installed:
az extension add --name azure-iot

# Create a resource group:
az group create --name tutorial-iot-hub-rg --location $location

# Create your free-tier IoT hub. You can only have one free IoT hub per subscription.
# Change the sku to S1 to create a standard-tier hub if necessary.
az iot hub create --name $hubname --location $location --resource-group tutorial-iot-hub-rg --partition-count 2 --sku F1

# Make a note of the service connection string, you need it later:
az iot hub connection-string show --hub-name $hubname --policy-name service -o table
本教學課程使用名為 MyTwinDevice 的模擬裝置。 下列腳本會將此裝置新增至您的身分識別登錄,並擷取其 連接字串:
# Create the device in the identity registry:
az iot hub device-identity create --device-id MyTwinDevice --hub-name $hubname --resource-group tutorial-iot-hub-rg

# Retrieve the device connection string, you need this later:
az iot hub device-identity connection-string show --device-id MyTwinDevice --hub-name $hubname --resource-group tutorial-iot-hub-rg -o table
將狀態資訊傳送至裝置
您可以使用所需的屬性,將狀態資訊從後端應用程式傳送至裝置。 在本節中,您將瞭解如何:
- 設定裝置以接收和處理所需的屬性。
- 將所需的屬性從後端應用程式傳送至裝置。
所需屬性範例
您可以透過任何方便應用程式的方式來建構所需的屬性。 此範例使用一 個名為 fanOn 的最上層屬性,並將其餘屬性分組為不同的 元件。 下列 JSON 代碼段顯示本教學課程所使用所需屬性的結構。 JSON 位於desired.json檔案中。
{
  "fanOn": "true",
  "components": {
    "system": {
      "id": "17",
      "units": "farenheit",
      "firmwareVersion": "9.75"
    },
    "wifi" : {
      "channel" : "6",
      "ssid": "my_network"
    },
    "climate" : {
      "minTemperature": "68",
      "maxTemperature": "76"
    }
  }
}
在裝置應用程式中接收所需的屬性
若要檢視接收所需屬性的模擬裝置範例程序代碼,請流覽至 您下載的範例Node.js專案中的 iot-hub/Tutorials/DeviceTwins 資料夾。 然後在文字編輯器中開啟SimulatedDevice.js檔案。
下列各節說明在模擬裝置上執行的程式代碼,以回應從後端應用程式傳送的所需屬性變更。
擷取裝置對應項物件
當您向IoT中樞註冊裝置時,您會取得裝置 連接字串 作為輸出。 裝置會使用裝置 連接字串 來向雲端中註冊的身分識別進行驗證。 下列程式代碼會使用裝置 連接字串 連線到 IoT 中樞:
// Get the device connection string from a command line argument
var connectionString = process.argv[2];
下列程式代碼會從客戶端物件取得對應項目:
// Get the device twin
client.getTwin(function(err, twin) {
  if (err) {
    console.error(chalk.red('Could not get device twin'));
  } else {
    console.log(chalk.green('Device twin created'));
建立處理程式
您可以建立所需屬性更新的處理程式,以回應 JSON 階層中不同層級的更新。 例如,此處理程式會看到從後端應用程式傳送至裝置的所有所需屬性變更。 差異變數包含從解決方案後端傳送的所需屬性:
// Handle all desired property updates
twin.on('properties.desired', function(delta) {
    console.log(chalk.yellow('\nNew desired properties received in patch:'));
下列處理程式只會回應對 fanOn 所需屬性所做的變更:
// Handle changes to the fanOn desired property
twin.on('properties.desired.fanOn', function(fanOn) {
    console.log(chalk.green('\nSetting fan state to ' + fanOn));

    // Update the reported property after processing the desired property
    reportedPropertiesPatch.fanOn = fanOn ? fanOn : '{unknown}';
});
多個屬性的處理程式
在本教學課程的範例所需屬性 JSON 中,元件下的氣候節點包含兩個屬性 minTemperature 和 maxTemperature。
裝置的本機 對應項 物件會儲存一組完整的所需和報告屬性。 從後端傳送的差異可能只會更新所需屬性的子集。 在下列代碼段中,如果模擬裝置只收到 minTemperature 和 maxTemperature 的其中一個更新,則會使用本機對應項中的值來設定裝置:
// Handle desired properties updates to the climate component
twin.on('properties.desired.components.climate', function(delta) {
    if (delta.minTemperature || delta.maxTemperature) {
      console.log(chalk.green('\nUpdating desired tempertures in climate component:'));
      console.log('Configuring minimum temperature: ' + twin.properties.desired.components.climate.minTemperature);
      console.log('Configuring maximum temperture: ' + twin.properties.desired.components.climate.maxTemperature);

      // Update the reported properties and send them to the hub
      reportedPropertiesPatch.minTemperature = twin.properties.desired.components.climate.minTemperature;
      reportedPropertiesPatch.maxTemperature = twin.properties.desired.components.climate.maxTemperature;
      sendReportedProperties();
    }
});
處理插入、更新和刪除作業
從後端傳送的所需屬性不會指出在特定所需屬性上執行的作業。 您的程式代碼必須從儲存在本機的目前所需屬性集推斷作業,以及從中樞傳送的變更。
下列代碼段顯示模擬裝置如何處理所需屬性中元件清單中的插入、更新和刪除作業。 您可以看到如何使用 Null 值來指出應該刪除元件:
// Keep track of all the components the device knows about
var componentList = {};

// Use this componentList list and compare it to the delta to infer
// if anything was added, deleted, or updated.
twin.on('properties.desired.components', function(delta) {
  if (delta === null) {
    componentList = {};
  }
  else {
    Object.keys(delta).forEach(function(key) {

      if (delta[key] === null && componentList[key]) {
        // The delta contains a null value, and the
        // device has a record of this component.
        // Must be a delete operation.
        console.log(chalk.green('\nDeleting component ' + key));
        delete componentList[key];

      } else if (delta[key]) {
        if (componentList[key]) {
          // The delta contains a component, and the
          // device has a record of it.
          // Must be an update operation.
          console.log(chalk.green('\nUpdating component ' + key + ':'));
          console.log(JSON.stringify(delta[key]));
          // Store the complete object instead of just the delta
          componentList[key] = twin.properties.desired.components[key];

        } else {
          // The delta contains a component, and the
          // device has no record of it.
          // Must be an add operation.
          console.log(chalk.green('\nAdding component ' + key + ':'));
          console.log(JSON.stringify(delta[key]));
          // Store the complete object instead of just the delta
          componentList[key] = twin.properties.desired.components[key];
        }
      }
    });
  }
});
從後端應用程式傳送所需的屬性
您已了解裝置如何實作處理程式以接收所需的屬性更新。 本節說明如何從後端應用程式將所需的屬性變更傳送至裝置。
若要檢視接收所需屬性的模擬裝置範例程序代碼,請流覽至 您下載的範例Node.js專案中的 iot-hub/Tutorials/DeviceTwins 資料夾。 然後在文字編輯器中開啟ServiceClient.js檔案。
下列代碼段示範如何連線到裝置身分識別登錄,並存取特定裝置的對應項:
// Create a device identity registry object
var registry = Registry.fromConnectionString(connectionString);

// Get the device twin and send desired property update patches at intervals.
// Print the reported properties after some of the desired property updates.
registry.getTwin(deviceId, async (err, twin) => {
  if (err) {
    console.error(err.message);
  } else {
    console.log('Got device twin');
下列代碼段顯示後端應用程式傳送至裝置的不同所需屬性 修補程式 :
// Turn the fan on
var twinPatchFanOn = {
  properties: {
    desired: {
      patchId: "Switch fan on",
      fanOn: "false",
    }
  }
};

// Set the maximum temperature for the climate component
var twinPatchSetMaxTemperature = {
  properties: {
    desired: {
      patchId: "Set maximum temperature",
      components: {
        climate: {
          maxTemperature: "92"
        }
      }
    }
  }
};

// Add a new component
var twinPatchAddWifiComponent = {
  properties: {
    desired: {
      patchId: "Add WiFi component",
      components: {
        wifi: {
          channel: "6",
          ssid: "my_network"
        }
      }
    }
  }
};

// Update the WiFi component
var twinPatchUpdateWifiComponent = {
  properties: {
    desired: {
      patchId: "Update WiFi component",
      components: {
        wifi: {
          channel: "13",
          ssid: "my_other_network"
        }
      }
    }
  }
};

// Delete the WiFi component
var twinPatchDeleteWifiComponent = {
  properties: {
    desired: {
      patchId: "Delete WiFi component",
      components: {
        wifi: null
      }
    }
  }
};
下列代碼段顯示後端應用程式如何將所需的屬性更新傳送至裝置:
// Send a desired property update patch
async function sendDesiredProperties(twin, patch) {
  twin.update(patch, (err, twin) => {
    if (err) {
      console.error(err.message);
    } else {
      console.log(chalk.green(`\nSent ${twin.properties.desired.patchId} patch:`));
      console.log(JSON.stringify(patch, null, 2));
    }
  });
}
從裝置接收狀態資訊
後端應用程式會從裝置接收狀態資訊,作為回報的屬性。 裝置會設定報告的屬性,並將其傳送至您的中樞。 後端應用程式可以從儲存在中樞的裝置對應項讀取報告屬性的目前值。
從裝置傳送報告的屬性
您可以將更新傳送至回報的屬性值作為修補程式。 下列代碼段顯示模擬裝置所傳送之修補程式的範本。 模擬裝置會在將它傳送至中樞之前,先更新修補程式中的字段:
// Create a patch to send to the hub
var reportedPropertiesPatch = {
  firmwareVersion:'1.2.1',
  lastPatchReceivedId: '',
  fanOn:'',
  minTemperature:'',
  maxTemperature:''
};
模擬裝置會使用下列函式,將包含報告屬性的修補程式傳送至中樞:
// Send the reported properties patch to the hub
function sendReportedProperties() {
  twin.properties.reported.update(reportedPropertiesPatch, function(err) {
    if (err) throw err;
    console.log(chalk.blue('\nTwin state reported'));
    console.log(JSON.stringify(reportedPropertiesPatch, null, 2));
  });
}
處理報告屬性
後端應用程式會透過裝置對應項存取裝置目前的回報屬性值。 下列代碼段示範後端應用程式如何讀取模擬裝置的報告屬性值:
// Display the reported properties from the device
function printReportedProperties(twin) {
  console.log("Last received patch: " + twin.properties.reported.lastPatchReceivedId);
  console.log("Firmware version: " + twin.properties.reported.firmwareVersion);
  console.log("Fan status: " + twin.properties.reported.fanOn);
  console.log("Min temperature set: " + twin.properties.reported.minTemperature);
  console.log("Max temperature set: " + twin.properties.reported.maxTemperature);
}
執行應用程式
在本節中,您會執行兩個範例應用程式來觀察後端應用程式將所需的屬性更新傳送至模擬裝置應用程式。
若要執行模擬裝置和後端應用程式,您需要裝置和服務 連接字串。 當您在本教學課程開始時建立資源時,請記下 連接字串。
若要執行模擬裝置應用程式,請開啟殼層或命令提示字元視窗,並流覽至 您所下載Node.js專案中的 iot-hub/Tutorials/DeviceTwins 資料夾。 然後,執行下列命令:
npm install
node SimulatedDevice.js "{your device connection string}"
若要執行後端應用程式,請開啟另一個殼層或命令提示字元視窗。 然後,流覽至您所下載Node.js專案中的 iot-hub/Tutorials/DeviceTwins 資料夾。 然後,執行下列命令:
npm install
node ServiceClient.js "{your service connection string}"
觀察所需的屬性更新
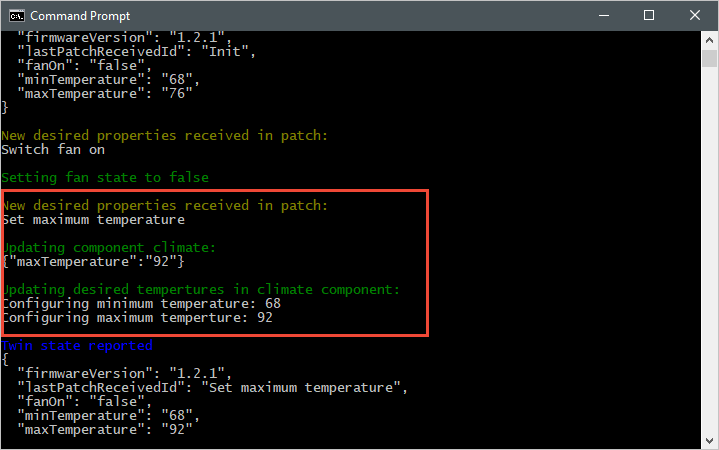
下列螢幕快照顯示模擬裝置應用程式的輸出,並醒目提示如何處理 maxTemperature 所需屬性的更新。 您可以看到最上層處理程式和氣候元件處理程式的執行方式:
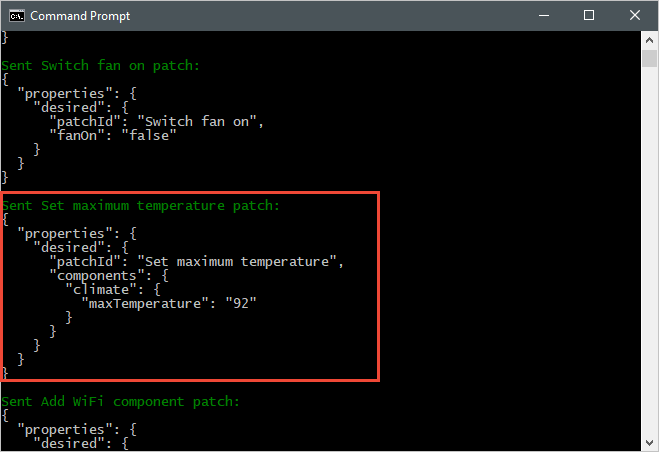
下列螢幕快照顯示後端應用程式的輸出,並醒目提示如何將更新傳送至 maxTemperature 所需的屬性:
觀察回報的屬性更新
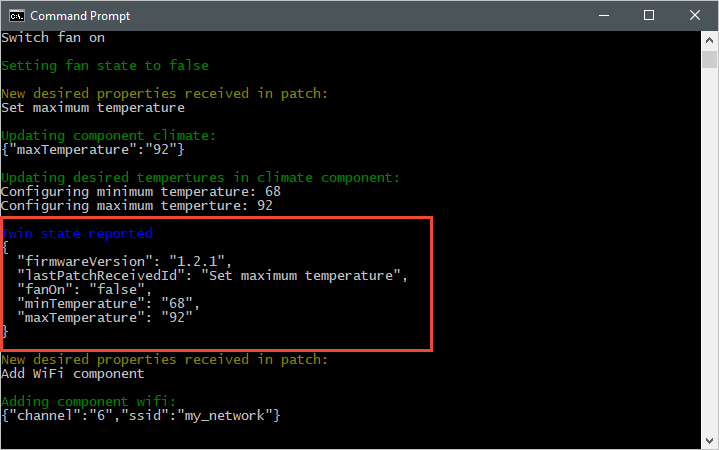
下列螢幕快照顯示模擬裝置應用程式的輸出,並醒目提示如何將回報的屬性更新傳送至中樞:
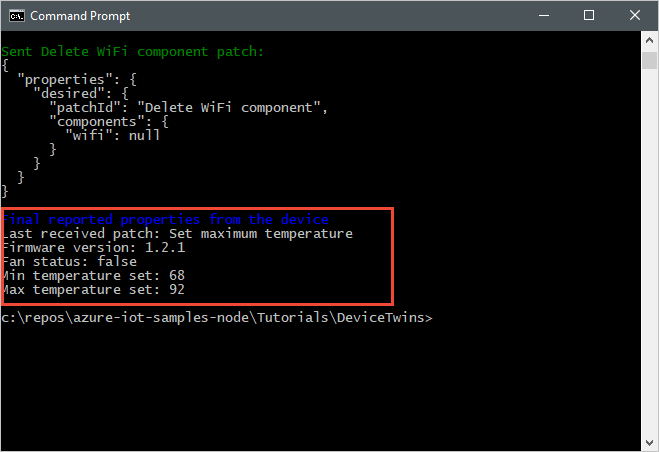
下列螢幕快照顯示後端應用程式的輸出,並醒目提示從裝置接收及處理報告屬性更新的方式:
清除資源
如果您打算完成下一個教學課程,請將資源群組和IoT中樞保留為稍後重複使用。
如果您不再需要IoT中樞,請在入口網站中刪除它和資源群組。 若要這樣做,請選取 包含IoT中樞的 tutorial-iot-hub-rg 資源群組,然後選取 [ 刪除]。
或者,使用 CLI:
# Delete your resource group and its contents
az group delete --name tutorial-iot-hub-rg
下一步
在本教學課程中,您已瞭解如何同步處理裝置與IoT中樞之間的狀態資訊。 前進到下一個教學課程,瞭解如何使用裝置對應項來實作裝置更新程式。
使用Raspberry Pi 3 B+ 參考映像,實作 Azure IoT 中樞 教學課程的裝置更新。