Email Phishing Protection Guide - Part 7: Deploy ATP Anti-Phishing Policies
The Email Phishing Protection Guide is a multi-part blog series written to walk you through the setup of many security focused features you may already own in Microsoft Windows, Microsoft Office 365, and Microsoft Azure. By implementing some or all of these items, an organization will increase their security posture against phishing email attacks designed to steal user identities. This guide is written for system administrators with skills ranging from beginner to expert.
Email Phishing Protection Guide Index: Introduction: Email Phishing Protection Guide - Enhancing Your Organization's Security Posture Part 1: Customize the Office 365 Logon Portal Part 2: Training Users with the Office 365 Attack Simulator Part 3: Deploy Multi Factor Authentication (MFA) Part 4: Deploy Windows Hello Part 5: Define Country and Region Logon Restrictions for Office 365 and Azure Services Part 6: Deploy Outlook Plug-in to Report Suspicious Emails Part 7: Deploy ATP Anti-Phishing Policies Part 8: Deploy ATP Safe Link Policies Part 9: Deploy ATP Safe Attachment Policies Part 10: Deploy and Enforce Smart Screen for Microsoft Edge, Microsoft Internet Explorer and Google Chrome Part 11: Monitor Phishing and SPAM Attacks in Office 365 Part 12: Discover Who is Attacking Your Office 365 User Identities Part 13: Update Your User Identity Password Strategy Part 14: Prevent Brute Force and Spray Attacks in Office 365 Part 15: Implement the Microsoft Azure AD Password Protection Service (for On-Premises too!) Part 16: Disable Office 365 Legacy Email Authentication Protocols Part 17: Control Application Consent Registrations in Microsoft Office 365 and Microsoft Azure Part 18: Increase Security with Microsoft Secure Score Part 19: Email Phishing Protection Security Checklist Part 20: Recommended Security and Anti-Phishing Training from Microsoft Ignite 2018
Part 7: Deploy ATP Anti-Phishing Policies
We are on a journey in this series of blogs to increase the security posture of your organization against phishing emails. We are setting up a variety of locks that an attacker will need to pick for a successful email phishing attack. So let's consider that a well-crafted phishing email has managed to pick through a few locks and made it to a user's email Inbox. Given the potential that the user may now click on the phishing link (or an attachment), we want to setup another "lock" to help prevent any type of malicious activity as a result. ATP Anti-Phishing Policies, ATP Safe Links, and ATP Safe Attachments (security features within Office 365 ATP) can help protect environments from a user who may unknowingly click on a malicious link or attachment.
I have encountered several organizations who have been the targets of spear phishing attacks. This is when specific users in an organization are the targets of a sophisticated phishing campaign designed to steal their logon credentials. These targeted users are often those people on the leadership team of an organization, most often those with some type of financial authority who can wire transfer money. Once the identity of these individuals are stolen, an attacker then has the keys to work through your organization.
This blog series has outlined several padlocks an attacker must pick to steal user identities. As another padlock, we will define and enable Office 365 ATP Anti-Phishing policies to help prevent these emails from being delivered.
Office 365 ATP Anti-Phishing Policies
As explained in this link, "ATP anti-phishing applies a set of machine learning models together with impersonation detection algorithms on incoming messages to provide protection from commodity and spear phishing attacks." Organizations that have ATP capabilities in their Office 365 subscriptions must define ATP anti-phishing policies. Also explained in the aforementioned link(see example scenarios), this policy is not defined or active by default. It is up to the organization to define policies based on their internal design.
With Office 365 anti-phishing policies in place, incoming messages are evaluated for many items including impersonation of users and/or other domains. Machine learning models help to determine phishing messages and what is the appropriate action by policy to take.
Instructions to Setup Office 365 ATP Anti-Phishing Policies
Note: Only user accounts in your organization with the ATP license assigned to their account will be protected by this policy. Please see the section how to How to Get ATP Anti-Phishing in this link for licensing information.
Logon to https://protection.office.com as a global administrator in your Office 365 tenant. This opens the Security & Compliance area of the tenant.
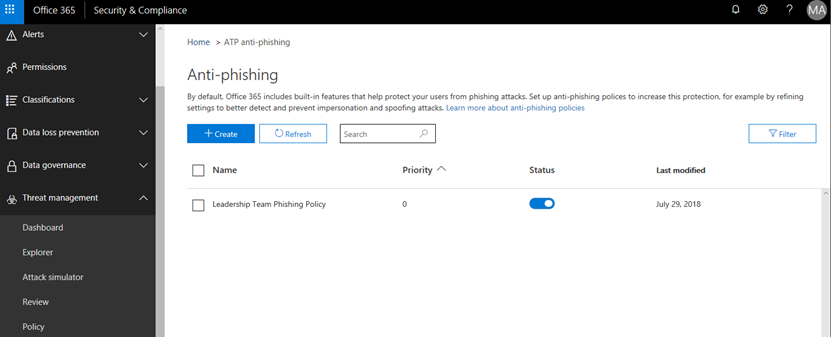
Within the Security & Compliance area, expand Threat Management and then click on Policy.

Click on the ATP Anti-Phishing tile.
Notice that within the Anti-Phishing policy administration area how there are no policies defined by default.
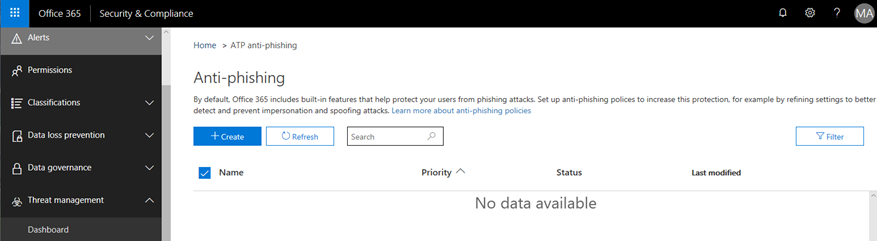
Create a new policy by clicking on the +Create option.
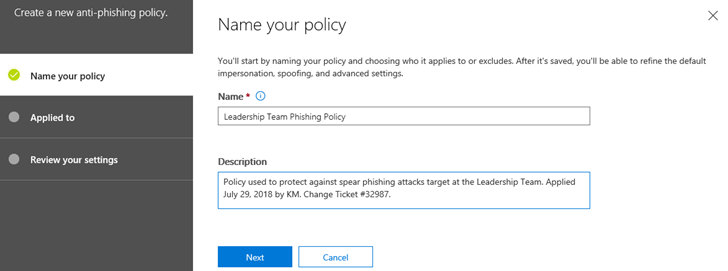
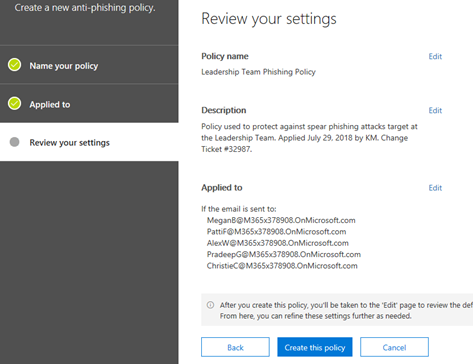
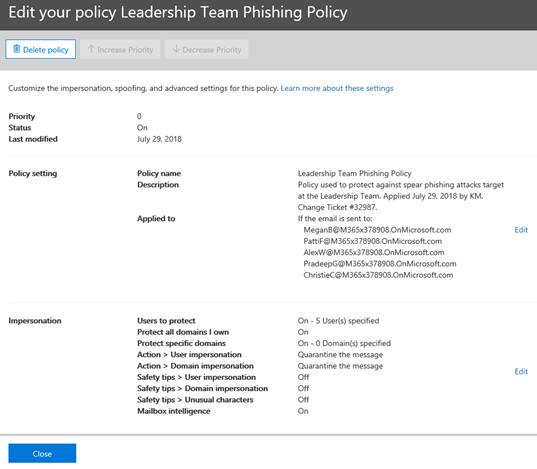
Start by providing a name for your new policy. For this example, we will setup a policy to be applied to an organization's leadership team - this team of people are often the targets of spear-phishing attacks. The policy will be named Leadership Team Phishing Policy. The description is Policy used to protect against spear phishing attacks target at the Leadership Team. Applied July 29, 2018 by KM. Change Ticket #32987. For testing purposes, I recommend setting up a policy on a few technical users in your organization who I like to call friendlies. Click Next when ready.
There are a number of conditional options to be defined that are described in detail in a table here. For this example policy, the following conditions will be applied:
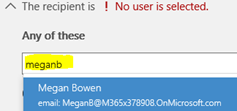
a. Applied To: Select the user names in your environment to apply the policy too. As you begin to type in each user's name, Office 365 will resolve to that name. Notice what happens when I enter MeganB, a user in this demonstration environment - the name resolves where it can then be selected. You could also add these users to a group and define the group name here instead (for example, a Leadership Team email distribution list). Click Next after entering one or more names.
b. The next screen displays a summary of your settings to review and edit if needed. Click on Create This Policy when ready.
8. In the next screen we have options in the policy that must now be edited to make sure it behaves as needed.
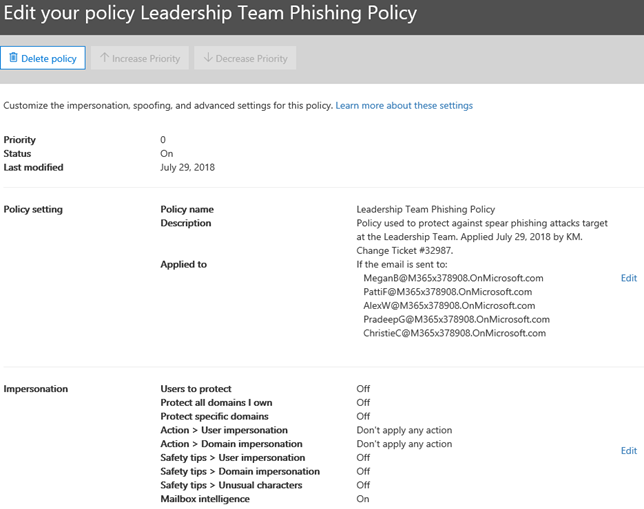

9. In step 7, we already created basic options in the policy setting. Now we will define advanced options under Impersonation. Click on the Edit option to the right of this section.

10. In the first screen under Edit Impersonation Policy, select the option to turn ON the policy. Next, select Add User.
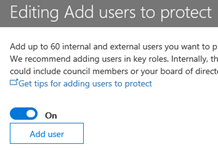
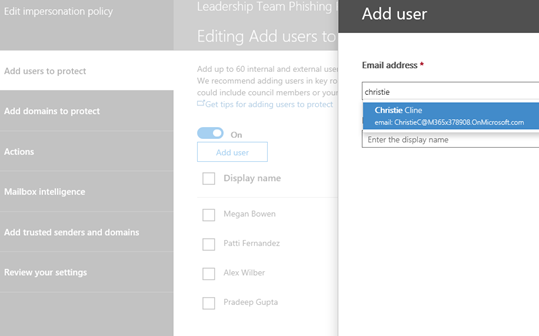
11. Add each user where this setting will be applied. Similar to when the policy was created in an earlier step, you may enter a user name or email address to add each person. Do NOT click Save when done as this will exit from the Edit Impersonation Policy area. Rather, click on the next item in the list to edit - Add Domains to Protect.
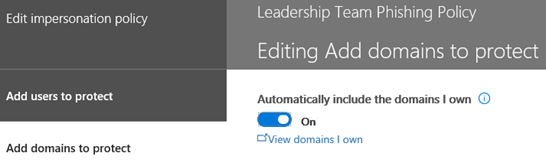
12. In the next area, Add Domains to Protect, select the option to enable Automatically Include the Domains I Own. Next, click Actions (do not select Save yet.)
13. In the Actions area, select the option of your choice for If email is sent by an impersonated user. If I were administering a network, my selection would be to Quarantine the Message so the user would not see it even in their Junk Email folder. I want to filter these messages to keep users from accidently clicking on phishing links no matter what folder they are in.

In the Actions area, under the second option If email is sent by an impersonated domain, I would choose the same option to Quarantine the message.
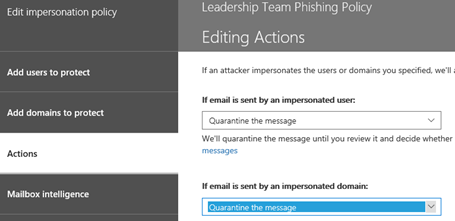
Note: These settings should be carefully decided and defined for what is appropriate for your organization.
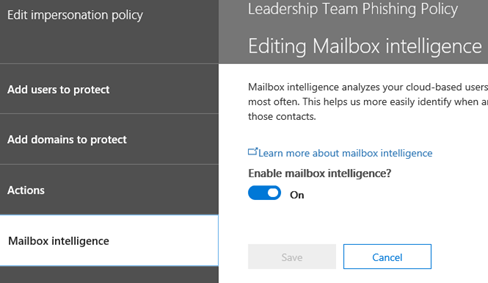
14. Click Mailbox Intelligence next (do not click Save yet). Mailbox Intelligence is already On by default, so no changes are needed in this section. Click Add trusted senders and domains.
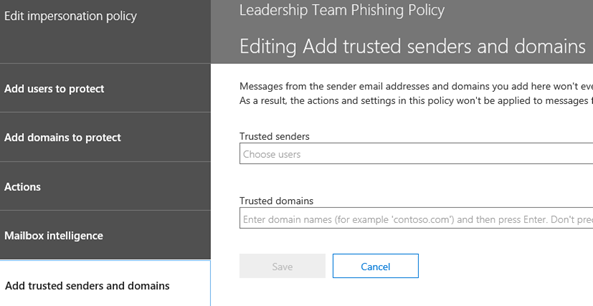
15. In Added trusted senders and domains, I will not include a value in this example. You may want to consider adding a partner organization you work with often to this area.
16. Click Review your settings. In the screen below, you may review your settings again. Click Save when done to save the new Leadership Team Phishing Policy.
17. Click Close to exit the policy creation area. The policy is now active on the users defined. Remember, these users must also have the correct Office 365 ATP license defined to work correctly.
18. Back in the ATP anti-phishing panel, verify the policy is enabled under the Status area.
19. The Office 365 ATP Anti-Phishing policy is now active in your environment. With this policy in place, be sure to monitor for any messages captured and placed into quarantine. Part 11 in this blog series discusses the monitoring console in detail.
20. Back in the Security & Compliance area, expand Threat Management. Then, click Threat Tracker to view items in quarantine. In addition to this blog about configuring ATP Anti-Phishing, be sure to review the other options to further secure your environment.
Conclusion: In this blog we reviewed ATP Anti-Phishing policies and how to implement and then monitor them for intended behavior.