Email Phishing Protection Guide - Part 17: Control Application Consent Registrations in Microsoft Office 365 and Azure
The Email Phishing Protection Guide is a multi-part blog series written to walk you through the setup of many security focused features you may already own in Microsoft Windows, Microsoft Office 365, and Microsoft Azure. By implementing some or all of these items, an organization will increase their security posture against phishing email attacks designed to steal user identities. This guide is written for system administrators with skills ranging from beginner to expert.
Introduction: Email Phishing Protection Guide - Enhancing Your Organization's Security Posture Part 1: Customize the Office 365 Logon Portal Part 2: Training Users with the Office 365 Attack Simulator Part 3: Deploy Multi Factor Authentication (MFA) Part 4: Deploy Windows Hello Part 5: Define Country and Region Logon Restrictions for Office 365 and Azure Services Part 6: Deploy Outlook Plug-in to Report Suspicious Emails Part 7: Deploy ATP Anti-Phishing Policies Part 8: Deploy ATP Safe Link Policies Part 9: Deploy ATP Safe Attachment Policies Part 10: Deploy and Enforce Smart Screen for Microsoft Edge, Microsoft Internet Explorer and Google Chrome Part 11: Monitor Phishing and SPAM Attacks in Office 365 Part 12: Discover Who is Attacking Your Office 365 User Identities Part 13: Update Your User Identity Password Strategy Part 14: Prevent Brute Force and Spray Attacks in Office 365 Part 15: Implement the Microsoft Azure AD Password Protection Service (for On-Premises too!) Part 16: Disable Office 365 Legacy Email Authentication Protocols Part 17: Control Application Consent Registrations in Microsoft Office 365 and Microsoft Azure Part 18: Increase Security with Microsoft Secure Score Part 19: Email Phishing Protection Security Checklist Part 20: Recommended Security and Anti-Phishing Training from Microsoft Ignite 2018
Part 17: Control Application Consent Registration in Microsoft Office 365 and Azure
In this continuing blog series about how to further secure your environment from email phishing threats, another attack vector is application consent provided by users for third party applications. While this type of attack vector is NOT commonly seen, as an administrator of an environment you still want to be aware of its existence and how to prevent it from becoming an issue. Below is an explanation of this type of threat, how to identity apps with granted permissions in your environment, and how to block future application permissions without an administrator approval.
Again, while not common, there have been several high profile attacks using this "grant consent" registration request that users may grant. Let's say a user downloads a new application - either from an application store or after clicking on a link in an email (phishing email). The average user may look at the prompt as, well, just another prompt and click "Accept" or "Approve" to continue. Afterall, the user is not providing a username and password. A user is typically not going to read the fine print and consider the implications of allowing access by an application that is not approved by their organization. Access statements may include items such as Read and write access to user profile, read and write access to user mail, have full access to calendars, have full access to contacts, have full access to all files a user can access, access a user's data anytime, etc. Unknowingly, by agreeing to the application consent request the user may have just granted the application many more permissions than needed or intended.
When access is granted to a third party application with this process (no username\password), it is permission to use Open Authentication (OAuth). Instead of a username and password, the third party application receives a token that can be used for a persistent authentication. Similar to a phishing email designed to trick a user into providing a username and password, granting a third party to use OAuth may present similar risks. While a user may be able to identify phishing emails, a malicious Application Consent Registration request of attack will not be as easy to identify. While many reputable providers do a thorough background check before allowing applications to use OAuth, in the world of security nothing is 100% and we cannot count on everyone to perform this type of scanning. An example consent screen is provided in the first figure below.
Below are examples of several breaches outlined at a session (BRK3251) about this topic Microsoft Ignite 2018:
- March 2017 - Fancy Bear Employs OAuth Phishing Attack on US Elections
- April 2017 - Russian Hackers Allegedly use OAuth in Attempts to Interfere with the French Election
- May 2017 - Fake Google Docs OAuth
- November 2017 - Ocean Lotus Intel Gathering Attack
- January 2018 - Kevin Mitnick Proof of Concept OAuth Cloud Ransomware
- March 2018 - Cambridge Analytica Data Scandal Exposed
So what can you do to identify and prevent this type of potential breach?
Below are several options that I elaborate on in the sections below:
- In your user education training about phishing emails, you can include this potential attack as well.
- Audit the consent permitted for all applications in your environment.
- Using the Azure Portal to discover apps approved by users and administrators
- Using a PowerShell script by Phillippe Signoret (link below)
- Use Microsoft Cloud App Security (MCAS)
- You can block consent for future applications from being permitted by users. This will become an administrator only function.
Option One:
User Education about Application Consent Requests
Training your end users is always a best practice as they are often times the weakest link in any well thought out security plan. Training users to identify phishing emails is becoming more common. Consider including a screen capture such as the one below in your training program to begin creating awareness about this type of threat.

Option Two:
Audit Application Consent Permissions - New and Existing
Before making any types of changes to application permissions, I recommend you review what applications already have been provided access to your environment. There could be any number of business critical applications in use that you may need to review for security concerns, but also keep in your environment until a new application is found. These applications could also be part of Shadow IT happening in your organization.
Audit Method One: PowerShell Script
A PowerShell script is available from Philippe Signoret in GitHub that can be used to export all of the delegated permissions and application permissions in an easy to sort format. Use the link above to download and execute the script for application permission discovery.
Audit Method Two: Microsoft Cloud Application Security (MCAS)
Using MCAS, review the applications with permissions already in your environment. To access this area, follow the steps below. This instruction set assumes you have licensing for MCAS.
- Logon to https://portal.cloudappsecurity.com with a global administrator account
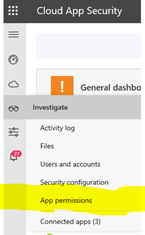
- Click on the Investigate option on the left (the eye glasses icon).
- Select App Permissions
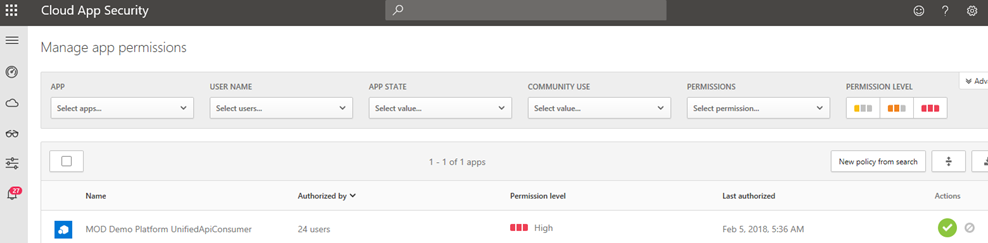
- In App Permissions, you will now see all of the applications that are currently authorized for integration with your environment. You may have none, some, or a group of items listed. For each item, the Authorized by column displays which user authorized each item, what level of permissions are provided (High, Med, Low) The options are available to Approve or Deny each application.
Audit Method Three: Azure Graph Explorer - Permissions
Using this method, logon to the Azure Portal to discover which apps have been granted permissions by users - sometimes on behalf of your organization. The Azure Graph Explorer was recently talked about at Microsoft Ignite in session BRK3251.
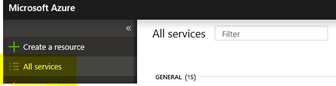
Logon to https://portal.azure.com
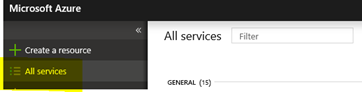
Select All Services
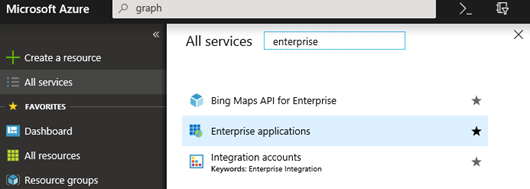
In the All Services search field, enter the word Enterprise. The results will be shown below.

Click on the Enterprise Applications item now displayed.
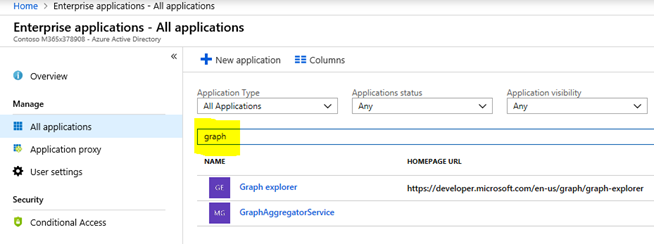
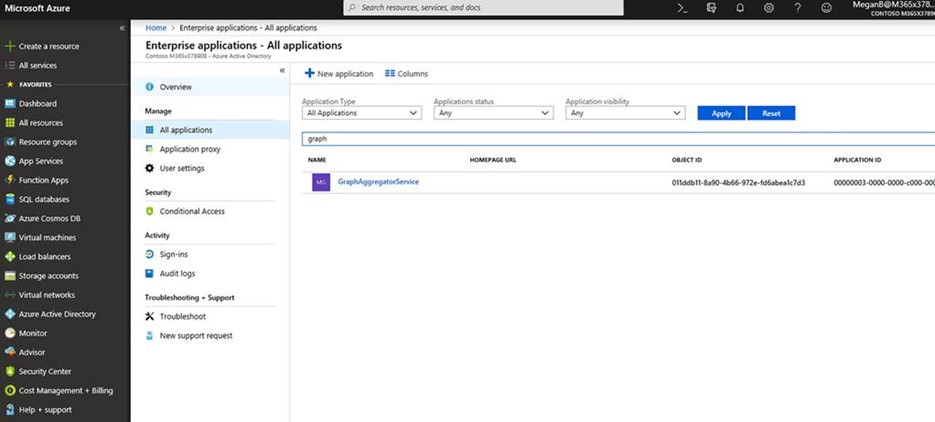
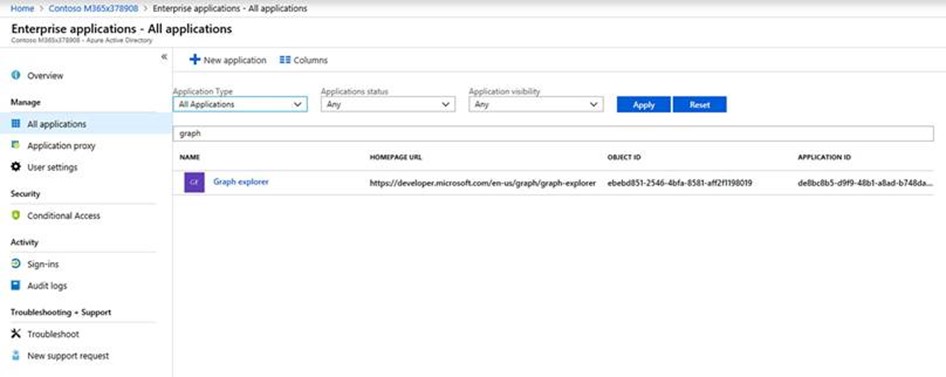
Under Application Type, select the option for All Applications. Then make sure Any is defined for Application Status and Application Visibility.
In the search field, enter the word Graph and then select Apply.
In the search results, Graph Explorer will now be seen.
Note: If Graph Explorer is not seen in this section, see the last section of this blog to enable it.
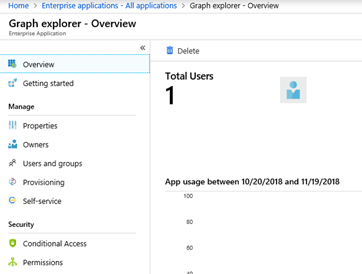
Select the Graph Explorer. You will now see the Graph Explorer - Overview.
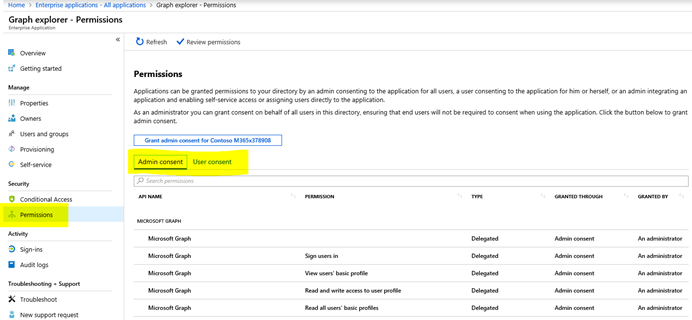
- Click on the Permissions area on the left. From here, you can review any applications granted consent by either the Admin or by Users. See the areas highlighted below to toggle the views between Admin and User Consent.
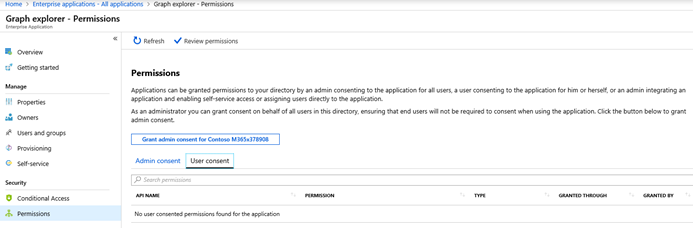
- When User Consent is selected, you will be able to see any applications provided with access and most importantly, but which user. You may then reach out to users to see if they recall taking the action and why (remember, there may be a valid business reason). In the screen below, there are no applications with access granted by users. While this is a demonstration tenant, a production environment will most likely be populated with entries.
Option Three: Block Application Consent by Users. Only Administrators Have Permissions.
Using one or more of the methods above, you should now have a good understanding of what applications have been granted access to your directory. With this knowledge, you may want to deny any future application from being granted access by users. This is done in the Office 365 Administration Portal by following the steps below in the Integrated Apps area.
Note: By disabling this feature, any existing apps and/or existing permissions will NOT be uninstalled. Existing permissions defined for any existing applications will NOT be modified.
- Logon to https://portal.office.com
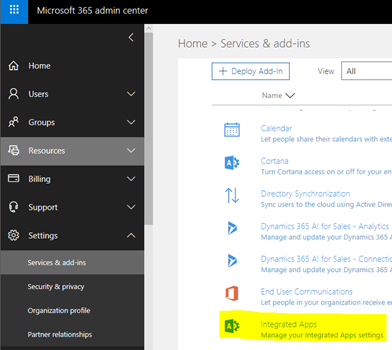
- Expand the Settings area.
- Click Services & Add-Ins
- Click Integrated Apps
- Select the option to disable the policy.

- Click Save to save the new setting.
What if the Graph Explorer is Missing in the Microsoft Azure portal?
If you are using the Azure Portal to view permissions granted to applications and you do not see the Graph Explorer using the instructions above, chances are an application has never been granted permissions. To verify, you can walk through the steps below to grant an application permission. Then, search for the Graph Explorer again then to see it in the results.
- Logon to https://portal.azure.com
- Select All Services
- In the All Services search field, enter the word Enterprise. The results will be shown below.
- Click on the Enterprise Applications area shown.
- Under Application Type, select the option for All Applications. Then make sure Any is defined for Application Status and Application Visibility.
- In the search field, enter the word Graph and then select Apply. If Graph does not appear, you may only see a single result like shown below:
- If Graph Explorer does not appear, logon to the site https://developer.microsoft.com/en-us/graph/graph-explorer. After logging in, you should be presented with a Permissions Request for Graph Explorer like the screen below.
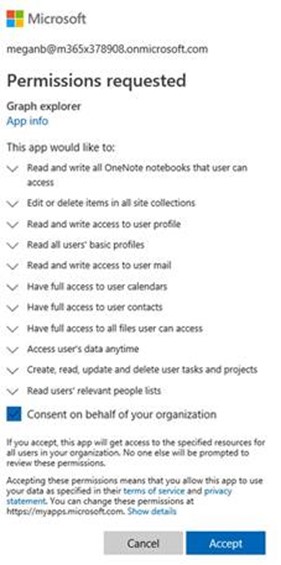
- After selected the checkbox to Consent on Behalf of Your Organization, click Accept.
- By going back through the instructions in step 1-6 above, Graph Explorer should now be visible as in the screen below.
- You may now click on Graph Explorer and start to explore the apps with consent granted by administrators or users in your organization.