Email Phishing Protection Guide - Part 18: Increase Security with Microsoft Secure Score
The Email Phishing Protection Guide is a multi-part blog series written to walk you through the setup of many security focused features you may already own in Microsoft Windows, Microsoft Office 365, and Microsoft Azure. By implementing some or all of these items, an organization will increase their security posture against phishing email attacks designed to steal user identities. This guide is written for system administrators with skills ranging from beginner to expert.
Introduction: Email Phishing Protection Guide - Enhancing Your Organization's Security Posture Part 1: Customize the Office 365 Logon Portal Part 2: Training Users with the Office 365 Attack Simulator Part 3: Deploy Multi Factor Authentication (MFA) Part 4: Deploy Windows Hello Part 5: Define Country and Region Logon Restrictions for Office 365 and Azure Services Part 6: Deploy Outlook Plug-in to Report Suspicious Emails Part 7: Deploy ATP Anti-Phishing Policies Part 8: Deploy ATP Safe Link Policies Part 9: Deploy ATP Safe Attachment Policies Part 10: Deploy and Enforce Smart Screen for Microsoft Edge, Microsoft Internet Explorer and Google Chrome Part 11: Monitor Phishing and SPAM Attacks in Office 365 Part 12: Discover Who is Attacking Your Office 365 User Identities Part 13: Update Your User Identity Password Strategy Part 14: Prevent Brute Force and Spray Attacks in Office 365 Part 15: Implement the Microsoft Azure AD Password Protection Service (for On-Premises too!) Part 16: Disable Office 365 Legacy Email Authentication Protocols Part 17: Control Application Consent Registrations in Microsoft Office 365 and Microsoft Azure Part 18: Increase Security with Microsoft Secure Score Part 19: Email Phishing Protection Security Checklist Part 20: Recommended Security and Anti-Phishing Training from Microsoft Ignite 2018
Part 18: Increase Security with Microsoft Secure Score
While this blog series has provided a large amount of configuration options to consider implementing in your organization this is definitely not a complete list. In fact, the list of recommendations and possible configuration options will always continue to grow! So how do you evaluate all of the existing and yet to be released settings so your security posture continues to be elevated? The answer is by using Microsoft Secure Score!
Microsoft Secure Score is a feature offered to every tenant in Office 365 as a window to evaluate and improve the overall cloud security posture of your organization. In a practically limitless realm of features, products, and opportunity in Microsoft Office 365 and Azure, Microsoft has designed this first of its kind scoring system to help you make adjustments in your cloud environment be more secure. The score represents a weighted value of how the security related features in your organization are configured according to Microsoft Best Practices.
Microsoft Secure Score provides valuable insights into your cloud environment so that you know what is going on. What I often recommend to customers is that it be used to drive awareness in the correct configuration options for each of the products they are subscribed to. With literally thousands of configuration options, how would any administrator know about all the potential configurations, what the best practices are and then how to configure them? Microsoft Secure Score takes care of this in an easy to use, rich graphical format that displays everything I would need to know as an administrator. I also recommend that customers use it for a self-assessment of their security posture.
There is a Secure Score API that can be used to import the available data in a SIEM or other type of dashboard. Information about the API is located at: https://aka.ms/ScureScore_APIBlog
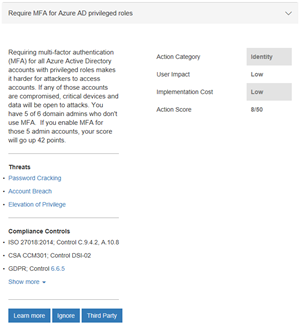
If you want to quickly raise your Microsoft Secure Score and greatly increase the security posture of your organization, the number one thing you should do is enable Multi-Factor Authentication (MFA) for your administrator/privileged accounts. If you don't take any other action from Microsoft Secure Score, do this! This is the first item to do in both the Microsoft Secure Score and Identity Secure Score.
Microsoft Secure Score
Below is information about how to access the Microsoft Secure Score area and a highlight of several of the features available in the site. This is not an exhaustive list of features available, but rather just a few items to get you started. Additional information about Microsoft Secure Score is located here.
Logon to https://securescore.microsoft.com. This is a direct link to your Microsoft Secure Score. This area can also be accessed using the Security and Compliance Center in the Microsoft Office 365 Portal.
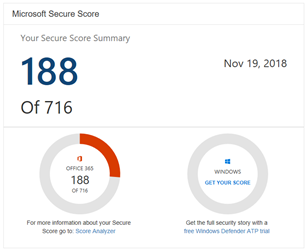
When logged in, you can see the overall security score of your organization…front and center! This is a screen capture of my demonstration tenant where my score is 188/716. While this may seem bad, it is far better than the average score across all cloud tenants that was, as of November 19, 2018, a value of 33.
As you scroll down, you will find a number of actions in the queue to consider doing.
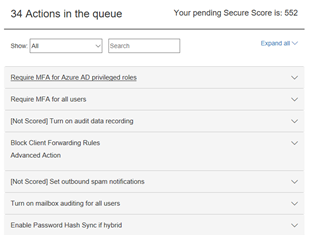
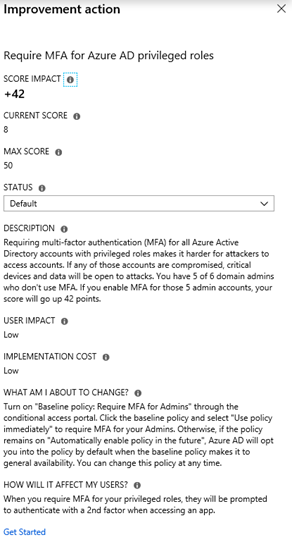
Expanding each of the actions listed will provide a wealth of information as shown below when I expanded the first item: Require MFA for Azure AD privileged roles.
Above the list of action items is a slider bar that will allow you to help define a target score. Remember there are a lot of action items you may choose, but do not feel compelled to take all actions. Evaluate each item and implement them based on what is appropriate for your organization.

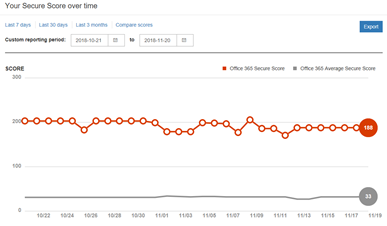
At the top of the screen are two tabs, Dashboard and Score Analyzer. Using the Score Analyzer tab you can track your progress over a period of time. This information can be invaluable to provide to a security team or auditor of your environment. Consider using the Export option in the upper right of the screen as well.
Microsoft Identity Secure Score
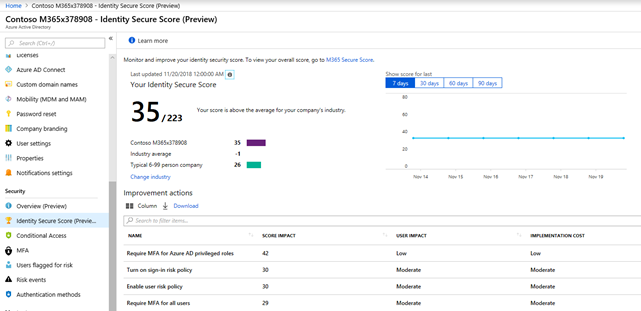
The Microsoft Secure Score area above includes information available in this next section called the Identity Secure Score. You can evaluate the Identity Score in detail using the steps below. More information on Identity Secure Score is available here.
To access your Identity Secure Score, logon to https://portal.azure.com
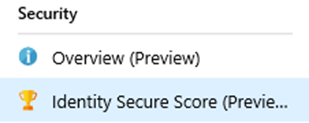
Click Azure Active Directory

Under the Security section, click Identity Secure Score (Preview(as of November 2018)).
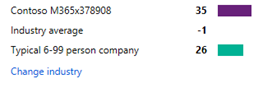
In the Identity Secure Score area, you will find your calculated score, comparison to other tenants in your industry, the trend of your score over the last 90 days, and a list of Improvement Actions to consider implementing.
- Clicking on an action in the Improvement Action list will open a new blade of very detailed information.
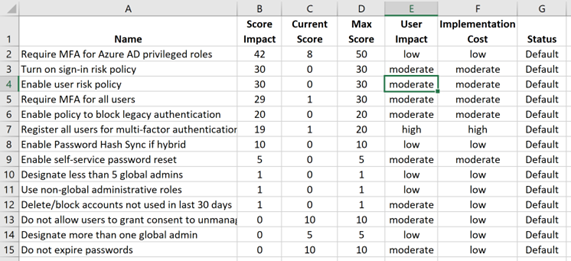
- Using the download option in the Improvement Action will generate a CSV file that can be used for additional data point tracking and sorting. Below is a sample download of the demonstration tenant information.
- To change the industry type used to evaluate your organization's Identity Secure Score:
- Click on the Change Industry option
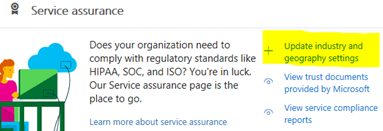
- The Security and Compliance Center will now load and log you in.
- Locate the Service Assurance section. Then click on Update Industry and Geography Settings.
- In this section choose the Region and Industry you would like to be compared against.
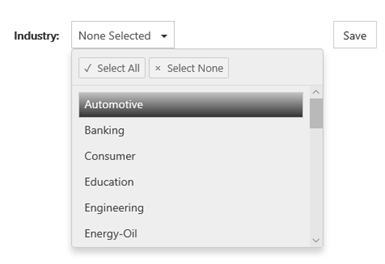
- Click Save when complete. Then refresh your Identity Secure Score area as well as the Microsoft Secure Score area.
- Click on the Change Industry option