SQL 2012 Core on Windows Server 2012 (Part 1 - OS Install and Environment Setup)
With the release of Windows Server 2012 I thought I would take the opportunity to look at running SQL 2012 Core on Windows Server 2012. This blog will be part of a series which will initially look at the configuration of installing SQL 2012 Core on Windows Server Core, and then finish with adding AlwaysOn functionality to the environment.
For this blog series the following servers are being used within the environment:
DC
Purpose: Domain Controller
OS: Windows Server 2012 Standard with GUI
RAM: 512Mb
Storage: 30Gb
IP: 10.x.x.2
SQL2012-01
Purpose: SQL Server
OS: Windows Server 2012 Standard Core
RAM: 1024Mb
Storage: 30Gb, 5Gb, 5Gb, 5Gb, 2Gb
IP: 10.x.x.4
SQL2012-MGMT
Purpose: Remote Management Server
OS: Windows Server 2012 Standard Core
RAM: 512Mb
Storage: 30Gb
IP: 10.x.x.3
IMPORTANT: It is important to highlight that there are particular requirements for installing SQL Server on Windows 2012 and those are available at https://support.microsoft.com/kb/2681562/EN-US. For SQL 2012 the RTM release is supported on Windows 2012 however you should always refer to the official MSDN documentation to verify your hardware and software requirements (for SQL 2012 see https://msdn.microsoft.com/en-us/library/ms143506.aspx). It is also important to note that this work is out of pure interest within an isolated LAB environment and does not represent any official supportability of this configuration, it is based on my experience when configuring the environment and you should verify the suitability and supportability of such configuration within your own environment.
Step 1 - Build the Remote Management Server (SQL2012-MGMT)
For the purpose of this blog I will be skimming the obvious steps but from a high level here is how I prepared the server:
- Create the VM with appropriate storage
- Install the OS, you need to select the option Server with a GUI during the install (e.g. Windows Server 2012 Standard (Server with a GUI) ).

- Configure the Computer Name, Time Zone, Region, Network, Domain, RDP, etc.... and make sure your domain user account has adequate permissions to access the server
- Make sure that the .Net feature has been enabled on the server.
- To simplify this ensure that the Windows Server 2012 media is inserted/mounted to the server's CD/DVD drive
- Using powershell run the following command to install the .Net 3.5 feature using the source from the Windows Server 2012 install media as the install package is no longer copied to the sources folder within the Windows installation.
Install-WindowsFeature -Name NET-Framework-Core -Source D:\sources\sxs
- Install the SQL features required for a client machine to allow connectivity to a remote server (e.g. SQL Server Data Tools, Client Tools Connectivity, Integration Services, Documentation Components, Management Tools - Complete)

Step 2 - Create the SQL Server with Windows Server 2012 Core
Create the VM with appropriate storage
Install the OS, you do need to select the option Server Core Installation during the install (e.g. Windows Server 2012 Standard (Server Core Installation) ).

Once the Windows install completes, log into the system and the console should be displayed with just a Command Prompt
Type sconfig to open the Server Configuration tool

From the Server Configuration tool you can manage most of the common properties of a server.

For those not familiar with the tool, it works by entering the numerical value of the property / setting you wish to change or perform. My suggested order of adjustment for a new machine is the following:
- Type "2" and enter the Computer Name of the server. When prompted Reboot the server and after re-authentication open the sconfig tool again.
- Verify that "Configure Remote Management" is Enabled, if not then type "4" to display the Configure Remote Management sub menu (see next screen), from this menu type "1" to Enable Remote Management.
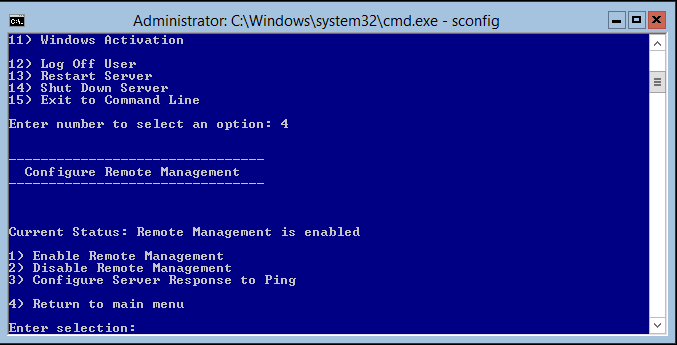
- If "Remote Desktop" is currently configured as "disabled" then type "7".
- When prompted type "e" for (E)nable.

- Ensure that the notification prompt reports Remote Desktop was enabled successfully

- The main menu will be displayed again, Type "8" to configure the Network Settings.
- The network adapters in the Server will be displayed. Type the Index# of the adapter you need to configure (in my example my Index# is 10).

- The various network configuration options will be displayed.

- Type "1" to configure the IP address of the network adapter as required (e.g. Type "S" for static, enter the IP address, subnet mask, and gateway).

- The network settings will be displayed on the screen again. Type "2" to enter the DNS server details. When prompted enter the Primary DNS and Secondary DNS servers.
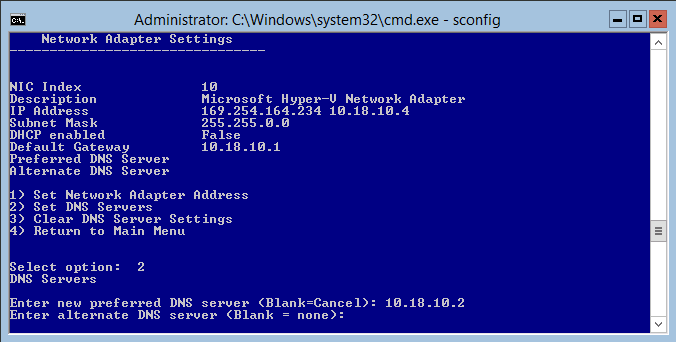
- Type "4" to return to the main menu.
- Type "9" to configure the Date and Time. The normal GUI for Date Time configuration will be displayed, configure the Time Zone and Date/Time as needed.
- Finally type "1" to set the Domain/Workgroup of the server.

- When prompted if you wish to change the Computer Name select "No" unless you did not set the computer name earlier in this process.
- Reboot the server when prompted.
The next step I like to perform is verify that the regional settings are correctly set, for a Server Core install this can be done from the Command Prompt (if you are still in the Server Configuration, sconfig, tool then use option 15 to exit to the command prompt)
- At the command prompt type control intl.Cpl
- The usual GUI configuration window will be displayed to allow configuration of the regional settings
Step 3 - Configure the Firewall between the SQL Server and Management Server
Before being able to remotely manage the Windows Server 2012 Core install we need to configure the firewall on both the SQL Server and also the Remote Management Server.
On the Windows Server 2012 Core machine (e.g. SQL2012-01), open the Command Prompt and run the following:
Netsh advfirewall firewall set rule group=“Remote Event Log Management” new enable=yes
Netsh advfirewall firewall set rule group=“Remote Volume Management” new enable=yes
Netsh advfirewall firewall set rule group=“Remote Service Management” new enable=yes
Netsh advfirewall firewall set rule group=“Windows Firewall Remote Management” new enable=yes
Netsh advfirewall firewall set rule group=“Remote Desktop” new enable=yes
Netsh advfirewall firewall set rule group=“Windows Management Instrumentation (WMI)” new enable=yesThe Firewall rule above allows you to then manage the firewall remotely, should any restrictions on these rules or any others be required for your environment.
The WMI rule is required to allow the SQL Server Configuration Manager connectivity.On the Remote Management Server running Windows Server 2012 with GUI (e.g. SQL2012-MGMT), open the Command Prompt as Administrator. Run the following commands to add the required rules for 2-way communication.
Netsh advfirewall firewall set rule group=“Remote Volume Management” new enable=yes
Netsh advfirewall firewall set rule group=“Windows Management Instrumentation (WMI)” new enable=yes**
NOTE: This will not allow access to Device Manager, as you can only allow a Read-Only view I am not going to turn that on in my lab. However if you require something like that in your environment then check out some of the other blogs which explain what Local Security Policy setting needs to be changed such as Brad Rutkowski's blog post https://blogs.technet.com/b/brad_rutkowski/archive/2007/10/22/unable-to-remotely-manage-a-server-core-machine-mmc-wmi-device-manager.aspx
Step 3 - Remote management of Windows Server 2012 Core
Now that the server is installed you still need to configure aspects like Storage and to do this it will involve remotely managing the server from the Management Server. This is where some of the new features in Windows 2012 really make this easier.
TIP: I recommended that you use a server with either Windows Server 2012 or Windows 8 OS for your Remote Management Server as the Server Manager console has been upgraded in the Windows Server 2012 release and therefore you cannot manage a Windows Server 2012 Core install from Windows 7 using Server Manager. However you can still use individual snap-ins via the mmc console. This is why within my environment I am using a server running the Windows Server 2012 OS as the Remote Management Server.
- Using RDP, log onto the RMS (Remote Management Server), in my case it is SQL2012-MGMT.
- Open Server Manager and right-click All Servers from the left-hand menu. Select Add Server from the context menu.

- Using the Active Directory search locate the server you wish to manage (in my case SQL2012-01) and add it to the list of selected servers via the center arrow.

- Click OK
- The server will now be listed in the list of servers. Initially the status of "In Progress" will be displayed as the Server Manager attempts to connect to the server. If the status reports "Access Denied" then right click the server and select Manage As and supply the required credentials for an account with administrative access to the server.
- Right-click the server and select Computer Management to launch the remote management.

- From the Computer Management console you can now adjust certain properties such as Local Users / Groups, Disk Management, or Services as well as view administrative properties such as Event Log.
- For the purpose of this LAB environment I added myself to Local Administrators group. This also allows me to remotely manage the server from Server Manager without specifying a separate account as in the step above.
Step 4 - (Option A) - Disk Configuration (via Command Line on Server Core)
Now that the server is installed you still need to configure aspects like Storage, there are two methods which you can use to achieve this. My preference is through the DiskPart Command-Line tool via the console of the Server Core install, however you can also use the GUI via the Remote Management Server (those instructions are below) and this is where some of the new features in Windows 2012 really make remote management easier.
Connect to the console of the server core SQL Server (SQL2012-01).
If automatically logged into the sconfig tool, select the appropriate option to exit to the Command Prompt (e.g. option 15).
From the Command Prompt type diskpart and <ENTER> to launch the command-line tool
Type the following command and verify that the appropriate disks are displayed:
list diskIn my example I expect to see 5 disks, remember the numerical identifier for these disks will start at zero.

The following steps will need to be performed for each disk as required.
Select the required disk you wish to create the partition on with the following where # is the numerical identifier from the list created by the above
Select Disk #If the disk was listed as Offline in the results of the List Disk command above, then run the following to bring it online
Online DiskRun the following command to check the attributes of the disk.
Detail DiskIf the disk's attributes reports the Current Read-only State as "Yes" then run the following to set it to Read-Write
attributes disk clear readonlyCheck for any existing partitions on the disk with the following command
list partition

In my case I am working with Basic disks as these are on a VM and no need for dynamic functionality however if you require dynamic disks then use the Convert command and the Create Volume command in replacement for the following steps.
Make sure the disk is cleaned before creating a partition so run
CleanUse the following command to create a partition on the disk using all the available space:
create partition primaryMark the current partition as active so that we can manage it by running the command:
activeNow we need to format the partition with the ntfs file system, where the label is appropriate for the disk you are creating.
format fs=ntfs label="#####" quickNext assign a drive letter to the partition as appropriate for the disk you have created
assign letter=#The following is the output of my screen after executing these commands:

Repeat the steps until all the disks are created as needed. In my example the following are the disks I created:
E:> SQLData
F:> SQLLog
G:> SQLTempDB
H:> SQLBackupFinally execute list volume and verify that all partitions are now created as required
Step 4 - (Option B) - Disk Configuration (via GUI on Remote Management Server)
Now that the server is installed you still need to configure aspects like Storage and to do this it will involve remotely managing the server from the Management Server. This is where some of the new features in Windows 2012 really make this easier.
- Follow the steps above to connect to the server (SQL2012-01) from the Remote Management Server (SQL2012-MGMT) using Computer Manager.
- Select Disk Management. As this is a SQL Server there are a number of disks / partitions to configure, and the following are the steps which I have taken
Right click any disk that is reported as Offline and select Online to bring the disk online.

Close and reopen Computer Manager to force a refresh of meta data.
NOTE: I found that the meta data does not refresh as you would expect when making changes and the only way to view all the changes was to close and reopen the Computer Management console. For example after bringing the Disk Online it would not be represented as Online and therefore you cannot continue until closing and reopening the Computer Management console.
When prompted use the Initialise Disk wizard, I used the MBR partition style
Again close and reopen Computer Manager if needed to refresh the data
Right click on the first unallocated disk and select New Simple Volume.

Follow the wizard to create the partition with appropriate drive letter and label using the NTFS file system and quick format method.
Repeat for all unallocated disks. For my environment I created the following partitions:
E:> SQLData
F:> SQLLog
G:> SQLTempDB
H:> SQLBackup
What's next?
At this point the Remote Management Server (SQL2012-MGMT) and SQL Server (SQL2012-01) are now configured enough where the SQL install can be commenced. This will be covered in Part 2 of this series.