第 6 部分,ASP.NET Core 中的 Razor Pages 和 EF Core - 读取相关数据
作者:Tom Dykstra、Jon P Smith 和 Rick Anderson
Contoso University Web 应用演示了如何使用 EF Core 和 Visual Studio 创建 Razor Pages Web 应用。 若要了解系列教程,请参阅第一个教程。
如果遇到无法解决的问题,请下载已完成的应用,然后对比该代码与按教程所创建的代码。
本教程介绍如何读取和显示相关数据。 相关数据为 EF Core 加载到导航属性中的数据。
下图显示了本教程中已完成的页面:
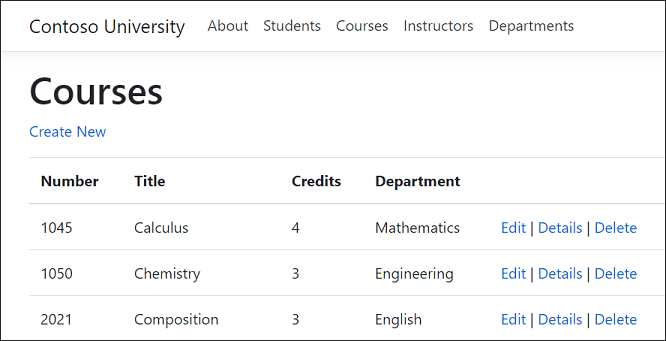

预先加载、显式加载和延迟加载
EF Core 可采用多种方式将相关数据加载到实体的导航属性中:
预先加载。 预先加载是指对查询某类型的实体时一并加载相关实体。 读取实体时,会检索其相关数据。 此时通常会出现单一联接查询,检索所有必需数据。 EF Core 将针对预先加载的某些类型发出多个查询。 发布多个查询可能比发布大型的单个查询更为有效。 预先加载通过 Include 和 ThenInclude 方法进行指定。
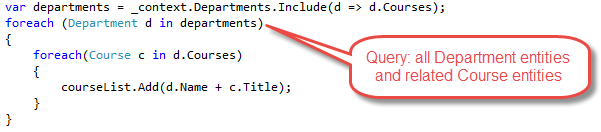
当包含集合导航时,预先加载会发送多个查询:
- 一个查询用于主查询
- 一个查询用于加载树中每个集合“边缘”。
使用
Load的单独查询:可在单独的查询中检索数据,EF Core 会“修复”导航属性。 “修复”是指 EF Core 自动填充导航属性。 使用Load单独查询比预先加载更像是显式加载。
注意:EF Core 会将导航属性自动“修复”为之前加载到上下文实例中的任何其他实体。 即使导航属性的数据非显式包含在内,但如果先前加载了部分或所有相关实体,则仍可能填充该属性。
显式加载。 首次读取实体时,不检索相关数据。 必须编写代码才能在需要时检索相关数据。 使用单独查询进行显式加载时,会向数据库发送多个查询。 该代码通过显式加载指定要加载的导航属性。 使用
Load方法进行显式加载。 例如: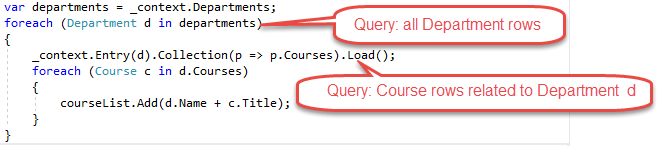
延迟加载。 首次读取实体时,不检索相关数据。 首次访问导航属性时,会自动检索该导航属性所需的数据。 首次访问导航属性时,都会向数据库发送一个查询。 延迟加载会损害性能,例如当开发人员使用 N+1 查询时。 N+1 查询加载父级并枚举子级。
创建“课程”页
Course 实体包括一个带相关 Department 实体的导航属性。
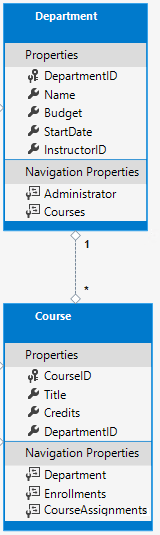
若要显示课程的已分配院系的名称,请执行以下操作:
- 将相关的
Department实体加载到Course.Department导航属性。 - 获取
Department实体的Name属性中的名称。
搭建“课程”页的基架
遵循搭建“学生”页的基架中的说明,但以下情况除外:
- 创建“Pages/Courses”文件夹。
- 将
Course用于模型类。 - 使用现有的上下文类,而不是新建上下文类。
打开
Pages/Courses/Index.cshtml.cs并检查OnGetAsync方法。 基架引擎为Department导航属性指定了预先加载。Include方法指定预先加载。运行应用并选择“课程”链接。 院系列显示
DepartmentID(该项无用)。
显示院系名称
使用以下代码更新 Pages/Courses/Index.cshtml.cs:
using ContosoUniversity.Models;
using Microsoft.AspNetCore.Mvc.RazorPages;
using Microsoft.EntityFrameworkCore;
using System.Collections.Generic;
using System.Threading.Tasks;

namespace ContosoUniversity.Pages.Courses
{
    public class IndexModel : PageModel
    {
        private readonly ContosoUniversity.Data.SchoolContext _context;

        public IndexModel(ContosoUniversity.Data.SchoolContext context)
        {
            _context = context;
        }

        public IList<Course> Courses { get; set; }

        public async Task OnGetAsync()
        {
            Courses = await _context.Courses
                .Include(c => c.Department)
                .AsNoTracking()
                .ToListAsync();
        }
    }
}
上述代码将 Course 属性更改为 Courses,然后添加 AsNoTracking。
在只读方案中使用结果时,非跟踪查询十分有用。 通常可以更快速地执行非跟踪查询,因为无需设置更改跟踪信息。 如果不需要更新从数据库检索到的实体,则非跟踪查询的性能可能优于跟踪查询。
在某些情况下,跟踪查询比非跟踪查询更高效。 有关详细信息,请参阅跟踪查询与非跟踪查询。
在前面的代码中,由于实体未在当前上下文中更新,因此调用 AsNoTracking。
使用以下代码更新 Pages/Courses/Index.cshtml。
@page
@model ContosoUniversity.Pages.Courses.IndexModel

@{
    ViewData["Title"] = "Courses";
}

<h1>Courses</h1>

<p>
    <a asp-page="Create">Create New</a>
</p>
<table class="table">
    <thead>
        <tr>
            <th>
                @Html.DisplayNameFor(model => model.Courses[0].CourseID)
            </th>
            <th>
                @Html.DisplayNameFor(model => model.Courses[0].Title)
            </th>
            <th>
                @Html.DisplayNameFor(model => model.Courses[0].Credits)
            </th>
            <th>
                @Html.DisplayNameFor(model => model.Courses[0].Department)
            </th>
            <th></th>
        </tr>
    </thead>
    <tbody>
@foreach (var item in Model.Courses)
{
        <tr>
            <td>
                @Html.DisplayFor(modelItem => item.CourseID)
            </td>
            <td>
                @Html.DisplayFor(modelItem => item.Title)
            </td>
            <td>
                @Html.DisplayFor(modelItem => item.Credits)
            </td>
            <td>
                @Html.DisplayFor(modelItem => item.Department.Name)
            </td>
            <td>
                <a asp-page="./Edit" asp-route-id="@item.CourseID">Edit</a> |
                <a asp-page="./Details" asp-route-id="@item.CourseID">Details</a> |
                <a asp-page="./Delete" asp-route-id="@item.CourseID">Delete</a>
            </td>
        </tr>
}
    </tbody>
</table>
对基架代码进行了以下更改:
将
Course属性名称更改为了Courses。添加了显示
CourseID属性值的“数字”列。 默认情况下,不针对主键进行架构,因为对最终用户而言,它们通常没有意义。 但在此情况下主键是有意义的。更改“院系”列,显示院系名称。 该代码显示已加载到
Department导航属性中的Department实体的Name属性:@Html.DisplayFor(modelItem => item.Department.Name)
运行应用并选择“课程”选项卡,查看包含系名称的列表。
使用 Select 加载相关数据
OnGetAsync 方法使用 Include 方法加载相关数据。 Select 方法是只加载所需相关数据的替代方法。 对于单个项(如 Department.Name),它使用 SQL INNER JOIN。 对于集合,它使用另一个数据库访问,但集合上的 Include 运算符也是如此。
以下代码使用 Select 方法加载相关数据:
public IList<CourseViewModel> CourseVM { get; set; }

public async Task OnGetAsync()
{
    CourseVM = await _context.Courses
    .Select(p => new CourseViewModel
    {
        CourseID = p.CourseID,
        Title = p.Title,
        Credits = p.Credits,
        DepartmentName = p.Department.Name
    }).ToListAsync();
}
上述代码不会返回任何实体类型,因此不进行任何跟踪。 有关 EF 跟踪的详细信息,请参阅 跟踪查询与非跟踪查询。
CourseViewModel:
public class CourseViewModel
{
    public int CourseID { get; set; }
    public string Title { get; set; }
    public int Credits { get; set; }
    public string DepartmentName { get; set; }
}
有关完整的 Razor Pages,请参阅 IndexSelectModel。
创建“讲师”页
本节搭建“讲师”页的基架,并向讲师“索引”页添加相关“课程”和“注册”。
该页面通过以下方式读取和显示相关数据:
- 讲师列表显示
OfficeAssignment实体(上图中的办公室)的相关数据。Instructor和OfficeAssignment实体之间存在一对零或一的关系。 预先加载适用于OfficeAssignment实体。 需要显示相关数据时,预先加载通常更高效。 在此情况下,会显示讲师的办公室分配。 - 用户选择一名讲师时,显示相关
Course实体。Instructor和Course实体之间存在多对多关系。 对Course实体及其相关的Department实体使用预先加载。 这种情况下,单独查询可能更有效,因为仅需显示所选讲师的课程。 此示例演示如何在位于导航实体内的实体中预先加载这些导航实体。 - 用户选择一门课程时,会显示
Enrollments实体的相关数据。 上图中显示了学生姓名和成绩。Course和Enrollment实体之间存在一对多的关系。
创建视图模型
“讲师”页显示来自三个不同表格的数据。 需要一个视图模型,该模型中包含表示三个表格的三个属性。
使用以下代码创建 Models/SchoolViewModels/InstructorIndexData.cs:
using System;
using System.Collections.Generic;
using System.Linq;
using System.Threading.Tasks;

namespace ContosoUniversity.Models.SchoolViewModels
{
    public class InstructorIndexData
    {
        public IEnumerable<Instructor> Instructors { get; set; }
        public IEnumerable<Course> Courses { get; set; }
        public IEnumerable<Enrollment> Enrollments { get; set; }
    }
}
搭建“讲师”页的基架
遵循搭建“学生”页的基架中的说明,但以下情况除外:
- 创建“Pages/Instructors”文件夹。
- 将
Instructor用于模型类。 - 使用现有的上下文类,而不是新建上下文类。
运行应用并导航到“讲师”页。
使用以下代码更新 Pages/Instructors/Index.cshtml.cs:
using ContosoUniversity.Models;
using ContosoUniversity.Models.SchoolViewModels;  // Add VM
using Microsoft.AspNetCore.Mvc.RazorPages;
using Microsoft.EntityFrameworkCore;
using System.Collections.Generic;
using System.Linq;
using System.Threading.Tasks;

namespace ContosoUniversity.Pages.Instructors
{
    public class IndexModel : PageModel
    {
        private readonly ContosoUniversity.Data.SchoolContext _context;

        public IndexModel(ContosoUniversity.Data.SchoolContext context)
        {
            _context = context;
        }

        public InstructorIndexData InstructorData { get; set; }
        public int InstructorID { get; set; }
        public int CourseID { get; set; }

        public async Task OnGetAsync(int? id, int? courseID)
        {
            InstructorData = new InstructorIndexData();
            InstructorData.Instructors = await _context.Instructors
                .Include(i => i.OfficeAssignment)
                .Include(i => i.Courses)
                    .ThenInclude(c => c.Department)
                .OrderBy(i => i.LastName)
                .ToListAsync();

            if (id != null)
            {
                InstructorID = id.Value;
                Instructor instructor = InstructorData.Instructors
                    .Where(i => i.ID == id.Value).Single();
                InstructorData.Courses = instructor.Courses;
            }

            if (courseID != null)
            {
                CourseID = courseID.Value;
                IEnumerable<Enrollment> Enrollments = await _context.Enrollments
                    .Where(x => x.CourseID == CourseID)
                    .Include(i=>i.Student)
                    .ToListAsync();
                InstructorData.Enrollments = Enrollments;
            }
        }
    }
}
OnGetAsync 方法接受所选讲师 ID 的可选路由数据。
检查 Pages/Instructors/Index.cshtml.cs 文件中的查询:
InstructorData = new InstructorIndexData();
InstructorData.Instructors = await _context.Instructors
    .Include(i => i.OfficeAssignment)
    .Include(i => i.Courses)
        .ThenInclude(c => c.Department)
    .OrderBy(i => i.LastName)
    .ToListAsync();
代码指定以下导航属性的预先加载:
Instructor.OfficeAssignmentInstructor.CoursesCourse.Department
选择讲师时(即 id != null),将执行以下代码。
if (id != null)
{
    InstructorID = id.Value;
    Instructor instructor = InstructorData.Instructors
        .Where(i => i.ID == id.Value).Single();
    InstructorData.Courses = instructor.Courses;
}
从视图模型中的讲师列表检索所选讲师。 向视图模型的 Courses 属性加载来自所选讲师 Courses 导航属性的 Course 实体。
Where 方法返回一个集合。 在这种情况下,筛选器将选择单个实体,因此会调用 Single 方法将集合转换为单个 Instructor 实体。 Instructor 实体提供对 Course 导航属性的访问。
当集合仅包含一个项时,集合使用 Single 方法。 如果集合为空或包含多个项,Single 方法会引发异常。 还可使用 SingleOrDefault,该方式在集合为空时返回默认值。 对于此查询,默认返回 null。
选中课程时,视图模型的 Enrollments 属性将填充以下代码:
if (courseID != null)
{
    CourseID = courseID.Value;
    IEnumerable<Enrollment> Enrollments = await _context.Enrollments
        .Where(x => x.CourseID == CourseID)
        .Include(i=>i.Student)
        .ToListAsync();
    InstructorData.Enrollments = Enrollments;
}
更新“讲师索引”页
使用以下代码更新 Pages/Instructors/Index.cshtml。
@page "{id:int?}"
@model ContosoUniversity.Pages.Instructors.IndexModel

@{
    ViewData["Title"] = "Instructors";
}

<h2>Instructors</h2>

<p>
    <a asp-page="Create">Create New</a>
</p>
<table class="table">
    <thead>
        <tr>
            <th>Last Name</th>
            <th>First Name</th>
            <th>Hire Date</th>
            <th>Office</th>
            <th>Courses</th>
            <th></th>
        </tr>
    </thead>
    <tbody>
        @foreach (var item in Model.InstructorData.Instructors)
        {
            string selectedRow = "";
            if (item.ID == Model.InstructorID)
            {
                selectedRow = "table-success";
            }
            <tr class="@selectedRow">
                <td>
                    @Html.DisplayFor(modelItem => item.LastName)
                </td>
                <td>
                    @Html.DisplayFor(modelItem => item.FirstMidName)
                </td>
                <td>
                    @Html.DisplayFor(modelItem => item.HireDate)
                </td>
                <td>
                    @if (item.OfficeAssignment != null)
                    {
                        @item.OfficeAssignment.Location
                    }
                </td>
                <td>
                    @{
                        foreach (var course in item.Courses)
                        {
                            @course.CourseID @:  @course.Title <br />
                        }
                    }
                </td>
                <td>
                    <a asp-page="./Index" asp-route-id="@item.ID">Select</a> |
                    <a asp-page="./Edit" asp-route-id="@item.ID">Edit</a> |
                    <a asp-page="./Details" asp-route-id="@item.ID">Details</a> |
                    <a asp-page="./Delete" asp-route-id="@item.ID">Delete</a>
                </td>
            </tr>
        }
    </tbody>
</table>

@if (Model.InstructorData.Courses != null)
{
    <h3>Courses Taught by Selected Instructor</h3>
    <table class="table">
        <tr>
            <th></th>
            <th>Number</th>
            <th>Title</th>
            <th>Department</th>
        </tr>

        @foreach (var item in Model.InstructorData.Courses)
        {
            string selectedRow = "";
            if (item.CourseID == Model.CourseID)
            {
                selectedRow = "table-success";
            }
            <tr class="@selectedRow">
                <td>
                    <a asp-page="./Index" asp-route-courseID="@item.CourseID">Select</a>
                </td>
                <td>
                    @item.CourseID
                </td>
                <td>
                    @item.Title
                </td>
                <td>
                    @item.Department.Name
                </td>
            </tr>
        }

    </table>
}

@if (Model.InstructorData.Enrollments != null)
{
    <h3>
        Students Enrolled in Selected Course
    </h3>
    <table class="table">
        <tr>
            <th>Name</th>
            <th>Grade</th>
        </tr>
        @foreach (var item in Model.InstructorData.Enrollments)
        {
            <tr>
                <td>
                    @item.Student.FullName
                </td>
                <td>
                    @Html.DisplayFor(modelItem => item.Grade)
                </td>
            </tr>
        }
    </table>
}
上面的代码执行以下更改:
将
page指令更新为@page "{id:int?}"。"{id:int?}"是一个路由模板。 路由模板将 URL 中的整数查询字符串更改为路由数据。 例如,单击仅具有@page指令的讲师的“选择”链接将生成如下 URL:https://localhost:5001/Instructors?id=2如果页面指令为
@page "{id:int?}",则 URL 为:https://localhost:5001/Instructors/2添加仅在
item.OfficeAssignment不为 null 时才显示item.OfficeAssignment.Location的“办公室”列。 由于这是一对零或一的关系,因此可能没有相关的 OfficeAssignment 实体。@if (item.OfficeAssignment != null) { @item.OfficeAssignment.Location }添加显示每位讲师所授课程的“课程”列。 有关此 razor 语法的详细信息,请参阅显式行转换。
添加向所选讲师和课程的
tr元素中动态添加class="table-success"的代码。 此时会使用 Bootstrap 类为所选行设置背景色。string selectedRow = ""; if (item.CourseID == Model.CourseID) { selectedRow = "table-success"; } <tr class="@selectedRow">添加标记为“选择”的新的超链接。 该链接将所选讲师的 ID 发送给
Index方法并设置背景色。<a asp-action="Index" asp-route-id="@item.ID">Select</a> |添加所选讲师的课程表。
添加所选课程的学生注册表。
运行应用并选择“讲师”选项卡。该页显示来自相关 OfficeAssignment 实体的 Location(办公室)。 如果 OfficeAssignment 为 NULL,则显示空白表格单元格。
单击“选择”链接,选择讲师。 显示行样式更改和分配给该讲师的课程。
选择一门课程,查看已注册的学生及其成绩列表。
后续步骤
下一个教程将介绍如何更新相关数据。
本教程介绍如何读取和显示相关数据。 相关数据为 EF Core 加载到导航属性中的数据。
下图显示了本教程中已完成的页面:
预先加载、显式加载和延迟加载
EF Core 可采用多种方式将相关数据加载到实体的导航属性中:
预先加载。 预先加载是指对查询某类型的实体时一并加载相关实体。 读取实体时,会检索其相关数据。 此时通常会出现单一联接查询,检索所有必需数据。 EF Core 将针对预先加载的某些类型发出多个查询。 发布多个查询可能比发布大型的单个查询更为有效。 预先加载通过
Include和ThenInclude方法进行指定。当包含集合导航时,预先加载会发送多个查询:
- 一个查询用于主查询
- 一个查询用于加载树中每个集合“边缘”。
使用
Load的单独查询:可在单独的查询中检索数据,EF Core 会“修复”导航属性。 “修复”是指 EF Core 自动填充导航属性。 使用Load单独查询比预先加载更像是显式加载。注意:EF Core 会将导航属性自动“修复”为之前加载到上下文实例中的任何其他实体。 即使导航属性的数据非显式包含在内,但如果先前加载了部分或所有相关实体,则仍可能填充该属性。
显式加载。 首次读取实体时,不检索相关数据。 必须编写代码才能在需要时检索相关数据。 使用单独查询进行显式加载时,会向数据库发送多个查询。 该代码通过显式加载指定要加载的导航属性。 使用
Load方法进行显式加载。 例如:延迟加载。 首次读取实体时,不检索相关数据。 首次访问导航属性时,会自动检索该导航属性所需的数据。 首次访问导航属性时,都会向数据库发送一个查询。 延迟加载可能会影响性能,例如,当开发人员使用 N+1 模式、加载父级和枚举子级时。
创建“课程”页
Course 实体包括一个带相关 Department 实体的导航属性。
若要显示课程的已分配院系的名称,请执行以下操作:
- 将相关的
Department实体加载到Course.Department导航属性。 - 获取
Department实体的Name属性中的名称。
搭建“课程”页的基架
遵循搭建“学生”页的基架中的说明,但以下情况除外:
- 创建“Pages/Courses”文件夹。
- 将
Course用于模型类。 - 使用现有的上下文类,而不是新建上下文类。
打开
Pages/Courses/Index.cshtml.cs并检查OnGetAsync方法。 基架引擎为Department导航属性指定了预先加载。Include方法指定预先加载。运行应用并选择“课程”链接。 院系列显示
DepartmentID(该项无用)。
显示院系名称
使用以下代码更新 Pages/Courses/Index.cshtml.cs:
using ContosoUniversity.Models;
using Microsoft.AspNetCore.Mvc.RazorPages;
using Microsoft.EntityFrameworkCore;
using System.Collections.Generic;
using System.Threading.Tasks;
namespace ContosoUniversity.Pages.Courses
{
public class IndexModel : PageModel
{
private readonly ContosoUniversity.Data.SchoolContext _context;
public IndexModel(ContosoUniversity.Data.SchoolContext context)
{
_context = context;
}
public IList<Course> Courses { get; set; }
public async Task OnGetAsync()
{
Courses = await _context.Courses
.Include(c => c.Department)
.AsNoTracking()
.ToListAsync();
}
}
}
上述代码将 Course 属性更改为 Courses,然后添加 AsNoTracking。 由于未跟踪返回的实体,因此 AsNoTracking 提升了性能。 无需跟踪实体,因为未在当前的上下文中更新这些实体。
使用以下代码更新 Pages/Courses/Index.cshtml。
@page
@model ContosoUniversity.Pages.Courses.IndexModel
@{
ViewData["Title"] = "Courses";
}
<h1>Courses</h1>
<p>
<a asp-page="Create">Create New</a>
</p>
<table class="table">
<thead>
<tr>
<th>
@Html.DisplayNameFor(model => model.Courses[0].CourseID)
</th>
<th>
@Html.DisplayNameFor(model => model.Courses[0].Title)
</th>
<th>
@Html.DisplayNameFor(model => model.Courses[0].Credits)
</th>
<th>
@Html.DisplayNameFor(model => model.Courses[0].Department)
</th>
<th></th>
</tr>
</thead>
<tbody>
@foreach (var item in Model.Courses)
{
<tr>
<td>
@Html.DisplayFor(modelItem => item.CourseID)
</td>
<td>
@Html.DisplayFor(modelItem => item.Title)
</td>
<td>
@Html.DisplayFor(modelItem => item.Credits)
</td>
<td>
@Html.DisplayFor(modelItem => item.Department.Name)
</td>
<td>
<a asp-page="./Edit" asp-route-id="@item.CourseID">Edit</a> |
<a asp-page="./Details" asp-route-id="@item.CourseID">Details</a> |
<a asp-page="./Delete" asp-route-id="@item.CourseID">Delete</a>
</td>
</tr>
}
</tbody>
</table>
对基架代码进行了以下更改:
将
Course属性名称更改为了Courses。添加了显示
CourseID属性值的“数字”列。 默认情况下,不针对主键进行架构,因为对最终用户而言,它们通常没有意义。 但在此情况下主键是有意义的。更改“院系”列,显示院系名称。 该代码显示已加载到
Department导航属性中的Department实体的Name属性:@Html.DisplayFor(modelItem => item.Department.Name)
运行应用并选择“课程”选项卡,查看包含系名称的列表。
使用 Select 加载相关数据
OnGetAsync 方法使用 Include 方法加载相关数据。 Select 方法是只加载所需相关数据的替代方法。 对于单个项(如 Department.Name),它使用 SQL INNER JOIN。 对于集合,它使用另一个数据库访问,但集合上的 Include 运算符也是如此。
以下代码使用 Select 方法加载相关数据:
public IList<CourseViewModel> CourseVM { get; set; }
public async Task OnGetAsync()
{
CourseVM = await _context.Courses
.Select(p => new CourseViewModel
{
CourseID = p.CourseID,
Title = p.Title,
Credits = p.Credits,
DepartmentName = p.Department.Name
}).ToListAsync();
}
上述代码不会返回任何实体类型,因此不进行任何跟踪。 有关 EF 跟踪的详细信息,请参阅 跟踪查询与非跟踪查询。
CourseViewModel:
public class CourseViewModel
{
public int CourseID { get; set; }
public string Title { get; set; }
public int Credits { get; set; }
public string DepartmentName { get; set; }
}
有关完整示例的信息,请参阅 IndexSelect.cshtml 和 IndexSelect.cshtml.cs。
创建“讲师”页
本节搭建“讲师”页的基架,并向讲师“索引”页添加相关“课程”和“注册”。
该页面通过以下方式读取和显示相关数据:
- 讲师列表显示
OfficeAssignment实体(上图中的办公室)的相关数据。Instructor和OfficeAssignment实体之间存在一对零或一的关系。 预先加载适用于OfficeAssignment实体。 需要显示相关数据时,预先加载通常更高效。 在此情况下,会显示讲师的办公室分配。 - 用户选择一名讲师时,显示相关
Course实体。Instructor和Course实体之间存在多对多关系。 对Course实体及其相关的Department实体使用预先加载。 这种情况下,单独查询可能更有效,因为仅需显示所选讲师的课程。 此示例演示如何在位于导航实体内的实体中预先加载这些导航实体。 - 用户选择一门课程时,会显示
Enrollments实体的相关数据。 上图中显示了学生姓名和成绩。Course和Enrollment实体之间存在一对多的关系。
创建视图模型
“讲师”页显示来自三个不同表格的数据。 需要一个视图模型,该模型中包含表示三个表格的三个属性。
使用以下代码创建 SchoolViewModels/InstructorIndexData.cs:
using System;
using System.Collections.Generic;
using System.Linq;
using System.Threading.Tasks;
namespace ContosoUniversity.Models.SchoolViewModels
{
public class InstructorIndexData
{
public IEnumerable<Instructor> Instructors { get; set; }
public IEnumerable<Course> Courses { get; set; }
public IEnumerable<Enrollment> Enrollments { get; set; }
}
}
搭建“讲师”页的基架
遵循搭建“学生”页的基架中的说明,但以下情况除外:
- 创建“Pages/Instructors”文件夹。
- 将
Instructor用于模型类。 - 使用现有的上下文类,而不是新建上下文类。
若要在更新之前查看已搭建基架的页面的外观,则运行应用并导航到“讲师”页。
使用以下代码更新 Pages/Instructors/Index.cshtml.cs:
using ContosoUniversity.Models;
using ContosoUniversity.Models.SchoolViewModels; // Add VM
using Microsoft.AspNetCore.Mvc.RazorPages;
using Microsoft.EntityFrameworkCore;
using System.Linq;
using System.Threading.Tasks;
namespace ContosoUniversity.Pages.Instructors
{
public class IndexModel : PageModel
{
private readonly ContosoUniversity.Data.SchoolContext _context;
public IndexModel(ContosoUniversity.Data.SchoolContext context)
{
_context = context;
}
public InstructorIndexData InstructorData { get; set; }
public int InstructorID { get; set; }
public int CourseID { get; set; }
public async Task OnGetAsync(int? id, int? courseID)
{
InstructorData = new InstructorIndexData();
InstructorData.Instructors = await _context.Instructors
.Include(i => i.OfficeAssignment)
.Include(i => i.CourseAssignments)
.ThenInclude(i => i.Course)
.ThenInclude(i => i.Department)
.Include(i => i.CourseAssignments)
.ThenInclude(i => i.Course)
.ThenInclude(i => i.Enrollments)
.ThenInclude(i => i.Student)
.AsNoTracking()
.OrderBy(i => i.LastName)
.ToListAsync();
if (id != null)
{
InstructorID = id.Value;
Instructor instructor = InstructorData.Instructors
.Where(i => i.ID == id.Value).Single();
InstructorData.Courses = instructor.CourseAssignments.Select(s => s.Course);
}
if (courseID != null)
{
CourseID = courseID.Value;
var selectedCourse = InstructorData.Courses
.Where(x => x.CourseID == courseID).Single();
InstructorData.Enrollments = selectedCourse.Enrollments;
}
}
}
}
OnGetAsync 方法接受所选讲师 ID 的可选路由数据。
检查 Pages/Instructors/Index.cshtml.cs 文件中的查询:
InstructorData.Instructors = await _context.Instructors
.Include(i => i.OfficeAssignment)
.Include(i => i.CourseAssignments)
.ThenInclude(i => i.Course)
.ThenInclude(i => i.Department)
.Include(i => i.CourseAssignments)
.ThenInclude(i => i.Course)
.ThenInclude(i => i.Enrollments)
.ThenInclude(i => i.Student)
.AsNoTracking()
.OrderBy(i => i.LastName)
.ToListAsync();
代码指定以下导航属性的预先加载:
Instructor.OfficeAssignmentInstructor.CourseAssignmentsCourseAssignments.CourseCourse.DepartmentCourse.EnrollmentsEnrollment.Student
注意 CourseAssignments 和 Course 对 Include 和 ThenInclude 方法的重复使用。 若要指定 Course 实体的两个导航属性的预先加载,则这种重复使用是必要的。
选择讲师时 (id != null),将执行以下代码。
if (id != null)
{
InstructorID = id.Value;
Instructor instructor = InstructorData.Instructors
.Where(i => i.ID == id.Value).Single();
InstructorData.Courses = instructor.CourseAssignments.Select(s => s.Course);
}
从视图模型中的讲师列表检索所选讲师。 向视图模型的 Courses 属性加载来自讲师 CourseAssignments 导航属性的 Course 实体。
Where 方法返回一个集合。 但在这种情况下,筛选器将选择单个实体,因此会调用 Single 方法将集合转换为单个 Instructor 实体。 Instructor 实体提供对 CourseAssignments 属性的访问。 CourseAssignments 提供对相关 Course 实体的访问。
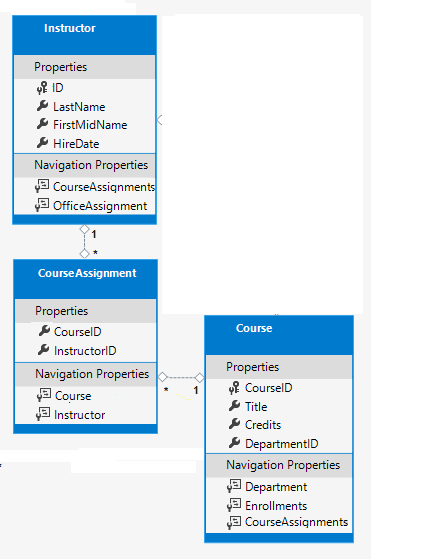
当集合仅包含一个项时,集合使用 Single 方法。 如果集合为空或包含多个项,Single 方法会引发异常。 还可使用 SingleOrDefault,该方式在集合为空时返回默认值(本例中为 null)。
选中课程时,视图模型的 Enrollments 属性将填充以下代码:
if (courseID != null)
{
CourseID = courseID.Value;
var selectedCourse = InstructorData.Courses
.Where(x => x.CourseID == courseID).Single();
InstructorData.Enrollments = selectedCourse.Enrollments;
}
更新“讲师索引”页
使用以下代码更新 Pages/Instructors/Index.cshtml。
@page "{id:int?}"
@model ContosoUniversity.Pages.Instructors.IndexModel
@{
ViewData["Title"] = "Instructors";
}
<h2>Instructors</h2>
<p>
<a asp-page="Create">Create New</a>
</p>
<table class="table">
<thead>
<tr>
<th>Last Name</th>
<th>First Name</th>
<th>Hire Date</th>
<th>Office</th>
<th>Courses</th>
<th></th>
</tr>
</thead>
<tbody>
@foreach (var item in Model.InstructorData.Instructors)
{
string selectedRow = "";
if (item.ID == Model.InstructorID)
{
selectedRow = "table-success";
}
<tr class="@selectedRow">
<td>
@Html.DisplayFor(modelItem => item.LastName)
</td>
<td>
@Html.DisplayFor(modelItem => item.FirstMidName)
</td>
<td>
@Html.DisplayFor(modelItem => item.HireDate)
</td>
<td>
@if (item.OfficeAssignment != null)
{
    @item.OfficeAssignment.Location
}
</td>
<td>
@{
foreach (var course in item.CourseAssignments)
{
@course.Course.CourseID @: @course.Course.Title <br />
}
}
</td>
<td>
<a asp-page="./Index" asp-route-id="@item.ID">Select</a> |
<a asp-page="./Edit" asp-route-id="@item.ID">Edit</a> |
<a asp-page="./Details" asp-route-id="@item.ID">Details</a> |
<a asp-page="./Delete" asp-route-id="@item.ID">Delete</a>
</td>
</tr>
}
</tbody>
</table>
@if (Model.InstructorData.Courses != null)
{
<h3>Courses Taught by Selected Instructor</h3>
<table class="table">
<tr>
<th></th>
<th>Number</th>
<th>Title</th>
<th>Department</th>
</tr>
@foreach (var item in Model.InstructorData.Courses)
{
string selectedRow = "";
if (item.CourseID == Model.CourseID)
{
    selectedRow = "table-success";
}
<tr class="@selectedRow">
<td>
<a asp-page="./Index" asp-route-courseID="@item.CourseID">Select</a>
</td>
<td>
@item.CourseID
</td>
<td>
@item.Title
</td>
<td>
@item.Department.Name
</td>
</tr>
}
</table>
}
@if (Model.InstructorData.Enrollments != null)
{
<h3>
Students Enrolled in Selected Course
</h3>
<table class="table">
<tr>
<th>Name</th>
<th>Grade</th>
</tr>
@foreach (var item in Model.InstructorData.Enrollments)
{
<tr>
<td>
@item.Student.FullName
</td>
<td>
@Html.DisplayFor(modelItem => item.Grade)
</td>
</tr>
}
</table>
}
上面的代码执行以下更改:
将
page指令从@page更新为@page "{id:int?}"。"{id:int?}"是一个路由模板。 路由模板将 URL 中的整数查询字符串更改为路由数据。 例如,单击仅具有@page指令的讲师的“选择”链接将生成如下 URL:https://localhost:5001/Instructors?id=2如果页面指令为
@page "{id:int?}"时,则 URL 为:https://localhost:5001/Instructors/2添加仅在
item.OfficeAssignment不为 null 时才显示item.OfficeAssignment.Location的“办公室”列。 由于这是一对零或一的关系,因此可能没有相关的 OfficeAssignment 实体。@if (item.OfficeAssignment != null) { @item.OfficeAssignment.Location }添加显示每位讲师所授课程的“课程”列。 有关此 razor 语法的详细信息,请参阅显式行转换。
添加向所选讲师和课程的
tr元素中动态添加class="table-success"的代码。 此时会使用 Bootstrap 类为所选行设置背景色。string selectedRow = ""; if (item.CourseID == Model.CourseID) { selectedRow = "table-success"; } <tr class="@selectedRow">添加标记为“选择”的新的超链接。 该链接将所选讲师的 ID 发送给
Index方法并设置背景色。<a asp-action="Index" asp-route-id="@item.ID">Select</a> |添加所选讲师的课程表。
添加所选课程的学生注册表。
运行应用并选择“讲师”选项卡。该页显示来自相关 OfficeAssignment 实体的 Location(办公室)。 如果 OfficeAssignment 为 NULL,则显示空白表格单元格。
单击“选择”链接,选择讲师。 显示行样式更改和分配给该讲师的课程。
选择一门课程,查看已注册的学生及其成绩列表。
使用 Single 方法
Single 方法可在 Where 条件中进行传递,无需分别调用 Where 方法:
public async Task OnGetAsync(int? id, int? courseID)
{
InstructorData = new InstructorIndexData();
InstructorData.Instructors = await _context.Instructors
.Include(i => i.OfficeAssignment)
.Include(i => i.CourseAssignments)
.ThenInclude(i => i.Course)
.ThenInclude(i => i.Department)
.Include(i => i.CourseAssignments)
.ThenInclude(i => i.Course)
.ThenInclude(i => i.Enrollments)
.ThenInclude(i => i.Student)
.AsNoTracking()
.OrderBy(i => i.LastName)
.ToListAsync();
if (id != null)
{
InstructorID = id.Value;
Instructor instructor = InstructorData.Instructors.Single(
i => i.ID == id.Value);
InstructorData.Courses = instructor.CourseAssignments.Select(
s => s.Course);
}
if (courseID != null)
{
CourseID = courseID.Value;
InstructorData.Enrollments = InstructorData.Courses.Single(
x => x.CourseID == courseID).Enrollments;
}
}
Single 与 Where 条件的配合使用与个人偏好相关。 相较于使用 Where 方法,它没有提供任何优势。
显式加载
当前代码为 Enrollments 和 Students 指定预先加载:
InstructorData.Instructors = await _context.Instructors
.Include(i => i.OfficeAssignment)
.Include(i => i.CourseAssignments)
.ThenInclude(i => i.Course)
.ThenInclude(i => i.Department)
.Include(i => i.CourseAssignments)
.ThenInclude(i => i.Course)
.ThenInclude(i => i.Enrollments)
.ThenInclude(i => i.Student)
.AsNoTracking()
.OrderBy(i => i.LastName)
.ToListAsync();
假设用户几乎不希望课程中显示注册情况。 在此情况下,可仅在请求时加载注册数据进行优化。 在本部分中,会更新 OnGetAsync 以使用 Enrollments 和 Students 的显式加载。
使用以下代码更新 Pages/Instructors/Index.cshtml.cs。
using ContosoUniversity.Models;
using ContosoUniversity.Models.SchoolViewModels; // Add VM
using Microsoft.AspNetCore.Mvc.RazorPages;
using Microsoft.EntityFrameworkCore;
using System.Linq;
using System.Threading.Tasks;
namespace ContosoUniversity.Pages.Instructors
{
public class IndexModel : PageModel
{
private readonly ContosoUniversity.Data.SchoolContext _context;
public IndexModel(ContosoUniversity.Data.SchoolContext context)
{
_context = context;
}
public InstructorIndexData InstructorData { get; set; }
public int InstructorID { get; set; }
public int CourseID { get; set; }
public async Task OnGetAsync(int? id, int? courseID)
{
InstructorData = new InstructorIndexData();
InstructorData.Instructors = await _context.Instructors
.Include(i => i.OfficeAssignment)
.Include(i => i.CourseAssignments)
.ThenInclude(i => i.Course)
.ThenInclude(i => i.Department)
//.Include(i => i.CourseAssignments)
// .ThenInclude(i => i.Course)
// .ThenInclude(i => i.Enrollments)
// .ThenInclude(i => i.Student)
//.AsNoTracking()
.OrderBy(i => i.LastName)
.ToListAsync();
if (id != null)
{
InstructorID = id.Value;
Instructor instructor = InstructorData.Instructors
.Where(i => i.ID == id.Value).Single();
InstructorData.Courses = instructor.CourseAssignments.Select(s => s.Course);
}
if (courseID != null)
{
CourseID = courseID.Value;
var selectedCourse = InstructorData.Courses
.Where(x => x.CourseID == courseID).Single();
await _context.Entry(selectedCourse).Collection(x => x.Enrollments).LoadAsync();
foreach (Enrollment enrollment in selectedCourse.Enrollments)
{
await _context.Entry(enrollment).Reference(x => x.Student).LoadAsync();
}
InstructorData.Enrollments = selectedCourse.Enrollments;
}
}
}
}
上述代码取消针对注册和学生数据的 ThenInclude 方法调用。 如果已选中课程,则显式加载的代码会检索:
- 所选课程的
Enrollment实体。 - 每个
Enrollment的Student实体。
注意,上述代码注释掉了 .AsNoTracking()。 对于跟踪的实体,仅可显式加载导航属性。
测试应用。 对用户而言,该应用的行为与上一版本相同。
后续步骤
下一个教程将介绍如何更新相关数据。
在本教程中,将读取和显示相关数据。 相关数据为 EF Core 加载到导航属性中的数据。
如果遇到无法解决的问题,请下载或查看已完成的应用。下载说明。
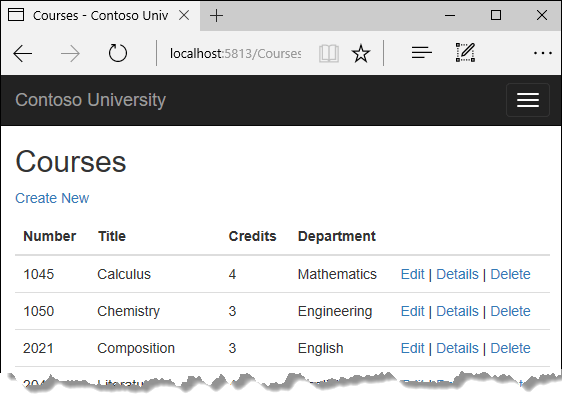
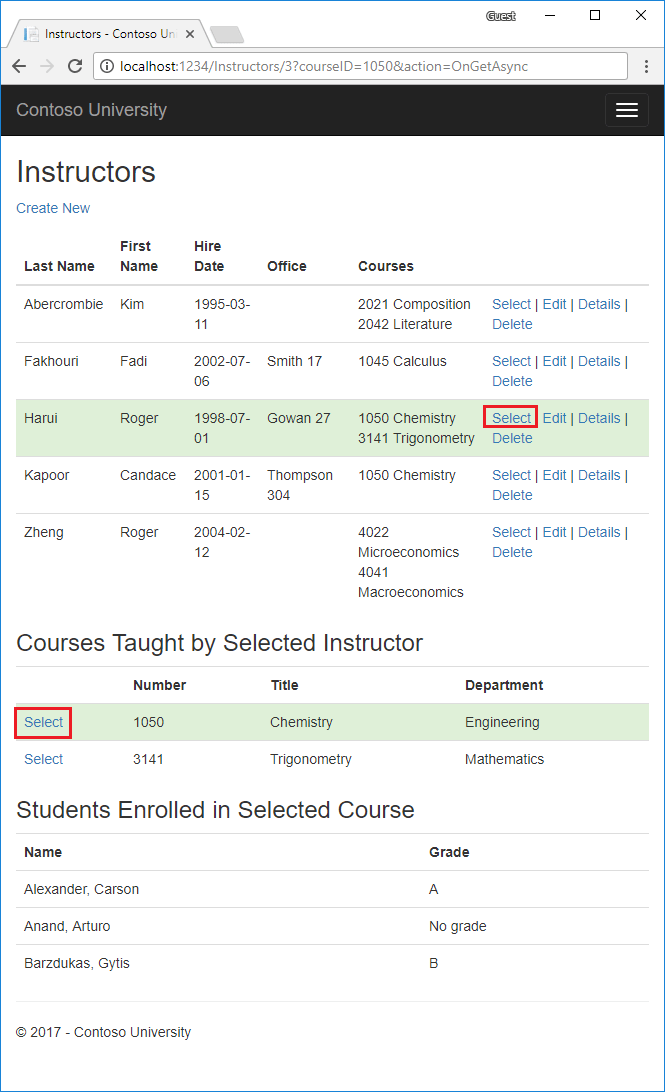
下图显示了本教程中已完成的页面:
相关数据的预先加载、显式加载和延迟加载
EF Core 可采用多种方式将相关数据加载到实体的导航属性中:
预先加载。 预先加载是指对查询某类型的实体时一并加载相关实体。 读取实体时,会检索其相关数据。 此时通常会出现单一联接查询,检索所有必需数据。 EF Core 将针对预先加载的某些类型发出多个查询。 与存在单一查询的 EF6 中的某些查询相比,发出多个查询可能更有效。 预先加载通过
Include和ThenInclude方法进行指定。当包含集合导航时,预先加载会发送多个查询:
- 一个查询用于主查询
- 一个查询用于加载树中每个集合“边缘”。
使用
Load的单独查询:可在单独的查询中检索数据,EF Core 会“修复”导航属性。 “修复”是指 EF Core 自动填充导航属性。 使用Load单独查询比预先加载更像是显式加载。注意:EF Core 会将导航属性自动“修复”为之前加载到上下文实例中的任何其他实体。 即使导航属性的数据非显式包含在内,但如果先前加载了部分或所有相关实体,则仍可能填充该属性。
显式加载。 首次读取实体时,不检索相关数据。 必须编写代码才能在需要时检索相关数据。 使用单独查询进行显式加载时,会向数据库发送多个查询。 该代码通过显式加载指定要加载的导航属性。 使用
Load方法进行显式加载。 例如:延迟加载。 延迟加载已添加到版本 2.1 中的 EF Core。 首次读取实体时,不检索相关数据。 首次访问导航属性时,会自动检索该导航属性所需的数据。 首次访问导航属性时,都会向数据库发送一个查询。
Select运算符仅加载所需的相关数据。
创建显示院系名称的“课程”页
课程实体包括一个带 Department 实体的导航属性。 Department 实体包含要分配课程的院系。
要在课程列表中显示已分配院系的名称:
- 从
Department实体中获取Name属性。 Department实体来自于Course.Department导航属性。
为课程模型创建基架
按照为“学生”模型搭建基架中的说明操作,并对模型类使用 Course。
上述命令为 Course 模型创建基架。 在 Visual Studio 中打开项目。
打开 Pages/Courses/Index.cshtml.cs 并检查 OnGetAsync 方法。 基架引擎为 Department 导航属性指定了预先加载。 Include 方法指定预先加载。
运行应用并选择“课程”链接。 院系列显示 DepartmentID(该项无用)。
使用以下代码更新 OnGetAsync 方法:
public async Task OnGetAsync()
{
Course = await _context.Courses
.Include(c => c.Department)
.AsNoTracking()
.ToListAsync();
}
上述代码添加了 AsNoTracking。 由于未跟踪返回的实体,因此 AsNoTracking 提升了性能。 未跟踪实体,因为未在当前上下文中更新这些实体。
使用以下突出显示的标记更新 Pages/Courses/Index.cshtml:
@page
@model ContosoUniversity.Pages.Courses.IndexModel
@{
ViewData["Title"] = "Courses";
}
<h2>Courses</h2>
<p>
<a asp-page="Create">Create New</a>
</p>
<table class="table">
<thead>
<tr>
<th>
@Html.DisplayNameFor(model => model.Course[0].CourseID)
</th>
<th>
@Html.DisplayNameFor(model => model.Course[0].Title)
</th>
<th>
@Html.DisplayNameFor(model => model.Course[0].Credits)
</th>
<th>
@Html.DisplayNameFor(model => model.Course[0].Department)
</th>
<th></th>
</tr>
</thead>
<tbody>
@foreach (var item in Model.Course)
{
<tr>
<td>
@Html.DisplayFor(modelItem => item.CourseID)
</td>
<td>
@Html.DisplayFor(modelItem => item.Title)
</td>
<td>
@Html.DisplayFor(modelItem => item.Credits)
</td>
<td>
@Html.DisplayFor(modelItem => item.Department.Name)
</td>
<td>
<a asp-page="./Edit" asp-route-id="@item.CourseID">Edit</a> |
<a asp-page="./Details" asp-route-id="@item.CourseID">Details</a> |
<a asp-page="./Delete" asp-route-id="@item.CourseID">Delete</a>
</td>
</tr>
}
</tbody>
</table>
对基架代码进行了以下更改:
将标题从“索引”更改为“课程”。
添加了显示
CourseID属性值的“数字”列。 默认情况下,不针对主键进行架构,因为对最终用户而言,它们通常没有意义。 但在此情况下主键是有意义的。更改“院系”列,显示院系名称。 该代码显示已加载到
Department导航属性中的Department实体的Name属性:@Html.DisplayFor(modelItem => item.Department.Name)
运行应用并选择“课程”选项卡,查看包含系名称的列表。
使用 Select 加载相关数据
OnGetAsync 方法使用 Include 方法加载相关数据:
public async Task OnGetAsync()
{
Course = await _context.Courses
.Include(c => c.Department)
.AsNoTracking()
.ToListAsync();
}
Select 运算符仅加载所需的相关数据。 对于单个项(如 Department.Name),它使用 SQL INNER JOIN。 对于集合,它使用另一个数据库访问,但集合上的 Include 运算符也是如此。
以下代码使用 Select 方法加载相关数据:
public IList<CourseViewModel> CourseVM { get; set; }

public async Task OnGetAsync()
{
    CourseVM = await _context.Courses
            .Select(p => new CourseViewModel
            {
                CourseID = p.CourseID,
                Title = p.Title,
                Credits = p.Credits,
                DepartmentName = p.Department.Name
            }).ToListAsync();
}
CourseViewModel:
public class CourseViewModel
{
    public int CourseID { get; set; }
    public string Title { get; set; }
    public int Credits { get; set; }
    public string DepartmentName { get; set; }
}
有关完整示例的信息,请参阅 IndexSelect.cshtml 和 IndexSelect.cshtml.cs。
创建显示“课程”和“注册”的“讲师”页
在本部分中,将创建“讲师”页。
该页面通过以下方式读取和显示相关数据:
- 讲师列表显示
OfficeAssignment实体(上图中的办公室)的相关数据。Instructor和OfficeAssignment实体之间存在一对零或一的关系。 预先加载适用于OfficeAssignment实体。 需要显示相关数据时,预先加载通常更高效。 在此情况下,会显示讲师的办公室分配。 - 当用户选择一名讲师(上图中的 Harui)时,显示相关的
Course实体。Instructor和Course实体之间存在多对多关系。 对Course实体及其相关的Department实体使用预先加载。 这种情况下,单独查询可能更有效,因为仅需显示所选讲师的课程。 此示例演示如何在位于导航实体内的实体中预先加载这些导航实体。 - 当用户选择一门课程(上图中的化学)时,显示
Enrollments实体的相关数据。 上图中显示了学生姓名和成绩。Course和Enrollment实体之间存在一对多的关系。
创建“讲师索引”视图的视图模型
“讲师”页显示来自三个不同表格的数据。 创建一个视图模型,该模型中包含表示三个表格的三个实体。
在 SchoolViewModels 文件夹中,使用以下代码创建 InstructorIndexData.cs:
using System;
using System.Collections.Generic;
using System.Linq;
using System.Threading.Tasks;

namespace ContosoUniversity.Models.SchoolViewModels
{
    public class InstructorIndexData
    {
        public IEnumerable<Instructor> Instructors { get; set; }
        public IEnumerable<Course> Courses { get; set; }
        public IEnumerable<Enrollment> Enrollments { get; set; }
    }
}
为讲师模型创建基架
按照为“学生”模型搭建基架中的说明操作,并对模型类使用 Instructor。
上述命令为 Instructor 模型创建基架。
运行应用并导航到“讲师”页。
将 Pages/Instructors/Index.cshtml.cs 替换为以下代码:
using ContosoUniversity.Models;
using ContosoUniversity.Models.SchoolViewModels; // Add VM
using Microsoft.AspNetCore.Mvc.RazorPages;
using Microsoft.EntityFrameworkCore;
using System.Linq;
using System.Threading.Tasks;
namespace ContosoUniversity.Pages.Instructors
{
public class IndexModel : PageModel
{
private readonly ContosoUniversity.Data.SchoolContext _context;
public IndexModel(ContosoUniversity.Data.SchoolContext context)
{
_context = context;
}
public InstructorIndexData Instructor { get; set; }
public int InstructorID { get; set; }
public async Task OnGetAsync(int? id)
{
Instructor = new InstructorIndexData();
Instructor.Instructors = await _context.Instructors
.Include(i => i.OfficeAssignment)
.Include(i => i.CourseAssignments)
.ThenInclude(i => i.Course)
.AsNoTracking()
.OrderBy(i => i.LastName)
.ToListAsync();
if (id != null)
{
InstructorID = id.Value;
}
}
}
}
OnGetAsync 方法接受所选讲师 ID 的可选路由数据。
检查 Pages/Instructors/Index.cshtml.cs 文件中的查询:
Instructor.Instructors = await _context.Instructors
.Include(i => i.OfficeAssignment)
.Include(i => i.CourseAssignments)
.ThenInclude(i => i.Course)
.AsNoTracking()
.OrderBy(i => i.LastName)
.ToListAsync();
查询包括两项内容:
OfficeAssignment:在讲师视图中显示。CourseAssignments:课程的教学内容。
更新“讲师索引”页
使用以下标记更新 Pages/Instructors/Index.cshtml:
@page "{id:int?}"
@model ContosoUniversity.Pages.Instructors.IndexModel
@{
ViewData["Title"] = "Instructors";
}
<h2>Instructors</h2>
<p>
<a asp-page="Create">Create New</a>
</p>
<table class="table">
<thead>
<tr>
<th>Last Name</th>
<th>First Name</th>
<th>Hire Date</th>
<th>Office</th>
<th>Courses</th>
<th></th>
</tr>
</thead>
<tbody>
@foreach (var item in Model.Instructor.Instructors)
{
string selectedRow = "";
if (item.ID == Model.InstructorID)
{
selectedRow = "success";
}
<tr class="@selectedRow">
<td>
@Html.DisplayFor(modelItem => item.LastName)
</td>
<td>
@Html.DisplayFor(modelItem => item.FirstMidName)
</td>
<td>
@Html.DisplayFor(modelItem => item.HireDate)
</td>
<td>
@if (item.OfficeAssignment != null)
{
    @item.OfficeAssignment.Location
}
</td>
<td>
@{
foreach (var course in item.CourseAssignments)
{
@course.Course.CourseID @: @course.Course.Title <br />
}
}
</td>
<td>
<a asp-page="./Index" asp-route-id="@item.ID">Select</a> |
<a asp-page="./Edit" asp-route-id="@item.ID">Edit</a> |
<a asp-page="./Details" asp-route-id="@item.ID">Details</a> |
<a asp-page="./Delete" asp-route-id="@item.ID">Delete</a>
</td>
</tr>
}
</tbody>
</table>
上述标记进行以下更改:
将
page指令从@page更新为@page "{id:int?}"。"{id:int?}"是一个路由模板。 路由模板将 URL 中的整数查询字符串更改为路由数据。 例如,单击仅具有@page指令的讲师的“选择”链接将生成如下 URL:http://localhost:1234/Instructors?id=2当页面指令是
@page "{id:int?}"时,之前的 URL 为:http://localhost:1234/Instructors/2页标题为“讲师”。
添加了仅在
item.OfficeAssignment不为 null 时才显示item.OfficeAssignment.Location的“办公室”列。 由于这是一对零或一的关系,因此可能没有相关的 OfficeAssignment 实体。@if (item.OfficeAssignment != null) { @item.OfficeAssignment.Location }添加了显示每位讲师所授课程的“课程”列。 有关此 razor 语法的详细信息,请参阅显式行转换。
添加了向所选讲师的
tr元素中动态添加class="success"的代码。 此时会使用 Bootstrap 类为所选行设置背景色。string selectedRow = ""; if (item.CourseID == Model.CourseID) { selectedRow = "success"; } <tr class="@selectedRow">添加了标记为“选择”的新的超链接。 该链接将所选讲师的 ID 发送给
Index方法并设置背景色。<a asp-action="Index" asp-route-id="@item.ID">Select</a> |
运行应用并选择“讲师”选项卡。该页显示来自相关 OfficeAssignment 实体的 Location(办公室)。 如果 OfficeAssignment` 为 NULL,则显示空白表格单元格。
单击“选择”链接。 随即更改行样式。
添加由所选讲师教授的课程
使用以下代码更新 Pages/Instructors/Index.cshtml.cs 中的 OnGetAsync 方法:
public async Task OnGetAsync(int? id, int? courseID)
{
Instructor = new InstructorIndexData();
Instructor.Instructors = await _context.Instructors
.Include(i => i.OfficeAssignment)
.Include(i => i.CourseAssignments)
.ThenInclude(i => i.Course)
.ThenInclude(i => i.Department)
.AsNoTracking()
.OrderBy(i => i.LastName)
.ToListAsync();
if (id != null)
{
InstructorID = id.Value;
Instructor instructor = Instructor.Instructors.Where(
i => i.ID == id.Value).Single();
Instructor.Courses = instructor.CourseAssignments.Select(s => s.Course);
}
if (courseID != null)
{
CourseID = courseID.Value;
Instructor.Enrollments = Instructor.Courses.Where(
x => x.CourseID == courseID).Single().Enrollments;
}
}
添加 public int CourseID { get; set; }
public class IndexModel : PageModel
{
private readonly ContosoUniversity.Data.SchoolContext _context;
public IndexModel(ContosoUniversity.Data.SchoolContext context)
{
_context = context;
}
public InstructorIndexData Instructor { get; set; }
public int InstructorID { get; set; }
public int CourseID { get; set; }
public async Task OnGetAsync(int? id, int? courseID)
{
Instructor = new InstructorIndexData();
Instructor.Instructors = await _context.Instructors
.Include(i => i.OfficeAssignment)
.Include(i => i.CourseAssignments)
.ThenInclude(i => i.Course)
.ThenInclude(i => i.Department)
.AsNoTracking()
.OrderBy(i => i.LastName)
.ToListAsync();
if (id != null)
{
InstructorID = id.Value;
Instructor instructor = Instructor.Instructors.Where(
i => i.ID == id.Value).Single();
Instructor.Courses = instructor.CourseAssignments.Select(s => s.Course);
}
if (courseID != null)
{
CourseID = courseID.Value;
Instructor.Enrollments = Instructor.Courses.Where(
x => x.CourseID == courseID).Single().Enrollments;
}
}
检查更新后的查询:
Instructor.Instructors = await _context.Instructors
.Include(i => i.OfficeAssignment)
.Include(i => i.CourseAssignments)
.ThenInclude(i => i.Course)
.ThenInclude(i => i.Department)
.AsNoTracking()
.OrderBy(i => i.LastName)
.ToListAsync();
先前查询添加了 Department 实体。
选择讲师时 (id != null),将执行以下代码。 从视图模型中的讲师列表检索所选讲师。 向视图模型的 Courses 属性加载来自讲师 CourseAssignments 导航属性的 Course 实体。
if (id != null)
{
InstructorID = id.Value;
Instructor instructor = Instructor.Instructors.Where(
i => i.ID == id.Value).Single();
Instructor.Courses = instructor.CourseAssignments.Select(s => s.Course);
}
Where 方法返回一个集合。 在前面的 Where 方法中,仅返回单个 Instructor 实体。 Single 方法将集合转换为单个 Instructor 实体。 Instructor 实体提供对 CourseAssignments 属性的访问。 CourseAssignments 提供对相关 Course 实体的访问。
当集合仅包含一个项时,集合使用 Single 方法。 如果集合为空或包含多个项,Single 方法会引发异常。 还可使用 SingleOrDefault,该方式在集合为空时返回默认值(本例中为 null)。 在空集合上使用 SingleOrDefault:
- 引发异常(因为尝试在空引用上找到
Courses属性)。 - 异常信息不太能清楚指出问题原因。
选中课程时,视图模型的 Enrollments 属性将填充以下代码:
if (courseID != null)
{
CourseID = courseID.Value;
Instructor.Enrollments = Instructor.Courses.Where(
x => x.CourseID == courseID).Single().Enrollments;
}
在 Pages/Instructors/Index.cshtmlRazor 页面末尾添加以下标记:
<a asp-page="./Delete" asp-route-id="@item.ID">Delete</a>
</td>
</tr>
}
</tbody>
</table>
@if (Model.Instructor.Courses != null)
{
<h3>Courses Taught by Selected Instructor</h3>
<table class="table">
<tr>
<th></th>
<th>Number</th>
<th>Title</th>
<th>Department</th>
</tr>
@foreach (var item in Model.Instructor.Courses)
{
string selectedRow = "";
if (item.CourseID == Model.CourseID)
{
    selectedRow = "success";
}
<tr class="@selectedRow">
<td>
<a asp-page="./Index" asp-route-courseID="@item.CourseID">Select</a>
</td>
<td>
@item.CourseID
</td>
<td>
@item.Title
</td>
<td>
@item.Department.Name
</td>
</tr>
}
</table>
}
上述标记显示选中某讲师时与该讲师相关的课程列表。
测试应用。 单击讲师页面上的“选择”链接。
显示学生数据
在本部分中,更新应用以显示所选课程的学生数据。
使用以下代码更新 Pages/Instructors/Index.cshtml.cs 中 OnGetAsync 方法中的查询:
Instructor.Instructors = await _context.Instructors
.Include(i => i.OfficeAssignment)
.Include(i => i.CourseAssignments)
.ThenInclude(i => i.Course)
.ThenInclude(i => i.Department)
.Include(i => i.CourseAssignments)
.ThenInclude(i => i.Course)
.ThenInclude(i => i.Enrollments)
.ThenInclude(i => i.Student)
.AsNoTracking()
.OrderBy(i => i.LastName)
.ToListAsync();
更新 Pages/Instructors/Index.cshtml。 在文件末尾添加以下标记:
@if (Model.Instructor.Enrollments != null)
{
<h3>
Students Enrolled in Selected Course
</h3>
<table class="table">
<tr>
<th>Name</th>
<th>Grade</th>
</tr>
@foreach (var item in Model.Instructor.Enrollments)
{
<tr>
<td>
@item.Student.FullName
</td>
<td>
@Html.DisplayFor(modelItem => item.Grade)
</td>
</tr>
}
</table>
}
上述标记显示已注册所选课程的学生列表。
刷新页面并选择讲师。 选择一门课程,查看已注册的学生及其成绩列表。
使用 Single 方法
Single 方法可在 Where 条件中进行传递,无需分别调用 Where 方法:
public async Task OnGetAsync(int? id, int? courseID)
{
Instructor = new InstructorIndexData();
Instructor.Instructors = await _context.Instructors
.Include(i => i.OfficeAssignment)
.Include(i => i.CourseAssignments)
.ThenInclude(i => i.Course)
.ThenInclude(i => i.Department)
.Include(i => i.CourseAssignments)
.ThenInclude(i => i.Course)
.ThenInclude(i => i.Enrollments)
.ThenInclude(i => i.Student)
.AsNoTracking()
.OrderBy(i => i.LastName)
.ToListAsync();
if (id != null)
{
InstructorID = id.Value;
Instructor instructor = Instructor.Instructors.Single(
i => i.ID == id.Value);
Instructor.Courses = instructor.CourseAssignments.Select(
s => s.Course);
}
if (courseID != null)
{
CourseID = courseID.Value;
Instructor.Enrollments = Instructor.Courses.Single(
x => x.CourseID == courseID).Enrollments;
}
}
使用 Where 时,前面的 Single 方法不适用。 一些开发人员更喜欢 Single 方法样式。
显式加载
当前代码为 Enrollments 和 Students 指定预先加载:
Instructor.Instructors = await _context.Instructors
.Include(i => i.OfficeAssignment)
.Include(i => i.CourseAssignments)
.ThenInclude(i => i.Course)
.ThenInclude(i => i.Department)
.Include(i => i.CourseAssignments)
.ThenInclude(i => i.Course)
.ThenInclude(i => i.Enrollments)
.ThenInclude(i => i.Student)
.AsNoTracking()
.OrderBy(i => i.LastName)
.ToListAsync();
假设用户几乎不希望课程中显示注册情况。 在此情况下,可仅在请求时加载注册数据进行优化。 在本部分中,会更新 OnGetAsync 以使用 Enrollments 和 Students 的显式加载。
使用以下代码更新 OnGetAsync:
public async Task OnGetAsync(int? id, int? courseID)
{
Instructor = new InstructorIndexData();
Instructor.Instructors = await _context.Instructors
.Include(i => i.OfficeAssignment)
.Include(i => i.CourseAssignments)
.ThenInclude(i => i.Course)
.ThenInclude(i => i.Department)
//.Include(i => i.CourseAssignments)
// .ThenInclude(i => i.Course)
// .ThenInclude(i => i.Enrollments)
// .ThenInclude(i => i.Student)
// .AsNoTracking()
.OrderBy(i => i.LastName)
.ToListAsync();
if (id != null)
{
    InstructorID = id.Value;
    Instructor instructor = Instructor.Instructors.Where(
        i => i.ID == id.Value).Single();
    Instructor.Courses = instructor.CourseAssignments.Select(s => s.Course);
}
if (courseID != null)
{
CourseID = courseID.Value;
var selectedCourse = Instructor.Courses.Where(x => x.CourseID == courseID).Single();
await _context.Entry(selectedCourse).Collection(x => x.Enrollments).LoadAsync();
foreach (Enrollment enrollment in selectedCourse.Enrollments)
{
await _context.Entry(enrollment).Reference(x => x.Student).LoadAsync();
}
Instructor.Enrollments = selectedCourse.Enrollments;
}
}
上述代码取消针对注册和学生数据的 ThenInclude 方法调用。 如果已选中课程,则突出显示的代码会检索:
- 所选课程的
Enrollment实体。 - 每个
Enrollment的Student实体。
请注意,上述代码为 .AsNoTracking() 加上注释。 对于跟踪的实体,仅可显式加载导航属性。
测试应用。 对用户而言,该应用的行为与上一版本相同。
下一个教程将介绍如何更新相关数据。
其他资源

反馈
即将发布:在整个 2024 年,我们将逐步淘汰作为内容反馈机制的“GitHub 问题”,并将其取代为新的反馈系统。 有关详细信息,请参阅:https://aka.ms/ContentUserFeedback。
提交和查看相关反馈