Note
此版本不是本文的最新版本。 有关当前版本,请参阅 本文的 .NET 10 版本。
Warning
此版本的 ASP.NET Core 不再受支持。 有关详细信息,请参阅 .NET 和 .NET Core 支持策略。 有关当前版本,请参阅本文的 .NET 9 版本。
本教程介绍使用 SignalR 生成实时应用的基础知识。 您将学习如何:
- 创建 Web 项目。
- 添加 SignalR 客户端库。
- 创建 SignalR 中心。
- 配置项目以使用 SignalR。
- 添加可将消息从任何客户端发送到所有连接客户端的代码。
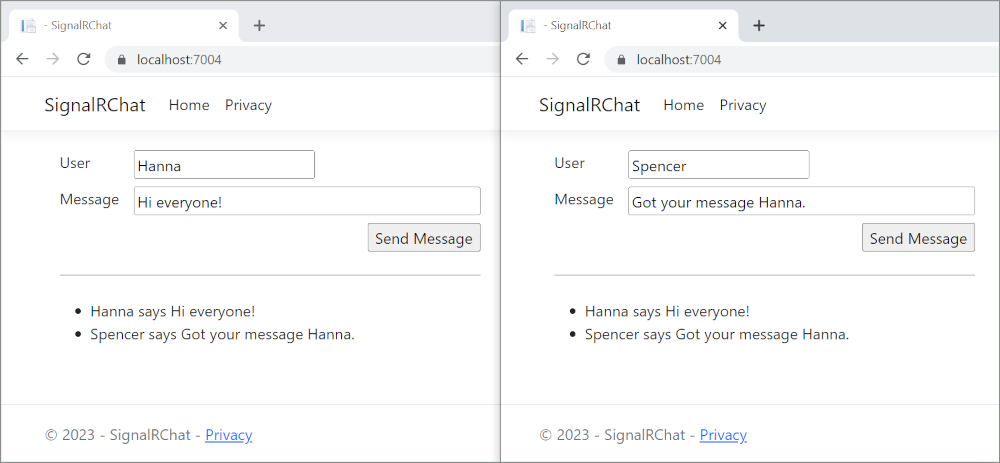
最终将创建一个正常运行的聊天应用:
Prerequisites
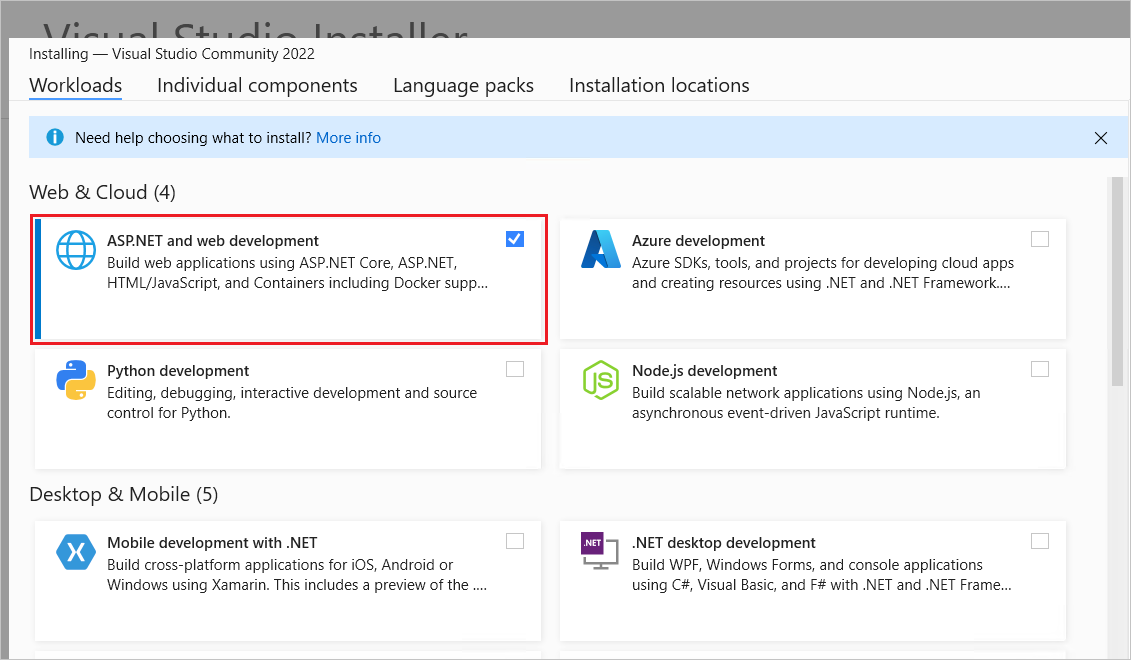
带有 ASP.NET 和 Web 开发工作负载的 Visual Studio 2022。
创建 Web 应用项目
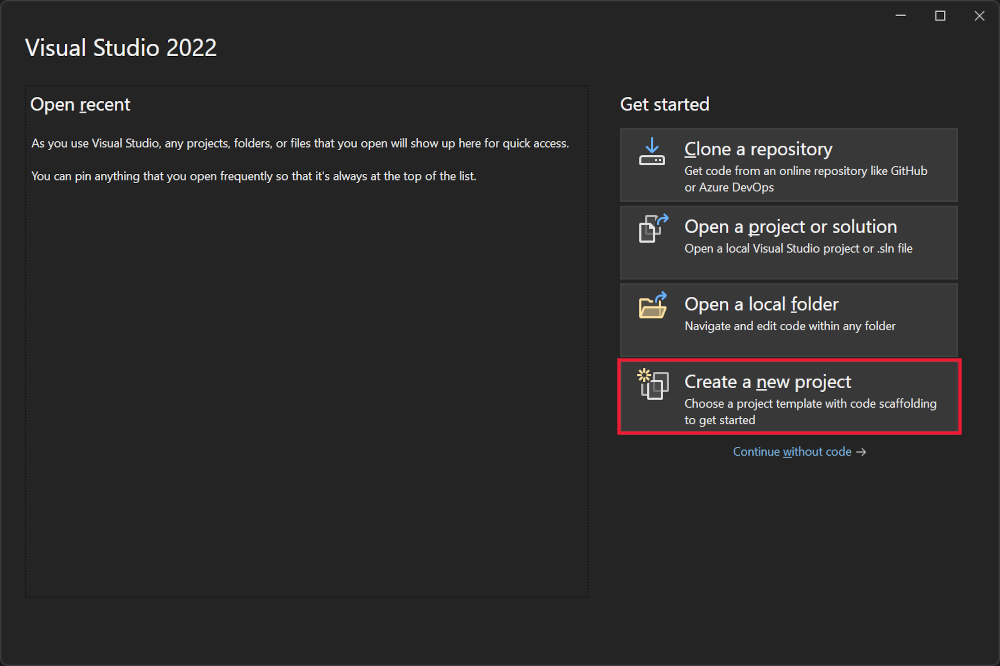
启动 Visual Studio 2022 并选择“创建新项目”。
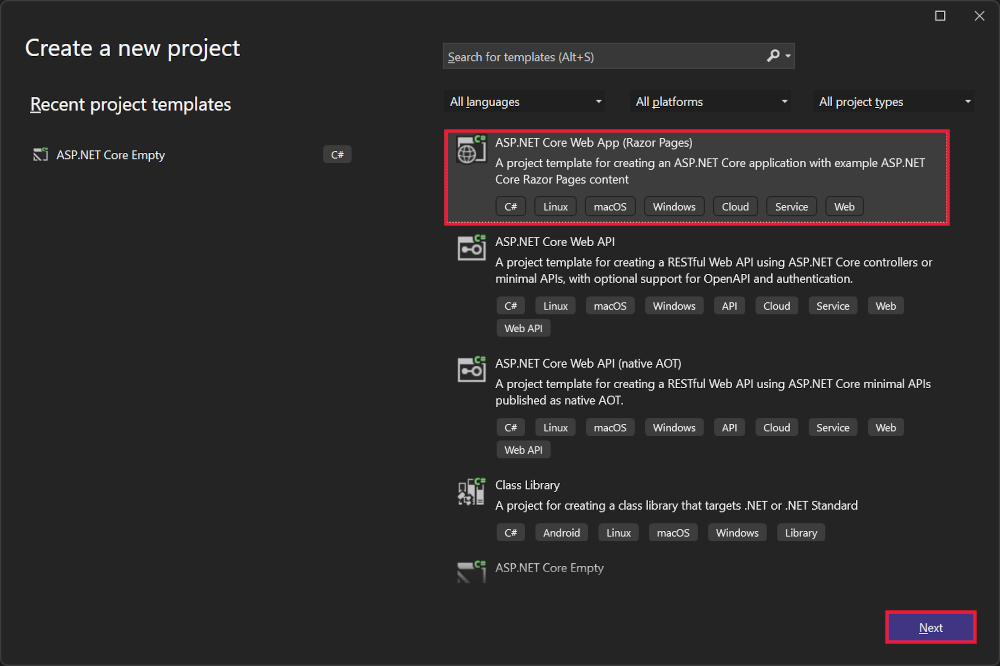
在“创建新项目”对话框中选择“ASP.NET Core Web 应用( 页面)”,然后选择“下一步”Razor。
在“配置新项目”对话框中,为“项目名称”输入 。 请务必将项目命名为 SignalRChat(包括匹配大写),以便命名空间与教程中的代码匹配。
选择“下一步”。
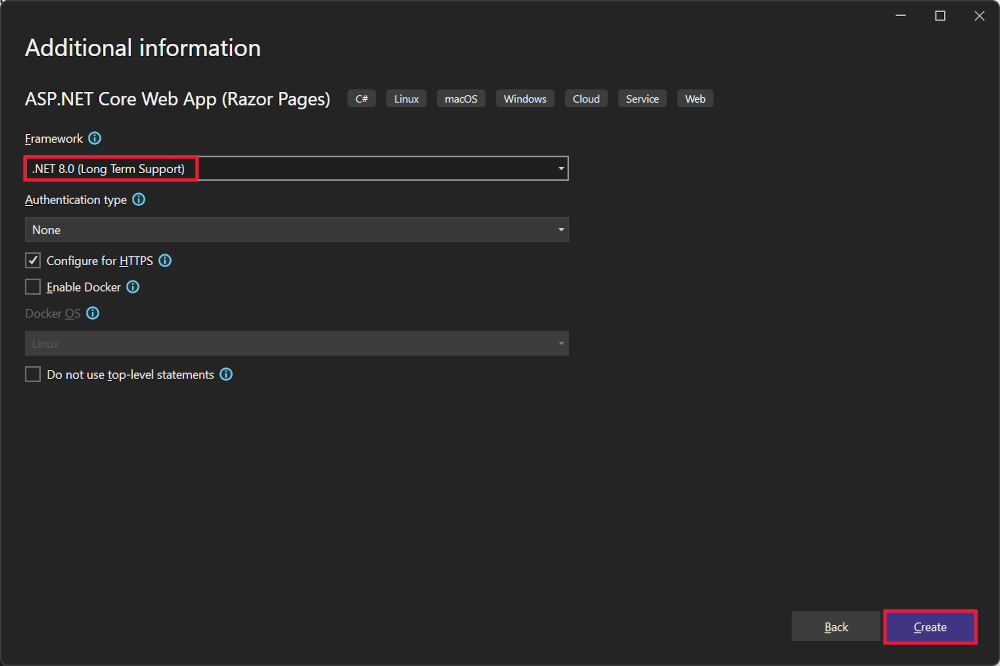
在“其他信息”对话框中,选择“.NET 8.0 (长期支持)”,然后选择“创建”。
添加 SignalR 客户端库
ASP.NET Core 共享框架中包含 SignalR 服务器库。 JavaScript 客户端库不会自动包含在项目中。 对于此教程,使用库管理器 (LibMan) 从 unpkg 获取客户端库。
unpkg 是一个快速的全局内容分发网络,适用于 npm 上的所有内容。
在“解决方案资源管理器”中,右键单击项目,然后选择“添加”>“客户端库”。
在“添加客户端库”对话框中:
- 为“提供程序”选择“unpkg”
- 对于“库”,请输入
@microsoft/signalr@latest。 - 选择“选择特定文件”,展开“dist/browser”文件夹,然后选择 和 。
- 将“目标位置”设置为 。
- 选择“安装”。
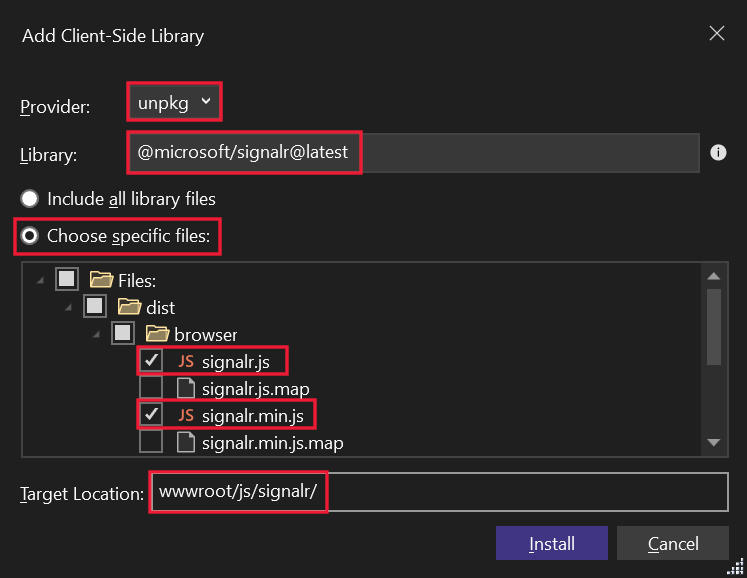
LibMan 创建 wwwroot/js/signalr 文件夹并将所选文件复制到该文件夹。
创建 SignalR 中心
中心是一个类,用作处理客户端 - 服务器通信的高级管道。
在 SignalRChat 项目文件夹中,创建 Hubs 文件夹。
在 Hubs 文件夹中,使用以下代码创建 ChatHub 类:
using Microsoft.AspNetCore.SignalR;

namespace SignalRChat.Hubs
{
    public class ChatHub : Hub
    {
        public async Task SendMessage(string user, string message)
        {
            await Clients.All.SendAsync("ReceiveMessage", user, message);
        }
    }
}
ChatHub 类继承自 SignalRHub。
Hub 类管理连接、组和消息。
可通过已连接客户端调用 SendMessage,以向所有客户端发送消息。 本教程后面部分将显示调用该方法的 JavaScript 客户端代码。
SignalR 代码是异步模式,可提供最大的可伸缩性。
配置 SignalR
必须将 SignalR 服务器配置为将 SignalR 请求传递给 SignalR。 将以下突出显示的代码添加到 Program.cs 文件。
using SignalRChat.Hubs;

var builder = WebApplication.CreateBuilder(args);

// Add services to the container.
builder.Services.AddRazorPages();
builder.Services.AddSignalR();

var app = builder.Build();

// Configure the HTTP request pipeline.
if (!app.Environment.IsDevelopment())
{
    app.UseExceptionHandler("/Error");
    // The default HSTS value is 30 days. You may want to change this for production scenarios, see https://aka.ms/aspnetcore-hsts.
    app.UseHsts();
}

app.UseHttpsRedirection();
app.UseStaticFiles();

app.UseRouting();

app.UseAuthorization();

app.MapRazorPages();
app.MapHub<ChatHub>("/chatHub");

app.Run();
以上突出显示的代码将 SignalR 添加到 ASP.NET Core 依赖关系注入和路由系统。
添加 SignalR 客户端代码
使用以下代码替换 Pages/Index.cshtml 中的内容:
@page
<div class="container">
    <div class="row p-1">
        <div class="col-1">User</div>
        <div class="col-5"><input type="text" id="userInput" /></div>
    </div>
    <div class="row p-1">
        <div class="col-1">Message</div>
        <div class="col-5"><input type="text" class="w-100" id="messageInput" /></div>
    </div>
    <div class="row p-1">
        <div class="col-6 text-end">
            <input type="button" id="sendButton" value="Send Message" />
        </div>
    </div>
    <div class="row p-1">
        <div class="col-6">
            <hr />
        </div>
    </div>
    <div class="row p-1">
        <div class="col-6">
            <ul id="messagesList"></ul>
        </div>
    </div>
</div>
<script src="~/js/signalr/dist/browser/signalr.js"></script>
<script src="~/js/chat.js"></script>
前面的标记:
- 创建文本框和提交按钮。
- 使用
id="messagesList"创建一个列表,用于显示从 SignalR 中心接收的消息。 - 包含对 SignalR 的脚本引用,并在下一步中创建
chat.js应用代码。
在 wwwroot/js 文件夹中,使用以下代码创建 chat.js 文件:
"use strict";

var connection = new signalR.HubConnectionBuilder().withUrl("/chatHub").build();

//Disable the send button until connection is established.
document.getElementById("sendButton").disabled = true;

connection.on("ReceiveMessage", function (user, message) {
    var li = document.createElement("li");
    document.getElementById("messagesList").appendChild(li);
    // We can assign user-supplied strings to an element's textContent because it
    // is not interpreted as markup. If you're assigning in any other way, you
    // should be aware of possible script injection concerns.
    li.textContent = `${user} says ${message}`;
});

connection.start().then(function () {
    document.getElementById("sendButton").disabled = false;
}).catch(function (err) {
    return console.error(err.toString());
});

document.getElementById("sendButton").addEventListener("click", function (event) {
    var user = document.getElementById("userInput").value;
    var message = document.getElementById("messageInput").value;
    connection.invoke("SendMessage", user, message).catch(function (err) {
        return console.error(err.toString());
    });
    event.preventDefault();
});
前面的 JavaScript:
- 创建并启动连接。
- 向“提交”按钮添加一个用于向中心发送消息的处理程序。
- 向连接对象添加一个用于从中心接收消息并将其添加到列表的处理程序。
运行应用
选择 Ctrl+F5 可运行应用,不会进行调试。
从地址栏复制 URL,打开另一个浏览器实例或选项卡,并在地址栏中粘贴该 URL。
选择任一浏览器,输入名称和消息,然后选择“发送消息”按钮。
两个页面上立即显示名称和消息。

Tip
如果应用不起作用,请打开浏览器开发人员工具 (F12) 并转到控制台。 查找与 HTML 和 JavaScript 代码相关的可能错误。 例如,如果 signalr.js 被放在一个与指示不同的文件夹中,对该文件的引用将不起作用,导致控制台中出现 404 错误。

ERR_SPDY_INADEQUATE_TRANSPORT_SECURITY如果 Chrome 中发生错误,请运行以下命令来更新开发证书:
dotnet dev-certs https --clean
dotnet dev-certs https --trust
发布到 Azure
有关部署到 Azure 的信息,请参阅快速入门:部署 ASP.NET Web 应用。 有关 Azure SignalR 服务的详细信息,请参阅什么是 Azure SignalR 服务?。
后续步骤
本教程介绍使用 SignalR 生成实时应用的基础知识。 您将学习如何:
- 创建 Web 项目。
- 添加 SignalR 客户端库。
- 创建 SignalR 中心。
- 配置项目以使用 SignalR。
- 添加可将消息从任何客户端发送到所有连接客户端的代码。
最终将创建一个正常运行的聊天应用:

Prerequisites
带有 ASP.NET 和 Web 开发工作负载的 Visual Studio 2022。

创建 Web 应用项目
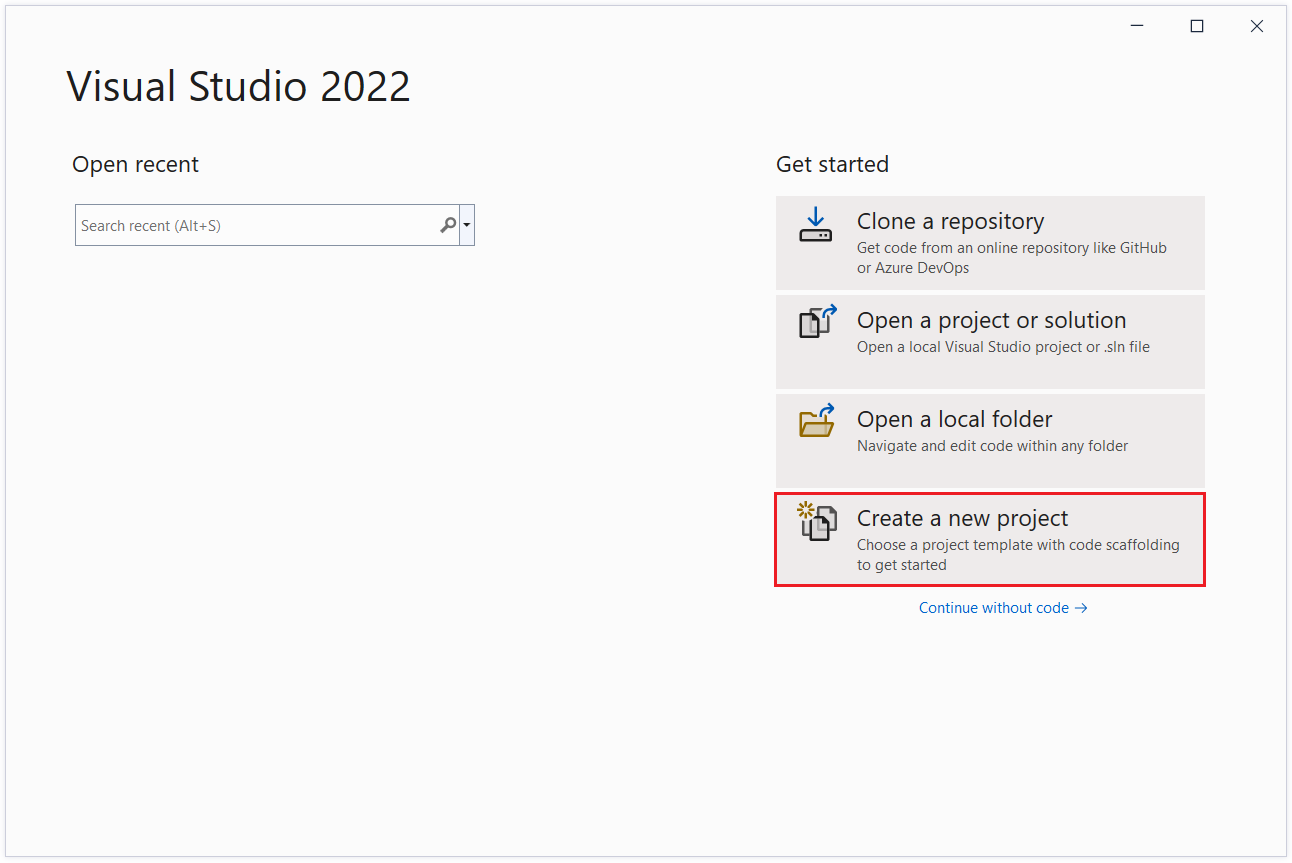
启动 Visual Studio 2022 并选择“创建新项目”。
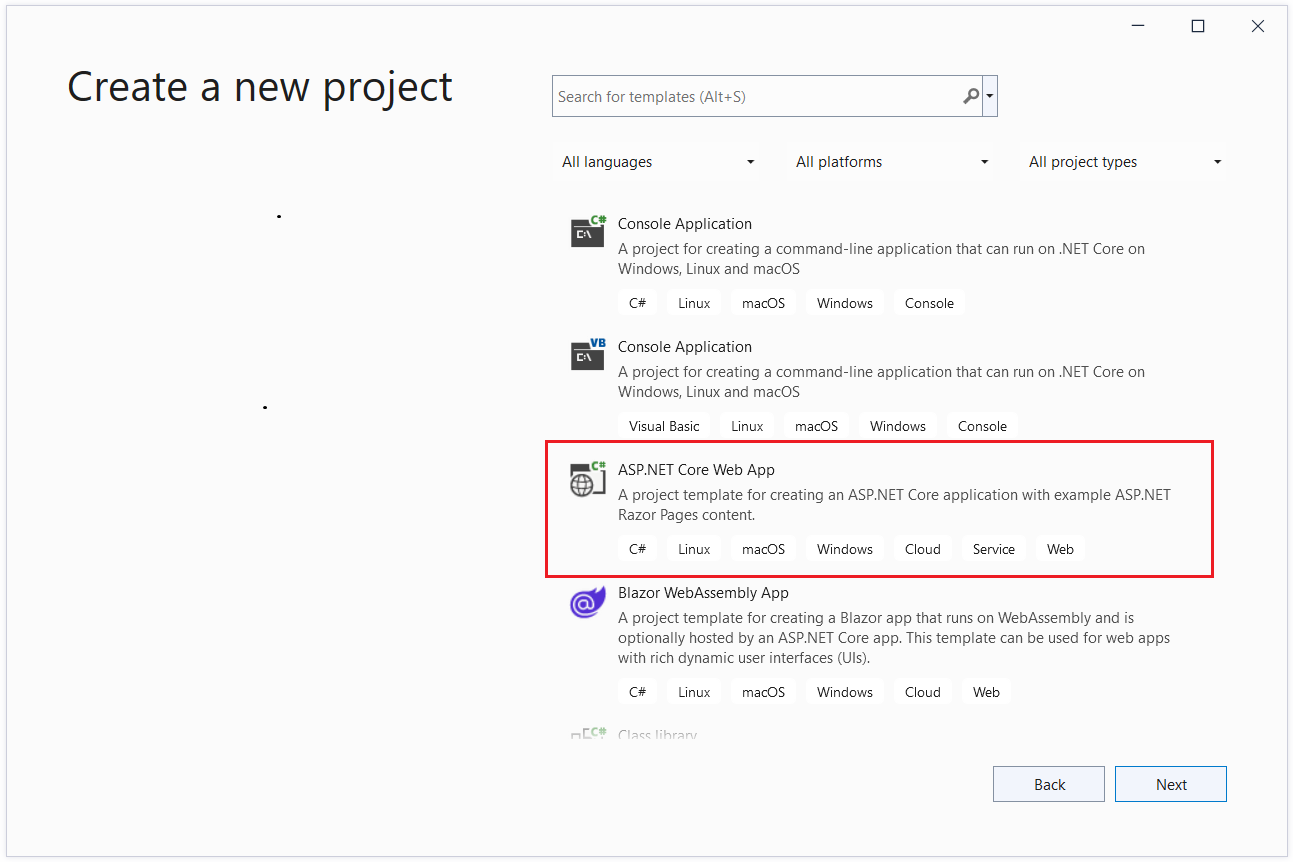
在“创建新项目”对话框中,选择“ASP.NET Core Web 应用”,然后选择“下一步” 。
在“配置新项目”对话框中,为“项目名称”输入 。 请务必将项目命名为 SignalRChat(包括匹配大写),以便命名空间与教程中的代码匹配。
选择“下一步”。
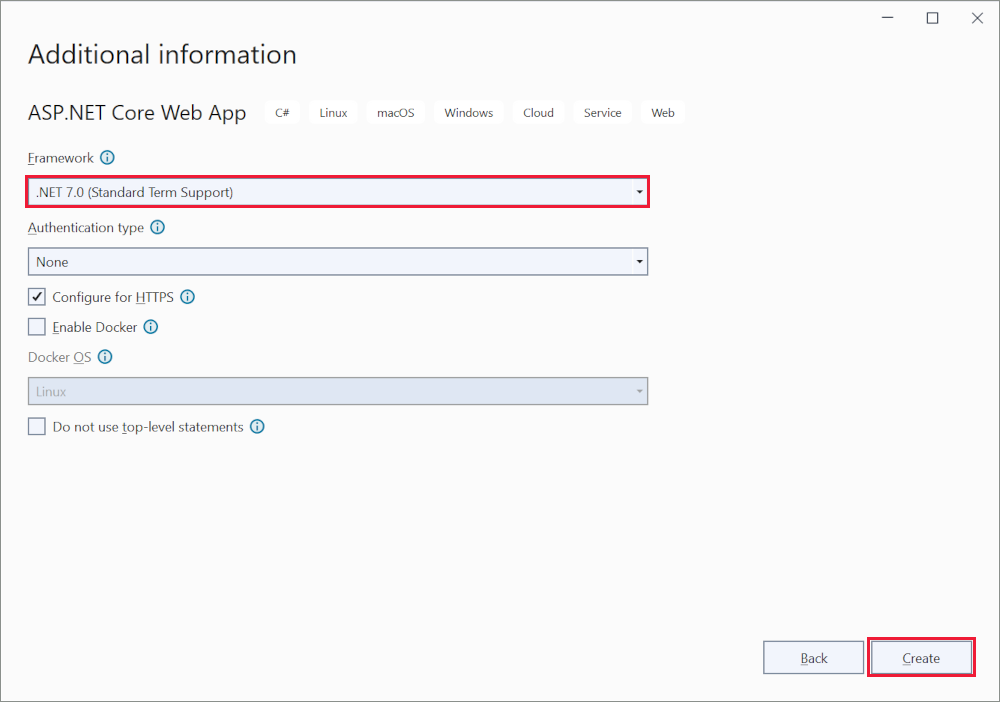
在“其他信息”对话框中,选择“.NET 7.0 (标准期限支持)”,然后选择“创建”。
添加 SignalR 客户端库
ASP.NET Core 共享框架中包含 SignalR 服务器库。 JavaScript 客户端库不会自动包含在项目中。 对于此教程,使用库管理器 (LibMan) 从 unpkg 获取客户端库。
unpkg 是一个快速的全局内容分发网络,适用于 npm 上的所有内容。
在“解决方案资源管理器”中,右键单击项目,然后选择“添加”>“客户端库”。
在“添加客户端库”对话框中:
- 为“提供程序”选择“unpkg”
- 对于“库”,请输入
@microsoft/signalr@latest。 - 选择“选择特定文件”,展开“dist/browser”文件夹,然后选择 和 。
- 将“目标位置”设置为 。
- 选择“安装”。
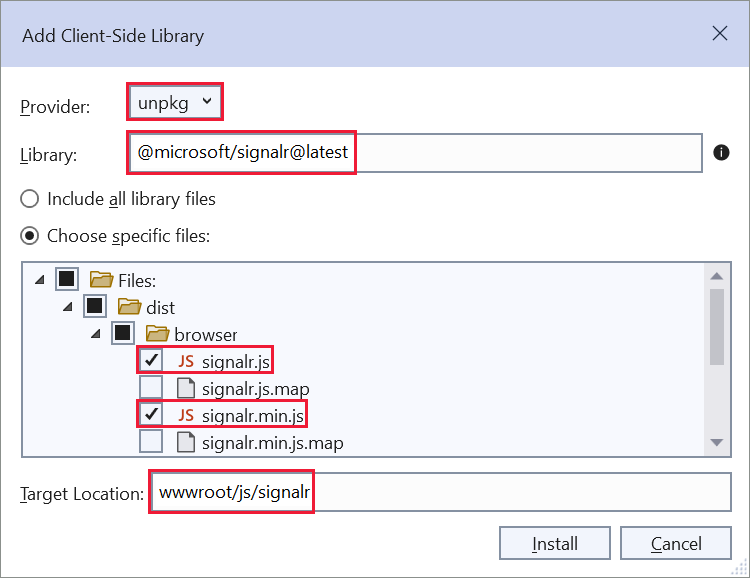
LibMan 创建 wwwroot/js/signalr 文件夹并将所选文件复制到该文件夹。
创建 SignalR 中心
中心是一个类,用作处理客户端 - 服务器通信的高级管道。
在 SignalRChat 项目文件夹中,创建 Hubs 文件夹。
在 Hubs 文件夹中,使用以下代码创建 ChatHub 类:
using Microsoft.AspNetCore.SignalR;

namespace SignalRChat.Hubs
{
    public class ChatHub : Hub
    {
        public async Task SendMessage(string user, string message)
        {
            await Clients.All.SendAsync("ReceiveMessage", user, message);
        }
    }
}
ChatHub 类继承自 SignalRHub。
Hub 类管理连接、组和消息。
可通过已连接客户端调用 SendMessage,以向所有客户端发送消息。 本教程后面部分将显示调用该方法的 JavaScript 客户端代码。
SignalR 代码是异步模式,可提供最大的可伸缩性。
配置 SignalR
必须将 SignalR 服务器配置为将 SignalR 请求传递给 SignalR。 将以下突出显示的代码添加到 Program.cs 文件。
using SignalRChat.Hubs;

var builder = WebApplication.CreateBuilder(args);

// Add services to the container.
builder.Services.AddRazorPages();
builder.Services.AddSignalR();

var app = builder.Build();

// Configure the HTTP request pipeline.
if (!app.Environment.IsDevelopment())
{
    app.UseExceptionHandler("/Error");
    // The default HSTS value is 30 days. You may want to change this for production scenarios, see https://aka.ms/aspnetcore-hsts.
    app.UseHsts();
}

app.UseHttpsRedirection();
app.UseStaticFiles();

app.UseRouting();

app.UseAuthorization();

app.MapRazorPages();
app.MapHub<ChatHub>("/chatHub");

app.Run();
以上突出显示的代码将 SignalR 添加到 ASP.NET Core 依赖关系注入和路由系统。
添加 SignalR 客户端代码
使用以下代码替换 Pages/Index.cshtml 中的内容:
@page
<div class="container">
    <div class="row p-1">
        <div class="col-1">User</div>
        <div class="col-5"><input type="text" id="userInput" /></div>
    </div>
    <div class="row p-1">
        <div class="col-1">Message</div>
        <div class="col-5"><input type="text" class="w-100" id="messageInput" /></div>
    </div>
    <div class="row p-1">
        <div class="col-6 text-end">
            <input type="button" id="sendButton" value="Send Message" />
        </div>
    </div>
    <div class="row p-1">
        <div class="col-6">
            <hr />
        </div>
    </div>
    <div class="row p-1">
        <div class="col-6">
            <ul id="messagesList"></ul>
        </div>
    </div>
</div>
<script src="~/js/signalr/dist/browser/signalr.js"></script>
<script src="~/js/chat.js"></script>
前面的标记:
- 创建文本框和提交按钮。
- 使用
id="messagesList"创建一个列表,用于显示从 SignalR 中心接收的消息。 - 包含对 SignalR 的脚本引用,并在下一步中创建
chat.js应用代码。
在 wwwroot/js 文件夹中,使用以下代码创建 chat.js 文件:
"use strict";

var connection = new signalR.HubConnectionBuilder().withUrl("/chatHub").build();

//Disable the send button until connection is established.
document.getElementById("sendButton").disabled = true;

connection.on("ReceiveMessage", function (user, message) {
    var li = document.createElement("li");
    document.getElementById("messagesList").appendChild(li);
    // We can assign user-supplied strings to an element's textContent because it
    // is not interpreted as markup. If you're assigning in any other way, you
    // should be aware of possible script injection concerns.
    li.textContent = `${user} says ${message}`;
});

connection.start().then(function () {
    document.getElementById("sendButton").disabled = false;
}).catch(function (err) {
    return console.error(err.toString());
});

document.getElementById("sendButton").addEventListener("click", function (event) {
    var user = document.getElementById("userInput").value;
    var message = document.getElementById("messageInput").value;
    connection.invoke("SendMessage", user, message).catch(function (err) {
        return console.error(err.toString());
    });
    event.preventDefault();
});
前面的 JavaScript:
- 创建并启动连接。
- 向“提交”按钮添加一个用于向中心发送消息的处理程序。
- 向连接对象添加一个用于从中心接收消息并将其添加到列表的处理程序。
运行应用
选择 Ctrl+F5 可运行应用,不会进行调试。
从地址栏复制 URL,打开另一个浏览器实例或选项卡,并在地址栏中粘贴该 URL。
选择任一浏览器,输入名称和消息,然后选择“发送消息”按钮。
两个页面上立即显示名称和消息。

Tip
如果应用不起作用,请打开浏览器开发人员工具 (F12) 并转到控制台。 查找与 HTML 和 JavaScript 代码相关的可能错误。 例如,如果 signalr.js 被放在一个与指示不同的文件夹中,对该文件的引用将不起作用,导致控制台中出现 404 错误。

ERR_SPDY_INADEQUATE_TRANSPORT_SECURITY如果 Chrome 中发生错误,请运行以下命令来更新开发证书:
dotnet dev-certs https --clean
dotnet dev-certs https --trust
发布到 Azure
有关部署到 Azure 的信息,请参阅快速入门:部署 ASP.NET Web 应用。 有关 Azure SignalR 服务的详细信息,请参阅什么是 Azure SignalR 服务?。
后续步骤
本教程介绍使用 SignalR 生成实时应用的基础知识。 您将学习如何:
- 创建 Web 项目。
- 添加 SignalR 客户端库。
- 创建 SignalR 中心。
- 配置项目以使用 SignalR。
- 添加可将消息从任何客户端发送到所有连接客户端的代码。
最终将创建一个正常运行的聊天应用:

Prerequisites
- 带有 ASP.NET 和 Web 开发工作负载的 Visual Studio 2022。
- .NET 6 SDK
创建 Web 应用项目
启动 Visual Studio 2022 并选择“创建新项目”。

在“创建新项目”对话框中,选择“ASP.NET Core Web 应用”,然后选择“下一步” 。

在“配置新项目”对话框中,为“项目名称”输入 。 请务必将项目命名为 SignalRChat(包括匹配大写),以便命名空间与教程中的代码匹配。
选择“下一步”。
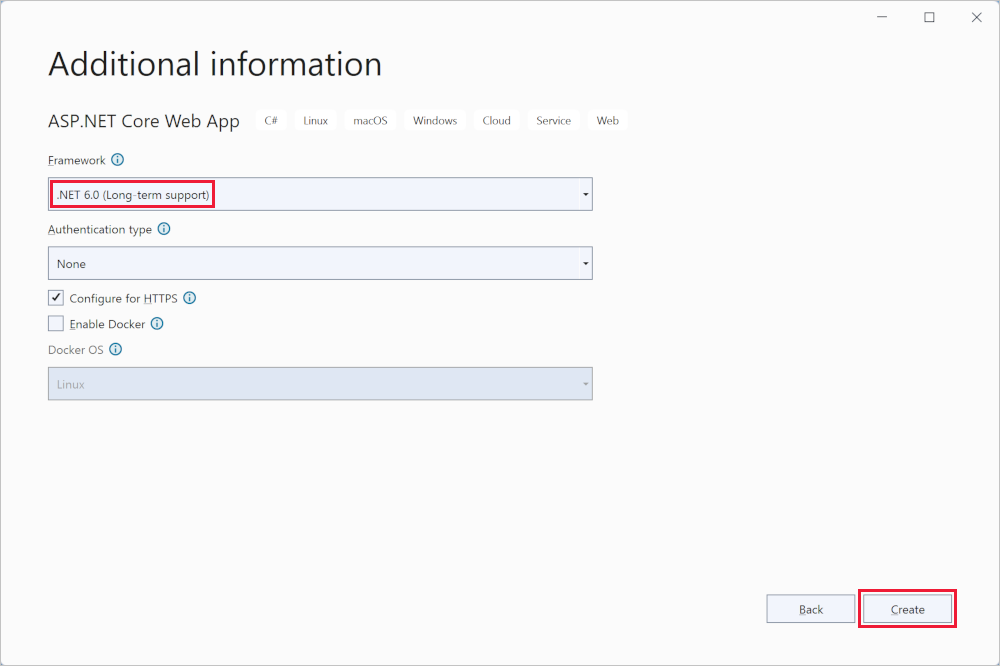
在“其他信息”对话框中,选择“.NET 6.0 (长期支持)”,然后选择“创建”。
添加 SignalR 客户端库
ASP.NET Core 共享框架中包含 SignalR 服务器库。 JavaScript 客户端库不会自动包含在项目中。 对于此教程,使用库管理器 (LibMan) 从 unpkg 获取客户端库。
unpkg 是一个快速的全局内容分发网络,适用于 npm 上的所有内容。
在“解决方案资源管理器”中,右键单击项目,然后选择“添加”>“客户端库”。
在“添加客户端库”对话框中:
- 为“提供程序”选择“unpkg”
- 对于“库”,请输入
@microsoft/signalr@latest。 - 选择“选择特定文件”,展开“dist/browser”文件夹,然后选择 和 。
- 将“目标位置”设置为 。
- 选择“安装”。

LibMan 创建 wwwroot/js/signalr 文件夹并将所选文件复制到该文件夹。
创建 SignalR 中心
中心是一个类,用作处理客户端 - 服务器通信的高级管道。
在 SignalRChat 项目文件夹中,创建 Hubs 文件夹。
在 Hubs 文件夹中,使用以下代码创建 ChatHub 类:
using Microsoft.AspNetCore.SignalR;

namespace SignalRChat.Hubs
{
    public class ChatHub : Hub
    {
        public async Task SendMessage(string user, string message)
        {
            await Clients.All.SendAsync("ReceiveMessage", user, message);
        }
    }
}
ChatHub 类继承自 SignalRHub。
Hub 类管理连接、组和消息。
可通过已连接客户端调用 SendMessage,以向所有客户端发送消息。 本教程后面部分将显示调用该方法的 JavaScript 客户端代码。
SignalR 代码是异步模式,可提供最大的可伸缩性。
配置 SignalR
必须将 SignalR 服务器配置为将 SignalR 请求传递给 SignalR。 将以下突出显示的代码添加到 Program.cs 文件。
using SignalRChat.Hubs;

var builder = WebApplication.CreateBuilder(args);

builder.Services.AddRazorPages();
builder.Services.AddSignalR();

var app = builder.Build();

if (!app.Environment.IsDevelopment())
{
    app.UseExceptionHandler("/Error");
    app.UseHsts();
}

app.UseHttpsRedirection();
app.UseStaticFiles();

app.UseRouting();

app.UseAuthorization();

app.MapRazorPages();
app.MapHub<ChatHub>("/chatHub");

app.Run();
以上突出显示的代码将 SignalR 添加到 ASP.NET Core 依赖关系注入和路由系统。
添加 SignalR 客户端代码
使用以下代码替换 Pages/Index.cshtml 中的内容:
@page
    <div class="container">
        <div class="row p-1">
            <div class="col-1">User</div>
            <div class="col-5"><input type="text" id="userInput" /></div>
        </div>
        <div class="row p-1">
            <div class="col-1">Message</div>
            <div class="col-5"><input type="text" class="w-100" id="messageInput" /></div>
        </div>
        <div class="row p-1">
            <div class="col-6 text-end">
                <input type="button" id="sendButton" value="Send Message" />
            </div>
        </div>
        <div class="row p-1">
            <div class="col-6">
                <hr />
            </div>
        </div>
        <div class="row p-1">
            <div class="col-6">
                <ul id="messagesList"></ul>
            </div>
        </div>
    </div>
<script src="~/js/signalr/dist/browser/signalr.js"></script>
<script src="~/js/chat.js"></script>
前面的标记:
- 创建文本框和提交按钮。
- 使用
id="messagesList"创建一个列表,用于显示从 SignalR 中心接收的消息。 - 包含对 SignalR 的脚本引用,并在下一步中创建
chat.js应用代码。
在 wwwroot/js 文件夹中,使用以下代码创建 chat.js 文件:
"use strict";

var connection = new signalR.HubConnectionBuilder().withUrl("/chatHub").build();

//Disable the send button until connection is established.
document.getElementById("sendButton").disabled = true;

connection.on("ReceiveMessage", function (user, message) {
    var li = document.createElement("li");
    document.getElementById("messagesList").appendChild(li);
    // We can assign user-supplied strings to an element's textContent because it
    // is not interpreted as markup. If you're assigning in any other way, you
    // should be aware of possible script injection concerns.
    li.textContent = `${user} says ${message}`;
});

connection.start().then(function () {
    document.getElementById("sendButton").disabled = false;
}).catch(function (err) {
    return console.error(err.toString());
});

document.getElementById("sendButton").addEventListener("click", function (event) {
    var user = document.getElementById("userInput").value;
    var message = document.getElementById("messageInput").value;
    connection.invoke("SendMessage", user, message).catch(function (err) {
        return console.error(err.toString());
    });
    event.preventDefault();
});
前面的 JavaScript:
- 创建并启动连接。
- 向“提交”按钮添加一个用于向中心发送消息的处理程序。
- 向连接对象添加一个用于从中心接收消息并将其添加到列表的处理程序。
运行应用
按 Ctrl+F5 可运行应用而不进行调试。
从地址栏复制 URL,打开另一个浏览器实例或选项卡,并在地址栏中粘贴该 URL。
选择任一浏览器,输入名称和消息,然后选择“发送消息”按钮。
两个页面上立即显示名称和消息。

Tip
如果应用不起作用,请打开浏览器开发人员工具 (F12) 并转到控制台。 查找与 HTML 和 JavaScript 代码相关的可能错误。 例如,如果 signalr.js 被放在一个与指示不同的文件夹中,对该文件的引用将不起作用,导致控制台中出现 404 错误。

ERR_SPDY_INADEQUATE_TRANSPORT_SECURITY如果 Chrome 中发生错误,请运行以下命令来更新开发证书:
dotnet dev-certs https --clean
dotnet dev-certs https --trust
发布到 Azure
有关部署到 Azure 的信息,请参阅快速入门:部署 ASP.NET Web 应用。 有关 Azure SignalR 服务的详细信息,请参阅什么是 Azure SignalR 服务?。
后续步骤
本教程介绍使用 SignalR 生成实时应用的基础知识。 您将学习如何:
- 创建 Web 项目。
- 添加 SignalR 客户端库。
- 创建 SignalR 中心。
- 配置项目以使用 SignalR。
- 添加可将消息从任何客户端发送到所有连接客户端的代码。
最终将创建一个正常运行的聊天应用:

Prerequisites
- 具有“ASP.NET 和 Web 开发”工作负载的 Visual Studio 2019 16.4 或更高版本
- .NET Core 3.1 SDK
创建 Web 应用项目
- 从菜单中选择“文件”>“新建项目”。
- 在“创建新项目”对话框中,选择“ASP.NET Core Web 应用程序”,然后选择“下一步” 。
- 在“配置新项目”对话框中,为项目 SignalRChat 命名,然后选择“创建”。
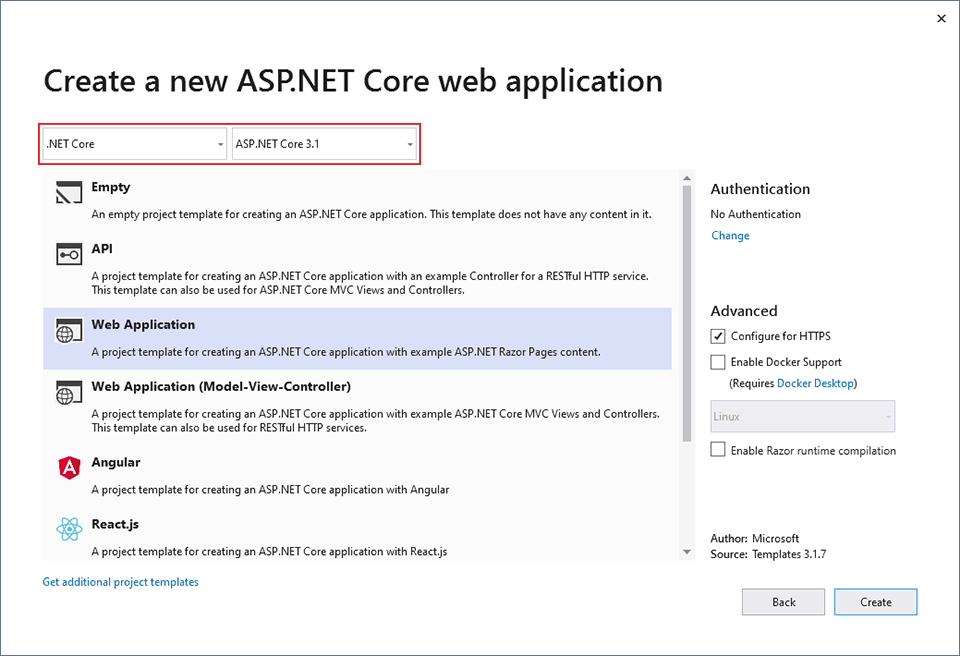
- 在“创建新的 ASP.NET Core Web 应用程序”对话框中,选择 .NET Core 和 ASP.NET Core 3.1 。
- 选择“Web 应用程序”以创建使用 Pages 的项目,然后选择“创建” 。
添加 SignalR 客户端库
ASP.NET Core 3.1 共享框架中包含 SignalR 服务器库。 JavaScript 客户端库不会自动包含在项目中。 对于此教程,使用库管理器 (LibMan) 从 unpkg 获取客户端库。 unpkg 是一个内容分发网络(CDN),可提供在 npm(Node.js 包管理器)中找到的任何内容。
- 在“解决方案资源管理器”中,右键单击项目,然后选择“添加”>“客户端库”。
- 在“添加客户端库”对话框中,对于“提供程序”,选择“unpkg”。
- 对于“库”,输入 。
- 选择“选择特定文件”,展开“dist/browser”文件夹,然后选择 和 。
- 将 目标位置 设置为 wwwroot/js/signalr/
- 选择 “安装”

LibMan 创建 wwwroot/js/signalr 文件夹,并将所选文件复制到其中。
创建 SignalR 中心
中心是一个类,用作处理客户端 - 服务器通信的高级管道。
- 在 SignalRChat 项目文件夹中,创建 Hubs 文件夹。
- 在 Hubs 文件夹中,使用以下代码创建 文件:
using Microsoft.AspNetCore.SignalR;
using System.Threading.Tasks;

namespace SignalRChat.Hubs
{
    public class ChatHub : Hub
    {
        public async Task SendMessage(string user, string message)
        {
            await Clients.All.SendAsync("ReceiveMessage", user, message);
        }
    }
}
ChatHub 类继承自 SignalRHub。
Hub 类管理连接、组和消息。
可通过已连接客户端调用 SendMessage,以向所有客户端发送消息。 本教程后面部分将显示调用该方法的 JavaScript 客户端代码。
SignalR 代码是异步模式,可提供最大的可伸缩性。
配置 SignalR
必须将 SignalR 服务器配置为将 SignalR 请求传递给 SignalR。
将以下突出显示的代码添加到
Startup.cs文件。using System; using System.Collections.Generic; using System.Linq; using System.Threading.Tasks; using Microsoft.AspNetCore.Builder; using Microsoft.AspNetCore.Hosting; using Microsoft.AspNetCore.HttpsPolicy; using Microsoft.Extensions.Configuration; using Microsoft.Extensions.DependencyInjection; using Microsoft.Extensions.Hosting; using SignalRChat.Hubs; namespace SignalRChat { public class Startup { public Startup(IConfiguration configuration) { Configuration = configuration; } public IConfiguration Configuration { get; } // This method gets called by the runtime. Use this method to add services to the container. public void ConfigureServices(IServiceCollection services) { services.AddRazorPages(); services.AddSignalR(); } // This method gets called by the runtime. Use this method to configure the HTTP request pipeline. public void Configure(IApplicationBuilder app, IWebHostEnvironment env) { if (env.IsDevelopment()) { app.UseDeveloperExceptionPage(); } else { app.UseExceptionHandler("/Error"); // The default HSTS value is 30 days. You may want to change this for production scenarios, see https://aka.ms/aspnetcore-hsts. app.UseHsts(); } app.UseHttpsRedirection(); app.UseStaticFiles(); app.UseRouting(); app.UseAuthorization(); app.UseEndpoints(endpoints => { endpoints.MapRazorPages(); endpoints.MapHub<ChatHub>("/chatHub"); }); } } }这些更改将 SignalR 添加到 ASP.NET Core 依赖关系注入和路由系统。
添加 SignalR 客户端代码
使用以下代码替换
Pages/Index.cshtml中的内容:@page <div class="container"> <div class="row p-1"> <div class="col-1">User</div> <div class="col-5"><input type="text" id="userInput" /></div> </div> <div class="row p-1"> <div class="col-1">Message</div> <div class="col-5"><input type="text" class="w-100" id="messageInput" /></div> </div> <div class="row p-1"> <div class="col-6 text-end"> <input type="button" id="sendButton" value="Send Message" /> </div> </div> <div class="row p-1"> <div class="col-6"> <hr /> </div> </div> <div class="row p-1"> <div class="col-6"> <ul id="messagesList"></ul> </div> </div> </div> <script src="~/js/signalr/dist/browser/signalr.js"></script> <script src="~/js/chat.js"></script>前面的代码:
- 创建名称以及消息文本的文本框和“提交”按钮。
- 使用
id="messagesList"创建一个列表,用于显示从 SignalR 中心接收的消息。 - 包含对 SignalR 的脚本引用以及在下一步中创建的
chat.js应用程序代码。
在 wwwroot/js 文件夹中,使用以下代码创建
chat.js文件:"use strict"; var connection = new signalR.HubConnectionBuilder().withUrl("/chatHub").build(); //Disable send button until connection is established document.getElementById("sendButton").disabled = true; connection.on("ReceiveMessage", function (user, message) { var li = document.createElement("li"); document.getElementById("messagesList").appendChild(li); // We can assign user-supplied strings to an element's textContent because it // is not interpreted as markup. If you're assigning in any other way, you // should be aware of possible script injection concerns. li.textContent = `${user} says ${message}`; }); connection.start().then(function () { document.getElementById("sendButton").disabled = false; }).catch(function (err) { return console.error(err.toString()); }); document.getElementById("sendButton").addEventListener("click", function (event) { var user = document.getElementById("userInput").value; var message = document.getElementById("messageInput").value; connection.invoke("SendMessage", user, message).catch(function (err) { return console.error(err.toString()); }); event.preventDefault(); });前面的代码:
- 创建并启动连接。
- 向“提交”按钮添加一个用于向中心发送消息的处理程序。
- 向连接对象添加一个用于从中心接收消息并将其添加到列表的处理程序。
运行应用
- 按 Ctrl+F5 可运行应用而不进行调试。
- 从地址栏复制 URL,打开另一个浏览器实例或选项卡,并在地址栏中粘贴该 URL。
- 选择任一浏览器,输入名称和消息,然后选择“发送消息”按钮。 两个页面上立即显示名称和消息。

Tip
如果应用不起作用,请打开浏览器开发人员工具 (F12) 并转到控制台。 可能会看到与 HTML 和 JavaScript 代码相关的错误。 例如,假设将
signalr.js放在不同于系统指示的文件夹中。 在这种情况下,对该文件的引用将不起作用,并且你将在控制台中看到 404 错误。
如果 Chrome 中出现 ERR_SPDY_INADEQUATE_TRANSPORT_SECURITY 错误,请运行这些命令以更新开发证书:
dotnet dev-certs https --clean
dotnet dev-certs https --trust
发布到 Azure
有关部署到 Azure 的信息,请参阅快速入门:部署 ASP.NET Web 应用。
