你当前正在访问 Microsoft Azure Global Edition 技术文档网站。 如果需要访问由世纪互联运营的 Microsoft Azure 中国技术文档网站,请访问 https://docs.azure.cn。
使用 Azure Active Directory B2C 自定义策略为社交帐户设置注册和登录流
在使用 Azure Active Directory B2C 自定义策略设置注册和登录流一文中,我们使用 Azure Active Directory B2C (Azure AD B2C) 为本地帐户设置登录流。
在本文中,我们将为外部帐户添加登录流,例如 Facebook 等社交帐户。 在本例中,Azure AD B2C 允许用户使用来自外部社交标识提供者 (IdP) 的凭据登录到应用程序。
对于本地帐户,将使用objectId用户属性对用户帐户进行唯一标识。 对于外部 IdP,虽然 objectId 仍存在,但我们将使用 alternativeSecurityId 用户属性。
先决条件
如果没有租户,请创建链接到 Azure 订阅的 Azure AD B2C 租户。
注册 Web 应用程序并启用 ID 令牌隐式授权。 对于“重定向 URI”,使用 https://jwt.ms。
必须在计算机上安装 Visual Studio Code (VS Code)。
完成使用 Azure Active Directory B2C 自定义策略为本地帐户设置注册和登录流中的步骤。 本文是创建和运行自己的自定义策略操作指南系列教程的一部分。
注意
本文是《在 Azure Active Directory B2C 中创建和运行自己的自定义策略操作指南系列教程》的一部分。 建议从第一篇文章开始使用本系列教程。
步骤 1 - 创建 Facebook 应用程序
使用创建 Facebook 应用程序中所述的步骤获取 Facebook 应用 ID 和应用机密 。 跳过使用 Facebook 帐户设置注册和登录一文中的先决条件和其余步骤。
步骤 2 - 创建 Facebook 策略密钥
使用创建 Facebook 密钥中概述的步骤,将策略密钥存储在你的 Azure AD B2C 租户中。 跳过使用 Facebook 帐户设置注册和登录一文中的先决条件和其余步骤。
步骤 3 - 配置 Facebook 登录
若要配置 Facebook 登录,你需要执行以下步骤:
- 提供更多声明
- 定义更多声明转换来帮助执行声明操作,例如创建
AlternativeSecurityId。 - 配置 Facebook 声明提供程序
- 配置 Microsoft Entra 技术配置文件,以便在 Microsoft Entra 数据库中读取和写入社交帐户。
- 配置自断言技术配置文件(用于接受来自用户的其他输入或更新用户详细信息)及其内容定义。
步骤 3.1 - 提供更多声明
在 ContosoCustomPolicy.XML 文件中,找到 ClaimsSchema 部分,然后使用以下代码提供更多声明:
    <!--<ClaimsSchema>-->
        ...
        <ClaimType Id="issuerUserId">
            <DisplayName>Username</DisplayName>
            <DataType>string</DataType>
            <UserHelpText/>
            <UserInputType>TextBox</UserInputType>
            <Restriction>
                <Pattern RegularExpression="^[a-zA-Z0-9]+[a-zA-Z0-9_-]*$" HelpText="The username you provided is not valid. It must begin with an alphabet or number and can contain alphabets, numbers and the following symbols: _ -" />
            </Restriction>
        </ClaimType>

        <ClaimType Id="identityProvider">
            <DisplayName>Identity Provider</DisplayName>
            <DataType>string</DataType>
            <UserHelpText/>
        </ClaimType>

        <ClaimType Id="authenticationSource">
            <DisplayName>AuthenticationSource</DisplayName>
            <DataType>string</DataType>
            <UserHelpText>Specifies whether the user was authenticated at Social IDP or local account.</UserHelpText>
        </ClaimType>

        <ClaimType Id="upnUserName">
            <DisplayName>UPN User Name</DisplayName>
            <DataType>string</DataType>
            <UserHelpText>The user name for creating user principal name.</UserHelpText>
        </ClaimType>

        <ClaimType Id="alternativeSecurityId">
            <DisplayName>AlternativeSecurityId</DisplayName>
            <DataType>string</DataType>
            <UserHelpText/>
        </ClaimType>

        <ClaimType Id="mailNickName">
            <DisplayName>MailNickName</DisplayName>
            <DataType>string</DataType>
            <UserHelpText>Your mail nick name as stored in the Azure Active Directory.</UserHelpText>
        </ClaimType>

        <ClaimType Id="newUser">
            <DisplayName>User is new or not</DisplayName>
            <DataType>boolean</DataType>
            <UserHelpText/>
        </ClaimType>
    <!--</ClaimsSchema>-->
步骤 3.2 - 定义声明转换
在 ContosoCustomPolicy.XML 文件中,找到 ClaimsTransformations 元素,然后使用以下代码添加声明转换:
   <!--<ClaimsTransformations>-->
       ...
       <ClaimsTransformation Id="CreateRandomUPNUserName" TransformationMethod="CreateRandomString">
           <InputParameters>
               <InputParameter Id="randomGeneratorType" DataType="string" Value="GUID" />
           </InputParameters>
           <OutputClaims>
               <OutputClaim ClaimTypeReferenceId="upnUserName" TransformationClaimType="outputClaim" />
           </OutputClaims>
       </ClaimsTransformation>

       <ClaimsTransformation Id="CreateAlternativeSecurityId" TransformationMethod="CreateAlternativeSecurityId">
           <InputClaims>
               <InputClaim ClaimTypeReferenceId="issuerUserId" TransformationClaimType="key" />
               <InputClaim ClaimTypeReferenceId="identityProvider" TransformationClaimType="identityProvider" />
           </InputClaims>
           <OutputClaims>
               <OutputClaim ClaimTypeReferenceId="alternativeSecurityId" TransformationClaimType="alternativeSecurityId" />
           </OutputClaims>
       </ClaimsTransformation>

       <ClaimsTransformation Id="CreateUserPrincipalName" TransformationMethod="FormatStringClaim">
           <InputClaims>
               <InputClaim ClaimTypeReferenceId="upnUserName" TransformationClaimType="inputClaim" />
           </InputClaims>
           <InputParameters>
               <InputParameter Id="stringFormat" DataType="string" Value="cpim_{0}@{RelyingPartyTenantId}" />
           </InputParameters>
           <OutputClaims>
               <OutputClaim ClaimTypeReferenceId="userPrincipalName" TransformationClaimType="outputClaim" />
           </OutputClaims>
       </ClaimsTransformation>
   <!--</ClaimsTransformations>-->
我们定义了 3 个声明转换,用于为 alternativeSecurityId 和 userPrincipalName 声明生成值。 这些 ClaimsTransformations 将在步骤 3.3 的 OAuth2 技术配置文件中调用。
步骤 3.3 - 配置 Facebook 声明提供程序
若要使用户能够使用 Facebook 帐户登录,需将该帐户定义为 Azure AD B2C 可通过终结点与之通信的声明提供程序。 可以将 Facebook 帐户定义为声明提供程序。
在 ContosoCustomPolicy.XML 文件中,找到 ClaimsProviders 元素,然后使用以下代码添加新的声明提供程序:
    <!--<ClaimsProviders>-->
        ...
        <ClaimsProvider>
            <!-- The following Domain element allows this profile to be used if the request comes with domain_hint
                    query string parameter, e.g. domain_hint=facebook.com  -->
            <Domain>facebook.com</Domain>
            <DisplayName>Facebook</DisplayName>
            <TechnicalProfiles>
                <TechnicalProfile Id="Facebook-OAUTH">
                <!-- The text in the following DisplayName element is shown to the user on the claims provider
                        selection screen. -->
                <DisplayName>Facebook</DisplayName>
                <Protocol Name="OAuth2" />
                <Metadata>
                    <Item Key="ProviderName">facebook</Item>
                    <Item Key="authorization_endpoint">https://www.facebook.com/dialog/oauth</Item>
                    <Item Key="AccessTokenEndpoint">https://graph.facebook.com/oauth/access_token</Item>
                    <Item Key="HttpBinding">GET</Item>
                    <Item Key="UsePolicyInRedirectUri">0</Item>
                    <Item Key="client_id">facebook-app-id</Item>
                    <Item Key="scope">email public_profile</Item>
                    <Item Key="ClaimsEndpoint">https://graph.facebook.com/me?fields=id,first_name,last_name,name,email</Item>
                    <Item Key="AccessTokenResponseFormat">json</Item>
                </Metadata>
                <CryptographicKeys>
                    <Key Id="client_secret" StorageReferenceId="facebook-policy-key" />
                </CryptographicKeys>
                <InputClaims />
                <OutputClaims>
                    <OutputClaim ClaimTypeReferenceId="issuerUserId" PartnerClaimType="id" />
                    <OutputClaim ClaimTypeReferenceId="givenName" PartnerClaimType="first_name" />
                    <OutputClaim ClaimTypeReferenceId="surname" PartnerClaimType="last_name" />
                    <OutputClaim ClaimTypeReferenceId="displayName" PartnerClaimType="name" />
                    <OutputClaim ClaimTypeReferenceId="email" PartnerClaimType="email" />
                    <OutputClaim ClaimTypeReferenceId="identityProvider" DefaultValue="facebook.com" AlwaysUseDefaultValue="true" />
                    <OutputClaim ClaimTypeReferenceId="authenticationSource" DefaultValue="socialIdpAuthentication" AlwaysUseDefaultValue="true" />
                </OutputClaims>
                <OutputClaimsTransformations>
                    <OutputClaimsTransformation ReferenceId="CreateRandomUPNUserName" />
                    <OutputClaimsTransformation ReferenceId="CreateUserPrincipalName" />
                    <OutputClaimsTransformation ReferenceId="CreateAlternativeSecurityId" />
                </OutputClaimsTransformations>
                </TechnicalProfile>
            </TechnicalProfiles>
        </ClaimsProvider>
    <!--</ClaimsProviders>-->
替换:
- 将
facebook-app-id替换为你在步骤 1 中获取的 FacebookappID值。 - 将
facebook-policy-key替换为你在步骤 2 中获取的 Facebook 策略密钥的名称。
请注意我们在步骤 3.2 的 OutputClaimsTransformations 集合中定义的声明转换。
步骤 3.4 - 创建 Microsoft Entra 技术配置文件
就像使用本地帐户登录一样,需要配置用于连接到 Microsoft Entra ID 存储的 Microsoft Entra 技术配置文件,才能存储或读取用户社交帐户。
在
ContosoCustomPolicy.XML文件中,找到AAD-UserUpdate技术配置文件,然后使用以下代码添加新的技术配置文件:<TechnicalProfile Id="AAD-UserWriteUsingAlternativeSecurityId"> <DisplayName>Azure Active Directory technical profile for handling social accounts</DisplayName> <Protocol Name="Proprietary" Handler="Web.TPEngine.Providers.AzureActiveDirectoryProvider, Web.TPEngine, Version=1.0.0.0, Culture=neutral, PublicKeyToken=null" /> <Metadata> <Item Key="Operation">Write</Item> <Item Key="RaiseErrorIfClaimsPrincipalAlreadyExists">true</Item> </Metadata> <CryptographicKeys> <Key Id="issuer_secret" StorageReferenceId="B2C_1A_TokenSigningKeyContainer" /> </CryptographicKeys> <InputClaims> <InputClaim ClaimTypeReferenceId="alternativeSecurityId" PartnerClaimType="alternativeSecurityId" Required="true" /> </InputClaims> <PersistedClaims> <!-- Required claims --> <PersistedClaim ClaimTypeReferenceId="alternativeSecurityId" /> <PersistedClaim ClaimTypeReferenceId="userPrincipalName" /> <PersistedClaim ClaimTypeReferenceId="mailNickName" DefaultValue="unknown" /> <PersistedClaim ClaimTypeReferenceId="displayName" DefaultValue="unknown" /> <!-- Optional claims --> <PersistedClaim ClaimTypeReferenceId="givenName" /> <PersistedClaim ClaimTypeReferenceId="surname" /> </PersistedClaims> <OutputClaims> <OutputClaim ClaimTypeReferenceId="objectId" /> <OutputClaim ClaimTypeReferenceId="newUser" PartnerClaimType="newClaimsPrincipalCreated" /> </OutputClaims> </TechnicalProfile>我们添加了一个新的 Microsoft Entra 技术配置文件
AAD-UserWriteUsingAlternativeSecurityId用于将新的社交帐户写入 Microsoft Entra ID。将 B2C_1A_TokenSigningKeyContainer 替换为你在配置签名中创建的令牌签名密钥。
在
ContosoCustomPolicy.XML文件中,使用以下代码在AAD-UserWriteUsingAlternativeSecurityId技术配置文件后面添加另一个Microsoft Entra 技术配置文件:<TechnicalProfile Id="AAD-UserReadUsingAlternativeSecurityId"> <DisplayName>Azure Active Directory</DisplayName> <Protocol Name="Proprietary" Handler="Web.TPEngine.Providers.AzureActiveDirectoryProvider, Web.TPEngine, Version=1.0.0.0, Culture=neutral, PublicKeyToken=null" /> <Metadata> <Item Key="Operation">Read</Item> <Item Key="RaiseErrorIfClaimsPrincipalDoesNotExist">false</Item> </Metadata> <CryptographicKeys> <Key Id="issuer_secret" StorageReferenceId="B2C_1A_TokenSigningKeyContainer" /> </CryptographicKeys> <InputClaims> <InputClaim ClaimTypeReferenceId="alternativeSecurityId" PartnerClaimType="alternativeSecurityId" Required="true" /> </InputClaims> <OutputClaims> <!-- Required claims --> <OutputClaim ClaimTypeReferenceId="objectId" /> <!-- Optional claims --> <OutputClaim ClaimTypeReferenceId="userPrincipalName" /> <OutputClaim ClaimTypeReferenceId="displayName" /> <OutputClaim ClaimTypeReferenceId="givenName" /> <OutputClaim ClaimTypeReferenceId="surname" /> </OutputClaims> </TechnicalProfile>我们添加了一个新的 Microsoft Entra 技术配置文件
AAD-UserReadUsingAlternativeSecurityId用于从 Microsoft Entra ID 读取新的社交帐户。 它将alternativeSecurityId用作社交帐户的唯一标识符。将 B2C_1A_TokenSigningKeyContainer 替换为你在配置签名中创建的令牌签名密钥。
步骤 3.5 - 配置内容定义
用户登录后,可以使用自断言技术配置文件从他们那里收集一些信息。 因此,你需要为自断言技术配置文件配置内容定义。
在 ContosoCustomPolicy.XML 文件中,找到 ContentDefinitions 元素,然后使用以下代码在 ContentDefinitions 集合中添加新的内容定义:
    <ContentDefinition Id="socialAccountsignupContentDefinition">
        <LoadUri>~/tenant/templates/AzureBlue/selfAsserted.cshtml</LoadUri>
        <RecoveryUri>~/common/default_page_error.html</RecoveryUri>
        <DataUri>urn:com:microsoft:aad:b2c:elements:contract:selfasserted:2.1.7</DataUri>
        <Metadata>
            <Item Key="DisplayName">Collect information from user page alongside those from social Idp.</Item>
        </Metadata>
    </ContentDefinition>
在下一步(步骤 3.6)中,我们会将此内容定义用作自断言技术配置文件中的元数据。
步骤 3.6 - 配置自断言技术配置文件
你在此步骤中配置的自断言技术配置文件将用于从用户收集详细信息,或更新从社交帐户获取的类似信息。
在 ContosoCustomPolicy.XML 文件中,找到 ClaimsProviders 部分,然后使用以下代码添加新的声明提供程序:
    <!--<ClaimsProviders>-->
        ...
        <ClaimsProvider>
            <DisplayName>Self Asserted for social sign in</DisplayName>
            <TechnicalProfiles>
                <TechnicalProfile Id="SelfAsserted-Social">
                    <DisplayName>Collect more info during social signup</DisplayName>
                    <Protocol Name="Proprietary" Handler="Web.TPEngine.Providers.SelfAssertedAttributeProvider, Web.TPEngine, Version=1.0.0.0, Culture=neutral, PublicKeyToken=null" />
                    <Metadata>
                      <Item Key="ContentDefinitionReferenceId">socialAccountsignupContentDefinition</Item>
                    </Metadata>
                    <CryptographicKeys>
                      <Key Id="issuer_secret" StorageReferenceId="B2C_1A_TokenSigningKeyContainer" />
                    </CryptographicKeys>
                    <InputClaims>
                      <!-- These claims ensure that any values retrieved in the previous steps (e.g. from an external IDP) are prefilled.
                           Note that some of these claims may not have any value, for example, if the external IDP did not provide any of
                           these values, or if the claim did not appear in the OutputClaims section of the IDP.
                           In addition, if a claim is not in the InputClaims section, but it is in the OutputClaims section, then its
                           value will not be prefilled, but the user will still be prompted for it (with an empty value). -->
                      <InputClaim ClaimTypeReferenceId="displayName" />
                      <InputClaim ClaimTypeReferenceId="givenName" />
                      <InputClaim ClaimTypeReferenceId="surname" />
                    </InputClaims>
                    <!---User will be asked to input or update these values-->
                    <DisplayClaims>
                        <DisplayClaim ClaimTypeReferenceId="displayName"/>
                        <DisplayClaim ClaimTypeReferenceId="givenName"/>
                        <DisplayClaim ClaimTypeReferenceId="surname"/>
                    </DisplayClaims>

                    <OutputClaims>
                      <!-- These claims are not shown to the user because their value is obtained through the "ValidationTechnicalProfiles"
                           referenced below, or a default value is assigned to the claim. A claim is only shown to the user to provide a
                           value if its value cannot be obtained through any other means. -->
                      <OutputClaim ClaimTypeReferenceId="objectId" />
                      <OutputClaim ClaimTypeReferenceId="newUser" />
                      <!---<OutputClaim ClaimTypeReferenceId="executed-SelfAsserted-Input" DefaultValue="true" />-->

                      <!-- Optional claims. These claims are collected from the user and can be modified. If a claim is to be persisted in the directory after having been
                           collected from the user, it needs to be added as a PersistedClaim in the ValidationTechnicalProfile referenced below, i.e.
                           in AAD-UserWriteUsingAlternativeSecurityId. -->
                      <OutputClaim ClaimTypeReferenceId="displayName" />
                      <OutputClaim ClaimTypeReferenceId="givenName" />
                      <OutputClaim ClaimTypeReferenceId="surname" />
                    </OutputClaims>
                    <ValidationTechnicalProfiles>
                      <ValidationTechnicalProfile ReferenceId="AAD-UserWriteUsingAlternativeSecurityId" />
                    </ValidationTechnicalProfiles>
                  </TechnicalProfile>
            </TechnicalProfiles>
        </ClaimsProvider>
    <!--</ClaimsProviders>-->
我们添加的声明提供程序包含自断言技术配置文件 SelfAsserted-Social。 自断言技术配置文件将 AAD-UserWriteUsingAlternativeSecurityId 技术配置文件用作验证技术配置文件。 因此,当用户选择“继续”按钮时,会执行 AAD-UserWriteUsingAlternativeSecurityId 技术配置文件(参见步骤 7 中的屏幕截图)。
另请注意,我们添加了内容定义 socialAccountsignupContentDefinition(已在步骤 3.5 的元数据部分进行配置)。
步骤 4 - 更新用户旅程业务流程步骤
在 ContosoCustomPolicy.XML 文件中,找到 HelloWorldJourney 用户旅程,然后将所有业务流程步骤替换为以下代码中显示的步骤:
    <!--<OrchestrationSteps>-->
        ...
        <OrchestrationStep Order="1" Type="CombinedSignInAndSignUp">
            <ClaimsProviderSelections>
                <ClaimsProviderSelection TargetClaimsExchangeId="FacebookExchange" />
            </ClaimsProviderSelections>
        </OrchestrationStep>

        <OrchestrationStep Order="2" Type="ClaimsExchange">
            <ClaimsExchanges>
                <ClaimsExchange Id="FacebookExchange"
                    TechnicalProfileReferenceId="Facebook-OAUTH" />
            </ClaimsExchanges>
        </OrchestrationStep>

        <!-- For social IDP authentication, attempt to find the user account in the
        directory. -->
        <OrchestrationStep Order="3" Type="ClaimsExchange">
            <ClaimsExchanges>
                <ClaimsExchange Id="AADUserReadUsingAlternativeSecurityId" TechnicalProfileReferenceId="AAD-UserReadUsingAlternativeSecurityId" />
            </ClaimsExchanges>
        </OrchestrationStep>

        <!-- Show self-asserted page only if the directory does not have the user account
        already (i.e. we don't have an objectId).  -->
        <OrchestrationStep Order="4" Type="ClaimsExchange">
            <Preconditions>
                <Precondition Type="ClaimsExist" ExecuteActionsIf="true">
                    <Value>objectId</Value>
                    <Action>SkipThisOrchestrationStep</Action>
                </Precondition>
            </Preconditions>
            <ClaimsExchanges>
                <ClaimsExchange Id="SelfAsserted-Social" TechnicalProfileReferenceId="SelfAsserted-Social" />
            </ClaimsExchanges>
        </OrchestrationStep>

        <OrchestrationStep Order="5" Type="ClaimsExchange">
            <Preconditions>
                <Precondition Type="ClaimsExist" ExecuteActionsIf="true">
                    <Value>objectId</Value>
                    <Action>SkipThisOrchestrationStep</Action>
                </Precondition>
            </Preconditions>
            <ClaimsExchanges>
                <ClaimsExchange Id="AADUserWrite" TechnicalProfileReferenceId="AAD-UserWriteUsingAlternativeSecurityId" />
            </ClaimsExchanges>
        </OrchestrationStep>
        <OrchestrationStep Order="6" Type="SendClaims" CpimIssuerTechnicalProfileReferenceId="JwtIssuer" />
    <!--</OrchestrationSteps>-->
在业务流程中,我们引用了允许用户使用社交帐户登录的技术配置文件。
当自定义策略运行时:
业务流程步骤 1 - 此步骤包含
ClaimsProviderSelections元素,其中列出了可供用户选择的可用登录选项。 在本例中,我们只有一个选项,即FacebookExchange,因此当策略运行时,用户将直接转到步骤 2 中的 Facebook.com,如TargetClaimsExchangeId属性所示。业务流程步骤 2 - 会执行
Facebook-OAUTH技术配置文件,以便用户重定向到 Facebook 进行登录。业务流程步骤 3 - 在步骤 3 中,会执行
AAD-UserReadUsingAlternativeSecurityId技术配置文件,以尝试从 Microsoft Entra ID 存储读取用户社交帐户。 如果找到社交帐户,则objectId将作为输出声明返回。业务流程步骤 4 - 如果用户尚不存在(
objectId不存在),则此步骤将运行。 它将显示用于从用户那里收集详细信息或更新从社交帐户获取的类似信息的表单。业务流程步骤 5 - 如果用户尚不存在(
objectId不存在),则此步骤将运行,因此AAD-UserWriteUsingAlternativeSecurityId技术配置文件将执行,以便将社交帐户写入 Microsoft Entra ID。业务流程步骤 6 - 最后,步骤 6 将在策略执行结束时组合并返回 JWT 令牌。
步骤 5 - 更新信赖方输出声明
在 ContosoCustomPolicy.XML 文件中,找到 RelyingParty 元素,然后将所有输出声明集合替换为以下代码:
    <OutputClaim ClaimTypeReferenceId="displayName" />
    <OutputClaim ClaimTypeReferenceId="givenName" />
    <OutputClaim ClaimTypeReferenceId="surname" />
    <OutputClaim ClaimTypeReferenceId="email" />
    <OutputClaim ClaimTypeReferenceId="objectId" PartnerClaimType="sub"/>
    <OutputClaim ClaimTypeReferenceId="identityProvider" />
我们已将标识提供者 (identityProvider) 添加为输出声明,因此它将包含在返回到信赖方应用程序的 JWT 令牌中。
步骤 6 - 上传策略
按照上传自定义策略文件中的步骤上传策略文件。 如果要上传与门户中已有文件同名的文件,请确保选择“覆盖自定义策略(若已有)”。
步骤 7 - 测试策略
按照测试自定义策略中的步骤测试自定义策略。
你将重定向到 Facebook 登录页。 输入 Facebook 凭据,然后选择“登录”。 由于没有提供多个登录选项,因此,在我们的业务流程步骤中,你将按照设置直接重定向到 Facebook。 通常,在应用中,你会添加一个按钮,例如“使用 Facebook 登录”,该按钮在选中后会运行策略。
如果这是首次运行此策略(Microsoft Entra 存储中尚不存在社交帐户),你会看到如下所示的屏幕截图。 在后续的策略执行中看不到此屏幕,因为 Microsoft Entra 存储中已存在社交帐户。
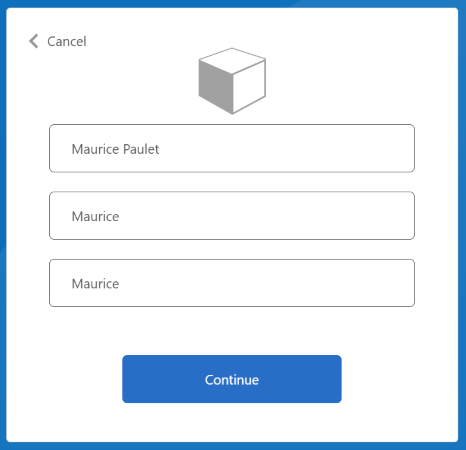
输入或更新“显示名称”、“名字”和“姓氏”,然后选择“继续”按钮。
策略执行完成后,你将重定向到 https://jwt.ms,并且会看到已解码的 JWT 令牌。 它类似于以下 JWT 令牌代码片段:
{
  "typ": "JWT",
  "alg": "RS256",
  "kid": "pxLOMWFgP4T..."
}.{
   ...
  "acr": "b2c_1a_contosocustompolicy",
   ...
  "given_name": "Maurice",
  "family_name": "Paulet",
  "name": "Maurice Paulet",
  "email": "maurice.p@contoso.com",
  "idp": "facebook.com"
}.[Signature]
请注意,标识提供者 "idp": "facebook.com" 已包含在 JWT 令牌中。
合并的本地帐户和社交帐户登录
在本文中,用户旅程业务流程步骤仅引用了允许用户使用社交帐户登录的技术配置文件。 我们可以修改业务流程步骤,使用户能够使用本地帐户或社交帐户登录。 为此,第一个业务流程步骤的 ClaimsProviderSelections 元素列出了可供用户选择的登录选项。
使用以下步骤添加组合的本地帐户和社交帐户:
在
ContosoCustomPolicy.XML文件中,找到AccountTypeInputCollector自断言技术配置文件,然后使用以下代码在其输出声明集合中添加authenticationSource声明:<OutputClaim ClaimTypeReferenceId="authenticationSource" DefaultValue="localIdpAuthentication" AlwaysUseDefaultValue="true" />在
UserJourneys部分中,使用以下代码添加新的用户旅程LocalAndSocialSignInAndSignUp:<!--<UserJourneys>--> ... <UserJourney Id="LocalAndSocialSignInAndSignUp"> <OrchestrationSteps> <!--Orchestration steps will be added here--> </OrchestrationSteps> </UserJourney> <!--</UserJourneys>-->在已创建的用户旅程
LocalAndSocialSignInAndSignUp中,使用以下代码添加业务流程步骤:<!--<UserJourneys> ... <UserJourney Id="LocalAndSocialSignInAndSignUp"> <OrchestrationSteps>--> <OrchestrationStep Order="1" Type="CombinedSignInAndSignUp" ContentDefinitionReferenceId="SignupOrSigninContentDefinition"> <ClaimsProviderSelections> <ClaimsProviderSelection TargetClaimsExchangeId="FacebookExchange" /> <ClaimsProviderSelection ValidationClaimsExchangeId="LocalAccountSigninEmailExchange" /> </ClaimsProviderSelections> <ClaimsExchanges> <ClaimsExchange Id="LocalAccountSigninEmailExchange" TechnicalProfileReferenceId="UserSignInCollector" /> </ClaimsExchanges> </OrchestrationStep> <!-- Check if the user has selected to sign in using one of the social providers --> <OrchestrationStep Order="2" Type="ClaimsExchange"> <Preconditions> <Precondition Type="ClaimsExist" ExecuteActionsIf="true"> <Value>objectId</Value> <Action>SkipThisOrchestrationStep</Action> </Precondition> </Preconditions> <ClaimsExchanges> <ClaimsExchange Id="FacebookExchange" TechnicalProfileReferenceId="Facebook-OAUTH" /> <ClaimsExchange Id="AccountTypeInputCollectorClaimsExchange" TechnicalProfileReferenceId="AccountTypeInputCollector"/> </ClaimsExchanges> </OrchestrationStep> <!--For Local sign in option start--> <OrchestrationStep Order="3" Type="ClaimsExchange"> <Preconditions> <Precondition Type="ClaimsExist" ExecuteActionsIf="true"> <Value>objectId</Value> <Action>SkipThisOrchestrationStep</Action> </Precondition> <Precondition Type="ClaimEquals" ExecuteActionsIf="true"> <Value>accountType</Value> <Value>work</Value> <Action>SkipThisOrchestrationStep</Action> </Precondition> <Precondition Type="ClaimEquals" ExecuteActionsIf="true"> <Value>authenticationSource</Value> <Value>socialIdpAuthentication</Value> <Action>SkipThisOrchestrationStep</Action> </Precondition> </Preconditions> <ClaimsExchanges> <ClaimsExchange Id="GetAccessCodeClaimsExchange" TechnicalProfileReferenceId="AccessCodeInputCollector" /> </ClaimsExchanges> </OrchestrationStep> <OrchestrationStep Order="4" Type="ClaimsExchange"> <Preconditions> <Precondition Type="ClaimsExist" ExecuteActionsIf="true"> <Value>objectId</Value> <Action>SkipThisOrchestrationStep</Action> </Precondition> <Precondition Type="ClaimEquals" ExecuteActionsIf="true"> <Value>authenticationSource</Value> <Value>socialIdpAuthentication</Value> <Action>SkipThisOrchestrationStep</Action> </Precondition> </Preconditions> <ClaimsExchanges> <ClaimsExchange Id="SignUpWithLogonEmailExchange" TechnicalProfileReferenceId="UserInformationCollector" /> </ClaimsExchanges> </OrchestrationStep> <OrchestrationStep Order="5" Type="ClaimsExchange"> <Preconditions> <Precondition Type="ClaimEquals" ExecuteActionsIf="true"> <Value>authenticationSource</Value> <Value>socialIdpAuthentication</Value> <Action>SkipThisOrchestrationStep</Action> </Precondition> </Preconditions> <ClaimsExchanges> <ClaimsExchange Id="AADUserReaderExchange" TechnicalProfileReferenceId="AAD-UserRead"/> </ClaimsExchanges> </OrchestrationStep> <!--For Local sign in option end--> <!--For social sign in option start--> <!-- For social IDP authentication, attempt to find the user account in the directory. --> <OrchestrationStep Order="6" Type="ClaimsExchange"> <Preconditions> <Precondition Type="ClaimEquals" ExecuteActionsIf="true"> <Value>authenticationSource</Value> <Value>localIdpAuthentication</Value> <Action>SkipThisOrchestrationStep</Action> </Precondition> </Preconditions> <ClaimsExchanges> <ClaimsExchange Id="AADUserReadUsingAlternativeSecurityId" TechnicalProfileReferenceId="AAD-UserReadUsingAlternativeSecurityId" /> </ClaimsExchanges> </OrchestrationStep> <!-- Show self-asserted page only if the directory does not have the user account already (i.e. we do not have an objectId). --> <OrchestrationStep Order="7" Type="ClaimsExchange"> <Preconditions> <Precondition Type="ClaimsExist" ExecuteActionsIf="true"> <Value>objectId</Value> <Action>SkipThisOrchestrationStep</Action> </Precondition> <Precondition Type="ClaimEquals" ExecuteActionsIf="true"> <Value>authenticationSource</Value> <Value>localIdpAuthentication</Value> <Action>SkipThisOrchestrationStep</Action> </Precondition> </Preconditions> <ClaimsExchanges> <ClaimsExchange Id="SelfAsserted-Social" TechnicalProfileReferenceId="SelfAsserted-Social" /> </ClaimsExchanges> </OrchestrationStep> <OrchestrationStep Order="8" Type="ClaimsExchange"> <Preconditions> <Precondition Type="ClaimsExist" ExecuteActionsIf="true"> <Value>objectId</Value> <Action>SkipThisOrchestrationStep</Action> </Precondition> <Precondition Type="ClaimEquals" ExecuteActionsIf="true"> <Value>authenticationSource</Value> <Value>localIdpAuthentication</Value> <Action>SkipThisOrchestrationStep</Action> </Precondition> </Preconditions> <ClaimsExchanges> <ClaimsExchange Id="AADUserWrite" TechnicalProfileReferenceId="AAD-UserWriteUsingAlternativeSecurityId" /> </ClaimsExchanges> </OrchestrationStep> <!--For social sign in option end--> <OrchestrationStep Order="9" Type="ClaimsExchange"> <ClaimsExchanges> <ClaimsExchange Id="GetMessageClaimsExchange" TechnicalProfileReferenceId="UserInputMessageClaimGenerator"/> </ClaimsExchanges> </OrchestrationStep> <OrchestrationStep Order="10" Type="SendClaims" CpimIssuerTechnicalProfileReferenceId="JwtIssuer" /> <!-- </OrchestrationSteps> </UserJourney> </UserJourneys>-->在第一步中,我们指定了用户在其旅程、本地或社交身份验证中需要选择的选项。 在后续步骤中,我们使用前置条件来跟踪用户选择的选项或用户所在的旅程阶段。 例如,我们使用
authenticationSource声明来区分本地身份验证旅程和社交身份验证旅程。在
RelyingParty部分中,将 DefaultUserJourney'sReferenceId更改为LocalAndSocialSignInAndSignUp使用 步骤 6 和步骤 7 中的过程上传并运行策略。 运行策略后,你将看到类似于以下屏幕截图的屏幕。
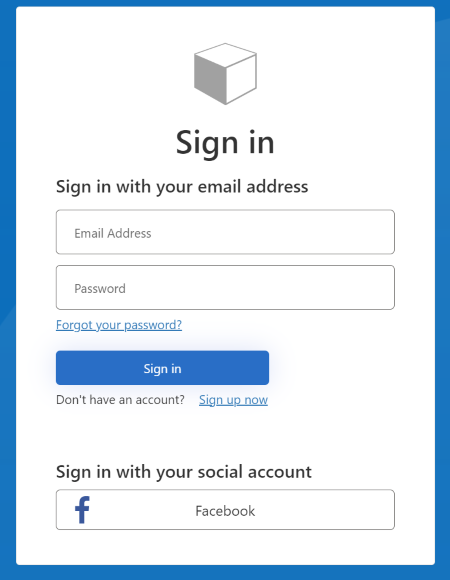
你可以看到,用户可以使用本地帐户或社交帐户进行注册或登录。