准备 Active Directory 轻型目录服务,以从 Microsoft Entra ID 进行预配
以下文档提供演示如何准备 Active Directory 轻型目录服务 (AD LDS) 安装的教程信息。 这可用作 LDAP 目录示例以进行故障排除或演示如何将 Microsoft Entra ID 中的用户预配到 LDAP 目录中。
准备 LDAP 目录
如果还没有目录服务器,则提供了以下信息来帮助创建测试 AD LDS 环境。 此设置使用 PowerShell,以及附带应答文件的 ADAMInstall.exe。 本文档不介绍有关 AD LDS 的深入信息。 有关详细信息,请参阅 Active Directory 轻型目录服务。
如果已经拥有 AD LDS 或其他目录服务器,则可以跳过此内容,并继续阅读教程:ECMA 连接器主机通用 LDAP 连接器,以安装和配置 ECMA 连接器主机。
创建 SSL 证书和测试目录并安装 AD LDS。
使用附录 A 中的 PowerShell 脚本。该脚本执行以下操作:
- 创建 LDAP 连接器使用的自签名证书。
- 创建一个目录用于保存功能安装日志。
- 将个人存储中的证书导出到该目录。
- 将证书导入到本地计算机的受信任根。
- 在虚拟机上安装 AD LDS 角色。
在用于测试 LDAP 连接器的 Windows Server 虚拟机上,编辑脚本以匹配计算机名称,然后使用具有管理权限的 Windows PowerShell 运行该脚本。
创建 AD LDS 的实例
安装角色后,需要创建 AD LDS 的实例。 若要创建实例,可以使用下面提供的应答文件。 此文件将在不使用 UI 的情况下以静默方式安装实例。
将附录 B 的内容复制到记事本,并在“C:\Windows\ADAM”中将其另存为“answer.txt” 。
现在以管理特权打开 cmd 提示符,并运行以下可执行文件:
C:\Windows\ADAM> ADAMInstall.exe /answer:answer.txt
为 AD LDS 创建容器和服务帐户
使用附录 C 中的 PowerShell 脚本。该脚本执行以下操作:
- 为将与 LDAP 连接器配合使用的服务帐户创建一个容器。
- 为云用户创建容器,用户将预配到其中。
- 在 AD LDS 中创建服务帐户。
- 启用服务帐户。
- 将服务帐户添加到 AD LDS 管理员角色。
在 Windows Server 虚拟机上,你将测试 LDAP 连接器,并以管理特权使用 Windows PowerShell 来运行脚本。
向网络服务授予对 SSL 证书的读取权限
为使 SSL 能够正常工作,需要授予对新建证书的网络服务读取权限。 若要授予权限,请使用以下步骤。
- 导航到“C:\Program Data\Microsoft\Crypto\Keys”。
- 右键单击其中的 system 文件。 该文件包含一个 GUID。 此容器存储了我们的证书。
- 选择属性。
- 在顶部选择“安全性”选项卡。
- 选择“编辑” 。
- 单击 添加。
- 在框中输入“网络服务”,然后选择“检查名称” 。
- 从列表中选择“网络服务”,然后单击“确定” 。
- 单击 “确定” 。
- 确保网络服务帐户拥有读取以及读取和执行权限,然后依次单击“应用”和“确定”。
验证与 AD LDS 的 SSL 连接
配置证书并授予网络服务帐户权限后,接下来请通过测试来验证连接是否正常。
- 打开服务器管理器,在左侧选择“AD LDS”
- 右键单击你的 AD LDS 实例,然后从弹出框中选择“ldp.exe”。

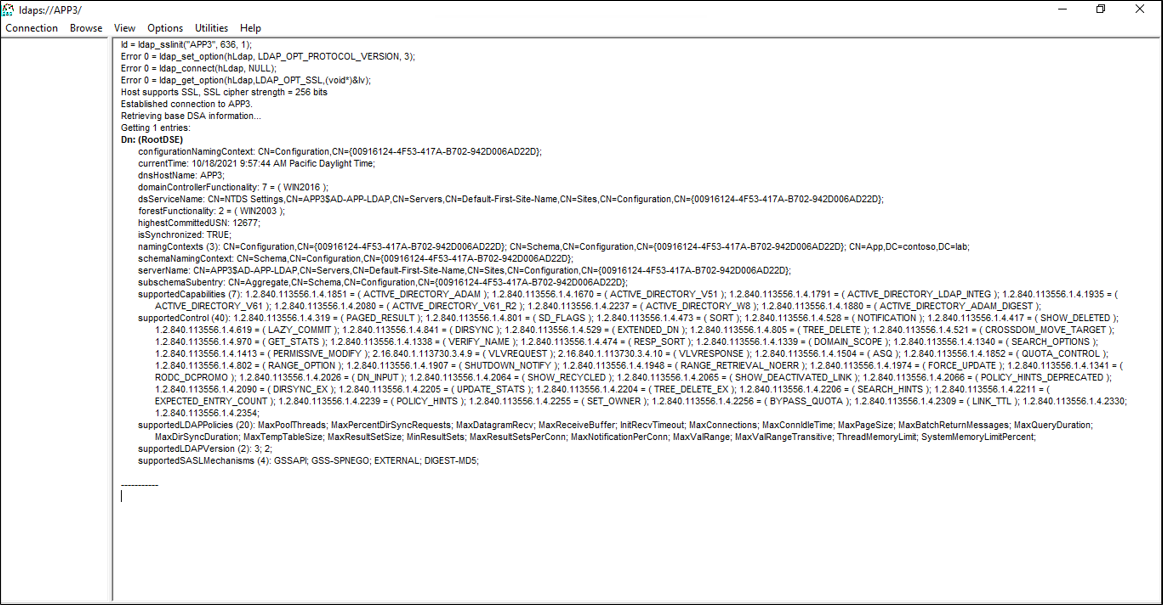
- 在 ldp.exe 顶部,依次选择“连接”和“连接” 。
- 输入以下信息并单击“确定”。
- 服务器:APP3
- 端口:636
- 选中“SSL”框

- 应会看到以下屏幕截图所示的响应。
- 在顶部的“连接”下,选择“绑定” 。
- 保留默认值并单击“确定”。

- 现在应已成功绑定到实例。


禁用本地密码策略
目前,LDAP 连接器使用空白密码来预配用户。 此配置不符合服务器上的本地密码策略,因此我们将禁用它以进行测试。 若要禁用密码复杂性,请在未加入域的服务器上使用以下步骤。
重要
由于持续密码同步不是本地 LDAP 配置的一项功能,因此 Microsoft 建议将 AD LDS 专门用于联合应用程序、与 AD DS 结合使用,或用于更新 AD LDS 实例中的现有用户。
- 在服务器上,依次单击“开始”、“运行”,然后输入“gpedit.msc”
- 在“本地组策略编辑器”中,导航到“计算机配置”>“Windows 设置”>“安全设置”>“帐户策略”>“密码策略”
- 在右侧,双击“密码必须符合复杂性要求”并选择“已禁用” 。
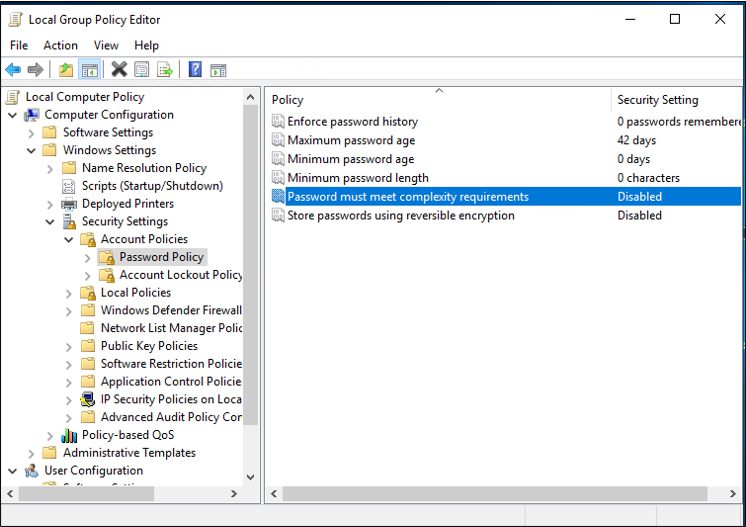
- 依次单击“应用”和“确定”
- 关闭本地组策略编辑器

接下来,继续按照将用户从 Microsoft Entra ID 预配到 LDAP 目录的指导来下载和配置预配代理。
附录 A - 安装 AD LDS PowerShell 脚本
以下 PowerShell 脚本可用于自动安装 Active Directory 轻型目录服务。 需要编辑脚本以匹配环境;特别是,请将 APP3 更改为计算机的主机名。
# Filename:    1_SetupADLDS.ps1
# Description: Creates a certificate that will be used for SSL and installs Active Directory Lighetweight Directory Services.
#
# DISCLAIMER:
# Copyright (c) Microsoft Corporation. All rights reserved. This
# script is made available to you without any express, implied or
# statutory warranty, not even the implied warranty of
# merchantability or fitness for a particular purpose, or the
# warranty of title or non-infringement. The entire risk of the
# use or the results from the use of this script remains with you.
#
#
#
#
#Declare variables
$DNSName = 'APP3'
$CertLocation = 'cert:\LocalMachine\MY'
$logpath = "c:\"
$dirname = "test"
$dirtype = "directory"
$featureLogPath = "c:\test\featurelog.txt"

#Create a new self-signed certificate
New-SelfSignedCertificate -DnsName $DNSName -CertStoreLocation $CertLocation

#Create directory
New-Item -Path $logpath -Name $dirname -ItemType $dirtype

#Export the certificate from the local machine personal store
Get-ChildItem -Path cert:\LocalMachine\my | Export-Certificate -FilePath c:\test\allcerts.sst -Type SST

#Import the certificate in to the trusted root
Import-Certificate -FilePath "C:\test\allcerts.sst" -CertStoreLocation cert:\LocalMachine\Root


#Install AD LDS
start-job -Name addFeature -ScriptBlock {
Add-WindowsFeature -Name "ADLDS" -IncludeAllSubFeature -IncludeManagementTools
 }
Wait-Job -Name addFeature
Get-WindowsFeature | Where installed >>$featureLogPath
附录 B - 应答文件
此文件用于自动化和创建 AD LDS 实例。 请编辑此文件以匹配环境;特别是,将 APP3 更改为服务器的主机名。
重要
此脚本使用 AD LDS 服务帐户的本地管理员身份,并在应答文件中将其密码硬编码。 此操作仅用于测试,不应在生产环境中使用。
如果在域控制器(而不是成员或独立服务器)上安装 AD LDS,需要将 LocalLDAPPortToListenOn 和 LocalSSLPortToListonOn 更改为 LDAP 和 SSL 上 LDAP 的已知端口以外的其他端口。 例如,LocalLDAPPortToListenOn=51300 并且 LocalSSLPortToListenOn=51301。
 [ADAMInstall]
 InstallType=Unique
 InstanceName=AD-APP-LDAP
 LocalLDAPPortToListenOn=389
 LocalSSLPortToListenOn=636
 NewApplicationPartitionToCreate=CN=App,DC=contoso,DC=lab
 DataFilesPath=C:\Program Files\Microsoft ADAM\AD-APP-LDAP\data
 LogFilesPath=C:\Program Files\Microsoft ADAM\AD-APP-LDAP\data
 ServiceAccount=APP3\Administrator
 ServicePassword=Pa$$Word1
 AddPermissionsToServiceAccount=Yes
 Administrator=APP3\Administrator
 ImportLDIFFiles="MS-User.LDF"
 SourceUserName=APP3\Administrator
 SourcePassword=Pa$$Word1
附录 C - 填充 AD LDS PowerShell 脚本
用于在 AD LDS 中填充容器和服务帐户的 PowerShell 脚本。
# Filename:    2_PopulateADLDS.ps1
# Description: Populates our AD LDS environment with 2 containers and a service account

# DISCLAIMER:
# Copyright (c) Microsoft Corporation. All rights reserved. This
# script is made available to you without any express, implied or
# statutory warranty, not even the implied warranty of
# merchantability or fitness for a particular purpose, or the
# warranty of title or non-infringement. The entire risk of the
# use or the results from the use of this script remains with you.
#
#
#
#
# Create service accounts container
New-ADObject -Name "ServiceAccounts" -Type "container" -Path "CN=App,DC=contoso,DC=lab" -Server "APP3:389"
Write-Output "Creating ServiceAccounts container"

# Create cloud users container
New-ADObject -Name "CloudUsers" -Type "container" -Path "CN=App,DC=contoso,DC=lab" -Server "APP3:389"
Write-Output "Creating CloudUsers container"

# Create a new service account
New-ADUser -name "svcAccountLDAP" -accountpassword  (ConvertTo-SecureString -AsPlainText 'Pa$$1Word' -Force) -Displayname "LDAP Service Account" -server 'APP3:389' -path "CN=ServiceAccounts,CN=App,DC=contoso,DC=lab"
Write-Output "Creating service account"

# Enable the new service account
Enable-ADAccount -Identity "CN=svcAccountLDAP,CN=ServiceAccounts,CN=App,DC=contoso,DC=lab" -Server "APP3:389"
Write-Output "Enabling service account"

# Add the service account to the Administrators role
Get-ADGroup -Server "APP3:389" -SearchBase "CN=Administrators,CN=Roles,CN=App,DC=contoso,DC=lab" -Filter "name -like 'Administrators'" | Add-ADGroupMember -Members "CN=svcAccountLDAP,CN=ServiceAccounts,CN=App,DC=contoso,DC=lab"
Write-Output "Adding service accounnt to Administrators role"