你当前正在访问 Microsoft Azure Global Edition 技术文档网站。 如果需要访问由世纪互联运营的 Microsoft Azure 中国技术文档网站,请访问 https://docs.azure.cn。
修复 Automanage 帐户
重要
本文仅适用于已加入 Automanage 早期版(API 版本 2020-06-30-preview)的计算机。 这些计算机的状态将为“需要升级”。
Azure Automanage 帐户是执行自动化操作所基于的安全性上下文或标识。 如果最近将包含 Automanage 帐户的订阅移动到了新租户,则需要重新配置该帐户。 若要重新配置该帐户,则需要重置标识类型,并为该帐户分配适当的角色。
步骤 1:重置 Automanage 帐户标识类型
使用以下 Azure 资源管理器 (ARM) 模板重置 Automanage 帐户标识类型。 使用 armdeploy.json 或类似的名称在本地保存文件。 记下 Automanage 帐户名和位置,因为它们是 ARM 模板必需的参数。
使用下面的模板创建资源管理器部署。 使用
identityType = None。- 可使用
az deployment sub create通过 Azure CLI 创建部署。 有关详细信息,请参阅 az deployment sub。 - 可使用
New-AzDeployment模块通过 PowerShell 创建部署。 有关详细信息,请参阅 New-AzDeployment。
- 可使用
使用
identityType = SystemAssigned再次运行相同的 ARM 模板。
{
    "$schema": "https://schema.management.azure.com/schemas/2019-04-01/deploymentTemplate.json#",
    "contentVersion": "1.0.0.0",
    "parameters": {
        "accountName": {
            "type": "string"
        },
        "location": {
            "type": "string"
        },
        "identityType": {
            "type": "string",
            "allowedValues": [ "None", "SystemAssigned" ]
        }
    },
    "resources": [
        {
            "apiVersion": "2020-06-30-preview",
            "name": "[parameters('accountName')]",
            "location": "[parameters('location')]",
            "type": "Microsoft.Automanage/accounts",
            "identity": {
                "type": "[parameters('identityType')]"
            }
        }
    ]
}
步骤 2:为 Automanage 帐户分配适当的角色
Automanage 帐户需要订阅(包含 Automanage 所管理的 VM)上的参与者角色和资源策略参与者角色。 可使用 Azure 门户、ARM 模板或 Azure CLI 来分配这些角色。
如果使用的是 ARM 模板或 Azure CLI,则需要 Automanage 帐户的主体 ID(也称为对象 ID)。 (如果使用的是 Azure 门户,则无需此 ID。)可以使用以下方法查找此 ID:
Azure CLI:使用命令
az ad sp list --display-name <name of your Automanage Account>。Azure 门户:转到“Microsoft Entra ID”,然后按名称搜索 Automanage 帐户。 在“企业应用程序”下,在显示 Automanage 帐户名时选择它。
Azure 门户
在“订阅”下,转到包含自动托管的 VM 的订阅。
选择“访问控制 (IAM)”。
选择“添加”>“添加角色分配”,打开“添加角色分配”页面 。
分配以下角色。 有关详细步骤,请参阅使用 Azure 门户分配 Azure 角色。
设置 值 角色 参与者 将访问权限分配到 用户、组或服务主体 成员 <Automanage 帐户的名称> 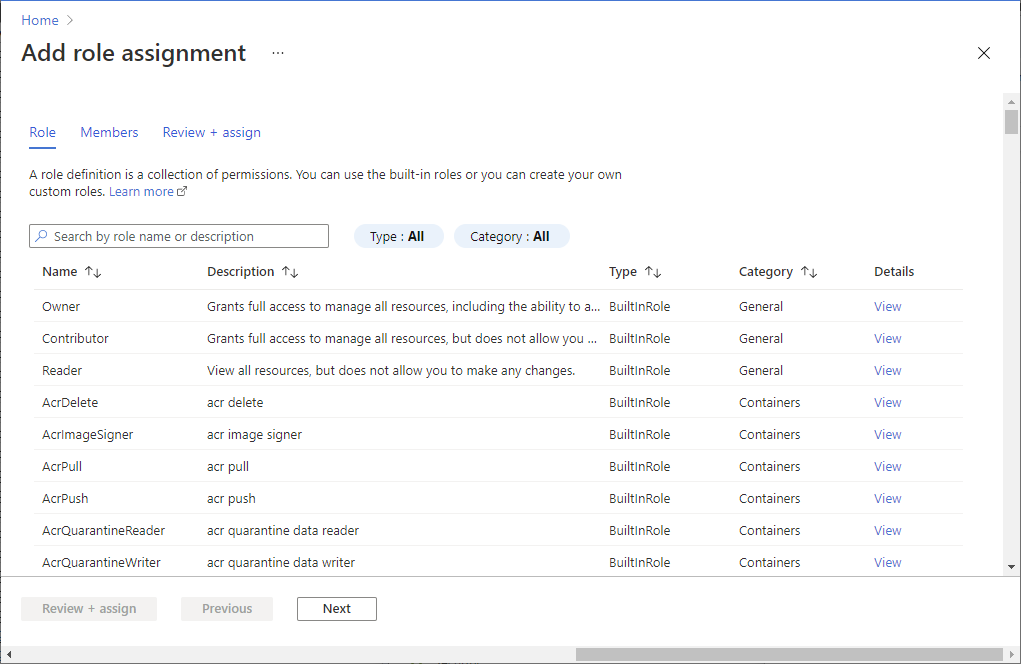
重复步骤 2 到 4,选择“资源策略参与者”角色。
ARM 模板
运行以下 ARM 模板。 需要 Automanage 帐户的主体 ID。 本部分的开头介绍了获取此 ID 的步骤。 在出现提示时输入此 ID。
{
    "$schema": "https://schema.management.azure.com/schemas/2015-01-01/deploymentTemplate.json#",
    "contentVersion": "1.0.0.0",
    "parameters": {
        "principalId": {
            "type": "string",
            "metadata": {
                "description": "The principal to assign the role to"
            }
        }
    },
    "variables": {
        "Contributor": "[concat('/subscriptions/', subscription().subscriptionId, '/providers/Microsoft.Authorization/roleDefinitions/', 'b24988ac-6180-42a0-ab88-20f7382dd24c')]",
        "Resource Policy Contributor": "[concat('/subscriptions/', subscription().subscriptionId, '/providers/Microsoft.Authorization/roleDefinitions/', '36243c78-bf99-498c-9df9-86d9f8d28608')]"
    },
    "resources": [
        {
            "type": "Microsoft.Authorization/roleAssignments",
            "apiVersion": "2018-09-01-preview",
            "name": "[guid(uniqueString(variables('Contributor')))]",
            "properties": {
                "roleDefinitionId": "[variables('Contributor')]",
                "principalId": "[parameters('principalId')]"
            }
        },
        {
            "type": "Microsoft.Authorization/roleAssignments",
            "apiVersion": "2018-09-01-preview",
            "name": "[guid(uniqueString(variables('Resource Policy Contributor')))]",
            "properties": {
                "roleDefinitionId": "[variables('Resource Policy Contributor')]",
                "principalId": "[parameters('principalId')]"
            }
        }
    ]
}
Azure CLI
运行以下命令:
az role assignment create --assignee-object-id <your Automanage Account Object ID> --role "Contributor" --scope /subscriptions/<your subscription ID>

az role assignment create --assignee-object-id <your Automanage Account Object ID> --role "Resource Policy Contributor" --scope /subscriptions/<your subscription ID>
后续步骤
反馈
即将发布:在整个 2024 年,我们将逐步淘汰作为内容反馈机制的“GitHub 问题”,并将其取代为新的反馈系统。 有关详细信息,请参阅:https://aka.ms/ContentUserFeedback。
提交和查看相关反馈