你当前正在访问 Microsoft Azure Global Edition 技术文档网站。 如果需要访问由世纪互联运营的 Microsoft Azure 中国技术文档网站,请访问 https://docs.azure.cn。
在已启用 Azure Arc 的 Kubernetes 群集上使用 Azure RBAC
Kubernetes ClusterRoleBinding 和 RoleBinding 对象类型可以帮助你以本机方式在 Kubernetes 中定义授权。 借助此功能,可在 Azure 中使用 Microsoft Entra ID 和角色分配来控制群集上的授权检查。 通过 Azure 角色分配,可以精细控制哪些用户可以读取、写入和删除 Kubernetes 对象,例如部署、Pod 和服务。
有关此功能的概念性概述,请参阅已启用 Azure Arc 的 Kubernetes 上的 Azure RBAC。
先决条件
安装或升级到 Azure CLI 的最新版本。
安装最新版本的
connectedk8sAzure CLI 扩展:az extension add --name connectedk8s如果已安装
connectedk8s扩展,则可以使用以下命令将其更新到最新版本:az extension update --name connectedk8s连接现有的已启用 Azure Arc 的 Kubernetes 群集:
注意
对于 Red Hat OpenShift 或云服务提供商的托管 Kubernetes 产品/服务(例如 Elastic Kubernetes Service 或 Google Kubernetes Engine),用户无权访问群集的 API 服务器,因此无法设置此功能。 对于 Azure Kubernetes Service (AKS) 群集,此功能是以本机方式提供,不要求 AKS 群集连接至 Azure Arc。
在群集上启用 Azure RBAC
通过运行以下命令来获取群集 MSI 标识:
az connectedk8s show -g <resource-group> -n <connected-cluster-name>从输出中获取 ID (
identity.principalId) 并运行以下命令,将“连接的群集托管标识 CheckAccess 读者” 角色分配给群集 MSI:az role assignment create --role "Connected Cluster Managed Identity CheckAccess Reader" --assignee "<Cluster MSI ID>" --scope <cluster ARM ID>在已启用 Azure Arc 的 Kubernetes 群集上,通过运行以下命令启用 Azure 基于角色的访问控制 (RBAC):
az connectedk8s enable-features -n <clusterName> -g <resourceGroupName> --features azure-rbac注意
运行上述命令之前,请确保计算机上的
kubeconfig文件指向要启用 Azure RBAC 功能的群集。在上述命令中可以使用
--skip-azure-rbac-list指定以逗号分隔的用户名、电子邮件地址和 OpenID 连接列表,它们使用 Kubernetes 原生ClusterRoleBinding和RoleBinding对象(而非 Azure RBAC)进行授权检查。
没有按 apiserver 规范上运行协调器的通用群集
通过 SSH 连接到该群集的每个主节点,并执行下列步骤:
如果
kube-apiserver是静态 Pod:kube-system命名空间中的azure-arc-guard-manifests机密包含两个文件:guard-authn-webhook.yaml和guard-authz-webhook.yaml。 将这些文件复制到节点的/etc/guard目录。sudo mkdir -p /etc/guard kubectl get secrets azure-arc-guard-manifests -n kube-system -o json | jq -r '.data."guard-authn-webhook.yaml"' | base64 -d > /etc/guard/guard-authn-webhook.yaml kubectl get secrets azure-arc-guard-manifests -n kube-system -o json | jq -r '.data."guard-authz-webhook.yaml"' | base64 -d > /etc/guard/guard-authz-webhook.yaml在编辑模式下打开
apiserver清单:sudo vi /etc/kubernetes/manifests/kube-apiserver.yaml在
volumes下添加以下规范:- name: azure-rbac hostPath: path: /etc/guard type: Directory在
volumeMounts下添加以下规范:- mountPath: /etc/guard name: azure-rbac readOnly: true
如果
kube-apiserver不是静态 Pod:在编辑模式下打开
apiserver清单:sudo vi /etc/kubernetes/manifests/kube-apiserver.yaml在
volumes下添加以下规范:- name: azure-rbac secret: secretName: azure-arc-guard-manifests在
volumeMounts下添加以下规范:- mountPath: /etc/guard name: azure-rbac readOnly: true
添加下列
apiserver参数:- --authentication-token-webhook-config-file=/etc/guard/guard-authn-webhook.yaml - --authentication-token-webhook-cache-ttl=5m0s - --authorization-webhook-cache-authorized-ttl=5m0s - --authorization-webhook-config-file=/etc/guard/guard-authz-webhook.yaml - --authorization-webhook-version=v1 - --authorization-mode=Node,RBAC,Webhook如果 Kubernetes 群集是版本1.19.0 或更高版本,则还需要设置以下
apiserver参数:- --authentication-token-webhook-version=v1保存并关闭编辑器以更新
apiserverPod。
使用群集 API 创建的群集
将包含身份验证和授权 Webhook 配置文件的保护机密从工作负载群集复制到计算机上:
kubectl get secret azure-arc-guard-manifests -n kube-system -o yaml > azure-arc-guard-manifests.yaml将 azure-arc-guard-manifests.yaml 文件中的
namespace字段更改为管理群集内的命名空间,你要将在其中应用自定义资源以创建工作负载群集。应用以下清单:
kubectl apply -f azure-arc-guard-manifests.yaml通过运行
kubectl edit kcp <clustername>-control-plane,编辑KubeadmControlPlane对象:将以下代码片段添加到
files下:- contentFrom: secret: key: guard-authn-webhook.yaml name: azure-arc-guard-manifests owner: root:root path: /etc/kubernetes/guard-authn-webhook.yaml permissions: "0644" - contentFrom: secret: key: guard-authz-webhook.yaml name: azure-arc-guard-manifests owner: root:root path: /etc/kubernetes/guard-authz-webhook.yaml permissions: "0644"将以下代码片段添加到
apiServer>extraVolumes下:- hostPath: /etc/kubernetes/guard-authn-webhook.yaml mountPath: /etc/guard/guard-authn-webhook.yaml name: guard-authn readOnly: true - hostPath: /etc/kubernetes/guard-authz-webhook.yaml mountPath: /etc/guard/guard-authz-webhook.yaml name: guard-authz readOnly: true将以下代码片段添加到
apiServer>extraArgs下:authentication-token-webhook-cache-ttl: 5m0s authentication-token-webhook-config-file: /etc/guard/guard-authn-webhook.yaml authentication-token-webhook-version: v1 authorization-mode: Node,RBAC,Webhook authorization-webhook-cache-authorized-ttl: 5m0s authorization-webhook-config-file: /etc/guard/guard-authz-webhook.yaml authorization-webhook-version: v1保存并关闭以更新
KubeadmControlPlane对象。 请等待这些更改出现在工作负载群集上。
创建角色分配以便用户访问群集
已启用 Azure Arc 的 Kubernetes 资源的所有者可以使用内置角色或自定义角色,将 Kubernetes 群集的访问权授予其他用户。
内置角色
| 角色 | 说明 |
|---|---|
| Azure Arc Kubernetes 查看者 | 允许进行只读访问并查看命名空间中的大多数对象。 此角色不允许查看机密,这是因为机密的 read 权限允许访问命名空间中的 ServiceAccount 凭据。 这些凭据进而会允许使用该 ServiceAccount 值进行 API 访问(一种特权提升形式)。 |
| Azure Arc Kubernetes 写入者 | 允许对命名空间中的大多数对象进行读/写访问。 此角色不允许查看或修改角色或角色绑定。 但是,此角色允许以命名空间中任何 ServiceAccount 值的身份访问密码和运行 Pod,因此可用于获取命名空间中任何 ServiceAccount 值的 API 访问级别。 |
| Azure Arc Kubernetes 管理员 | 授予管理员访问权限。 旨在通过 RoleBinding 在命名空间内授予。 如果在 RoleBinding 中使用,则允许对命名空间中的大部分资源进行读/写访问,包括能够在该命名空间内创建角色和角色绑定。 此角色不允许对资源配额或命名空间本身进行写入访问。 |
| Azure Arc Kubernetes 群集管理员 | 授予超级用户访问权限(对任何资源执行任何操作)。 在 ClusterRoleBinding 中使用时,它提供对群集和所有命名空间中每种资源的完全控制。 在 RoleBinding 中使用时,即授予对该角色绑定的命名空间中每种资源(包括该命名空间本身)的完全控制权。 |
可以在 Azure 门户的群集资源的“访问控制 (IAM)”窗格中创建角色分配,其作用域为已启用 Azure Arc 的 Kubernetes 群集。 也可使用以下 Azure CLI 命令:
az role assignment create --role "Azure Arc Kubernetes Cluster Admin" --assignee <AZURE-AD-ENTITY-ID> --scope $ARM_ID
其中,AZURE-AD-ENTITY-ID 可以是用户名(例如 testuser@mytenant.onmicrosoft.com),甚至可以是服务主体的 appId 值。
下面是另一个在群集中创建作用域为特定命名空间的角色分配的示例:
az role assignment create --role "Azure Arc Kubernetes Viewer" --assignee <AZURE-AD-ENTITY-ID> --scope $ARM_ID/namespaces/<namespace-name>
注意
可以使用 Azure 门户或 Azure CLI 创建群集范围内的角色分配。 但是,只能使用 Azure CLI 创建范围限定为命名空间的角色分配。
自定义角色
可以选择创建自己的角色定义,以便在角色分配中使用。
请演练以下角色定义示例,该角色定义仅允许用户读取部署。 有关详细信息,请参阅可用于构造角色定义的数据操作完整列表。
将以下 JSON 对象复制到名为“custom-role.json”的文件中。 请将 <subscription-id> 占位符替换为实际订阅 ID。 自定义角色使用其中一项数据操作,并让你可查看创建角色分配所在作用域(群集或命名空间)内的所有部署。
{
    "Name": "Arc Deployment Viewer",
    "Description": "Lets you view all deployments in cluster/namespace.",
    "Actions": [],
    "NotActions": [],
    "DataActions": [
        "Microsoft.Kubernetes/connectedClusters/apps/deployments/read"
    ],
    "NotDataActions": [],
    "assignableScopes": [
        "/subscriptions/<subscription-id>"
    ]
}
通过从保存了“custom-role.json”的文件夹运行以下命令来创建角色定义:
az role definition create --role-definition @custom-role.json使用该自定义角色定义创建角色分配:
az role assignment create --role "Arc Deployment Viewer" --assignee <AZURE-AD-ENTITY-ID> --scope $ARM_ID/namespaces/<namespace-name>
使用用户凭据来配置 kubectl
可通过两种方法获取访问群集所需的 kubeconfig 文件:
- 使用已启用 Azure Arc 的 Kubernetes 群集的群集连接功能 (
az connectedk8s proxy)。 - 群集管理员与其他所有用户共享 kubeconfig 文件。
使用群集连接
运行以下命令以启动代理进程:
az connectedk8s proxy -n <clusterName> -g <resourceGroupName>
该代理进程运行后,你可以在控制台中打开另一个选项卡,开始向群集发送请求。
使用共享 kubeconfig 文件
使用共享 kubeconfig 所需的步骤略有不同,具体取决于 Kubernetes 版本。
运行以下命令,以便为用户设置凭据。 将
serverApplicationId指定为6256c85f-0aad-4d50-b960-e6e9b21efe35,并将clientApplicationId指定为3f4439ff-e698-4d6d-84fe-09c9d574f06b:kubectl config set-credentials <testuser>@<mytenant.onmicrosoft.com> \ --auth-provider=azure \ --auth-provider-arg=environment=AzurePublicCloud \ --auth-provider-arg=client-id=<clientApplicationId> \ --auth-provider-arg=tenant-id=<tenantId> \ --auth-provider-arg=apiserver-id=<serverApplicationId>打开先前创建的 kubeconfig 文件。 在
contexts下,确认与该群集相关联的上下文指向上一步中创建的用户凭据。 若要将当前上下文设置为这些用户凭据,请运行以下命令:kubectl config set-context --current=true --user=<testuser>@<mytenant.onmicrosoft.com>在
user>config下,添加 config-mode 设置:name: testuser@mytenant.onmicrosoft.com user: auth-provider: config: apiserver-id: $SERVER_APP_ID client-id: $CLIENT_APP_ID environment: AzurePublicCloud tenant-id: $TENANT_ID config-mode: "1" name: azure注意
Exec 插件 是一种 Kubernetes 身份验证策略,允许
kubectl执行外部命令来接收要发送到apiserver的用户凭据。 从 Kubernetes 版本 1.26 开始,默认的 Azure 授权插件不再包含在client-go和kubectl中。 对于更高版本,若要使用 exec 插件接收用户凭据,必须使用 Azure Kubelogin,client-go该凭据 (exec) 是实现 Azure 身份验证的插件。安装 Azure Kubelogin:
对于 Windows 或 Mac,请遵循 Azure Kubelogin 安装说明进行操作。
对于 Linux 或 Ubuntu,请下载 最新版本的 kubelogin,然后运行以下命令:
curl -LO https://github.com/Azure/kubelogin/releases/download/"$KUBELOGIN_VERSION"/kubelogin-linux-amd64.zip

unzip kubelogin-linux-amd64.zip

sudo mv bin/linux_amd64/kubelogin /usr/local/bin/

sudo chmod +x /usr/local/bin/kubelogin
Kubelogin 可用于通过请求所有权证明 (PoP) 令牌向已启用 Azure Arc 的群集进行身份验证。 使用 kubelogin 转换 kubeconfig 以使用合适的登录模式。 例如,对于 Microsoft Entra 用户的设备代码登录,命令将如下所示:
export KUBECONFIG=/path/to/kubeconfig

kubelogin convert-kubeconfig --pop-enabled --pop-claims 'u=<ARM ID of cluster>"
发送请求到群集
运行任何
kubectl命令。 例如:kubectl get nodeskubectl get pods
系统提示进行基于浏览器的身份验证后,请复制设备登录 URL (
https://microsoft.com/devicelogin),并在 Web 浏览器中打开。输入显示在控制台上的代码。 将终端上的代码复制并粘贴到设备身份验证输入提示中。
输入用户名 (
testuser@mytenant.onmicrosoft.com) 和关联的密码。如果你看到类似如下的错误消息,则表示你无权访问所请求的资源:
Error from server (Forbidden): nodes is forbidden: User "testuser@mytenant.onmicrosoft.com" cannot list resource "nodes" in API group "" at the cluster scope: User doesn't have access to the resource in Azure. Update role assignment to allow access.管理员必须创建新的角色分配,授权该用户访问该资源。
将条件访问与 Microsoft Entra ID 配合使用
将 Microsoft Entra ID 与已启用 Arc 的 Kubernetes 群集集成后,还可以使用条件访问来控制对群集的访问。
注意
Microsoft Entra 条件访问是 Microsoft Entra ID P2 的功能。
若要创建用于群集的示例条件访问策略:
在 Azure 门户顶部,搜索并选择“Microsoft Entra ID”。
在左侧的 Microsoft Entra ID 菜单上,选择“企业应用程序”。
在左侧企业应用程序的菜单中,选择“条件访问”。
在左侧“条件访问”的菜单中,选择“策略”>“新建策略” 。

为策略输入名称,例如“arc-k8s-policy”。
选择“用户和组” 。 在“包括”下,选择“选择用户和组” 。 然后选择要应用策略的用户和组。 对于此示例,请选择对你的群集拥有管理访问权限的同一个 Microsoft Entra 组。
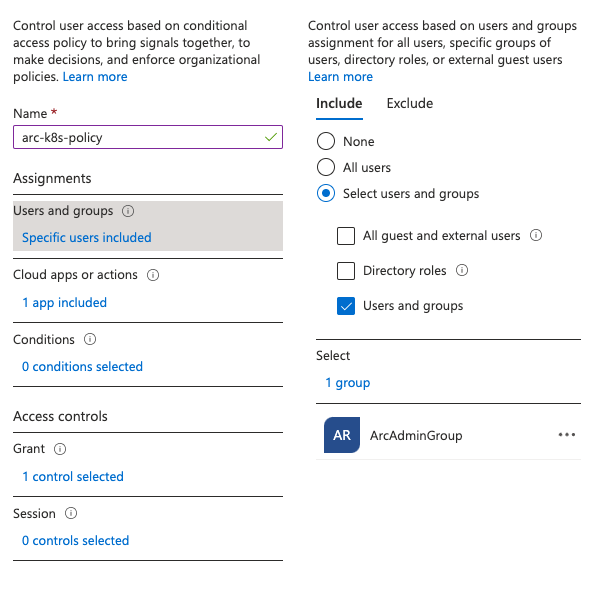
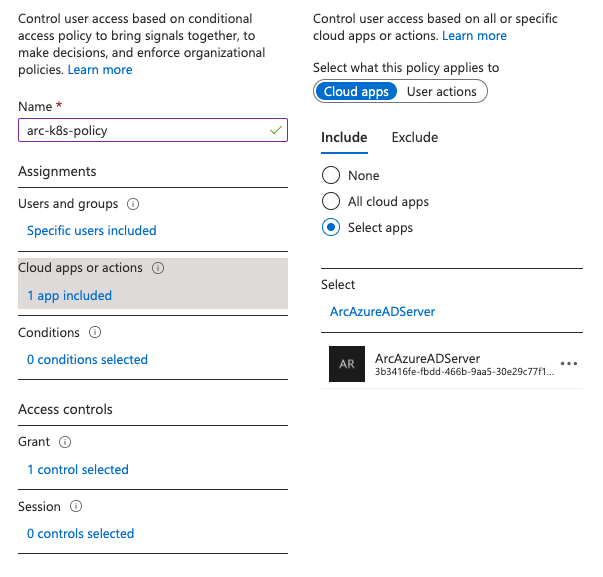
选择“云应用或操作”。 在“包含”下,选择“选择应用” 。 然后,搜索并选择之前创建的服务器应用程序。
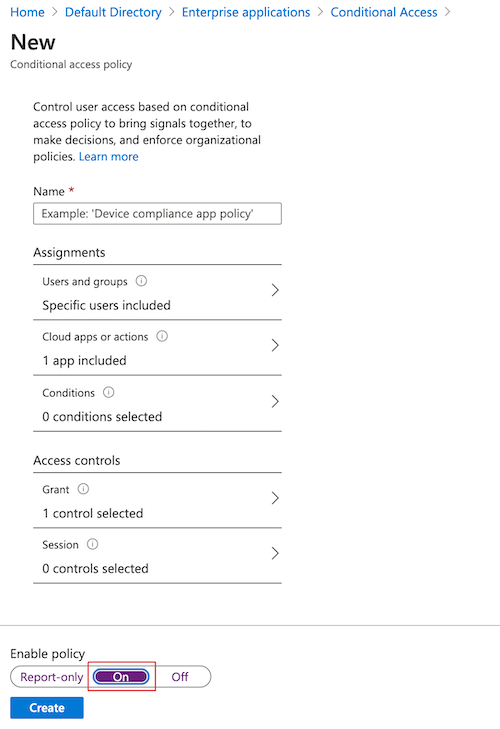
在“访问控制” 下,选择“授予” 。 选择“授予访问权限”>“要求设备标记为合规” 。

在“启用策略”下,选择“开”>“创建” 。


再次访问群集。 例如,运行 kubectl get nodes 命令来查看群集中的节点:
kubectl get nodes
再次按照说明进行登录。 一条错误消息会指明你已成功登录,但若要访问资源,你的管理员要求请求访问的设备受 Microsoft Entra ID 管理。 执行以下步骤:
在 Azure 门户中,转到 Microsoft Entra ID。
选择“企业应用程序”。 然后在“活动”下,选择“登录” 。
顶部的条目显示“状态”为“失败”,而“条件访问”为“成功” 。 选择该条目,然后在“详细信息”中选择“条件访问” 。 请注意,你的条件访问策略已列出。


使用 Microsoft Entra ID 配置实时群集访问
用于群集访问控制的另一个选项是对即时请求使用 Privileged Identity Management (PIM)。
注意
Microsoft Entra PIM 是 Microsoft Entra ID P2 的功能。 有关 Microsoft Entra ID SKU 的详细信息,请参阅定价指南。
若要为群集配置即时访问请求,请完成以下步骤:
在 Azure 门户顶部,搜索并选择“Microsoft Entra ID”。
记下租户 ID。 对于这些说明的其余部分,我们将该 ID 引用为
<tenant-id>。
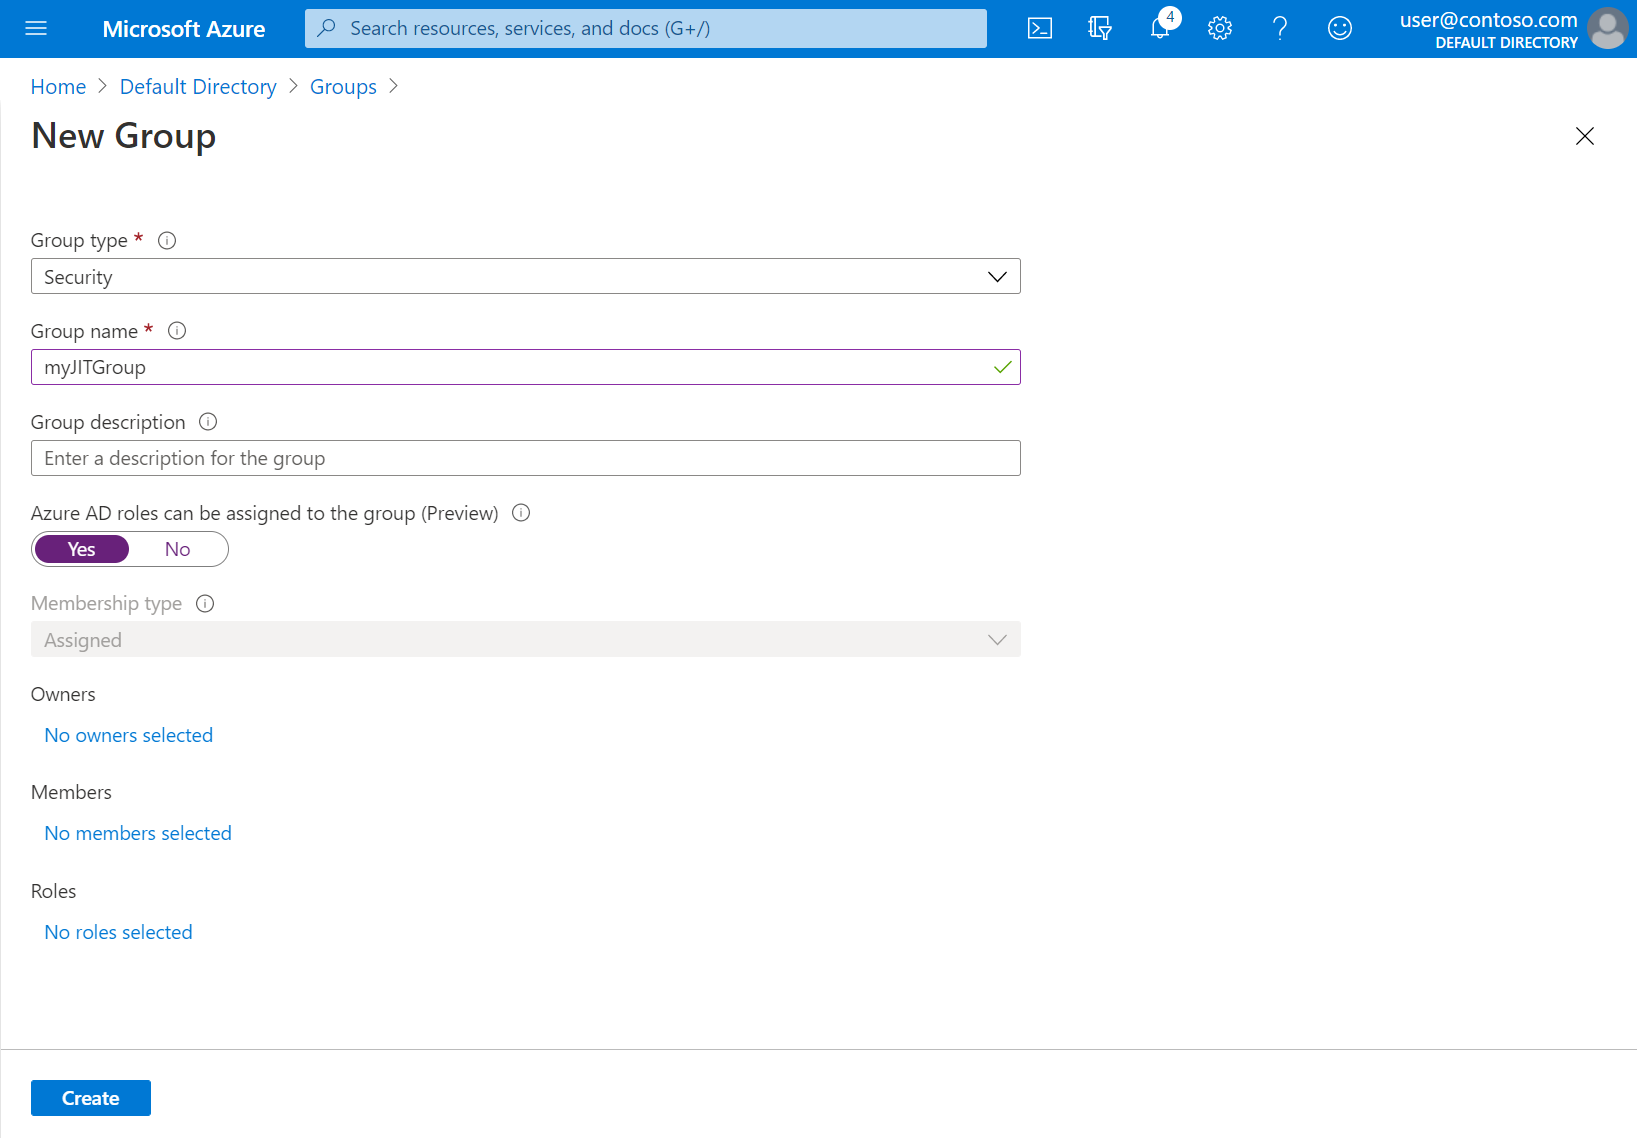
在左侧 Microsoft Entra ID 的菜单上的“管理”下,选择“组”>“新建组”。
确保为“组类型”选择了“安全性” 。 输入组名称,例如“myJITGroup”。 在“可将 Microsoft Entra 角色分配到此组(预览版)”下,选择“是”。 最后,选择“创建”。
你将返回到“组”页。 选择新创建的组并记下对象 ID。 对于这些说明的其余部分,我们将该 ID 引用为
<object-id>。
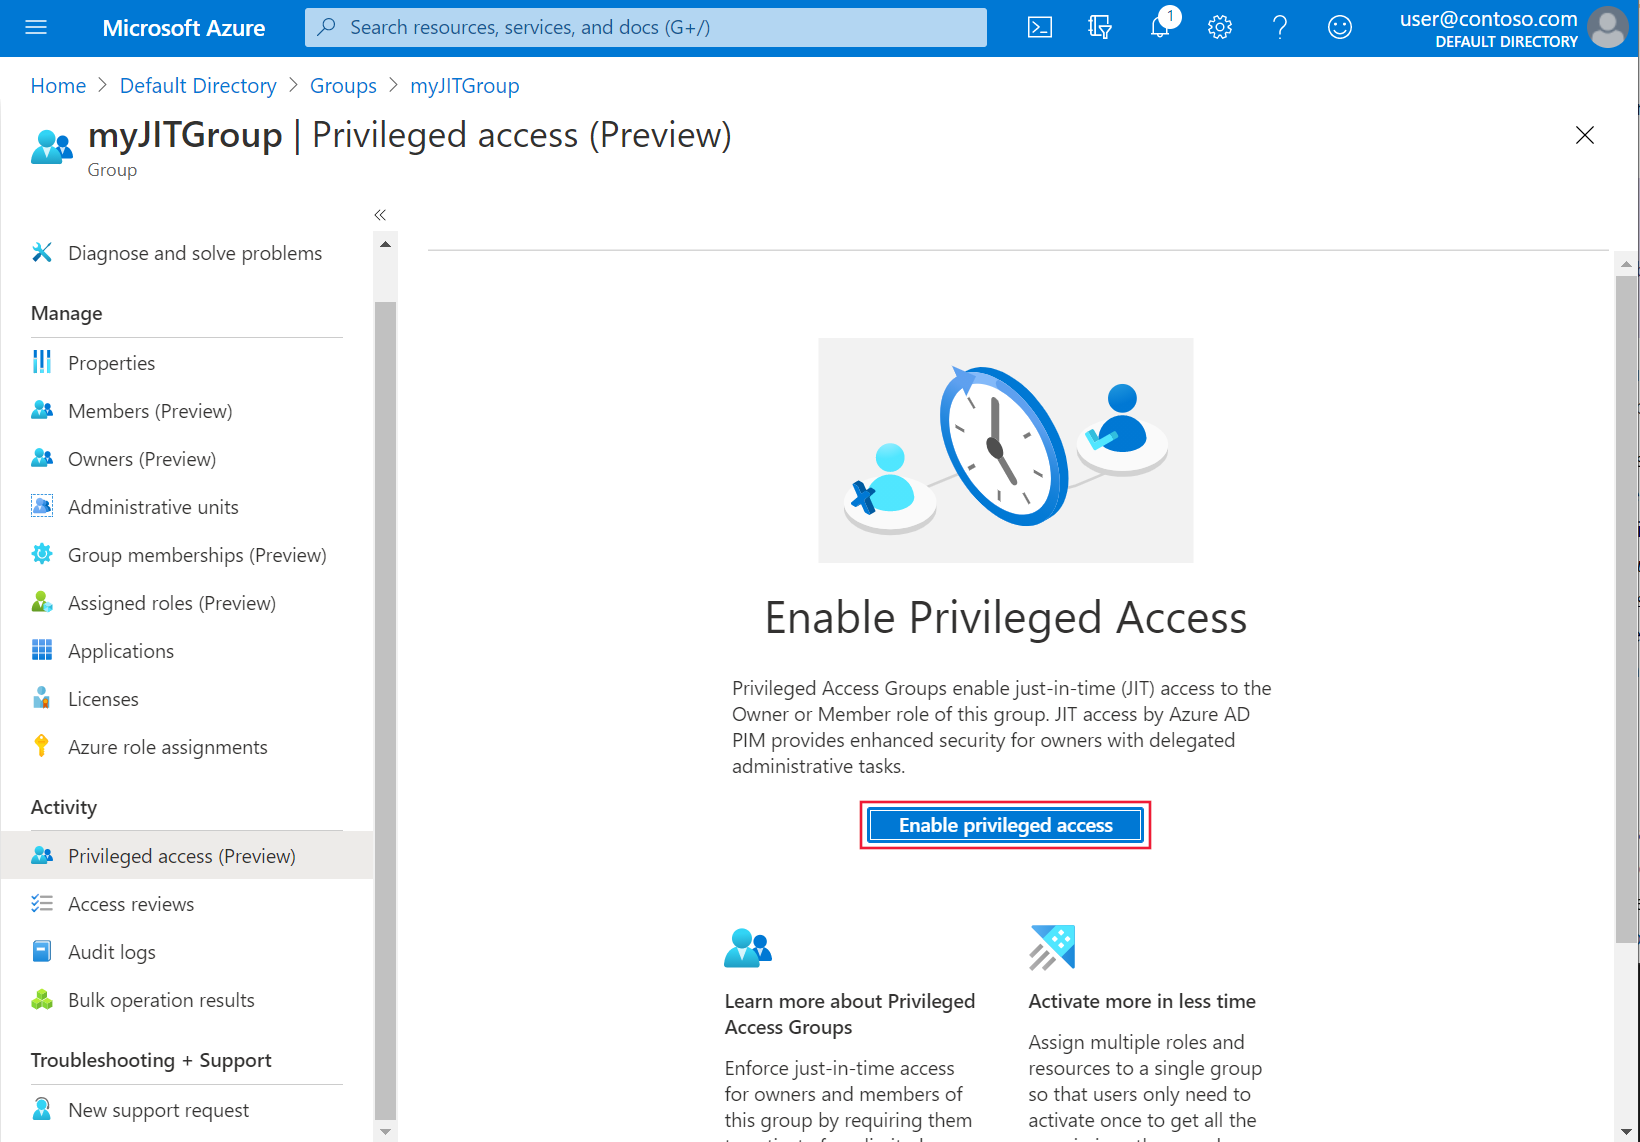
返回 Azure 门户,在左侧“活动”的菜单中,选择“特权访问(预览版)” 。 然后选择“启用特权访问”。
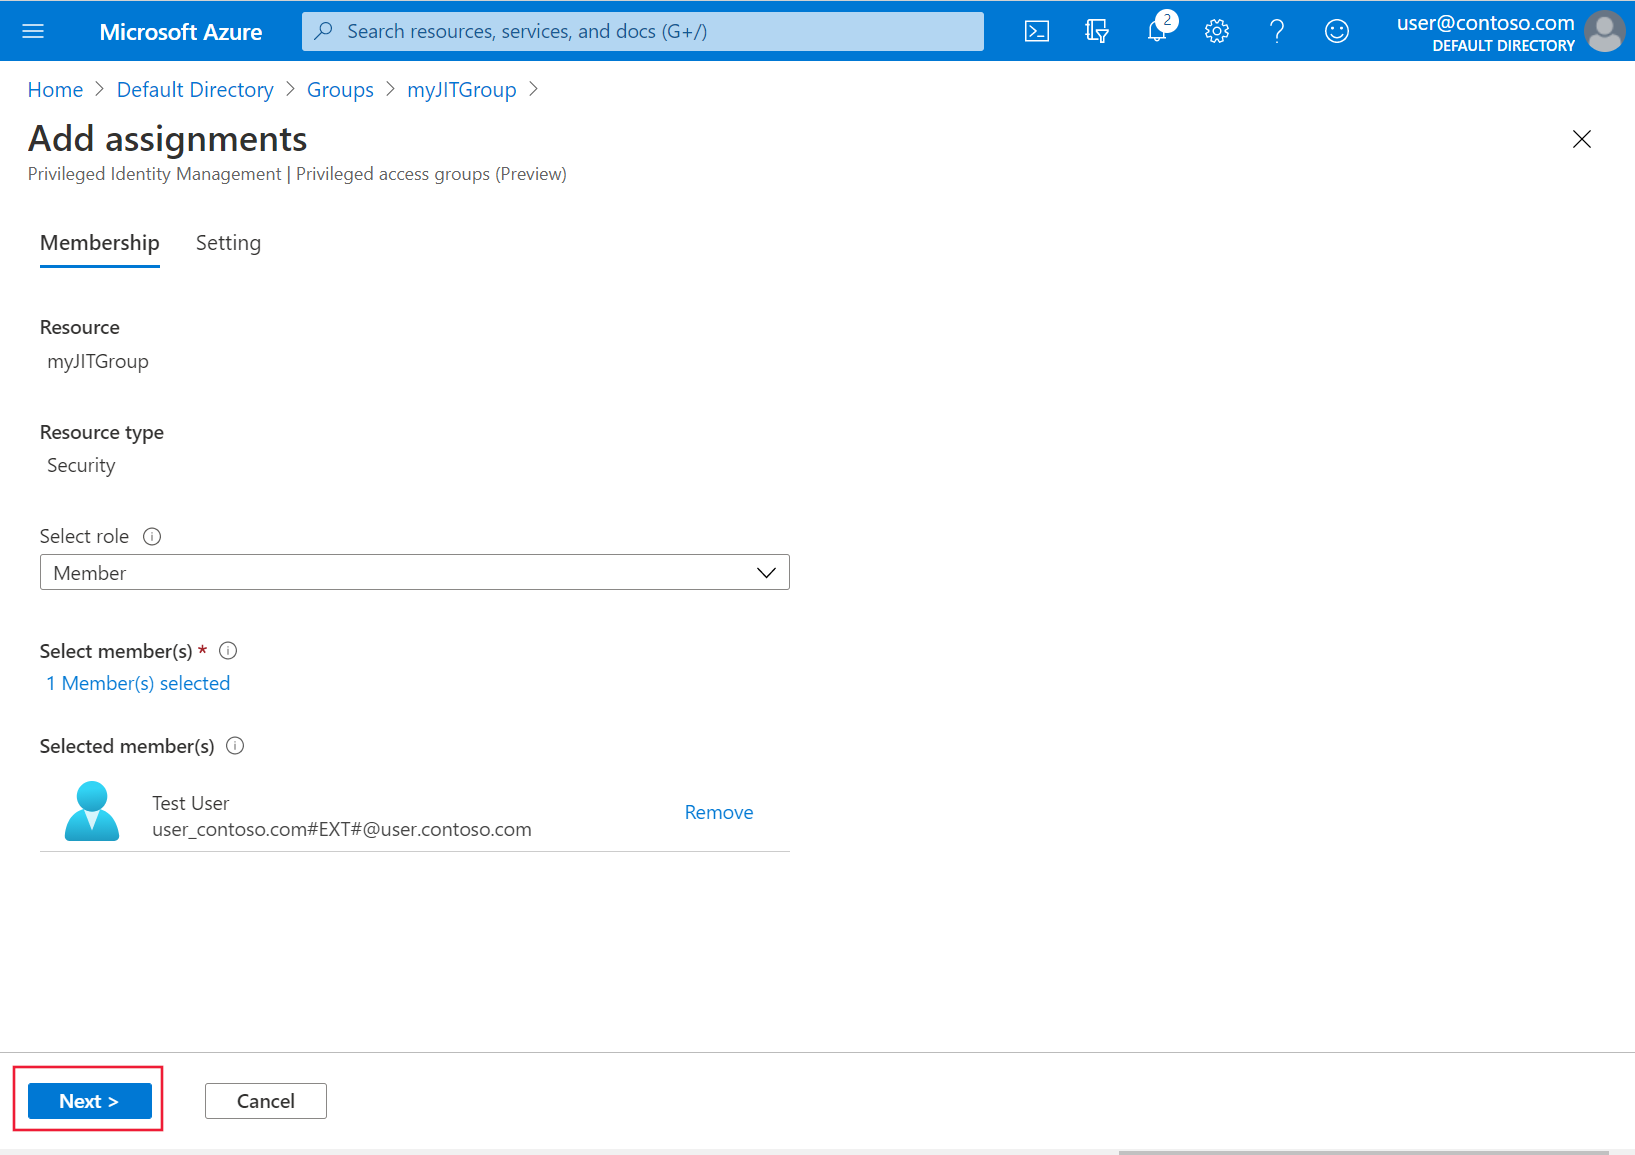
选择“添加分配”开始授予访问权限。

选择“成员”的角色,然后选择要向其授予群集访问权限的用户和组。 组管理员可以随时修改这些分配。 准备好继续操作时,选择“下一步”。
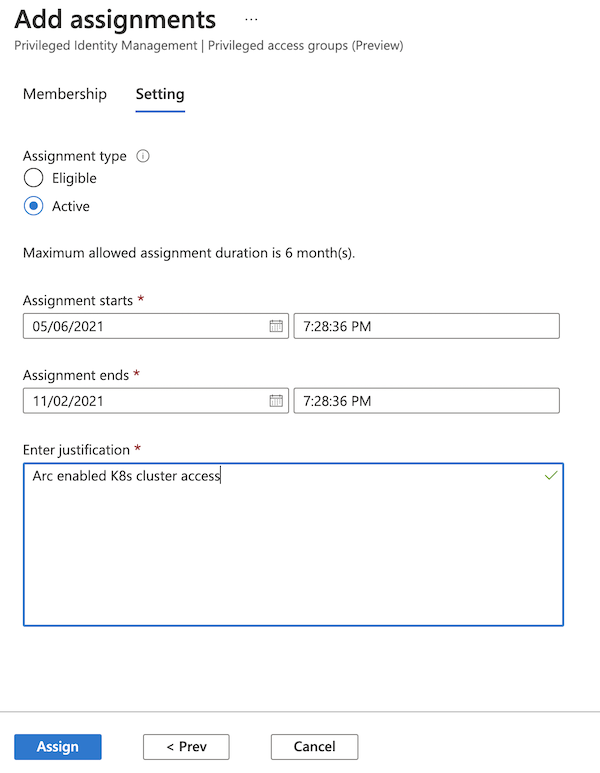
选择“活动”分配类型,选择所需的持续时间,并提供理由。 准备好继续操作时,选择“分配”。 有关分配类型的详细信息,请参阅在 Privileged Identity Management 中为特权访问组分配资格(预览版)。


完成分配后,通过访问群集来验证是否可以正常进行即时访问。 例如,使用 kubectl get nodes 命令来查看群集中的节点:
kubectl get nodes
请注意身份验证要求,并按照步骤完成身份验证。 如果身份验证成功,应会看到类似于此内容的输出:
To sign in, use a web browser to open the page https://microsoft.com/devicelogin and enter the code AAAAAAAAA to authenticate.

NAME      STATUS   ROLES    AGE      VERSION
node-1    Ready    agent    6m36s    v1.18.14
node-2    Ready    agent    6m42s    v1.18.14
node-3    Ready    agent    6m33s    v1.18.14
后续步骤
- 使用群集连接安全连接到群集。
- 阅读已启用 Arc 的 Kubernetes 上的 Azure RBAC 体系结构。
反馈
即将发布:在整个 2024 年,我们将逐步淘汰作为内容反馈机制的“GitHub 问题”,并将其取代为新的反馈系统。 有关详细信息,请参阅:https://aka.ms/ContentUserFeedback。
提交和查看相关反馈