你当前正在访问 Microsoft Azure Global Edition 技术文档网站。 如果需要访问由世纪互联运营的 Microsoft Azure 中国技术文档网站,请访问 https://docs.azure.cn。
将 Azure Maps Indoor Maps 模块与自定义样式搭配使用(预览版)
注意
Azure Maps Creator 停用
Azure Maps Creator 室内地图服务现已弃用,将于 2025 年 9 月 30 日停用。 有关详细信息,请参阅 Azure Maps Creator 生命周期结束公告。
Azure Maps Web SDK 包含“室内地图”模块,可用于渲染在 Azure Maps Creator 服务中创建的室内地图。
使用 Azure Maps Creator 创建室内地图时,将应用默认样式。 Azure Maps Creator 现在还支持使用样式 Rest API 或视觉样式编辑器自定义室内地图的不同元素的样式。
先决条件
- Azure Maps 帐户
- Azure Maps Creator 资源
- 订阅密钥
- 地图配置别名或 ID。 有关详细信息,请参阅地图配置 API。
需要使用地图配置 alias(或 mapConfigurationId)通过 Azure Maps Indoor Maps 模块来使用自定义样式渲染室内地图。
嵌入室内定位模块
可以通过以下两种方式之一来安装和嵌入“Azure Maps 室内”模块。
若要使用“Azure Maps Indoor”模块全球托管的 Azure 内容分发网络版本,请参阅 HTML 文件 <head> 元素中的以下 script 和 stylesheet 引用:
<link rel="stylesheet" href="https://atlas.microsoft.com/sdk/javascript/indoor/0.2/atlas-indoor.min.css" type="text/css"/>
<script src="https://atlas.microsoft.com/sdk/javascript/indoor/0.2/atlas-indoor.min.js"></script>
或者,你可以下载“Azure Maps 室内”模块。 “Azure Maps 室内”模块包含用于访问 Azure Maps 服务的客户端库。 以下步骤演示如何安装室内模块,并将其加载到 Web 应用程序中。
安装最新的 azure-maps-indoor 包。
>npm install azure-maps-indoor在源文件中导入 Azure Maps Indoor 模块 JavaScript:
import * as indoor from "azure-maps-indoor";还需要嵌入 CSS 样式表才能正确显示各种控件。 如果使用的是 JavaScript 捆绑程序来捆绑依赖项并打包代码,请参考所使用捆绑程序的文档,了解如何完成操作。 如果使用的是 Webpack,则通常通过将
style-loader和css-loader与 style-loader 提供的文档相结合来完成。首先,安装 style-loader 和 css-loader:
npm install --save-dev style-loader css-loader在源文件中,导入 atlas-indoor.min.css:
import "azure-maps-indoor/dist/atlas-indoor.min.css";然后将加载程序添加到 Webpack 配置的模块规则部分:
module.exports = { module: { rules: [ { test: /\.css$/i, use: ["style-loader", "css-loader"] } ] } };若要了解详细信息,请参阅如何使用 Azure Maps 地图控件 npm 包。
设置域并实例化地图对象
使用与 Creator 资源的位置匹配的前缀(如 US 或 EU)设置地图域:
atlas.setDomain('us.atlas.microsoft.com');
有关详细信息,请参阅 Azure Maps 服务地理范围。
接下来实例化一个地图对象,并将地图配置对象设置为地图配置的 alias 或 mapConfigurationId 属性,然后将 styleAPIVersion 设置为 2023-03-01-preview。
定位对象将在下一步中用于实例化室内管理器对象。 下面的代码演示如何实例化地图对象并设置 mapConfiguration、styleAPIVersion 和地图域:
const subscriptionKey = "<Your Azure Maps Subscription Key>";
const region = "<Your Creator resource region: us or eu>"
const mapConfiguration = "<map configuration alias or ID>"
atlas.setDomain(`${region}.atlas.microsoft.com`);

const map = new atlas.Map("map-id", {
  //use your facility's location
  center: [-122.13315, 47.63637],
  //or, you can use bounds: [# west, # south, # east, # north] and replace # with your Map bounds
  authOptions: {
      authType: 'subscriptionKey',
      subscriptionKey: subscriptionKey
  },
  zoom: 19,

  mapConfiguration: mapConfiguration,
  styleAPIVersion: '2023-03-01-preview'
});
实例化室内管理器
要加载图块的室内地图样式,必须实例化室内管理器。 通过提供地图对象来实例化室内管理器。 代码应如以下 JavaScript 代码片段所示:
const indoorManager = new atlas.indoor.IndoorManager(map, {
});
室内楼层选取器控件
可使用“室内楼层选取器”控件更改呈现的定位的楼层。 可以根据需要通过“室内管理器”初始化“室内楼层选取器”控件。 下面是用于初始化楼层控制选取器的代码:
const levelControl = new atlas.control.LevelControl({ position: "top-right" });
indoorManager.setOptions({ levelControl });
室内事件
“Azure Maps 室内”模块支持定位对象事件。 当楼层或设施发生更改时,将调用定位对象事件侦听器。 如果要在楼层或设施发生更改时运行代码,请将代码置于事件侦听器中。 下面的代码演示如何将事件侦听器添加到定位对象。
map.events.add("levelchanged", indoorManager, (eventData) => {

  //code that you want to run after a level has been changed
  console.log("The level has changed: ", eventData);
});

map.events.add("facilitychanged", indoorManager, (eventData) => {

  //code that you want to run after a facility has been changed
  console.log("The facility has changed: ", eventData);
});
eventData 变量分别保存有关调用 levelchanged 或 facilitychanged 事件的楼层或设备的信息。 当楼层发生更改时,eventData 对象包含 facilityId、新的 levelNumber 和其他元数据。 当设施发生更改时,eventData 对象包含新的 facilityId、新的 levelNumber 和其他元数据。
示例:自定义样式设置:使用 WebSDK 中的地图配置(预览版)
使用 Azure Maps Creator 创建室内地图时,将应用默认样式。 Azure Maps Creator 现在还支持自定义室内样式。 有关详细信息,请参阅为室内地图创建自定义样式。 Creator 还提供视觉样式编辑器。
按照为室内地图创建自定义样式操作指南文章创建自定义样式。 保存更改后,记下地图配置别名。
使用 Azure 内容分发网络选项安装 Azure Maps Indoor 模块。
创建新的 HTML 文件
在 HTML 标头中,引用 Azure Maps Indoor 模块 JavaScript 和样式表。
使用与 Creator 资源的位置匹配的前缀设置地图域:如果 Creator 资源是在美国区域创建的,则为
atlas.setDomain('us.atlas.microsoft.com');;如果 Creator 资源是在欧洲区域创建的,则为atlas.setDomain('eu.atlas.microsoft.com');。初始化定位对象。 定位对象支持以下选项:
Subscription key为你的 Azure Maps 订阅密钥。center定义室内定位中心位置的纬度和经度。 如果你不希望为bounds提供值,则为center提供值。 格式应显示为center:[-122.13315, 47.63637]。bounds是包含图块集定位数据的最小矩形。 如果你不希望为center设置值,则为bounds设置值。 可以通过调用图块集列表 API 找到定位边界。 图块集列表 API 返回bbox,可以对其进行分析并将其分配给bounds。 格式应显示为bounds:[# west, # south, # east, # north]。mapConfiguration定义要在地图上显示的自定义样式的地图配置的 ID 或别名。请使用步骤 1 中的地图配置 ID 或别名。style允许从显示的地图配置设置初始样式。 如果未设置,则使用与地图配置的默认配置匹配的样式。zoom允许你指定定位的最小和最大缩放级别。styleAPIVersion:传递“2023-03-01-preview”(当自定义样式为公共预览版时,这是必需的)
接下来创建“室内管理器”模块,并将“室内楼层选取器”控件实例化为“室内管理器”选项的一部分。
添加定位对象事件侦听器。
提示
地图配置是使用 mapConfigurationId 或 alias 引用的。 每次编辑或更改地图配置时,其 ID 都会更改,但其别名保持不变。 建议在应用程序中通过别名引用地图配置。 有关详细信息,请参阅概念文章中的地图配置。
文件现在应类似于以下 HTML:
<!DOCTYPE html>
<html lang="en">
  <head>
    <meta charset="utf-8" />
    <meta name="viewport" content="width=device-width, user-scalable=no" />
    <title>Indoor Maps App</title>

    <link rel="stylesheet" href="https://atlas.microsoft.com/sdk/javascript/mapcontrol/3/atlas.min.css" type="text/css" />
    <link rel="stylesheet" href="https://atlas.microsoft.com/sdk/javascript/indoor/0.2/atlas-indoor.min.css" type="text/css"/>

    <script src="https://atlas.microsoft.com/sdk/javascript/mapcontrol/3/atlas.min.js"></script>
    <script src="https://atlas.microsoft.com/sdk/javascript/indoor/0.2/atlas-indoor.min.js"></script>

    <style>
      html,
      body {
        width: 100%;
        height: 100%;
        padding: 0;
        margin: 0;
      }

      #map-id {
        width: 100%;
        height: 100%;
      }
    </style>
  </head>

  <body>
    <div id="map-id"></div>
    <script>
      const subscriptionKey = "<Your Azure Maps Subscription Key>";
      const mapConfig = "<Your map configuration id or alias>";
      const region = "<Your Creator resource region: us or eu>"
      atlas.setDomain(`${region}.atlas.microsoft.com`);

      const map = new atlas.Map("map-id", {
        //use your facility's location
        center: [-122.13315, 47.63637],
        //or, you can use bounds: [# west, # south, # east, # north] and replace # with your Map bounds
        authOptions: {
            authType: 'subscriptionKey',
            subscriptionKey: subscriptionKey
        },
        zoom: 19,

        mapConfiguration: mapConfig,
        styleAPIVersion: '2023-03-01-preview'
      });

      const levelControl = new atlas.control.LevelControl({
        position: "top-right",
      });

      const indoorManager = new atlas.indoor.IndoorManager(map, {
        levelControl: levelControl, //level picker
      });

      map.events.add("levelchanged", indoorManager, (eventData) => {
        //put code that runs after a level has been changed
        console.log("The level has changed:", eventData);
      });

      map.events.add("facilitychanged", indoorManager, (eventData) => {
        //put code that runs after a facility has been changed
        console.log("The facility has changed:", eventData);
      });
    </script>
  </body>
</html>
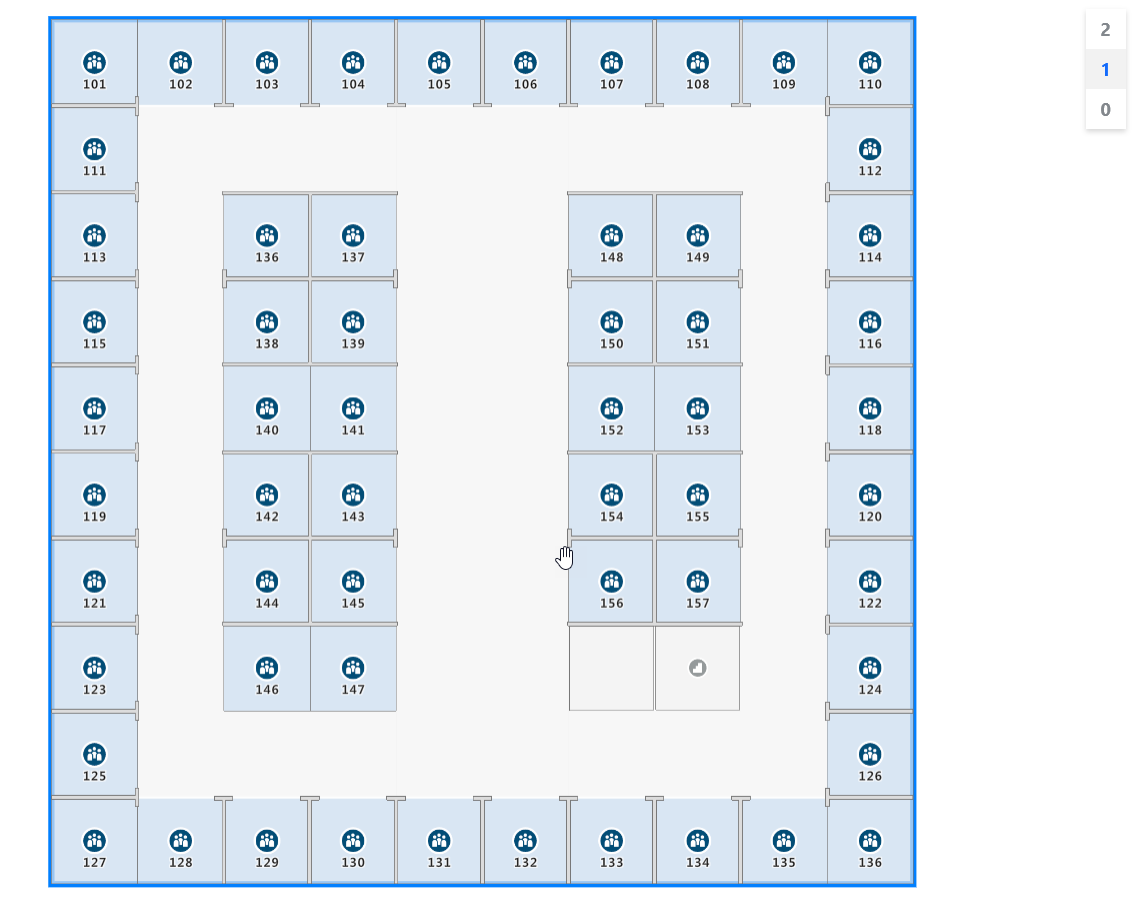
若要查看室内定位,请将其加载到 Web 浏览器中。 它应类似于下图。 如果选择楼梯井功能,则“楼层选取器”显示在右上角。
如需查看提供源代码的室内地图的实时演示,请参阅 [Azure Maps 示例]中的创建室内地图。
后续步骤
了解与“Azure Maps 室内”模块相关的 API:
详细了解如何将更多数据添加到定位: