你当前正在访问 Microsoft Azure Global Edition 技术文档网站。 如果需要访问由世纪互联运营的 Microsoft Azure 中国技术文档网站,请访问 https://docs.azure.cn。
Dependency Agent
注意
本文引用了 CentOS,这是一个处于生命周期结束 (EOL) 状态的 Linux 发行版。 请相应地考虑你的使用和规划。 有关详细信息,请参阅 CentOS 生命周期结束指南。
Dependency Agent 收集有关虚拟机上运行的进程和外部进程依赖项的数据。 更新包括 bug 修补程序或对新特性或功能的支持。 本文介绍 Dependency Agent 要求以及如何手动或通过自动化对其进行升级。
注意
Dependency Agent 将检测信号数据发送到 InsightsMetrics 表,此过程会产生数据引入费用。 此行为不同于 Azure Monitor 代理,后者会将代理运行状况数据发送到检测信号表,该过程不收取数据收集费用。
Dependency Agent 要求
- 要求在同一台计算机上安装 Azure Monitor 代理。
- 在 Windows 和 Linux 上,使用用户空间服务和内核驱动程序收集数据。
- 支持 Azure Monitor 代理支持的同一 Windows 版本,但 Windows Server 2008 SP2 和 Azure Stack HCI 除外。 对于 Linux,请参阅 Dependency Agent Linux 支持。
安装或升级 Dependency Agent
可以使用以下方法手动或自动升级适用于 Windows 和 Linux 的 Dependency Agent,具体取决于计算机运行的部署方案和环境:
| 环境 | 安装方法 | 升级方法 |
|---|---|---|
| Azure VM | 适用于 Windows 和 Linux 的 Dependency Agent VM 扩展 | 默认情况下 Agent 会自动升级,除非你通过将 autoUpgradeMinorVersion 属性设置为 false 来将 Azure 资源管理器模板配置为“选择退出”。 禁用自动升级的次要版本升级和主版本升级遵循相同的方法 - 卸载并重新安装扩展。 |
| 自定义 Azure VM 映像 | 手动安装适用于 Windows/Linux 的 Dependency Agent | 将 VM 更新到最新版本的代理需要从命令行运行 Windows 安装程序包或 Linux 自解压和可安装的 shell 脚本包。 |
| 非 Azure VM | 手动安装适用于 Windows/Linux 的 Dependency Agent | 将 VM 更新到最新版本的代理需要从命令行运行 Windows 安装程序包或 Linux 自解压和可安装的 shell 脚本包。 |
注意
当通过 Azure 门户、PowerShell、ARM 模板部署或 Azure Policy 为进程和连接数据启用 VM Insights 时,会自动安装 Dependency Agent。
如果仅为性能数据启用了 VM Insights,则不会安装 Dependency Agent。
在 Windows 上手动安装或升级 Dependency Agent
从命令提示符使用脚本或其他自动化解决方案,或者使用 InstallDependencyAgent-Windows.exe 安装向导更新 Windows VM 上的代理。
先决条件
- 可从 aka.ms/dependencyagentwindows 下载最新版本的 Windows 代理。
使用安装向导
使用具有管理权限的帐户登录到计算机。
执行 InstallDependencyAgent-Windows.exe 以启动安装向导。
按照“Dependency Agent 安装向导”的要求卸载以前版本的 Dependency Agent,然后安装最新版本。
从命令行中
使用具有管理权限的帐户登录到计算机。
运行下面的命令:
InstallDependencyAgent-Windows.exe /S /RebootMode=manual/RebootMode=manual参数可防止此升级在某些进程使用以前版本的文件并对其进行锁定的情况下自动重启计算机。若要确认升级是否成功,请查看
install.log,了解详细的安装信息。 日志目录为 %Programfiles%\Microsoft Dependency Agent\logs。
在 Linux 上手动安装或升级 Dependency Agent
从 Linux 上的旧版 Dependency Agent 进行升级是受支持的操作,进行升级时使用与新安装相同的命令。
先决条件
- 从 aka.ms/dependencyagentlinux 或通过 curl 下载最新版本的 Linux 代理:
curl -L -o DependencyAgent-Linux64.bin https://aka.ms/dependencyagentlinux
注意
curl 不会自动设置执行权限。 需要使用 chmod 手动设置它们:
chmod +x DependencyAgent-Linux64.bin
从命令行中
使用具有 sudo 特权的用户帐户登录计算机,以 root 身份执行命令。
运行下面的命令:
sudo <path>/InstallDependencyAgent-Linux64.bin
如果 Dependency Agent 无法启动,请检查日志以获取详细的错误信息。 在 Linux 代理上,日志目录是 /var/opt/microsoft/dependency-agent/log。
卸载依赖关系代理
注意
如果手动安装 Dependency Agent,则它不会显示在 Azure 门户中,必须手动卸载。 仅当通过 Azure 门户、PowerShell、ARM 模板部署或 Azure Policy 安装时,才会显示它。
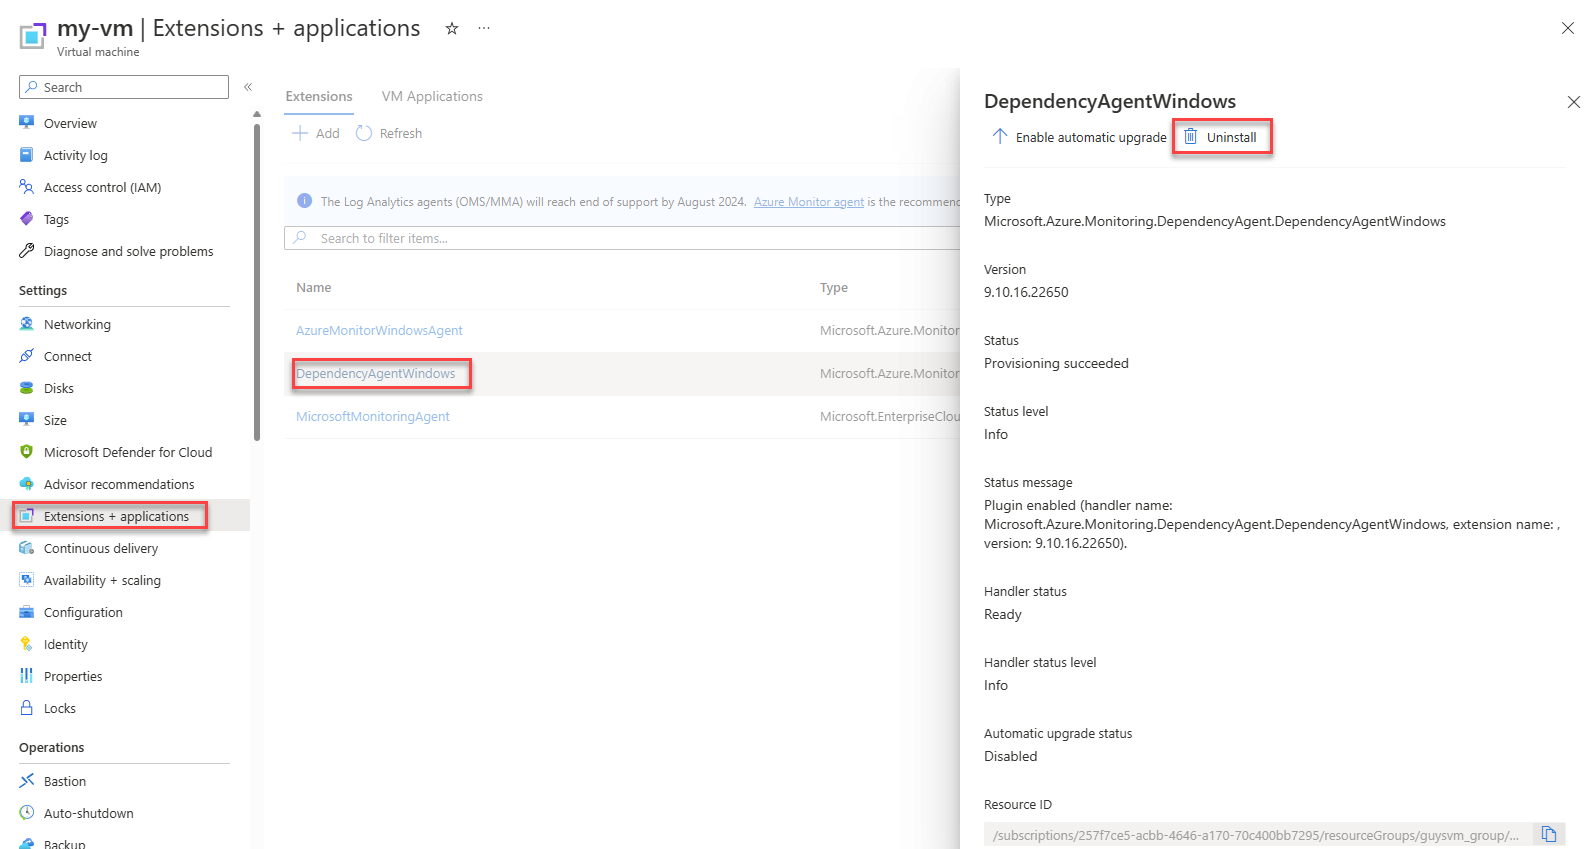
从 Azure 门户的“虚拟机”菜单中,选择虚拟机。
选择“扩展 + 应用程序”>“DependencyAgentWindows”或“DependencyAgentLinux”>“卸载”。

手动卸载 Windows 上的 Dependency Agent
方法 1:在 Windows 中,转到“添加和删除程序”,找到“Microsoft Dependency Agent”,单击省略号以打开上下文菜单,然后选择“卸载”。
方法 2:使用位于 Microsoft Dependency Agent 文件夹中的卸载程序,例如 C:\Program Files\Microsoft Dependency Agent"\Uninstall_v.w.x.y.exe(其中 v.w.x.y 是版本号)。
手动卸载 Linux 上的 Dependency Agent
使用具有 sudo 特权的用户帐户登录计算机,以 root 身份执行命令。
运行下面的命令:
sudo /opt/microsoft/dependency-agent/uninstall -s
Dependency Agent Linux 支持
由于 Dependency Agent 在内核级别工作,因此支持也依赖于内核版本。 从 Dependency Agent 版本 9.10.* 开始,代理支持 * 内核。 下表列出了 Dependency Agent 的主要和次要 Linux OS 版本以及支持的内核版本。
注意
使用 Dependency Agent 9.10.15 及更高版本时,允许不受支持的内核版本的安装,但代理将在降级模式下运行。 在此模式下,不会收集存储在 VMConnection 和 VMBoundport 表中的连接和端口数据。 VMProcess 表可能包含一些数据,但数据量最少。
| 分发 | OS 版本 | 内核版本 |
|---|---|---|
| Red Hat Linux 8 | 8.6 | 4.18.0-372.*el8.x86_64、4.18.0-372.*el8_6.x86_64 |
| 8.5 | 4.18.0-348.*el8_5.x86_644.18.0-348.*el8.x86_64 | |
| 8.4 | 4.18.0-305.*el8.x86_64, 4.18.0-305.*el8_4.x86_64 | |
| 8.3 | 4.18.0-240.*el8_3.x86_64 | |
| 8.2 | 4.18.0-193.*el8_2.x86_64 | |
| 8.1 | 4.18.0-147.*el8_1.x86_64 | |
| 8.0 | 4.18.0-80.*el8.x86_64 4.18.0-80.*el8_0.x86_64 |
|
| Red Hat Linux 7 | 7.9 | 3.10.0-1160 |
| 7.8 | 3.10.0-1136 | |
| 7.7 | 3.10.0-1062 | |
| 7.6 | 3.10.0-957 | |
| 7.5 | 3.10.0-862 | |
| 7.4 | 3.10.0-693 | |
| Red Hat Linux 6 | 6.10 | 2.6.32-754 |
| 6.9 | 2.6.32-696 | |
| CentOS Linux 8 | 8.6 | 4.18.0-372.*el8.x86_64、4.18.0-372.*el8_6.x86_64 |
| 8.5 | 4.18.0-348.*el8_5.x86_644.18.0-348.*el8.x86_64 | |
| 8.4 | 4.18.0-305.*el8.x86_64, 4.18.0-305.*el8_4.x86_64 | |
| 8.3 | 4.18.0-240.*el8_3.x86_64 | |
| 8.2 | 4.18.0-193.*el8_2.x86_64 | |
| 8.1 | 4.18.0-147.*el8_1.x86_64 | |
| 8.0 | 4.18.0-80.*el8.x86_64 4.18.0-80.*el8_0.x86_64 |
|
| CentOS Linux 7 | 7.9 | 3.10.0-1160 |
| 7.8 | 3.10.0-1136 | |
| 7.7 | 3.10.0-1062 | |
| CentOS Linux 6 | 6.10 | 2.6.32-754.3.5 2.6.32-696.30.1 |
| 6.9 | 2.6.32-696.30.1 2.6.32-696.18.7 |
|
| Ubuntu Server | 20.04 | 5.8 5.4* |
| 18.04 | 5.3.0-1020 5.0(包括 Azure 优化内核) 4.18* 4.15* |
|
| 16.04.3 | 4.15.* | |
| 16.04 | 4.13.* 4.11.* 4.10.* 4.8.* 4.4.* |
|
| 14.04 | 3.13.*-generic 4.4.*-generic |
|
| SUSE Linux 12 Enterprise Server | 12 SP5 | 4.12.14-122.*-default, 4.12.14-16.*-azure |
| 12 SP4 | 4.12.*(包括 Azure 优化内核) | |
| 12 SP3 | 4.4.* | |
| 12 SP2 | 4.4.* | |
| SUSE Linux 15 Enterprise Server | 15 SP1 | 4.12.14-197.*-default, 4.12.14-8.*-azure |
| 15 | 4.12.14-150.*-default | |
| Debian | 9 | 4.9 |
注意
具有基于 Ampere Altra ARM 的处理器的 Azure 虚拟机不支持 Dependency Agent。
后续步骤
如果要停止监视 VM 一段时间,或者要完全删除 VM Insights,请参阅在 VM Insights 中禁用对 VM 的监视。