你当前正在访问 Microsoft Azure Global Edition 技术文档网站。 如果需要访问由世纪互联运营的 Microsoft Azure 中国技术文档网站,请访问 https://docs.azure.cn。
使用 Node.js 和 mssql npm 包连接到 Azure SQL 数据库并执行查询
适用于:![]() Azure SQL 数据库
Azure SQL 数据库
本快速入门教程介绍了如何使用 Node.js 和 mssql 将应用程序连接到 Azure SQL 数据库中的数据库并执行查询。 本快速入门按照建议的无密码方法连接到数据库。
面向开发人员的无密码连接
无密码连接提供更安全的机制来访问 Azure 资源。 本文中的以下高级步骤用于使用无密码连接连接至 Azure SQL 数据库:
- 为无密码身份验证准备环境。
- 对于本地环境:使用个人标识。 可以从 IDE、CLI 或其他本地开发工具中拉取此标识。
- 对于云环境:使用托管标识。
- 使用
DefaultAzureCredentialAzure 标识库中的 在环境中进行身份验证,以获取已验证凭据。 - 使用已验证凭据创建 Azure SDK 客户端对象以进行资源访问。
可以在无密码中心了解有关无密码连接的详细信息。
先决条件
- Azure 订阅
- Azure SQL 数据库中一个配置了 Microsoft Entra ID(旧称 Azure Active Directory)身份验证的数据库。 可以按照创建数据库快速入门创建数据库。
- 已启用 Bash 的 shell
- Node.js LTS
- Visual Studio Code
- Visual Studio Code 应用服务扩展
- 最新版本的 Azure CLI
配置数据库服务器
要与 Azure SQL 数据库建立安全的无密码连接,需要特定的数据库配置。 确认 Azure 中的逻辑服务器上的以下设置,在本地和托管环境中正确连接到 Azure SQL 数据库:
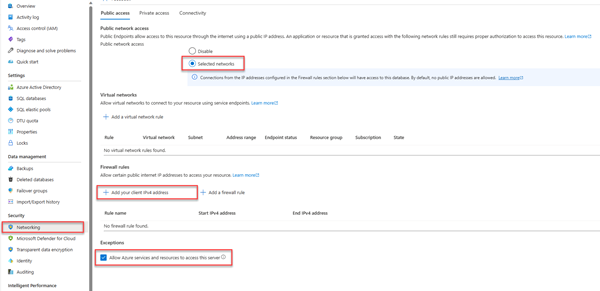
对于本地开发连接,请确保逻辑服务器配置为允许本地计算机 IP 地址和其他 Azure 服务进行连接:
导航到服务器的“网络”页。
切换“所选网络”单选按钮以显示其他配置选项。
选择“添加客户端 IPv4 地址(xx.xx.xx.xx)”以添加防火墙规则,这会启用来自本地计算机 IPv4 地址的连接。 或者,还可以选择“+ 添加防火墙规则”,输入所选的特定 IP 地址。
确保选中“允许 Azure 服务和资源访问此服务器”复选框。
警告
对于生产方案,不建议启用“允许 Azure 服务和资源访问此服务器”设置。 实际应用程序应实现更安全的方法,例如更强的防火墙限制或虚拟网络配置。
若要详细了解数据库安全配置,可以阅读以下资源:
还必须为服务器启用 Microsoft Entra 身份验证,并为其分配 Microsoft Entra 管理员帐户。 对于本地开发连接,Microsoft Entra 管理员帐户应该是你也可以在本地用于登录到 Visual Studio 或 Azure CLI 的帐户。 可以在逻辑服务器的“Microsoft Entra ID”页上验证是否为服务器启用了 Microsoft Entra 身份验证。
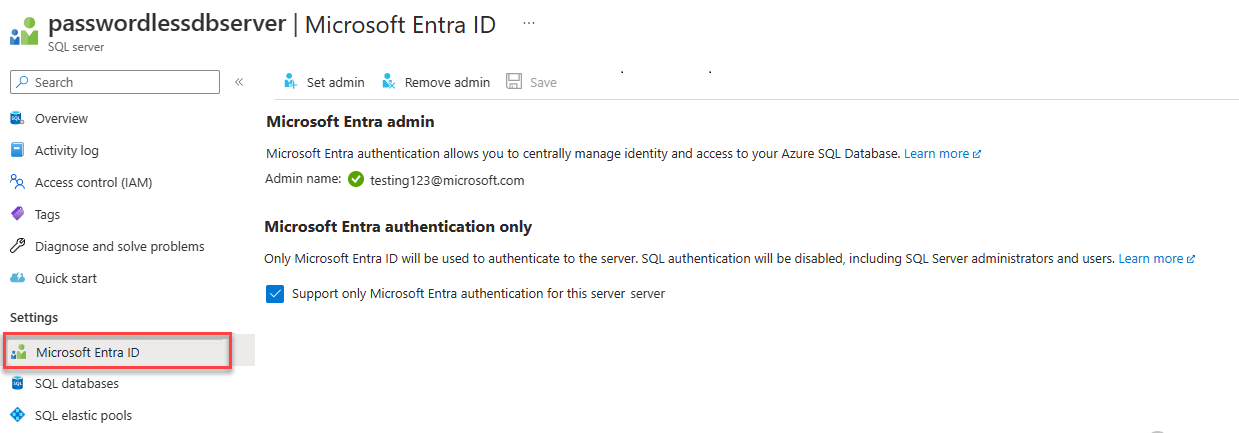
如果你使用个人 Azure 帐户,请确保已为 Azure SQL 数据库设置并配置 Microsoft Entra,以便将你的帐户分配为服务器管理员。如果你使用公司帐户,则很可能已为你配置了 Microsoft Entra ID。


创建项目
本部分中的步骤用于创建 Node.js REST API。
为项目创建一个新目录并导航到其中。
通过在终端中运行以下命令来初始化项目:
npm init -y安装本文示例代码中使用的所需包:
npm install mssql swagger-ui-express yamljs安装本文示例代码中使用的开发包:
npm install --save-dev dotenv在 Visual Studio Code 中打开项目。
code .打开 package.json 文件,在 name 属性后面添加以下属性和值,以便为 ESM 模块配置项目。
"type": "module",
创建 Express.js 应用程序代码
要创建 Express.js OpenAPI 应用程序,需要创建多个文件:
| 文件 | 说明 |
|---|---|
| .env.development | 本地仅开发环境文件。 |
| index.js | 主应用程序文件,用于在端口 3000 上启动 Express.js 应用。 |
| person.js | Express.js /person 路由 API 文件,用于处理 CRUD 操作。 |
| openapi.js | OpenAPI 资源管理器 UI 的 Express.js /api-docs 路由。 根重定向到此路由。 |
| openApiSchema.yml | 定义人员 API 的 OpenAPI 3.0 架构文件。 |
| config.js | 用于读取环境变量并构造适当 mssql 连接对象的配置文件。 |
| database.js | 使用 mssql npm 包处理 Azure SQL CRUD 操作的数据库类。 |
| ./vscode/settings.json | 在部署期间按 glob 模式忽略文件。 |
创建 index.js 文件并添加以下代码:
import express from 'express';
import { config } from './config.js';
import Database from './database.js';

// Import App routes
import person from './person.js';
import openapi from './openapi.js';

const port = process.env.PORT || 3000;

const app = express();

// Development only - don't do in production
// Run this to create the table in the database
if (process.env.NODE_ENV === 'development') {
  const database = new Database(config);
  database
    .executeQuery(
      `CREATE TABLE Person (id int NOT NULL IDENTITY, firstName varchar(255), lastName varchar(255));`
    )
    .then(() => {
      console.log('Table created');
    })
    .catch((err) => {
      // Table may already exist
      console.error(`Error creating table: ${err}`);
    });
}

// Connect App routes
app.use('/api-docs', openapi);
app.use('/persons', person);
app.use('*', (_, res) => {
  res.redirect('/api-docs');
});

// Start the server
app.listen(port, () => {
  console.log(`Server started on port ${port}`);
});
创建 person.js 路由文件并添加以下代码:
import express from 'express';
import { config } from './config.js';
import Database from './database.js';

const router = express.Router();
router.use(express.json());

// Development only - don't do in production
console.log(config);

// Create database object
const database = new Database(config);

router.get('/', async (_, res) => {
  try {
    // Return a list of persons
    const persons = await database.readAll();
    console.log(`persons: ${JSON.stringify(persons)}`);
    res.status(200).json(persons);
  } catch (err) {
    res.status(500).json({ error: err?.message });
  }
});

router.post('/', async (req, res) => {
  try {
    // Create a person
    const person = req.body;
    console.log(`person: ${JSON.stringify(person)}`);
    const rowsAffected = await database.create(person);
    res.status(201).json({ rowsAffected });
  } catch (err) {
    res.status(500).json({ error: err?.message });
  }
});

router.get('/:id', async (req, res) => {
  try {
    // Get the person with the specified ID
    const personId = req.params.id;
    console.log(`personId: ${personId}`);
    if (personId) {
      const result = await database.read(personId);
      console.log(`persons: ${JSON.stringify(result)}`);
      res.status(200).json(result);
    } else {
      res.status(404);
    }
  } catch (err) {
    res.status(500).json({ error: err?.message });
  }
});

router.put('/:id', async (req, res) => {
  try {
    // Update the person with the specified ID
    const personId = req.params.id;
    console.log(`personId: ${personId}`);
    const person = req.body;

    if (personId && person) {
      delete person.id;
      console.log(`person: ${JSON.stringify(person)}`);
      const rowsAffected = await database.update(personId, person);
      res.status(200).json({ rowsAffected });
    } else {
      res.status(404);
    }
  } catch (err) {
    res.status(500).json({ error: err?.message });
  }
});

router.delete('/:id', async (req, res) => {
  try {
    // Delete the person with the specified ID
    const personId = req.params.id;
    console.log(`personId: ${personId}`);

    if (!personId) {
      res.status(404);
    } else {
      const rowsAffected = await database.delete(personId);
      res.status(204).json({ rowsAffected });
    }
  } catch (err) {
    res.status(500).json({ error: err?.message });
  }
});

export default router;
创建 opanapi.js 路由文件,并为 OpenAPI UI 资源管理器添加以下代码:
import express from 'express';
import { join, dirname } from 'path';
import swaggerUi from 'swagger-ui-express';
import yaml from 'yamljs';
import { fileURLToPath } from 'url';

const __dirname = dirname(fileURLToPath(import.meta.url));

const router = express.Router();
router.use(express.json());

const pathToSpec = join(__dirname, './openApiSchema.yml');
const openApiSpec = yaml.load(pathToSpec);

router.use('/', swaggerUi.serve, swaggerUi.setup(openApiSpec));

export default router;
创建 openApiSchema.yml 架构文件并添加以下 YAML:
openapi: 3.0.0
info:
  version: 1.0.0
  title: Persons API
paths:
  /persons:
    get:
      summary: Get all persons
      responses:
        '200':
          description: OK
          content:
            application/json:
              schema:
                type: array
                items:
                  $ref: '#/components/schemas/Person'
    post:
      summary: Create a new person
      requestBody:
        required: true
        content:
          application/json:
            schema:
              $ref: '#/components/schemas/Person'
      responses:
        '201':
          description: Created
          content:
            application/json:
              schema:
                $ref: '#/components/schemas/Person'
  /persons/{id}:
    parameters:
      - name: id
        in: path
        required: true
        schema:
          type: integer
    get:
      summary: Get a person by ID
      responses:
        '200':
          description: OK
          content:
            application/json:
              schema:
                $ref: '#/components/schemas/Person'
        '404':
          description: Person not found
    put:
      summary: Update a person by ID
      requestBody:
        required: true
        content:
          application/json:
            schema:
              $ref: '#/components/schemas/Person'
      responses:
        '200':
          description: OK
          content:
            application/json:
              schema:
                $ref: '#/components/schemas/Person'
        '404':
          description: Person not found
    delete:
      summary: Delete a person by ID
      responses:
        '204':
          description: No Content
        '404':
          description: Person not found
components:
  schemas:
    Person:
      type: object
      properties:
        id:
          type: integer
          readOnly: true
        firstName:
          type: string
        lastName:
          type: string
配置 mssql 连接对象
mssql 包通过为身份验证类型提供配置设置来实现与 Azure SQL 数据库的连接。
在 Visual Studio Code 中创建一个 config.js 文件,并添加以下 mssql 配置代码,以对 Azure SQL 数据库进行身份验证。
import * as dotenv from 'dotenv';
dotenv.config({ path: `.env.${process.env.NODE_ENV}`, debug: true });

const server = process.env.AZURE_SQL_SERVER;
const database = process.env.AZURE_SQL_DATABASE;
const port = parseInt(process.env.AZURE_SQL_PORT);
const type = process.env.AZURE_SQL_AUTHENTICATIONTYPE;

export const config = {
    server,
    port,
    database,
    authentication: {
        type
    },
    options: {
        encrypt: true
    }
};
为本地环境变量创建一个 .env.development 文件,添加以下文本并更新
<YOURSERVERNAME>和<YOURDATABASENAME>的值。AZURE_SQL_SERVER=<YOURSERVERNAME>.database.windows.net AZURE_SQL_DATABASE=<YOURDATABASENAME> AZURE_SQL_PORT=1433 AZURE_SQL_AUTHENTICATIONTYPE=azure-active-directory-default
注意
无密码配置对象可以安全地提交到源代码管理,因为它们不包含用户名、密码或访问密钥这样的任何机密。
创建一个
.vscode文件夹并在该文件夹中创建一个 settings.json 文件。添加以下内容以在 zip 部署期间忽略环境变量和依赖关系。
{
    "appService.zipIgnorePattern": ["./.env*","node_modules{,/**}"]
}
添加代码以连接到 Azure SQL 数据库
创建 database.js 文件并添加以下代码:
import sql from 'mssql';

export default class Database {
  config = {};
  poolconnection = null;
  connected = false;

  constructor(config) {
    this.config = config;
    console.log(`Database: config: ${JSON.stringify(config)}`);
  }

  async connect() {
    try {
      console.log(`Database connecting...${this.connected}`);
      if (this.connected === false) {
        this.poolconnection = await sql.connect(this.config);
        this.connected = true;
        console.log('Database connection successful');
      } else {
        console.log('Database already connected');
      }
    } catch (error) {
      console.error(`Error connecting to database: ${JSON.stringify(error)}`);
    }
  }

  async disconnect() {
    try {
      this.poolconnection.close();
      console.log('Database connection closed');
    } catch (error) {
      console.error(`Error closing database connection: ${error}`);
    }
  }

  async executeQuery(query) {
    await this.connect();
    const request = this.poolconnection.request();
    const result = await request.query(query);

    return result.rowsAffected[0];
  }

  async create(data) {
    await this.connect();
    const request = this.poolconnection.request();

    request.input('firstName', sql.NVarChar(255), data.firstName);
    request.input('lastName', sql.NVarChar(255), data.lastName);

    const result = await request.query(
      `INSERT INTO Person (firstName, lastName) VALUES (@firstName, @lastName)`
    );

    return result.rowsAffected[0];
  }

  async readAll() {
    await this.connect();
    const request = this.poolconnection.request();
    const result = await request.query(`SELECT * FROM Person`);

    return result.recordsets[0];
  }

  async read(id) {
    await this.connect();

    const request = this.poolconnection.request();
    const result = await request
      .input('id', sql.Int, +id)
      .query(`SELECT * FROM Person WHERE id = @id`);

    return result.recordset[0];
  }

  async update(id, data) {
    await this.connect();

    const request = this.poolconnection.request();

    request.input('id', sql.Int, +id);
    request.input('firstName', sql.NVarChar(255), data.firstName);
    request.input('lastName', sql.NVarChar(255), data.lastName);

    const result = await request.query(
      `UPDATE Person SET firstName=@firstName, lastName=@lastName WHERE id = @id`
    );

    return result.rowsAffected[0];
  }

  async delete(id) {
    await this.connect();

    const idAsNumber = Number(id);

    const request = this.poolconnection.request();
    const result = await request
      .input('id', sql.Int, idAsNumber)
      .query(`DELETE FROM Person WHERE id = @id`);

    return result.rowsAffected[0];
  }
}
在本地测试应用
应用已准备好在本地进行测试。 请确保使用设置为数据库管理员的同一帐户登录 Visual Studio Code 中的 Azure 云。
使用以下命令运行应用程序。 该应用在端口 3000 上启动。
NODE_ENV=development node index.jsPerson 表是在你运行此应用程序时在数据库中创建的。
在浏览器中,导航到 OpenAPI 资源管理器 (http://localhost:3000)。
在 Swagger UI 页上,展开 POST 方法并选择“试用”。
修改示例 JSON 以包含属性值。 将忽略 ID 属性。
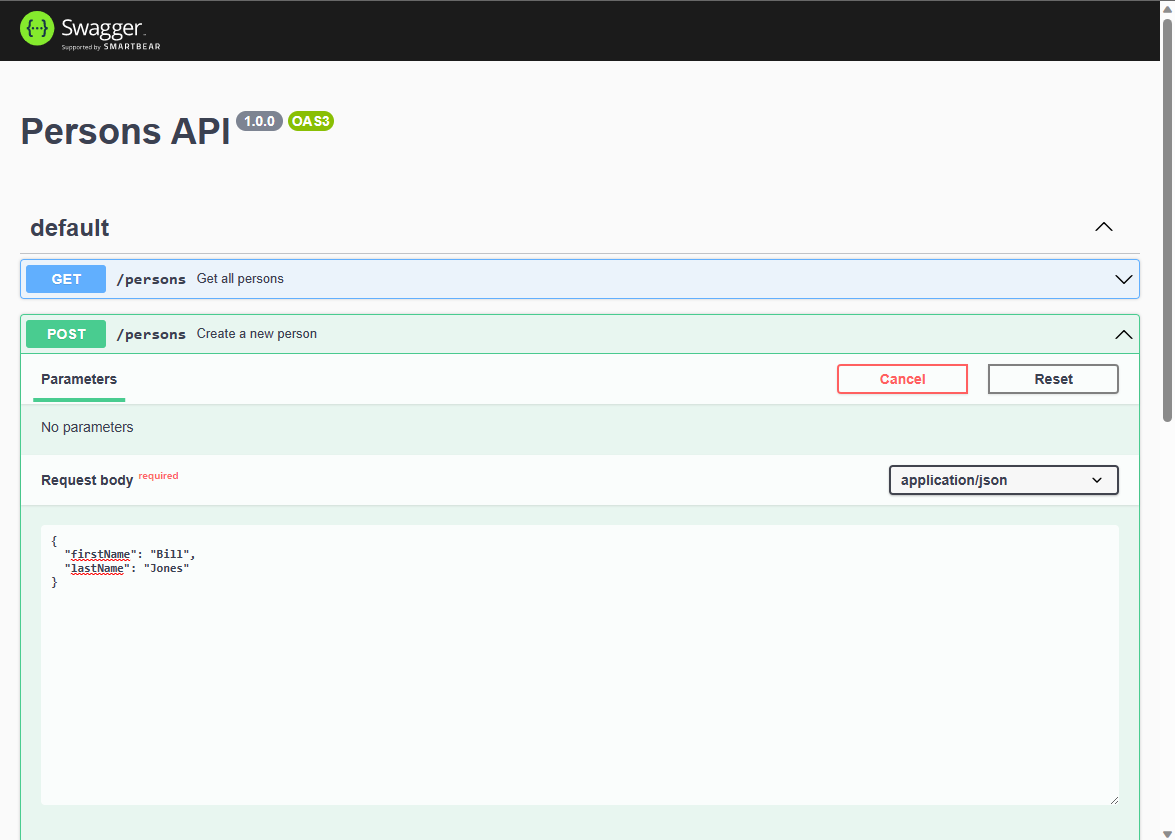
选择“执行”,将新记录添加到数据库中。 API 返回成功的响应。
在 Swagger UI 页上,展开 GET 方法并选择“试用”。 选择“执行”,此时会返回你刚刚创建的人员。

部署到 Azure 应用服务
应用已准备好部署到 Azure。 Visual Studio Code 可以创建 Azure 应用服务并在单个工作流中部署应用程序。
确保应用已停止。
如果尚未登录到 Azure,请在命令面板中选择“Azure: 登录到 Azure 云”(Ctrl + Shift + P) 进行登录
在 Visual Studio Code 的 Azure 资源管理器窗口中,右键单击“应用服务”节点并选择“创建新的 Web 应用(高级)”。
使用下表创建应用服务:
Prompt “值” 为新 Web 应用输入全局唯一名称。 输入提示,例如 azure-sql-passwordless。 在后面追加一个唯一字符串,如123。选择新资源的资源组。 选择“+创建新资源组”,然后选择默认名称。 选择运行时堆栈。 选择 Node.js 堆栈的 LTS 版本。 选择 OS。 选择“Linux”。 选择新资源的位置。 选择靠近自己的位置。 选择 Linux 应用服务计划。 选择“新建应用服务计划”。然后选择默认名称。 选择定价层。 选择“免费(F1)”。 为你的应用选择 Application Insights 资源。 选择“暂时跳过”。 请在收到已创建应用的通知后再继续。
在 Azure 资源管理器中,展开“应用服务”节点,然后右键单击新应用。
选择“部署到 Web 应用”。
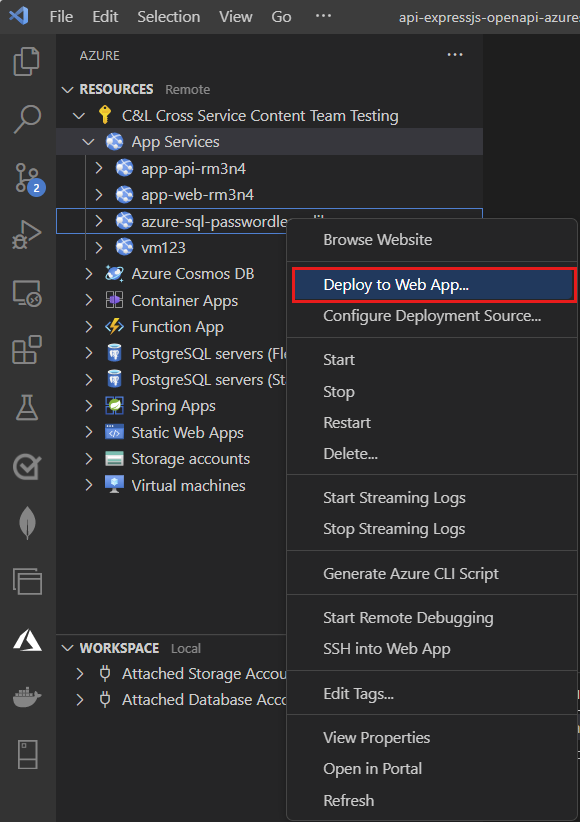
选择 JavaScript 项目的根文件夹。
出现 Visual Studio Code 弹出窗口时,选择“部署”。
部署完成后,应用无法在 Azure 上正常运行。 你仍然需要在应用服务和 SQL 数据库之间配置安全连接,才能检索数据。
将应用服务连接到 Azure SQL 数据库
若要将应用服务实例连接到 Azure SQL 数据库,需要执行以下步骤:
- 为应用服务创建托管标识。
- 创建 SQL 数据库用户,并将它与应用服务托管标识关联。
- 将 SQL 角色分配给允许读取、写入以及可能的其他权限的数据库用户。
可以使用多种工具实现这些步骤:
服务连接器是一种工具,可简化 Azure 中不同服务之间经过身份验证的连接。 服务连接器目前支持通过 Azure CLI 使用 az webapp connection create sql 命令将应用服务连接到 Azure SQL 数据库。 这个命令完成了上面提到的三个步骤。
使用服务连接器创建托管标识
在 Azure 门户的 Cloud Shell 中运行以下命令。 Cloud Shell 具有最新版本的 Azure CLI。 将 <> 中的变量替换为自己的值。
az webapp connection create sql \
    -g <app-service-resource-group> \
    -n <app-service-name> \
    --tg <database-server-resource-group> \
    --server <database-server-name> \
    --database <database-name> \
    --system-identity
验证应用服务应用设置
可以验证服务连接器对应用服务设置所做的更改。
在 Visual Studio Code 的 Azure 资源管理器中,右键单击应用服务,然后选择“在门户中打开”。
导航到应用服务的“标识”页。 在“系统分配”选项卡下,“状态”应设置为“开”。 此值表示已经为应用启用了系统分配的托管标识。
导航到应用服务的“配置”页。 在“应用程序设置”选项卡下,应会看到 mssql 配置对象中已有多个环境变量。
AZURE_SQL_SERVERAZURE_SQL_DATABASEAZURE_SQL_PORTAZURE_SQL_AUTHENTICATIONTYPE
请勿删除或更改属性名称或值。

测试已部署的应用程序
浏览到应用的 URL,测试与 Azure SQL 数据库的连接是否正常工作。 可以在应用服务的概述页上找到应用的 URL。
你在本地创建的人员应会显示在浏览器中。 恭喜! 现在,你的应用程序已连接到本地和托管环境中的 Azure SQL 数据库。
提示
如果在测试时收到 500 内部服务器错误,则可能是由于数据库网络配置造成的。 验证逻辑服务器是否配置了配置数据库部分中概述的设置。
清理资源
使用完 Azure SQL 数据库后,请删除资源以避免意外成本。
在 Azure 门户搜索栏中,搜索 Azure SQL 并选择匹配结果。
在数据库列表中找到并选择数据库。
在 Azure SQL 数据库的“概述”页上,选择“删除”。
Azure 上随即打开“确定要删除...”页,键入数据库名称进行确认,然后选择“删除”。
代码示例
GitHub 上提供了此应用程序的示例代码。
后续步骤
反馈
即将发布:在整个 2024 年,我们将逐步淘汰作为内容反馈机制的“GitHub 问题”,并将其取代为新的反馈系统。 有关详细信息,请参阅:https://aka.ms/ContentUserFeedback。
提交和查看相关反馈