你当前正在访问 Microsoft Azure Global Edition 技术文档网站。 如果需要访问由世纪互联运营的 Microsoft Azure 中国技术文档网站,请访问 https://docs.azure.cn。
快速入门:将你的聊天应用连接到 Teams 会议
通过将聊天解决方案连接到 Microsoft Teams,开始使用 Azure 通信服务。
本快速入门介绍如何使用适用于 JavaScript 的 Azure 通信服务聊天 SDK 在 Teams 会议中聊天。
代码示例
在 GitHub 上查找此快速入门的最终代码。
先决条件
加入会议聊天
通信服务用户可以使用调用 SDK 作为匿名用户加入 Teams 会议。 用户加入会议时还会以参与者身份加入会议聊天,用户可以在聊天中与会议中的其他用户发送和接收消息。 用户将不能访问在其加入会议之前发送的聊天消息,也无法在会议结束后发送或接收消息。 若要加入会议并开始聊天,可以执行后续步骤。
创建新的 Node.js 应用程序
打开终端或命令窗口,为应用创建一个新目录,并导航到该目录。
mkdir chat-interop-quickstart && cd chat-interop-quickstart
运行 npm init -y 以使用默认设置创建 package.json 文件。
npm init -y
安装聊天包
使用 npm install 命令安装适用于 JavaScript 的必要通信服务 SDK。
npm install @azure/communication-common --save

npm install @azure/communication-identity --save

npm install @azure/communication-chat --save

npm install @azure/communication-calling --save
--save 选项将该库作为 package.json 文件中的依赖项列出。
设置应用框架
此快速入门使用 Webpack 捆绑应用程序资产。 运行以下命令以安装 Webpack、webpack-cli 和 webpack-dev-server npm 包,并将它们作为 package.json 中的开发依赖项列出:
npm install webpack@5.89.0 webpack-cli@5.1.4 webpack-dev-server@4.15.1 --save-dev
在项目的根目录中创建一个 index.html 文件。 我们将使用此文件来配置一个基本布局,让用户可以加入会议并开始聊天。
添加 Teams UI 控件
将 index.html 中的代码替换为以下代码片段。 页面顶部的文本框将用于输入 Teams 会议上下文。 使用“加入 Teams 会议”按钮加入指定会议。 页面底部将弹出一个聊天窗口。 它可用于在会议线程上发送消息,并且它将在通信服务用户为成员时实时显示在该线程上发送的任何消息。
<!DOCTYPE html>
<html>
   <head>
      <title>Communication Client - Calling and Chat Sample</title>
      <style>
         body {box-sizing: border-box;}
         /* The popup chat - hidden by default */
         .chat-popup {
         display: none;
         position: fixed;
         bottom: 0;
         left: 15px;
         border: 3px solid #f1f1f1;
         z-index: 9;
         }
         .message-box {
         display: none;
         position: fixed;
         bottom: 0;
         left: 15px;
         border: 3px solid #FFFACD;
         z-index: 9;
         }
         .form-container {
         max-width: 300px;
         padding: 10px;
         background-color: white;
         }
         .form-container textarea {
         width: 90%;
         padding: 15px;
         margin: 5px 0 22px 0;
         border: none;
         background: #e1e1e1;
         resize: none;
         min-height: 50px;
         }
         .form-container .btn {
         background-color: #4CAF40;
         color: white;
         padding: 14px 18px;
         margin-bottom:10px;
         opacity: 0.6;
         border: none;
         cursor: pointer;
         width: 100%;
         }
         .container {
         border: 1px solid #dedede;
         background-color: #F1F1F1;
         border-radius: 3px;
         padding: 8px;
         margin: 8px 0;
         }
         .darker {
         border-color: #ccc;
         background-color: #ffdab9;
         margin-left: 25px;
         margin-right: 3px;
         }
         .lighter {
         margin-right: 20px;
         margin-left: 3px;
         }
         .container::after {
         content: "";
         clear: both;
         display: table;
         }
      </style>
   </head>
   <body>
      <h4>Azure Communication Services</h4>
      <h1>Calling and Chat Quickstart</h1>
          <input id="teams-link-input" type="text" placeholder="Teams meeting link"
        style="margin-bottom:1em; width: 400px;" />
        <p>Call state <span style="font-weight: bold" id="call-state">-</span></p>
      <div>
        <button id="join-meeting-button" type="button">
            Join Teams Meeting
        </button>
        <button id="hang-up-button" type="button" disabled="true">
            Hang Up
        </button>
      </div>
      <div class="chat-popup" id="chat-box">
         <div id="messages-container"></div>
         <form class="form-container">
            <textarea placeholder="Type message.." name="msg" id="message-box" required></textarea>
            <button type="button" class="btn" id="send-message">Send</button>
         </form>
      </div>
      <script src="./bundle.js"></script>
   </body>
</html>
启用 Teams UI 控件
将 client.js 文件的内容替换为以下代码片段。
在代码片段中,将
SECRET_CONNECTION_STRING替换为通信服务的连接字符串
import { CallClient } from "@azure/communication-calling";
import { AzureCommunicationTokenCredential } from "@azure/communication-common";
import { CommunicationIdentityClient } from "@azure/communication-identity";
import { ChatClient } from "@azure/communication-chat";

let call;
let callAgent;
let chatClient;
let chatThreadClient;

const meetingLinkInput = document.getElementById("teams-link-input");
const callButton = document.getElementById("join-meeting-button");
const hangUpButton = document.getElementById("hang-up-button");
const callStateElement = document.getElementById("call-state");

const messagesContainer = document.getElementById("messages-container");
const chatBox = document.getElementById("chat-box");
const sendMessageButton = document.getElementById("send-message");
const messageBox = document.getElementById("message-box");

var userId = "";
var messages = "";
var chatThreadId = "";

async function init() {
  const connectionString = "<SECRET_CONNECTION_STRING>";
  const endpointUrl = connectionString.split(";")[0].replace("endpoint=", "");

  const identityClient = new CommunicationIdentityClient(connectionString);

  let identityResponse = await identityClient.createUser();
  userId = identityResponse.communicationUserId;
  console.log(`\nCreated an identity with ID: ${identityResponse.communicationUserId}`);

  let tokenResponse = await identityClient.getToken(identityResponse, ["voip", "chat"]);

  const { token, expiresOn } = tokenResponse;
  console.log(`\nIssued an access token that expires at: ${expiresOn}`);
  console.log(token);

  const callClient = new CallClient();
  const tokenCredential = new AzureCommunicationTokenCredential(token);

  callAgent = await callClient.createCallAgent(tokenCredential);
  callButton.disabled = false;
  chatClient = new ChatClient(endpointUrl, new AzureCommunicationTokenCredential(token));

  console.log("Azure Communication Chat client created!");
}

init();

const joinCall = (urlString, callAgent) => {
  const url = new URL(urlString);
  console.log(url);
  if (url.pathname.startsWith("/meet")) {
    // Short teams URL, so for now call meetingID and pass code API
    return callAgent.join({
      meetingId: url.pathname.split("/").pop(),
      passcode: url.searchParams.get("p"),
    });
  } else {
    return callAgent.join({ meetingLink: urlString }, {});
  }
};

callButton.addEventListener("click", async () => {
  // join with meeting link
  try {
    call = joinCall(meetingLinkInput.value, callAgent);
  } catch {
    throw new Error("Could not join meeting - have you set your connection string?");
  }

  // Chat thread ID is provided from the call info, after connection.
  call.on("stateChanged", async () => {
    callStateElement.innerText = call.state;

    if (call.state === "Connected" && !chatThreadClient) {
      chatThreadId = call.info?.threadId;
      chatThreadClient = chatClient.getChatThreadClient(chatThreadId);

      chatBox.style.display = "block";
      messagesContainer.innerHTML = messages;

      // open notifications channel
      await chatClient.startRealtimeNotifications();

      // subscribe to new message notifications
      chatClient.on("chatMessageReceived", (e) => {
        console.log("Notification chatMessageReceived!");

        // check whether the notification is intended for the current thread
        if (chatThreadId != e.threadId) {
          return;
        }

        if (e.sender.communicationUserId != userId) {
          renderReceivedMessage(e.message);
        } else {
          renderSentMessage(e.message);
        }
      });
    }
  });

  // toggle button and chat box states
  hangUpButton.disabled = false;
  callButton.disabled = true;

  console.log(call);
});

async function renderReceivedMessage(message) {
  messages += '<div class="container lighter">' + message + "</div>";
  messagesContainer.innerHTML = messages;
}

async function renderSentMessage(message) {
  messages += '<div class="container darker">' + message + "</div>";
  messagesContainer.innerHTML = messages;
}

hangUpButton.addEventListener("click", async () => {
  // end the current call
  await call.hangUp();
  // Stop notifications
  chatClient.stopRealtimeNotifications();

  // toggle button states
  hangUpButton.disabled = true;
  callButton.disabled = false;
  callStateElement.innerText = "-";

  // toggle chat states
  chatBox.style.display = "none";
  messages = "";
  // Remove local ref
  chatThreadClient = undefined;
});

sendMessageButton.addEventListener("click", async () => {
  let message = messageBox.value;

  let sendMessageRequest = { content: message };
  let sendMessageOptions = { senderDisplayName: "Jack" };
  let sendChatMessageResult = await chatThreadClient.sendMessage(
    sendMessageRequest,
    sendMessageOptions
  );
  let messageId = sendChatMessageResult.id;

  messageBox.value = "";
  console.log(`Message sent!, message id:${messageId}`);
});
聊天线程参与者的显示名称不由 Teams 客户端设置。 在participantsAdded事件和participantsRemoved事件当中,这些名称将在列出参与者的 API 中作为 null 返回。 可以从 call 对象的 remoteParticipants 字段检索聊天参与者的显示名称。 收到有关名册更改的通知后,可以使用此代码来检索已添加或已删除的用户名称:
var displayName = call.remoteParticipants.find(p => p.identifier.communicationUserId == '<REMOTE_USER_ID>').displayName;
运行代码
Webpack 用户可以使用 webpack-dev-server 生成并运行应用。 运行以下命令,在本地 Web 服务器上捆绑应用程序主机:
npx webpack-dev-server --entry ./client.js --output bundle.js --debug --devtool inline-source-map
打开浏览器并导航到 http://localhost:8080/。 你应会看到应用已启动,如以下屏幕截图所示:
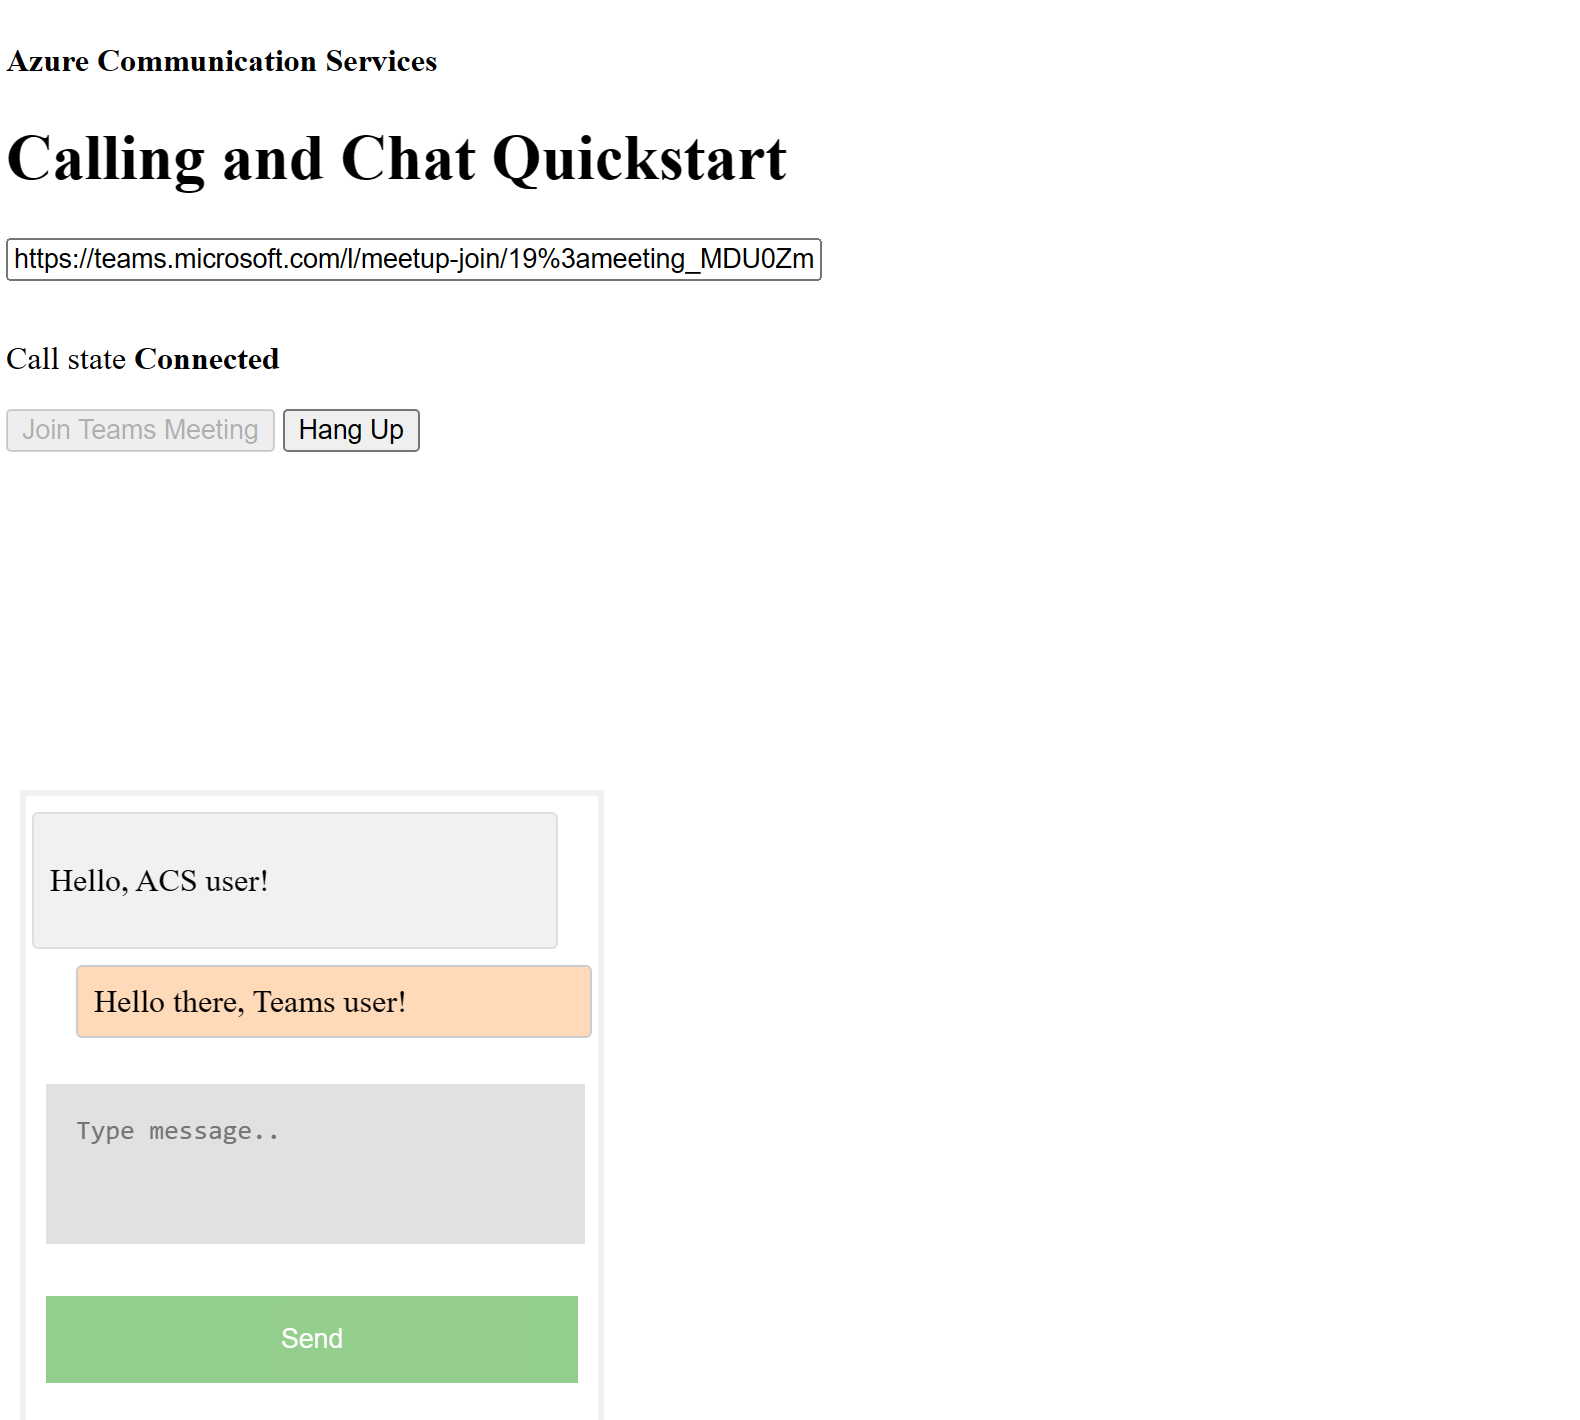
在文本框中插入 Teams 会议链接。 按“加入 Teams 会议”来加入 Teams 会议。 在通信服务用户获批进入会议后,可以在通信服务应用程序中进行聊天。 导航到页面底部的框以开始聊天。 为简单起见,应用程序将仅显示聊天中的最后两条消息。
注意
与 Teams 的互操作性方案目前不支持某些功能。 要详细了解支持的功能,请参阅 Teams 外部用户的 Teams 会议功能
本快速入门介绍如何使用适用于 iOS 的 Azure 通信服务聊天 SDK 在 Teams 会议中聊天。
代码示例
如果你要向前跳转到末尾,可以从 GitHub 下载此快速入门示例。
先决条件
- 具有活动订阅的 Azure 帐户。 免费创建帐户
- 一部运行 Xcode 的 Mac,以及一个安装到密钥链的有效开发人员证书。
- Teams 部署。
- Azure 通信服务的用户访问令牌。 可以使用 Azure CLI,并结合你的连接字符串运行命令来创建用户和访问令牌。
az communication identity token issue --scope voip --connection-string "yourConnectionString"
有关详细信息,请参阅使用 Azure CLI 创建和管理访问令牌。
设置
创建 Xcode 项目
在 Xcode 中,创建新的 iOS 项目,并选择“单视图应用”模板。 本教程使用 SwiftUI 框架,因此应将“语言”设置为“Swift”,并将“用户界面”设置为“SwiftUI”。 在此快速入门过程中,不会创建测试。 可以取消选中“包括测试”。

安装 CocoaPods
使用此指南在 Mac 上安装 CocoaPods。
使用 CocoaPods 安装包和依赖项
若要为应用程序创建
Podfile,请打开终端并导航到项目文件夹,然后运行 pod init。将以下代码添加到目标下的
Podfile,然后保存。
target 'Chat Teams Interop' do
  # Comment the next line if you don't want to use dynamic frameworks
  use_frameworks!

  # Pods for Chat Teams Interop
  pod 'AzureCommunicationCalling'
  pod 'AzureCommunicationChat'

end
运行
pod install。使用 Xcode 打开
.xcworkspace文件。
请求访问麦克风
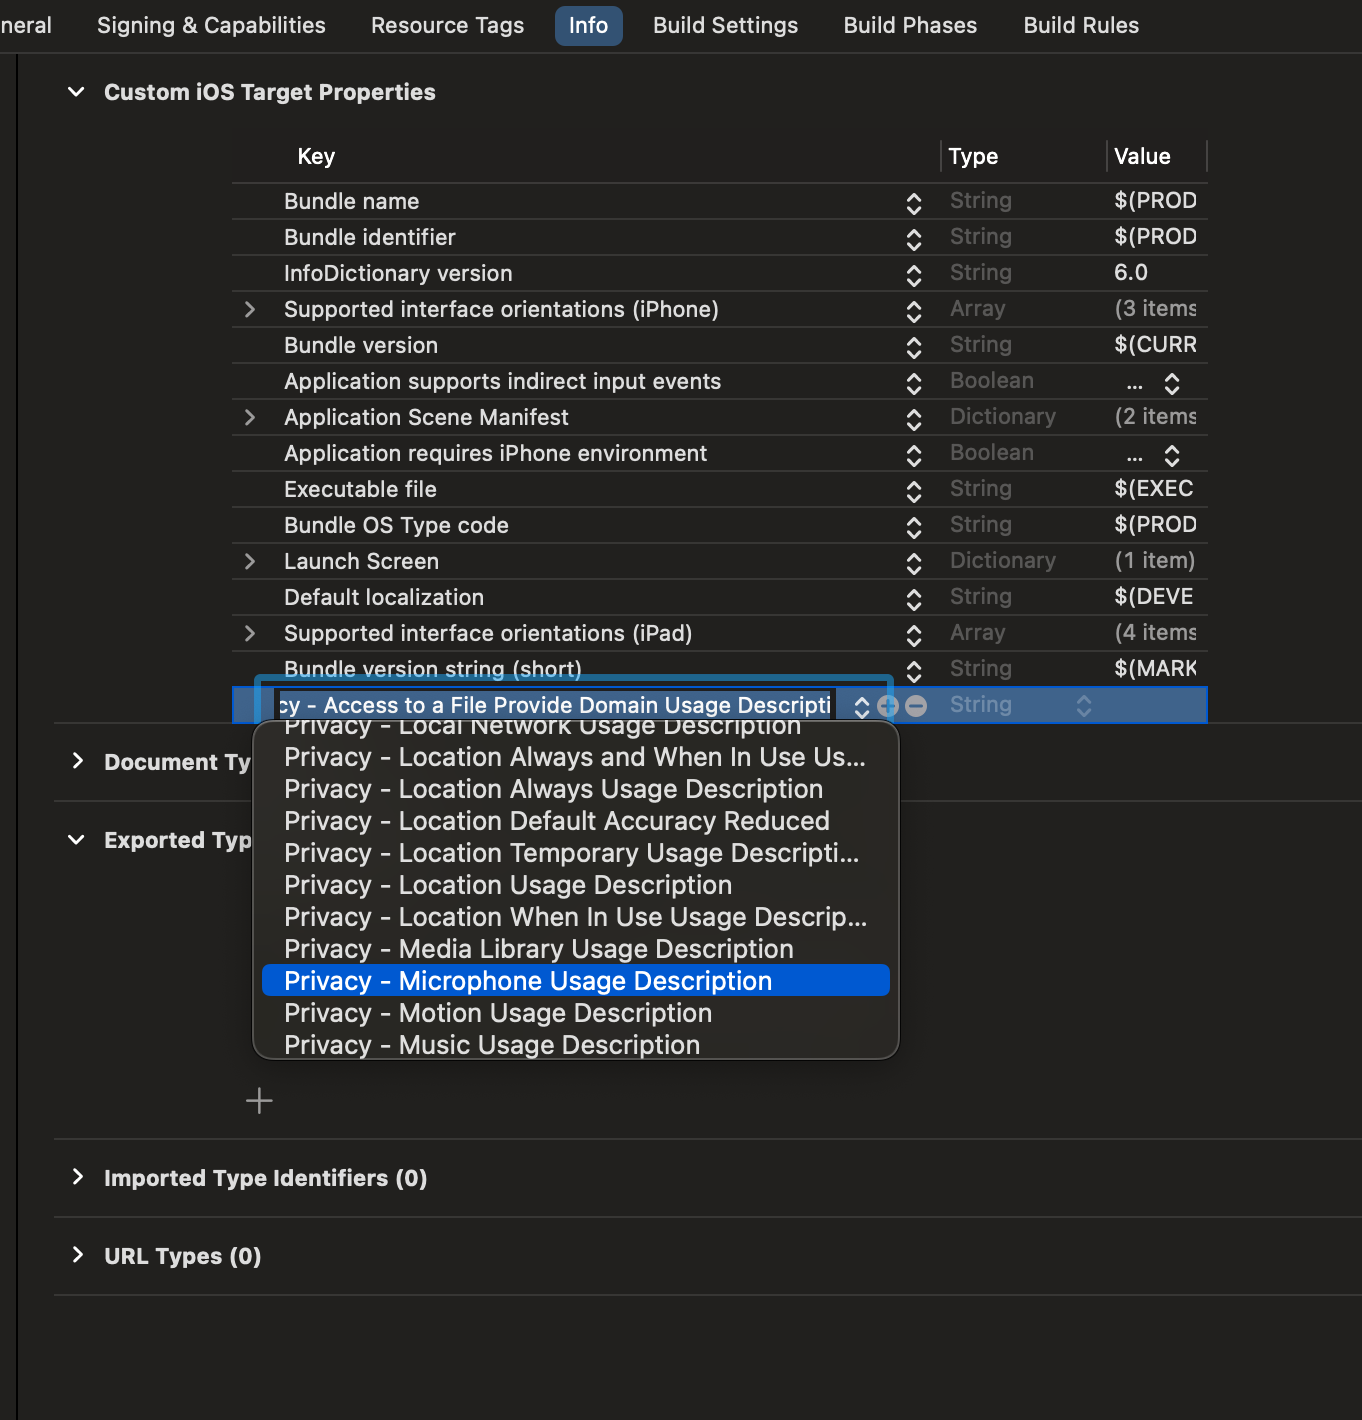
若要访问设备的麦克风,需要使用 NSMicrophoneUsageDescription 更新应用的信息属性列表。 将关联的值设置为将要包含在系统用于向用户请求访问权限的对话框中的 string。
在目标下,选择 Info 选项卡,并为“隐私 - 麦克风使用说明”添加字符串
禁用用户脚本沙盒
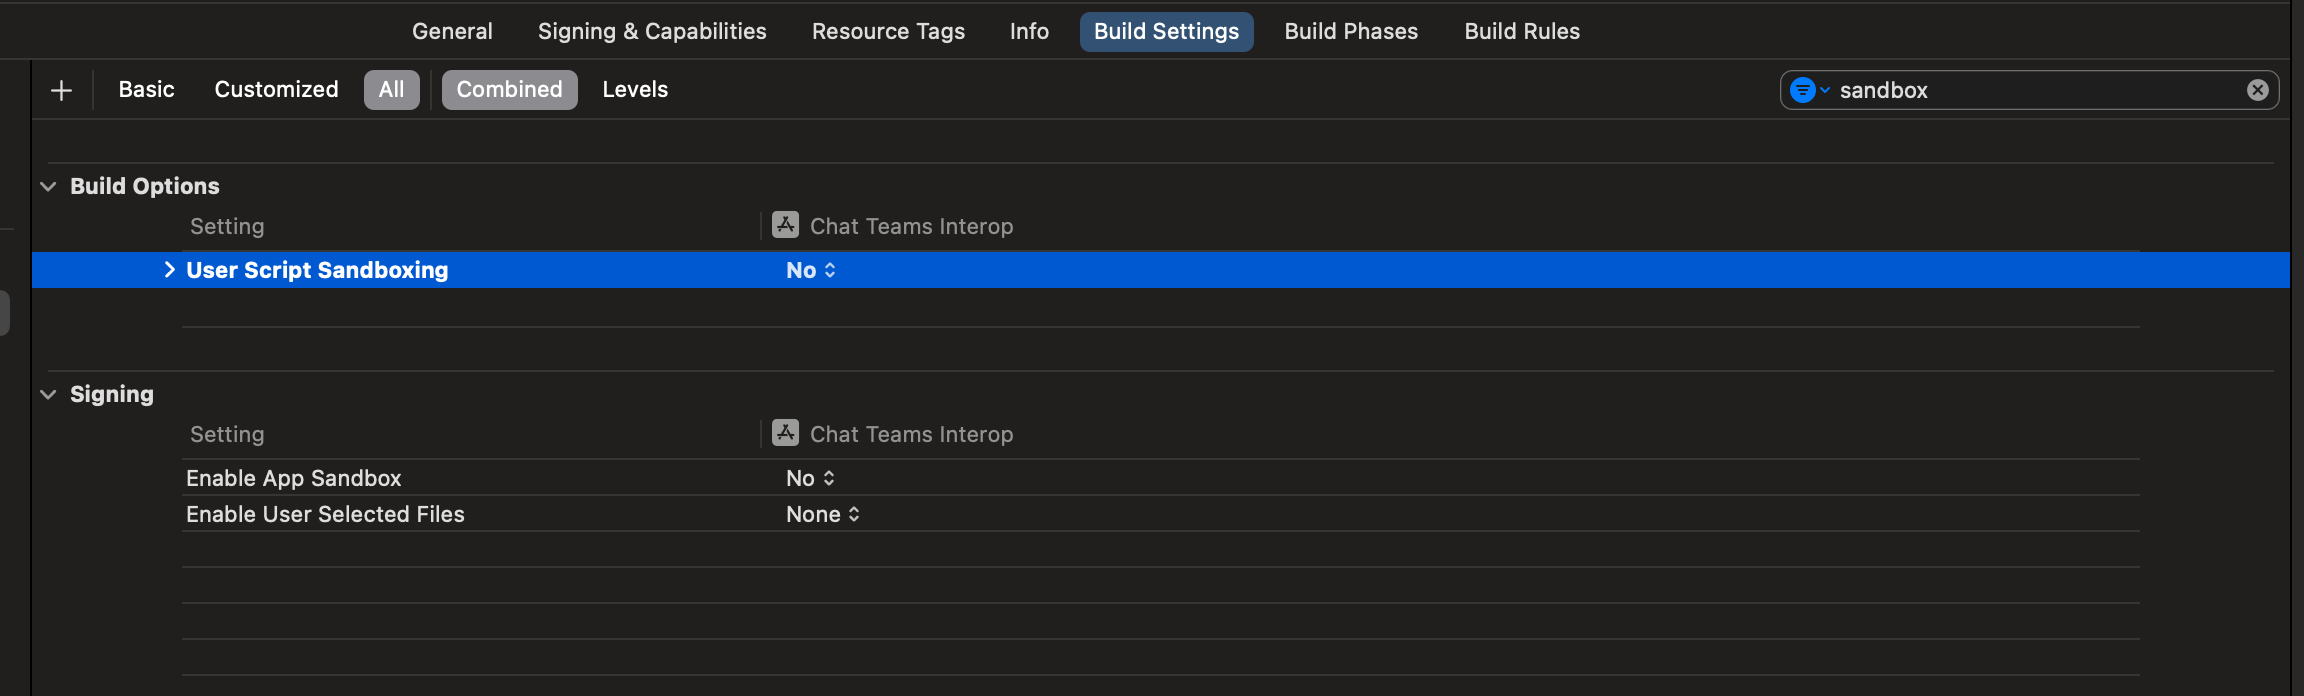
链接库中的某些脚本在生成过程中会写入文件。 若要允许此操作,请在 Xcode 中禁用用户脚本沙盒。
在生成设置下,搜索 sandbox 并将 User Script Sandboxing 设置为 No。
加入会议聊天
通信服务用户可以使用调用 SDK 作为匿名用户加入 Teams 会议。 用户加入 Teams 会议后,他们可与其他参会者相互发送和接收消息。 用户无法访问在加入会议之前发送的聊天消息,也无法在离开会议时发送或接收消息。 若要加入会议并开始聊天,可以执行后续步骤。
设置应用框架
通过添加以下代码片段来导入 ContentView.swift 中的 Azure 通信包:
import AVFoundation
import SwiftUI

import AzureCommunicationCalling
import AzureCommunicationChat
在 ContentView.swift 中紧靠 struct ContentView: View 声明的上方添加以下代码片段:
let endpoint = "<ADD_YOUR_ENDPOINT_URL_HERE>"
let token = "<ADD_YOUR_USER_TOKEN_HERE>"
let displayName: String = "Quickstart User"
将 <ADD_YOUR_ENDPOINT_URL_HERE> 替换为通信服务资源的终结点。
通过 Azure 客户端命令行,将 <ADD_YOUR_USER_TOKEN_HERE> 替换为上面生成的令牌。
详细了解用户访问令牌:用户访问令牌
将 Quickstart User 替换为要用于聊天的显示名称。
若要保存状态,请将以下变量添加到 ContentView 结构:
  @State var message: String = ""
  @State var meetingLink: String = ""
  @State var chatThreadId: String = ""

  // Calling state
  @State var callClient: CallClient?
  @State var callObserver: CallDelegate?
  @State var callAgent: CallAgent?
  @State var call: Call?

  // Chat state
  @State var chatClient: ChatClient?
  @State var chatThreadClient: ChatThreadClient?
  @State var chatMessage: String = ""
  @State var meetingMessages: [MeetingMessage] = []
现在让我们添加主体变量来保存 UI 元素。 我们会在本快速入门中将业务逻辑附加到这些控件。 将以下代码添加到 ContentView 结构:
var body: some View {
    NavigationView {
      Form {
        Section {
          TextField("Teams Meeting URL", text: $meetingLink)
            .onChange(of: self.meetingLink, perform: { value in
              if let threadIdFromMeetingLink = getThreadId(from: value) {
                self.chatThreadId = threadIdFromMeetingLink
              }
            })
          TextField("Chat thread ID", text: $chatThreadId)
        }
        Section {
          HStack {
            Button(action: joinMeeting) {
              Text("Join Meeting")
            }.disabled(
              chatThreadId.isEmpty || callAgent == nil || call != nil
            )
            Spacer()
            Button(action: leaveMeeting) {
              Text("Leave Meeting")
            }.disabled(call == nil)
          }
          Text(message)
        }
        Section {
          ForEach(meetingMessages, id: \.id) { message in
            let currentUser: Bool = (message.displayName == displayName)
            let foregroundColor = currentUser ? Color.white : Color.black
            let background = currentUser ? Color.blue : Color(.systemGray6)
            let alignment = currentUser ? HorizontalAlignment.trailing : .leading

            HStack {
              if currentUser {
                Spacer()
              }
              VStack(alignment: alignment) {
                Text(message.displayName).font(Font.system(size: 10))
                Text(message.content)
                  .frame(maxWidth: 200)
              }

              .padding(8)
              .foregroundColor(foregroundColor)
              .background(background)
              .cornerRadius(8)

              if !currentUser {
                Spacer()
              }
            }
          }
          .frame(maxWidth: .infinity)
        }

        TextField("Enter your message...", text: $chatMessage)
        Button(action: sendMessage) {
          Text("Send Message")
        }.disabled(chatThreadClient == nil)
      }

      .navigationBarTitle("Teams Chat Interop")
    }

    .onAppear {
      // Handle initialization of the call and chat clients
    }
  }
初始化 ChatClient
实例化 ChatClient 并启用消息通知。 我们将使用实时通知来接收聊天消息。
设置主体后,让我们添加用于处理通话和聊天客户端设置的函数。
在 onAppear 函数中,添加以下代码以初始化 CallClient 和 ChatClient:
  if let threadIdFromMeetingLink = getThreadId(from: self.meetingLink) {
    self.chatThreadId = threadIdFromMeetingLink
  }
  // Authenticate
  do {
    let credentials = try CommunicationTokenCredential(token: token)
    self.callClient = CallClient()
    self.callClient?.createCallAgent(
      userCredential: credentials
    ) { agent, error in
      if let e = error {
        self.message = "ERROR: It was not possible to create a call agent."
        print(e)
        return
      } else {
        self.callAgent = agent
      }
    }

    // Start the chat client
    self.chatClient = try ChatClient(
      endpoint: endpoint,
      credential: credentials,
      withOptions: AzureCommunicationChatClientOptions()
    )
    // Register for real-time notifications
    self.chatClient?.startRealTimeNotifications { result in
      switch result {
      case .success:
        self.chatClient?.register(
          event: .chatMessageReceived,
          handler: receiveMessage
      )
      case let .failure(error):
        self.message = "Could not register for message notifications: " + error.localizedDescription
        print(error)
      }
    }
  } catch {
    print(error)
    self.message = error.localizedDescription
  }
添加会议加入函数
将以下函数添加到 ContentView 结构以处理会议加入。
  func joinMeeting() {
    // Ask permissions
    AVAudioSession.sharedInstance().requestRecordPermission { (granted) in
      if granted {
        let teamsMeetingLink = TeamsMeetingLinkLocator(
          meetingLink: self.meetingLink
        )
        self.callAgent?.join(
          with: teamsMeetingLink,
          joinCallOptions: JoinCallOptions()
        ) {(call, error) in
          if let e = error {
            self.message = "Failed to join call: " + e.localizedDescription
            print(e.localizedDescription)
            return
          }

          self.call = call
          self.callObserver = CallObserver(self)
          self.call?.delegate = self.callObserver
          self.message = "Teams meeting joined successfully"
        }
      } else {
        self.message = "Not authorized to use mic"
      }
    }
  }
初始化 ChatThreadClient
我们将在用户加入会议后初始化 ChatThreadClient。 这需要检查委托的会议状态,然后在加入会议时使用 threadId 初始化 ChatThreadClient。
使用以下代码创建 connectChat() 函数:
  func connectChat() {
    do {
      self.chatThreadClient = try chatClient?.createClient(
        forThread: self.chatThreadId
      )
      self.message = "Joined meeting chat successfully"
    } catch {
      self.message = "Failed to join the chat thread: " + error.localizedDescription
    }
  }
如果可能,请将以下帮助器函数添加到 ContentView,用于分析团队会议链接中的聊天线程 ID。 如果提取失败,用户需要使用图形 API 手动输入聊天线程 ID 来检索线程 ID。
 func getThreadId(from teamsMeetingLink: String) -> String? {
  if let range = teamsMeetingLink.range(of: "meetup-join/") {
    let thread = teamsMeetingLink[range.upperBound...]
    if let endRange = thread.range(of: "/")?.lowerBound {
      return String(thread.prefix(upTo: endRange))
    }
  }
  return nil
}
启用消息发送
添加 sendMessage() 函数到 ContentView。 此函数将使用 ChatThreadClient 发送来自用户的消息。
func sendMessage() {
  let message = SendChatMessageRequest(
    content: self.chatMessage,
    senderDisplayName: displayName,
    type: .text
  )

  self.chatThreadClient?.send(message: message) { result, _ in
    switch result {
    case .success:
    print("Chat message sent")
    self.chatMessage = ""

    case let .failure(error):
    self.message = "Failed to send message: " + error.localizedDescription + "\n Has your token expired?"
    }
  }
}
启用消息接收
若要接收消息,我们将实现 ChatMessageReceived 事件的处理程序。 将新消息发送到线程时,此处理程序会将消息添加到 meetingMessages 变量中,以便可以在 UI 中显示这些消息。
首先,将以下结构添加到 ContentView.swift。 此 UI 将使用结构中的数据来显示聊天消息。
struct MeetingMessage: Identifiable {
  let id: String
  let date: Date
  let content: String
  let displayName: String

  static func fromTrouter(event: ChatMessageReceivedEvent) -> MeetingMessage {
    let displayName: String = event.senderDisplayName ?? "Unknown User"
    let content: String = event.message.replacingOccurrences(
      of: "<[^>]+>", with: "",
      options: String.CompareOptions.regularExpression
    )
    return MeetingMessage(
      id: event.id,
      date: event.createdOn?.value ?? Date(),
      content: content,
      displayName: displayName
    )
  }
}
然后将 receiveMessage() 函数添加到 ContentView。 当消息传递事件发生时会调用此项。 请注意,需要通过 chatClient?.register() 方法在 switch 语句中注册你要处理的所有事件。
  func receiveMessage(event: TrouterEvent) -> Void {
    switch event {
    case let .chatMessageReceivedEvent(messageEvent):
      let message = MeetingMessage.fromTrouter(event: messageEvent)
      self.meetingMessages.append(message)

      /// OTHER EVENTS
      //    case .realTimeNotificationConnected:
      //    case .realTimeNotificationDisconnected:
      //    case .typingIndicatorReceived(_):
      //    case .readReceiptReceived(_):
      //    case .chatMessageEdited(_):
      //    case .chatMessageDeleted(_):
      //    case .chatThreadCreated(_):
      //    case .chatThreadPropertiesUpdated(_):
      //    case .chatThreadDeleted(_):
      //    case .participantsAdded(_):
      //    case .participantsRemoved(_):

    default:
      break
    }
  }
最后,需要为通话客户端实现委托处理程序。 此处理程序用于在用户加入会议时检查通话状态并初始化聊天客户端。
class CallObserver : NSObject, CallDelegate {
  private var owner: ContentView

  init(_ view: ContentView) {
    owner = view
  }

  func call(
    _ call: Call,
    didChangeState args: PropertyChangedEventArgs
  ) {
    owner.message = CallObserver.callStateToString(state: call.state)
    if call.state == .disconnected {
      owner.call = nil
      owner.message = "Left Meeting"
    } else if call.state == .inLobby {
      owner.message = "Waiting in lobby (go let them in!)"
    } else if call.state == .connected {
      owner.message = "Connected"
      owner.connectChat()
    }
  }

  private static func callStateToString(state: CallState) -> String {
    switch state {
    case .connected: return "Connected"
    case .connecting: return "Connecting"
    case .disconnected: return "Disconnected"
    case .disconnecting: return "Disconnecting"
    case .earlyMedia: return "EarlyMedia"
    case .none: return "None"
    case .ringing: return "Ringing"
    case .inLobby: return "InLobby"
    default: return "Unknown"
    }
  }
}
离开聊天
当用户离开团队会议时,我们会清除 UI 中的聊天消息并挂断电话。 完整代码如下所示。
  func leaveMeeting() {
    if let call = self.call {
      self.chatClient?.unregister(event: .chatMessageReceived)
      self.chatClient?.stopRealTimeNotifications()

      call.hangUp(options: nil) { (error) in
        if let e = error {
          self.message = "Leaving Teams meeting failed: " + e.localizedDescription
        } else {
          self.message = "Leaving Teams meeting was successful"
        }
      }
      self.meetingMessages.removeAll()
    } else {
      self.message = "No active call to hangup"
    }
  }
获取通信服务用户的 Teams 会议聊天线程
可以使用图形 API 来检索 Teams 会议详细信息,详情请参阅图形文档。 通信服务呼叫 SDK 接受完整的 Teams 会议链接或会议 ID。 它们将作为onlineMeeting资源的一部分返回,可在joinWebUrl属性下访问
使用图形 API,还可以获取 threadID。 响应拥有包含 threadID 的 chatInfo 对象。
运行代码
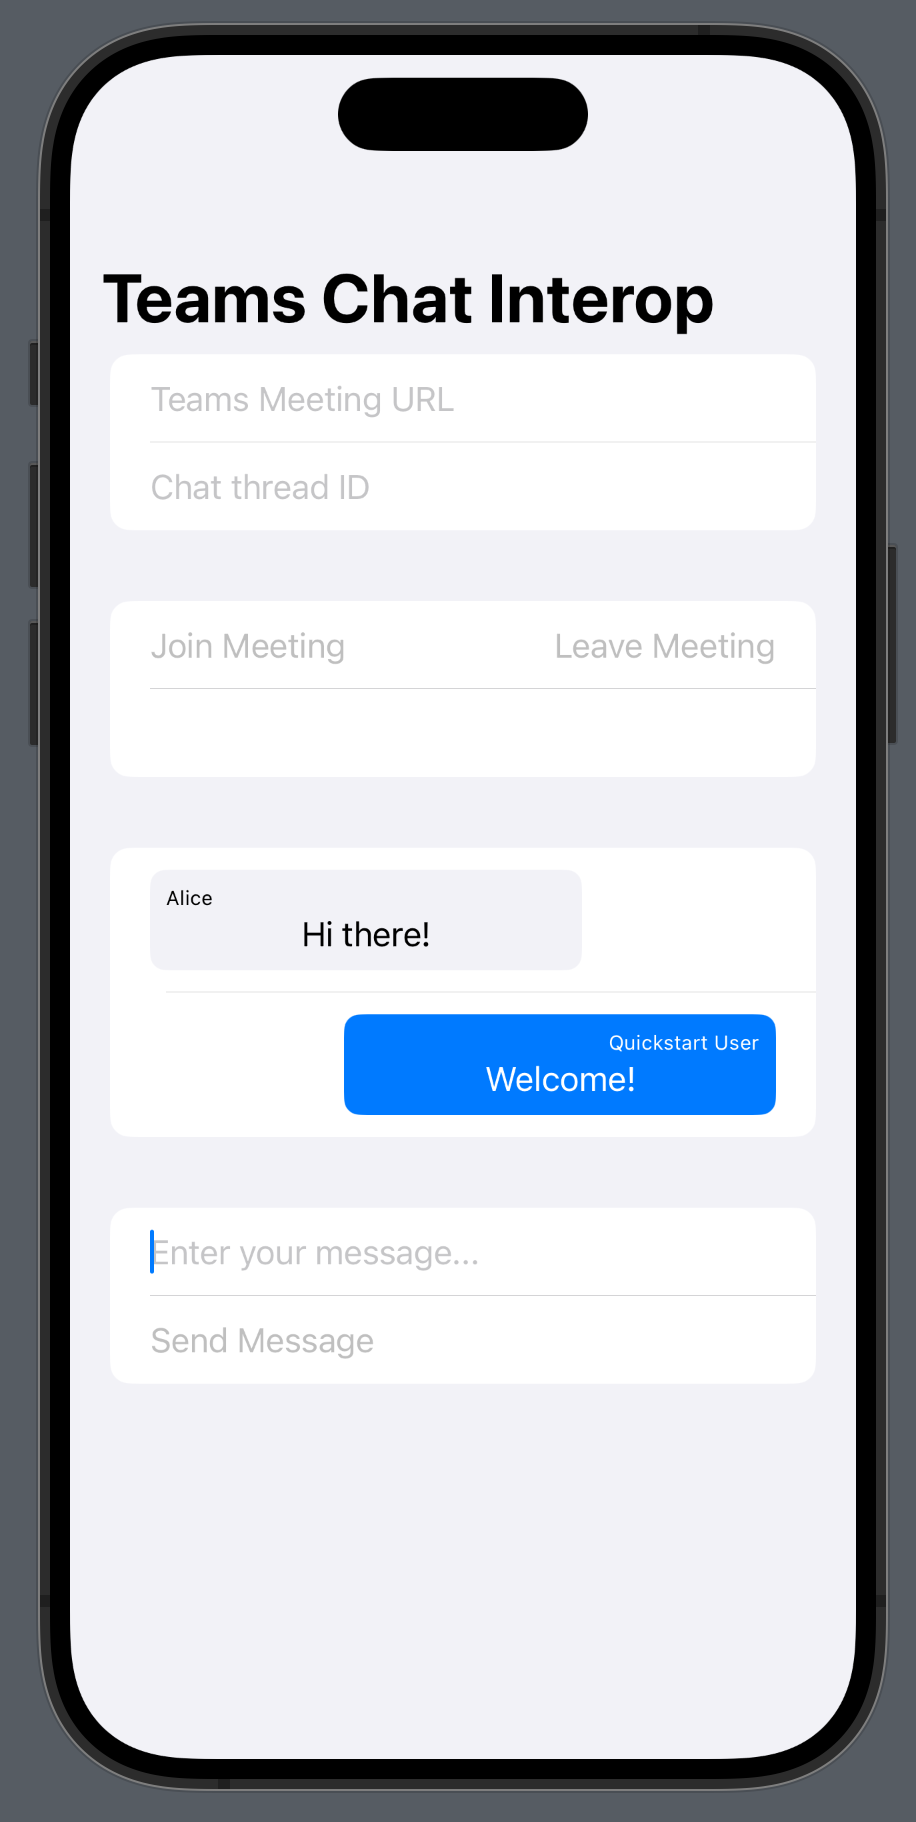
运行该应用程序。
若要加入 Teams 会议,请在此 UI 中输入 Teams 的会议链接。
加入 Team 会议后,需要在 Team 客户端中允许用户加入会议。 用户获准并加入聊天后,就可以发送和接收消息了。
注意
与 Teams 的互操作性方案目前不支持某些功能。 要详细了解支持的功能,请参阅 Teams 外部用户的 Teams 会议功能
本快速入门介绍如何使用适用于 Android 的 Azure 通信服务聊天 SDK 在 Teams 会议中聊天。
代码示例
如果你要向前跳转到末尾,可以从 GitHub 下载此快速入门示例。
先决条件
启用 Teams 互操作性
以来宾用户身份加入 Teams 会议的通信服务用户仅在加入 Teams 会议通话后才能访问会议的聊天。 请参阅 Teams 互操作文档,了解如何将通信服务用户添加到 Teams 会议通话。
你需要是拥有这两个实体的组织的成员才能使用此功能。
加入会议聊天
启用 Teams 互操作性后,通信服务用户可以使用通话 SDK 以外部用户身份加入 Teams 通话。 用户加入通话时还会以参与者身份加入会议聊天,可在其中与通话中的其他用户发送和接收消息。 用户无法访问在其加入通话前发送的聊天消息。 若要加入会议并开始聊天,可以执行后续步骤。
将聊天添加到 Teams 通话应用
在模块级别 build.gradle 中,在聊天 SDK 上添加依赖项。
重要
已知问题:在同一应用程序中同时使用 Android 聊天和调用 SDK 时,聊天 SDK 的实时通知功能不起作用。 你将遇到依赖项解析问题。 在我们寻找解决方案期间,你可以通过将以下排除项添加到应用程序 build.gradle 文件中的聊天 SDK 依赖项来关闭实时通知功能:
implementation ("com.azure.android:azure-communication-chat:2.0.3") {
    exclude group: 'com.microsoft', module: 'trouter-client-android'
}
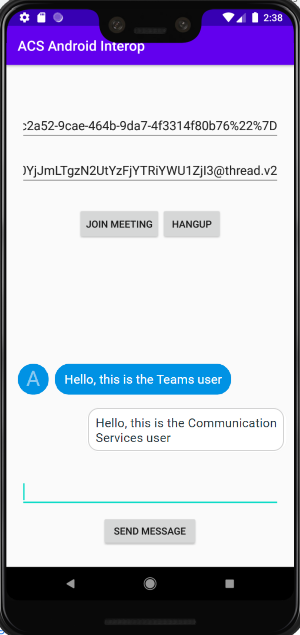
添加 Teams UI 布局
将 activity_main.xml 中的代码替换为以下代码片段。 此操作会添加用于线程 ID 和发送消息的输入,以及用于发送类型化消息和基本聊天布局的按钮。
<?xml version="1.0" encoding="utf-8"?>
<androidx.constraintlayout.widget.ConstraintLayout xmlns:android="http://schemas.android.com/apk/res/android"
    xmlns:app="http://schemas.android.com/apk/res-auto"
    xmlns:tools="http://schemas.android.com/tools"
    android:layout_width="match_parent"
    android:layout_height="match_parent"
    tools:context=".MainActivity">

    <EditText
        android:id="@+id/teams_meeting_thread_id"
        android:layout_width="match_parent"
        android:layout_height="wrap_content"
        android:layout_marginHorizontal="20dp"
        android:layout_marginTop="128dp"
        android:ems="10"
        android:hint="Meeting Thread Id"
        android:inputType="textUri"
        app:layout_constraintEnd_toEndOf="parent"
        app:layout_constraintStart_toStartOf="parent"
        app:layout_constraintTop_toTopOf="parent" />

    <EditText
        android:id="@+id/teams_meeting_link"
        android:layout_width="match_parent"
        android:layout_height="wrap_content"
        android:layout_marginHorizontal="20dp"
        android:layout_marginTop="64dp"
        android:ems="10"
        android:hint="Teams meeting link"
        android:inputType="textUri"
        app:layout_constraintEnd_toEndOf="parent"
        app:layout_constraintStart_toStartOf="parent"
        app:layout_constraintTop_toTopOf="parent" />

    <LinearLayout
        android:id="@+id/button_layout"
        android:layout_width="match_parent"
        android:layout_height="wrap_content"
        android:layout_marginTop="30dp"
        android:gravity="center"
        app:layout_constraintEnd_toEndOf="parent"
        app:layout_constraintHorizontal_bias="0.0"
        app:layout_constraintStart_toStartOf="parent"
        app:layout_constraintTop_toBottomOf="@+id/teams_meeting_thread_id">

        <Button
            android:id="@+id/join_meeting_button"
            android:layout_width="wrap_content"
            android:layout_height="wrap_content"
            android:text="Join Meeting" />

        <Button
            android:id="@+id/hangup_button"
            android:layout_width="wrap_content"
            android:layout_height="wrap_content"
            android:text="Hangup" />

    </LinearLayout>

    <TextView
        android:id="@+id/call_status_bar"
        android:layout_width="wrap_content"
        android:layout_height="wrap_content"
        android:layout_marginBottom="40dp"
        app:layout_constraintBottom_toBottomOf="parent"
        app:layout_constraintEnd_toEndOf="parent"
        app:layout_constraintStart_toStartOf="parent" />

    <TextView
        android:id="@+id/recording_status_bar"
        android:layout_width="wrap_content"
        android:layout_height="wrap_content"
        android:layout_marginBottom="20dp"
        app:layout_constraintBottom_toBottomOf="parent"
        app:layout_constraintEnd_toEndOf="parent"
        app:layout_constraintStart_toStartOf="parent" />

    <ScrollView
        android:id="@+id/chat_box"
        android:layout_width="374dp"
        android:layout_height="294dp"
        android:layout_marginTop="40dp"
        android:layout_marginBottom="20dp"
        app:layout_constraintBottom_toTopOf="@+id/send_message_button"
        app:layout_constraintEnd_toEndOf="parent"
        app:layout_constraintStart_toStartOf="parent"
        app:layout_constraintTop_toBottomOf="@+id/button_layout"
        android:orientation="vertical"
        android:gravity="bottom"
        android:layout_gravity="bottom"
        android:fillViewport="true">

        <LinearLayout
            android:id="@+id/chat_box_layout"
            android:orientation="vertical"
            android:layout_width="fill_parent"
            android:layout_height="fill_parent"
            android:gravity="bottom"
            android:layout_gravity="top"
            android:layout_alignParentBottom="true"/>
    </ScrollView>

    <EditText
        android:id="@+id/message_body"
        android:layout_width="match_parent"
        android:layout_height="wrap_content"
        android:layout_marginHorizontal="20dp"
        android:layout_marginTop="588dp"
        android:ems="10"
        android:inputType="textUri"
        app:layout_constraintEnd_toEndOf="parent"
        app:layout_constraintStart_toStartOf="parent"
        app:layout_constraintTop_toTopOf="parent"
        tools:text="Type your message here..."
        tools:visibility="invisible" />

    <Button
        android:id="@+id/send_message_button"
        android:layout_width="138dp"
        android:layout_height="45dp"
        android:layout_marginStart="133dp"
        android:layout_marginTop="48dp"
        android:layout_marginEnd="133dp"
        android:text="Send Message"
        android:visibility="invisible"
        app:layout_constraintBottom_toTopOf="@+id/recording_status_bar"
        app:layout_constraintEnd_toEndOf="parent"
        app:layout_constraintHorizontal_bias="0.428"
        app:layout_constraintStart_toStartOf="parent"
        app:layout_constraintTop_toBottomOf="@+id/chat_box" />

</androidx.constraintlayout.widget.ConstraintLayout>
启用 Teams UI 控件
导入包并定义状态变量
对于 MainActivity.java 的内容,请添加以下导入内容:
import android.graphics.Typeface;
import android.graphics.Color;
import android.text.Html;
import android.os.Handler;
import android.view.Gravity;
import android.view.View;
import android.widget.LinearLayout;
import java.util.Collections;
import java.util.concurrent.CountDownLatch;
import java.util.concurrent.TimeUnit;
import java.util.List;
import com.azure.android.communication.chat.ChatThreadAsyncClient;
import com.azure.android.communication.chat.ChatThreadClientBuilder;
import com.azure.android.communication.chat.models.ChatMessage;
import com.azure.android.communication.chat.models.ChatMessageType;
import com.azure.android.communication.chat.models.ChatParticipant;
import com.azure.android.communication.chat.models.ListChatMessagesOptions;
import com.azure.android.communication.chat.models.SendChatMessageOptions;
import com.azure.android.communication.common.CommunicationIdentifier;
import com.azure.android.communication.common.CommunicationUserIdentifier;
import com.azure.android.core.rest.util.paging.PagedAsyncStream;
import com.azure.android.core.util.AsyncStreamHandler;
对于 MainActivity 类,请添加以下变量:
    // InitiatorId is used to differentiate incoming messages from outgoing messages
    private static final String InitiatorId = "<USER_ID>";
    private static final String ResourceUrl = "<COMMUNICATION_SERVICES_RESOURCE_ENDPOINT>";
    private String threadId;
    private ChatThreadAsyncClient chatThreadAsyncClient;

    // The list of ids corresponsding to messages which have already been processed
    ArrayList<String> chatMessages = new ArrayList<>();
将 <USER_ID> 替换为发起聊天的用户的 ID。
将 <COMMUNICATION_SERVICES_RESOURCE_ENDPOINT> 替换为通信服务资源的终结点。
初始化 ChatThreadClient
加入会议后,将 ChatThreadClient 实例化并让聊天组件可见。
用以下代码更新 MainActivity.joinTeamsMeeting() 方法的末尾:
    private void joinTeamsMeeting() {
        ...
        EditText threadIdView = findViewById(R.id.teams_meeting_thread_id);
        threadId = threadIdView.getText().toString();
        // Initialize Chat Thread Client
        chatThreadAsyncClient = new ChatThreadClientBuilder()
                .endpoint(ResourceUrl)
                .credential(new CommunicationTokenCredential(UserToken))
                .chatThreadId(threadId)
                .buildAsyncClient();
        Button sendMessageButton = findViewById(R.id.send_message_button);
        EditText messageBody = findViewById(R.id.message_body);
        // Register the method for sending messages and toggle the visibility of chat components
        sendMessageButton.setOnClickListener(l -> sendMessage());
        sendMessageButton.setVisibility(View.VISIBLE);
        messageBody.setVisibility(View.VISIBLE);

        // Start the polling for chat messages immediately
        handler.post(runnable);
    }
启用消息发送
将 sendMessage() 方法添加到 MainActivity。 该方法使用 ChatThreadClient 代表用户发送消息。
    private void sendMessage() {
        // Retrieve the typed message content
        EditText messageBody = findViewById(R.id.message_body);
        // Set request options and send message
        SendChatMessageOptions options = new SendChatMessageOptions();
        options.setContent(messageBody.getText().toString());
        options.setSenderDisplayName("Test User");
        chatThreadAsyncClient.sendMessage(options);
        // Clear the text box
        messageBody.setText("");
    }
启用消息轮询并在应用程序中呈现消息
重要
已知问题:由于聊天 SDK 的实时通知功能无法与调用 SDK 配合使用,我们必须按照预定义的间隔轮询 GetMessages API。 我们将在示例中使用 3 秒间隔。
我们可以从 GetMessages API 返回的消息列表中获取以下数据:
- 自联接后线程上的
text和html消息 - 对线程名册做出的更改
- 对线程主题做出的更新
对于 MainActivity 类,添加一个处理程序和一个将以 3 秒间隔运行的可运行任务:
    private Handler handler = new Handler();
    private Runnable runnable = new Runnable() {
        @Override
        public void run() {
            try {
                retrieveMessages();
            } catch (InterruptedException e) {
                e.printStackTrace();
            }
            // Repeat every 3 seconds
            handler.postDelayed(runnable, 3000);
        }
    };
请注意,该任务已在初始化步骤中更新 MainActivity.joinTeamsMeeting() 方法的末尾启动。
最后,我们将添加该方法,以便查询线程上的所有可访问消息、按消息类型对其进行分析,并显示 html 和 text 消息:
    private void retrieveMessages() throws InterruptedException {
        // Initialize the list of messages not yet processed
        ArrayList<ChatMessage> newChatMessages = new ArrayList<>();

        // Retrieve all messages accessible to the user
        PagedAsyncStream<ChatMessage> messagePagedAsyncStream
                = this.chatThreadAsyncClient.listMessages(new ListChatMessagesOptions(), null);
        // Set up a lock to wait until all returned messages have been inspected
        CountDownLatch latch = new CountDownLatch(1);
        // Traverse the returned messages
        messagePagedAsyncStream.forEach(new AsyncStreamHandler<ChatMessage>() {
            @Override
            public void onNext(ChatMessage message) {
                // Messages that should be displayed in the chat
                if ((message.getType().equals(ChatMessageType.TEXT)
                    || message.getType().equals(ChatMessageType.HTML))
                    && !chatMessages.contains(message.getId())) {
                    newChatMessages.add(message);
                    chatMessages.add(message.getId());
                }
                if (message.getType().equals(ChatMessageType.PARTICIPANT_ADDED)) {
                    // Handle participants added to chat operation
                    List<ChatParticipant> participantsAdded = message.getContent().getParticipants();
                    CommunicationIdentifier participantsAddedBy = message.getContent().getInitiatorCommunicationIdentifier();
                }
                if (message.getType().equals(ChatMessageType.PARTICIPANT_REMOVED)) {
                    // Handle participants removed from chat operation
                    List<ChatParticipant> participantsRemoved = message.getContent().getParticipants();
                    CommunicationIdentifier participantsRemovedBy = message.getContent().getInitiatorCommunicationIdentifier();
                }
                if (message.getType().equals(ChatMessageType.TOPIC_UPDATED)) {
                    // Handle topic updated
                    String newTopic = message.getContent().getTopic();
                    CommunicationIdentifier topicUpdatedBy = message.getContent().getInitiatorCommunicationIdentifier();
                }
            }
            @Override
            public void onError(Throwable throwable) {
                latch.countDown();
            }
            @Override
            public void onComplete() {
                latch.countDown();
            }
        });
        // Wait until the operation completes
        latch.await(1, TimeUnit.MINUTES);
        // Returned messages should be ordered by the createdOn field to be guaranteed a proper chronological order
        // For the purpose of this demo we will just reverse the list of returned messages
        Collections.reverse(newChatMessages);
        for (ChatMessage chatMessage : newChatMessages)
        {
            LinearLayout chatBoxLayout = findViewById(R.id.chat_box_layout);
            // For the purpose of this demo UI, we don't need to use HTML formatting for displaying messages
            // The Teams client always sends html messages in meeting chats
            String message = Html.fromHtml(chatMessage.getContent().getMessage(), Html.FROM_HTML_MODE_LEGACY).toString().trim();
            TextView messageView = new TextView(this);
            messageView.setText(message);
            // Compare with sender identifier and align LEFT/RIGHT accordingly
            // Azure Communication Services users are of type CommunicationUserIdentifier
            CommunicationIdentifier senderId = chatMessage.getSenderCommunicationIdentifier();
            if (senderId instanceof CommunicationUserIdentifier
                && InitiatorId.equals(((CommunicationUserIdentifier) senderId).getId())) {
                messageView.setTextColor(Color.GREEN);
                messageView.setGravity(Gravity.RIGHT);
            } else {
                messageView.setTextColor(Color.BLUE);
                messageView.setGravity(Gravity.LEFT);
            }
            // Note: messages with the deletedOn property set to a timestamp, should be marked as deleted
            // Note: messages with the editedOn property set to a timestamp, should be marked as edited
            messageView.setTypeface(Typeface.SANS_SERIF, Typeface.BOLD);
            chatBoxLayout.addView(messageView);
        }
    }
聊天线程参与者的显示名称不由 Teams 客户端设置。 在participantsAdded事件和participantsRemoved事件当中,这些名称将在列出参与者的 API 中作为 null 返回。 可以从 call 对象的 remoteParticipants 字段检索聊天参与者的显示名称。
获取通信服务用户的 Teams 会议聊天线程
可以使用图形 API 来检索 Teams 会议详细信息,详情请参阅图形文档。 通信服务呼叫 SDK 接受完整的 Teams 会议链接或会议 ID。 它们将作为onlineMeeting资源的一部分返回,可在joinWebUrl属性下访问
使用图形 API,还可以获取 threadID。 响应拥有包含 threadID 的 chatInfo 对象。
运行代码
现在可以使用工具栏上的“运行应用”按钮 (Shift+F10) 启动应用。
若要加入 Teams 会议和聊天,请在 UI 中输入团队的会议链接和线程 ID。
加入 Team 会议后,需要在 Team 客户端中允许用户加入会议。 用户获准并加入聊天后,就可以发送和接收消息了。
注意
与 Teams 的互操作性方案目前不支持某些功能。 要详细了解支持的功能,请参阅 Teams 外部用户的 Teams 会议功能
本快速入门介绍如何使用适用于 C# 的 Azure 通信服务聊天 SDK 在 Teams 会议中聊天。
示例代码
在 GitHub 上查找此快速入门的代码。
先决条件
- Teams 部署。
- 具有活动订阅的 Azure 帐户。 免费创建帐户。
- 安装带有通用 Windows 平台开发工作负载的 Visual Studio 2019。
- 已部署的通信服务资源。 创建通信服务资源。
- Teams 会议链接。
加入会议聊天
通信服务用户可以使用调用 SDK 作为匿名用户加入 Teams 会议。 用户加入会议时还会以参与者身份加入会议聊天,用户可以在聊天中与会议中的其他用户发送和接收消息。 用户将无法访问在其加入会议之前发送的聊天消息,也无法在会议结束后发送或接收消息。 若要加入会议并开始聊天,可以执行后续步骤。
运行代码
可在 Visual Studio 中生成并运行代码。 请注意,我们支持的解决方案平台如下:x64、x86 和 ARM64。
- 打开 PowerShell、Windows 终端、命令提示符或等效项的实例,然后导航到要将示例克隆到其中的目录。
git clone https://github.com/Azure-Samples/Communication-Services-dotnet-quickstarts.git- 在 Visual Studio 中打开 ChatTeamsInteropQuickStart/ChatTeamsInteropQuickStart.csproj 项目。
- 安装以下 NuGet 包版本(或更高版本):
Install-Package Azure.Communication.Calling -Version 1.0.0-beta.29
Install-Package Azure.Communication.Chat -Version 1.1.0
Install-Package Azure.Communication.Common -Version 1.0.1
Install-Package Azure.Communication.Identity -Version 1.0.1
- 使用先决条件中购买的通信服务资源,将 connectionstring 添加到 ChatTeamsInteropQuickStart/MainPage.xaml.cs 文件。
//Azure Communication Services resource connection string, i.e., = "endpoint=https://your-resource.communication.azure.net/;accesskey=your-access-key";
private const string connectionString_ = "";
重要
- 在运行代码(例如
x64)之前,从 Visual Studio 的“解决方案平台”下拉列表中选择适当的平台。 - 请确保已在 Windows 10 中启用了“开发人员模式”(开发人员设置)
如果未正确配置,后续步骤将不起作用
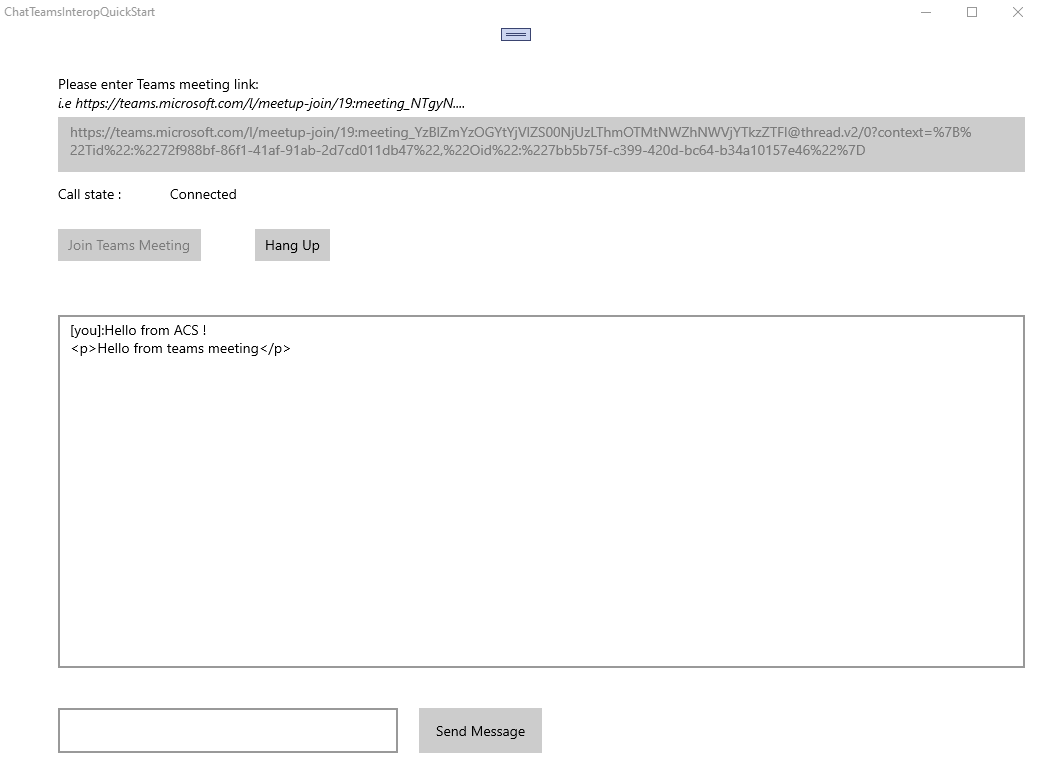
- 按 F5 以调试模式启动项目。
- 在“Teams 会议链接”框中粘贴有效的团队会议链接(请参阅下一部分)
- 按“加入 Teams 会议”开始聊天。
重要
一旦通话 SDK 与团队会议建立连接,请参阅通信服务通话 Windows 应用,用于处理聊天操作的关键函数是:StartPollingForChatMessages 和 SendMessageButton_Click。 这两个代码片段都在 ChatTeamsInteropQuickStart\MainPage.xaml.cs 中
        /// <summary>
        /// Background task that keeps polling for chat messages while the call connection is stablished
        /// </summary>
        private async Task StartPollingForChatMessages()
        {
            CommunicationTokenCredential communicationTokenCredential = new(user_token_);
            chatClient_ = new ChatClient(EndPointFromConnectionString(), communicationTokenCredential);
            await Task.Run(async () =>
            {
                keepPolling_ = true;

                ChatThreadClient chatThreadClient = chatClient_.GetChatThreadClient(thread_Id_);
                int previousTextMessages = 0;
                while (keepPolling_)
                {
                    try
                    {
                        CommunicationUserIdentifier currentUser = new(user_Id_);
                        AsyncPageable<ChatMessage> allMessages = chatThreadClient.GetMessagesAsync();
                        SortedDictionary<long, string> messageList = new();
                        int textMessages = 0;
                        string userPrefix;
                        await foreach (ChatMessage message in allMessages)
                        {
                            if (message.Type == ChatMessageType.Html || message.Type == ChatMessageType.Text)
                            {
                                textMessages++;
                                userPrefix = message.Sender.Equals(currentUser) ? "[you]:" : "";
                                messageList.Add(long.Parse(message.SequenceId), $"{userPrefix}{StripHtml(message.Content.Message)}");
                            }
                        }

                        //Update UI just when there are new messages
                        if (textMessages > previousTextMessages)
                        {
                            previousTextMessages = textMessages;
                            await Dispatcher.RunAsync(CoreDispatcherPriority.Normal, () =>
                            {
                                TxtChat.Text = string.Join(Environment.NewLine, messageList.Values.ToList());
                            });

                        }
                        if (!keepPolling_)
                        {
                            return;
                        }

                        await SetInCallState(true);
                        await Task.Delay(3000);
                    }
                    catch (Exception e)
                    {
                        await Dispatcher.RunAsync(CoreDispatcherPriority.Normal, () =>
                        {
                            _ = new MessageDialog($"An error occurred while fetching messages in PollingChatMessagesAsync(). The application will shutdown. Details : {e.Message}").ShowAsync();
                            throw e;
                        });
                        await SetInCallState(false);
                    }
                }
            });
        }
        private async void SendMessageButton_Click(object sender, RoutedEventArgs e)
        {
            SendMessageButton.IsEnabled = false;
            ChatThreadClient chatThreadClient = chatClient_.GetChatThreadClient(thread_Id_);
            _ = await chatThreadClient.SendMessageAsync(TxtMessage.Text);

            TxtMessage.Text = "";
            SendMessageButton.IsEnabled = true;
        }
获取 Teams 会议链接
可以使用图形 API 来检索 Teams 会议链接,详情请参阅图形文档。 此链接将作为 onlineMeeting 资源的一部分返回,可在 joinWebUrl 属性下访问。
还可以从 Teams 会议邀请本身内的“加入会议”URL 中获取所需的会议链接。
Teams 会议链接如下所示:https://teams.microsoft.com/l/meetup-join/meeting_chat_thread_id/1606337455313?context=some_context_here。
如果团队链接的格式与此不同,则需要使用图形 API 检索线程 ID。
注意
与 Teams 的互操作性方案目前不支持某些功能。 要详细了解支持的功能,请参阅 Teams 外部用户的 Teams 会议功能
清理资源
如果想要清理并删除通信服务订阅,可以删除资源或资源组。 删除资源组同时也会删除与之相关联的任何其他资源。 了解有关清理资源的详细信息。
后续步骤
有关详细信息,请参阅以下文章:
反馈
即将发布:在整个 2024 年,我们将逐步淘汰作为内容反馈机制的“GitHub 问题”,并将其取代为新的反馈系统。 有关详细信息,请参阅:https://aka.ms/ContentUserFeedback。
提交和查看相关反馈