你当前正在访问 Microsoft Azure Global Edition 技术文档网站。 如果需要访问由世纪互联运营的 Microsoft Azure 中国技术文档网站,请访问 https://docs.azure.cn。
开发 C# IoT Edge 模块以使用 Azure Stack Edge Pro FPGA 移动文件
重要
Azure Stack Edge Pro FPGA 设备将于 2024 年 2 月停用。 如果正在考虑进行新部署,我们建议你了解适合你的工作负载的 Azure Stack Edge Pro 2 或 Azure Stack Edge Pro GPU 设备。
本文逐步讲解如何创建 IoT Edge 模块,以便将其部署在 Azure Stack Edge Pro FPGA 设备中。 Azure Stack Edge Pro FPGA 是可用于处理数据并通过网络将其发送到 Azure 的存储解决方案。
Azure IoT Edge 模块可以与 Azure Stack Edge Pro FPGA 配合使用,以便在将数据移动到 Azure 时转换数据。 本文中使用的模块实现的逻辑可在 Azure Stack Edge Pro FPGA 设备上将文件从本地共享复制到云共享。
在本文中,学习如何:
- 创建容器注册表来存储和管理你的模块(Docker 映像)。
- 创建可在 Azure Stack Edge Pro FPGA 设备上部署的 IoT Edge 模块。
关于 IoT Edge 模块
Azure Stack Edge Pro FPGA 设备可以部署并运行 IoT Edge 模块。 Edge 模块实质上是执行特定任务的 Docker 容器,如从设备引入消息、转换消息,或将消息发送到 IoT 中心。 在本文中,你将创建一个模块,用于在 Azure Stack Edge Pro FPGA 设备上将文件从本地共享复制到云共享。
- 在 Azure Stack Edge Pro FPGA 设备上,文件将写入到本地共享。
- 文件事件生成器将为写入到本地共享的每个文件创建文件事件。 修改文件时,也会生成文件事件。 随后,将文件事件发送到 IoT Edge 中心(在 IoT Edge 运行时中)。
- IoT Edge 自定义模块处理文件事件,来为文件创建还包含文件相对路径的文件事件对象。 该模块将使用相对文件路径生成绝对路径,并将文件从本地共享复制到云共享。 然后,该模块从本地共享中删除文件。
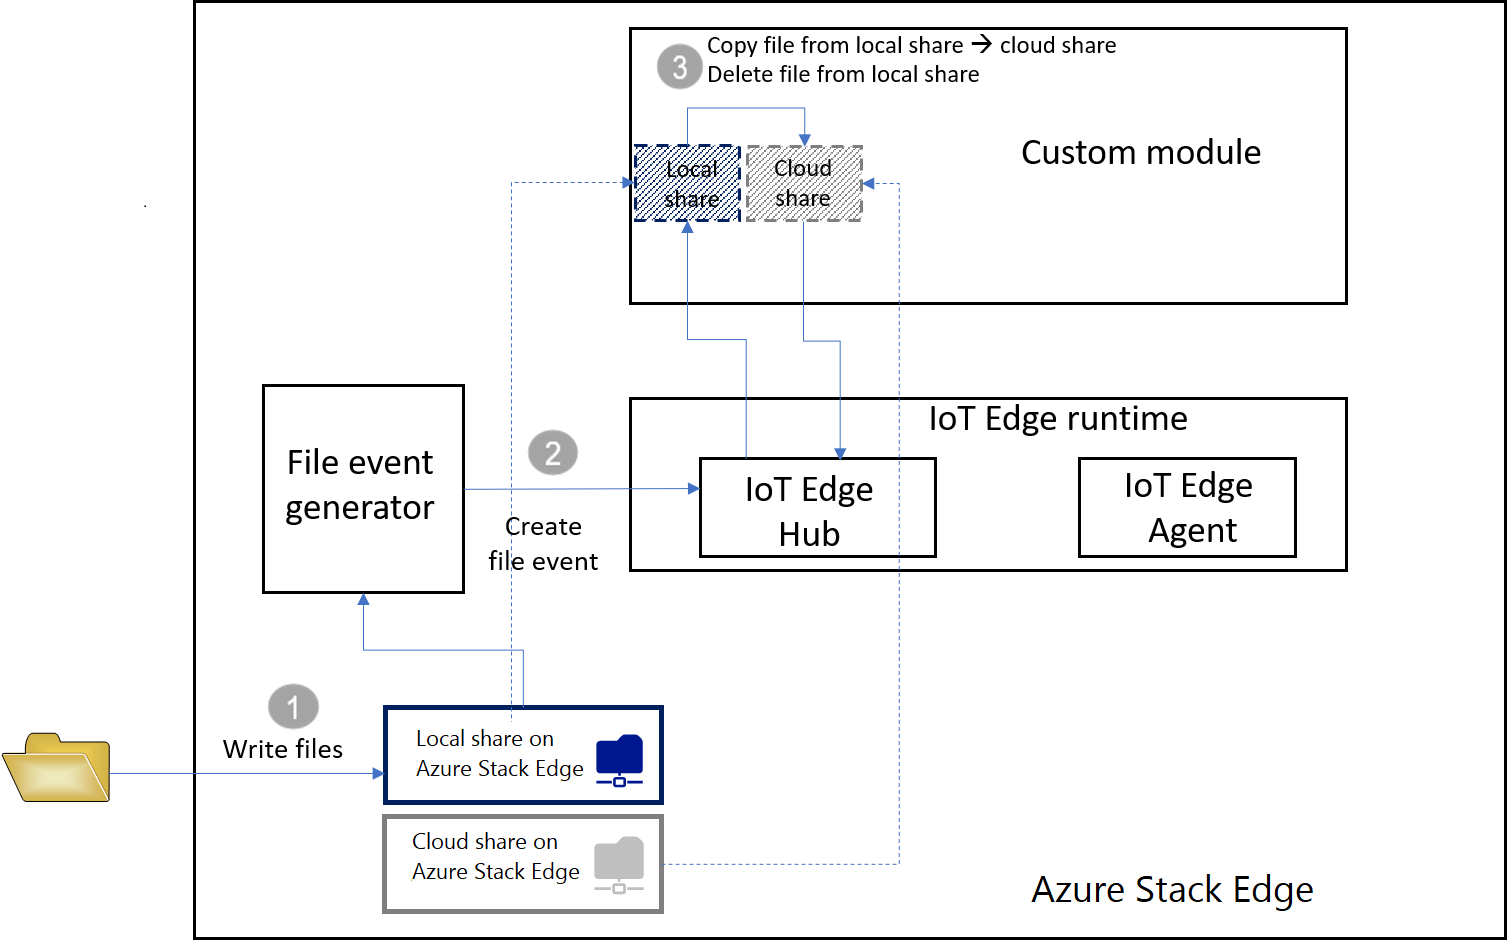
文件位于云共享中后,它会自动上传到 Azure 存储帐户。
先决条件
在开始之前,请确保:
正在运行的 Azure Stack Edge Pro FPGA 设备。
- 该设备还具有一个关联的 IoT 中心资源。
- 该设备已配置 Edge 计算角色。 有关详细信息,请转到配置计算(针对 Azure Stack Edge Pro FPGA)。
以下开发资源:
创建容器注册表
Azure 容器注册表是 Azure 中的专用 Docker 注册表,你可在其中存储和管理专用 Docker 容器映像。 可以在云中使用的两个常见 Docker 注册表服务分别是 Azure 容器注册表和 Docker 中心。 本文使用容器注册表。
在浏览器中,登录到 Azure 门户。
选择“创建资源”>“容器”>“容器注册表”。 单击 “创建” 。
提供:
Azure 中的唯一“注册表名称”,可包含 5 到 50 个字母数字字符。
选择订阅。
创建新的资源组,或选择现有的“资源组”。
选择“位置” 。 我们建议此位置应该与 Azure Stack Edge 资源的关联位置相同。
将“管理员用户”切换到“启用”。
将 SKU 设置为“基本”。

选择创建。
创建容器注册表后,请浏览到其中,然后选择“访问密钥”。
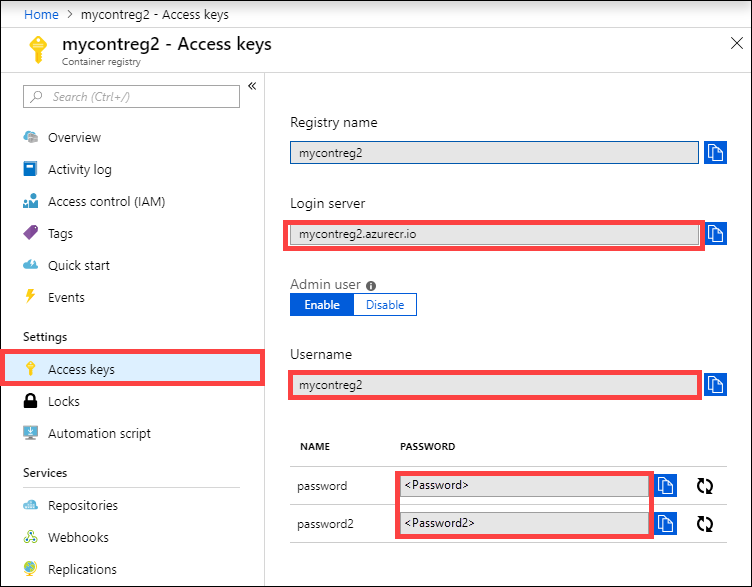
复制“登录服务器”、“用户名”和“密码”的值。 你稍后使用这些值将 Docker 映像发布到注册表,并将注册表凭据添加到 Azure IoT Edge 运行时。
创建 IoT Edge 模块项目
以下步骤创建基于 .NET Core 2.1 SDK 的 IoT Edge 模块项目。 此项目使用 Visual Studio Code 和 Azure IoT Edge 扩展。
创建新解决方案
创建可以使用自己的代码自定义的 C# 解决方案模板。
在 Visual Studio Code 中,选择“查看”>“命令面板”,以打开 VS Code 命令面板。
在命令面板中,输入并运行命令“Azure: Sign in 命令并按照说明登录到 Azure 帐户。 如果已登录,则可跳过此步骤。
在“命令面板”中,输入并运行 Azure IoT Edge:New IoT Edge solution 命令。 在命令面板中提供以下信息,以便创建解决方案:
选择要在其中创建解决方案的文件夹。
提供解决方案的名称,或者接受默认的 EdgeSolution。

选择“C# 模块”作为模块模板。
将默认模块名称替换为你想要分配的名称,在此案例中,它是“FileCopyModule”。

将在上一部分创建的容器注册表指定为第一个模块的映像存储库。 将 localhost:5000 替换为复制的登录服务器值。
最终的字符串如下所示
<Login server name>/<Module name>。 在本示例中,字符串为:mycontreg2.azurecr.io/filecopymodule。
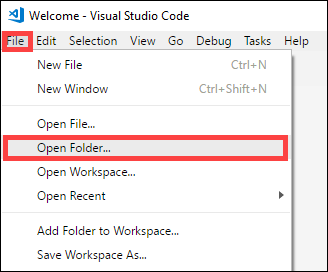
转到“文件”>“打开文件夹”。
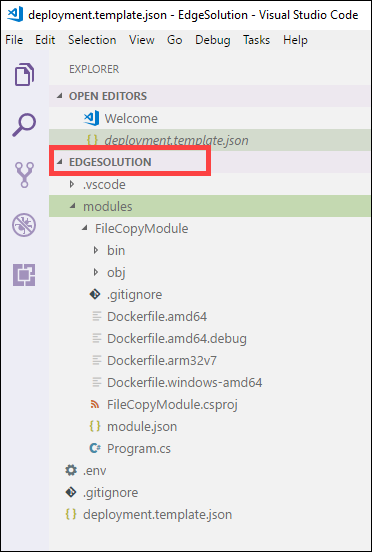
浏览并指向先前创建的文件夹 EdgeSolution。 VS Code 窗口将加载你的 IoT Edge 解决方案空间及其五个顶级组件。 在本文中,不会编辑 .vscode 文件夹、.gitignore 文件、.env 文件和 deployment.template.json。
修改的组件仅是 modules 文件夹。 此文件夹包含 module 和 Docker 文件的 C# 代码,可将模块生成为容器映像。
使用自定义代码更新模块
在 VS Code 资源管理器中,打开“modules”>“FileCopyModule”>“Program.cs”。
在 FileCopyModule namespace 的顶部,为稍后要使用的类型添加三个 using 语句。 Microsoft.Azure.Devices.Client.Transport.Mqtt 是一种协议,可将消息发送到 IoT Edge 中心。
namespace FileCopyModule { using Microsoft.Azure.Devices.Client.Transport.Mqtt; using Newtonsoft.Json;将“InputFolderPath”和“OutputFolderPath”变量添加到 Program 类。
class Program
    {
        static int counter;
        private const string InputFolderPath = "/home/input";
        private const string OutputFolderPath = "/home/output";
上一步完成后,立即添加 FileEvent 类以定义消息正文。
/// <summary>
/// The FileEvent class defines the body of incoming messages.
/// </summary>
private class FileEvent
{
    public string ChangeType { get; set; }

    public string ShareRelativeFilePath { get; set; }

    public string ShareName { get; set; }
}
在 Init 方法中,此代码创建并配置 ModuleClient 对象。 该对象允许模块使用 MQTT 协议连接到本地 Azure IoT Edge 运行时,以发送并接收消息。 在 Init 方法中使用的连接字符串由 IoT Edge 运行时提供给模块。 代码注册 FileCopy 回调,以通过 input1 终结点从 IoT Edge 中心接收消息。 将 Init 方法替换为以下代码。
/// <summary>
/// Initializes the ModuleClient and sets up the callback to receive
/// messages containing file event information
/// </summary>
static async Task Init()
{
    MqttTransportSettings mqttSetting = new MqttTransportSettings(TransportType.Mqtt_Tcp_Only);
    ITransportSettings[] settings = { mqttSetting };

    // Open a connection to the IoT Edge runtime
    ModuleClient ioTHubModuleClient = await ModuleClient.CreateFromEnvironmentAsync(settings);
    await ioTHubModuleClient.OpenAsync();
    Console.WriteLine("IoT Hub module client initialized.");

    // Register callback to be called when a message is received by the module
    await ioTHubModuleClient.SetInputMessageHandlerAsync("input1", FileCopy, ioTHubModuleClient);
}
删除 PipeMessage 方法的代码,并在其位置插入 FileCopy 的代码。
    /// <summary>
    /// This method is called whenever the module is sent a message from the IoT Edge Hub.
    /// This method deserializes the file event, extracts the corresponding relative file path, and creates the absolute input file path using the relative file path and the InputFolderPath.
    /// This method also forms the absolute output file path using the relative file path and the OutputFolderPath. It then copies the input file to output file and deletes the input file after the copy is complete.
    /// </summary>
    static async Task<MessageResponse> FileCopy(Message message, object userContext)
    {
        int counterValue = Interlocked.Increment(ref counter);

        try
        {
            byte[] messageBytes = message.GetBytes();
            string messageString = Encoding.UTF8.GetString(messageBytes);
            Console.WriteLine($"Received message: {counterValue}, Body: [{messageString}]");

            if (!string.IsNullOrEmpty(messageString))
            {
                var fileEvent = JsonConvert.DeserializeObject<FileEvent>(messageString);

                string relativeFileName = fileEvent.ShareRelativeFilePath.Replace("\\", "/");
                string inputFilePath = InputFolderPath + relativeFileName;
                string outputFilePath = OutputFolderPath + relativeFileName;

                if (File.Exists(inputFilePath))
                {
                    Console.WriteLine($"Moving input file: {inputFilePath} to output file: {outputFilePath}");
                    var outputDir = Path.GetDirectoryName(outputFilePath);
                    if (!Directory.Exists(outputDir))
                    {
                        Directory.CreateDirectory(outputDir);
                    }

                    File.Copy(inputFilePath, outputFilePath, true);
                    Console.WriteLine($"Copied input file: {inputFilePath} to output file: {outputFilePath}");
                    File.Delete(inputFilePath);
                    Console.WriteLine($"Deleted input file: {inputFilePath}");
                }
                else
                {
                    Console.WriteLine($"Skipping this event as input file doesn't exist: {inputFilePath}");
                }
            }
        }
        catch (Exception ex)
        {
            Console.WriteLine("Caught exception: {0}", ex.Message);
            Console.WriteLine(ex.StackTrace);
        }

        Console.WriteLine($"Processed event.");
        return MessageResponse.Completed;
    }
保存此文件。
还可下载此项目的现有代码示例。 然后,你可在根据此示例中的 program.cs 文件验证你保存的文件。
生成 IoT Edge 解决方案
在上一部分中,你创建了 IoT Edge 解决方案并将代码添加到了 FileCopyModule,以将文件从本地共享复制到云共享。 现在需将解决方案生成为容器映像并将其推送到容器注册表。
在 VSCode 中,转到“终端”>“新建终端”,打开一个新的 Visual Studio Code 集成终端。
在集成终端输入以下命令,登录到 Docker。
docker login <ACR login server> -u <ACR username>使用从 Azure 容器注册表复制的登录服务器和用户名。

提示输入密码时,提供密码。 还可以从 Azure 门户中容器注册表的“访问密钥”中检索登录服务器的值、用户名和密码。
提供凭据后,可将模块映像推送到 Azure 容器注册表。 在 VS Code 资源管理器中,右键单击 module.json 文件,然后选择“生成并推送 IoT Edge 解决方案”。
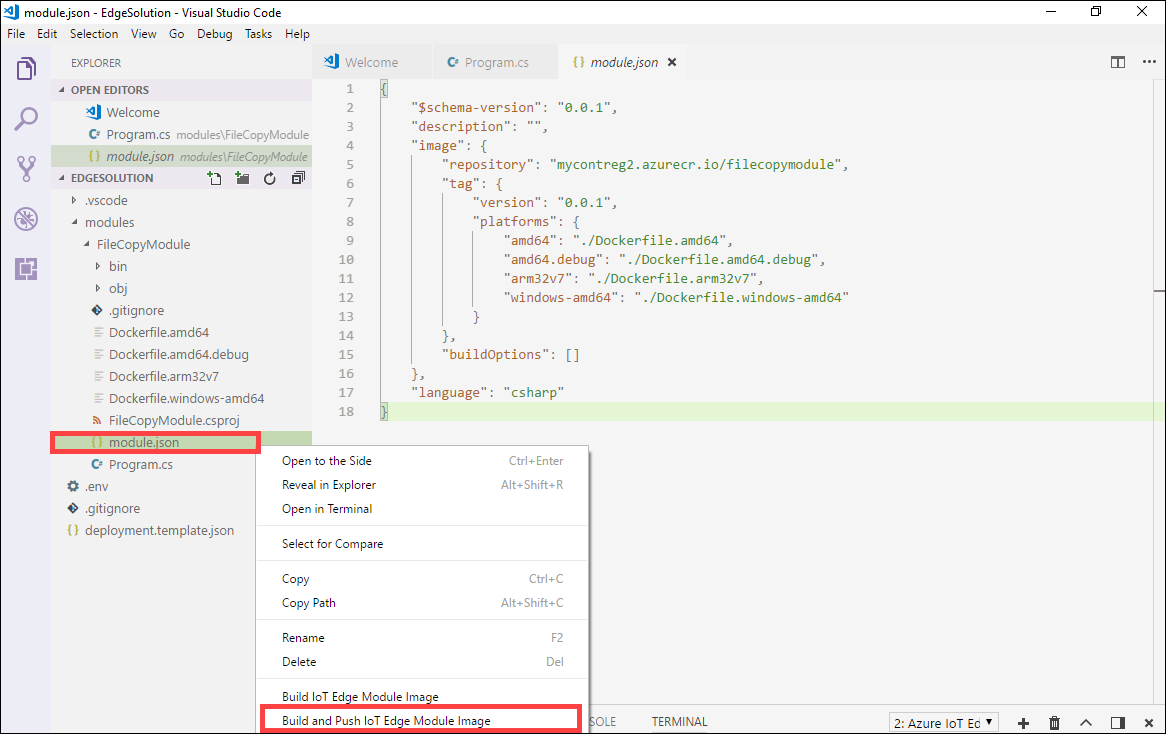
告知 Visual Studio Code 生成解决方案时,它将在集成终端中运行两个命令:docker build 和 docker push。 这两个命令会生成代码,将 CSharpModule.dll 容器化,然后将代码推送到在初始化解决方案时指定的容器注册表。
系统将提示你选择模块平台。 选择和 Linux 对应的 amd64。

重要
仅支持 Linux 模块。
可能会看到可以忽略的以下警告:
Program.cs(77,44):警告 CS1998:此异步方法缺少“await”运算符,因此将以同步方式运行。 请考虑使用“await”运算符等待非阻止的 API 调用,或者使用“await Task.Run(...)”在后台线程上执行占用大量 CPU 的工作。
可在 VS Code 集成终端中查看具有标记的完整容器映像地址。 映像地址根据 module.json 文件中的信息生成,其格式为
<repository>:<version>-<platform>。 对于本文,它应类似于mycontreg2.azurecr.io/filecopymodule:0.0.1-amd64。
后续步骤
若要在 Azure Stack Edge Pro FPGA 上部署并运行此模块,请参阅添加模块中的步骤。