你当前正在访问 Microsoft Azure Global Edition 技术文档网站。 如果需要访问由世纪互联运营的 Microsoft Azure 中国技术文档网站,请访问 https://docs.azure.cn。
将 IoT 中心遥测数据引入到 Azure 数字孪生
本指南逐步讲解如何编写一个函数,该函数可以从IoT 中心引入设备遥测数据并将其发送到 Azure 数字孪生实例。
Azure 数字孪生是使用来自 IoT 设备和其他来源的数据驱动的。 要在 Azure 数字孪生中使用的设备数据的常见源为 IoT 中心。
将数据引入到 Azure 数字孪生的过程是设置外部计算资源(例如使用 Azure Functions 创建的函数)。 函数接收数据,并相应地使用 DigitalTwins API 来设置属性或在数字孪生上触发遥测事件。
本操作指南文档逐步讲解如何编写可从IoT 中心引入设备遥测数据的函数。
先决条件
在继续此示例之前,需要将以下资源设置为先决条件:
- 一个 IoT 中心。 有关说明,请参阅本IoT 中心快速入门的“创建IoT 中心”部分。
- 将接收设备遥测的 Azure 数字孪生实例。 有关说明,请参阅设置 Azure 数字孪生实例和身份验证。
遥测方案示例
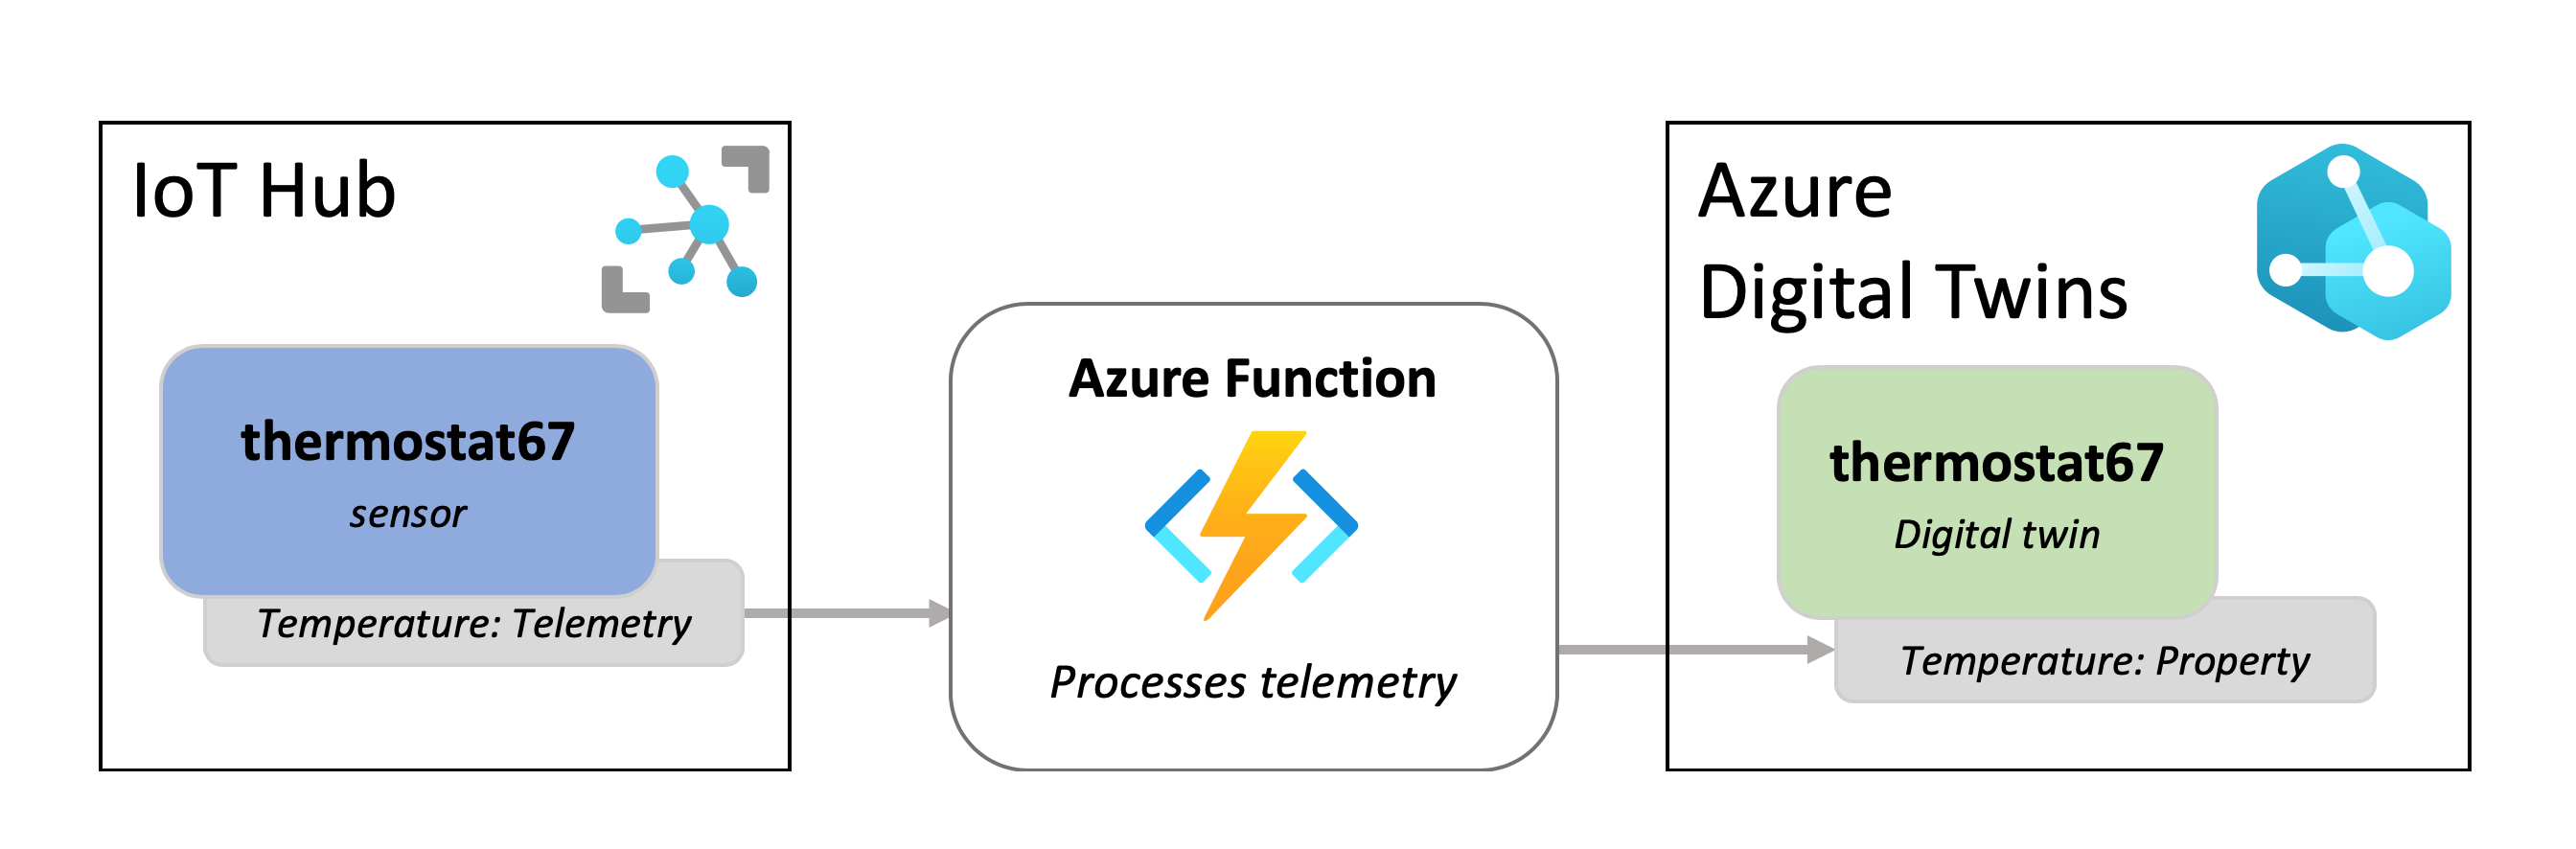
本操作说明概述了如何使用 Azure 中的函数将消息从 IoT 中心发送到 Azure 数字孪生。 可以使用多个可能的配置和匹配策略来发送消息,但本文的示例包含以下部分:
- IoT 中心中的恒温器设备,具有已知设备 ID
- 用于表示设备的数字孪生,具有匹配 ID
注意
本示例在设备 ID 与相应的数字孪生的 ID 之间使用简单的 ID 匹配,但可以提供从设备到其孪生的更复杂映射(如使用映射表)。
每当恒温器设备发送温度遥测事件时,函数就会处理遥测数据,并且数字孪生的 Temperature 属性应进行更新。 下图概述了此方案:
添加模型和孪生体
在本部分中,你将在 Azure 数字孪生中设置用于表示恒温器设备并使用 IoT 中心提供的信息进行更新的数字孪生。
若要创建恒温器类型的孪生,首先需要将恒温器模型上传到实例,该实例描述了恒温器的属性,稍后将用来创建孪生。
该模型下所示:
{
    "@id": "dtmi:contosocom:DigitalTwins:Thermostat;1",
    "@type": "Interface",
    "@context": "dtmi:dtdl:context;3",
    "contents": [
      {
        "@type": "Property",
        "name": "Temperature",
        "schema": "double"
      }
    ]
  }
若要将此模型上传到孪生实例,请运行以下 Azure CLI 命令,该命令会将上述模型上传为内联 JSON。 可以在浏览器中(使用 Bash 环境)或在计算机上安装 CLI 的情况下,在 Azure Cloud Shell 中运行命令。 实例的主机名有一个占位符(也可以使用实例的易记名称,但性能会略有下降)。
az dt model create --dt-name <instance-hostname-or-name> --models '{ "@id": "dtmi:contosocom:DigitalTwins:Thermostat;1", "@type": "Interface", "@context": "dtmi:dtdl:context;2", "contents": [ { "@type": "Property", "name": "Temperature", "schema": "double" } ]}'
注意
如果你在 Bash 环境中使用 Cloud Shell 以外的任何内容,则可能需要转义内联 JSON 中的某些字符,以便对其进行正确解析。 有关详细信息,请参阅在不同的 shell 中使用特殊字符。
然后,需要使用此模型创建一个孪生。 使用以下命令创建名为 thermostat67 的恒温器孪生,并将初始温度值设置为 0.0。 实例的主机名有一个占位符(也可以使用实例的易记名称,但性能会略有下降)。
az dt twin create --dt-name <instance-hostname-or-name> --dtmi "dtmi:contosocom:DigitalTwins:Thermostat;1" --twin-id thermostat67 --properties '{"Temperature": 0.0}'
成功创建孪生后,命令的 CLI 输出应如下所示:
{
  "$dtId": "thermostat67",
  "$etag": "W/\"0000000-9735-4f41-98d5-90d68e673e15\"",
  "$metadata": {
    "$model": "dtmi:contosocom:DigitalTwins:Thermostat;1",
    "Temperature": {
      "lastUpdateTime": "2021-09-09T20:32:46.6692326Z"
    }
  },
  "Temperature": 0.0
}
创建 Azure 函数
在本部分中,你将创建一个 Azure 函数,以基于它收到的 IoT 设备遥测事件访问 Azure 数字孪生和更新孪生。 按照以下步骤创建并发布函数。
首先,新建一个事件网格触发器类型的 Azure Functions 项目。
可以使用 Visual Studio(相关说明,请参阅使用 Visual Studio 开发 Azure Functions)、Visual Studio Code(相关说明,请参阅在 Azure 中使用 Visual Studio Code 创建 C# 函数)或 Azure CLI(相关说明,请参阅在 Azure 中从命令行创建 C# 函数)来执行此操作。
将以下包添加到项目(可以使用 Visual Studio NuGet 包管理器,或者使用命令行工具中的 dotnet add package 命令)。
在项目中创建一个名为 IoTHubtoTwins.cs 的函数。 将以下代码粘贴到函数文件中:
using System;
using Azure;
using System.Net.Http;
using Azure.Core.Pipeline;
using Azure.DigitalTwins.Core;
using Azure.Identity;
using Microsoft.Azure.WebJobs;
using Microsoft.Azure.WebJobs.Extensions.EventGrid;
using Microsoft.Extensions.Logging;
using Newtonsoft.Json;
using Newtonsoft.Json.Linq;
using Azure.Messaging.EventGrid;

namespace IotHubtoTwins
{
    public class IoTHubtoTwins
    {
        private static readonly string adtInstanceUrl = Environment.GetEnvironmentVariable("ADT_SERVICE_URL");
        private static readonly HttpClient httpClient = new HttpClient();

        [FunctionName("IoTHubtoTwins")]
        // While async void should generally be used with caution, it's not uncommon for Azure function apps, since the function app isn't awaiting the task.
#pragma warning disable AZF0001 // Suppress async void error
        public async void Run([EventGridTrigger] EventGridEvent eventGridEvent, ILogger log)
#pragma warning restore AZF0001 // Suppress async void error
        {
            if (adtInstanceUrl == null) log.LogError("Application setting \"ADT_SERVICE_URL\" not set");

            try
            {
                // Authenticate with Digital Twins
                var cred = new DefaultAzureCredential();
                var client = new DigitalTwinsClient(new Uri(adtInstanceUrl), cred);
                log.LogInformation($"ADT service client connection created.");

                if (eventGridEvent != null && eventGridEvent.Data != null)
                {
                    log.LogInformation(eventGridEvent.Data.ToString());

                    // <Find_device_ID_and_temperature>
                    JObject deviceMessage = (JObject)JsonConvert.DeserializeObject(eventGridEvent.Data.ToString());
                    string deviceId = (string)deviceMessage["systemProperties"]["iothub-connection-device-id"];
                    var temperature = deviceMessage["body"]["Temperature"];
                    // </Find_device_ID_and_temperature>

                    log.LogInformation($"Device:{deviceId} Temperature is:{temperature}");

                    // <Update_twin_with_device_temperature>
                    var updateTwinData = new JsonPatchDocument();
                    updateTwinData.AppendReplace("/Temperature", temperature.Value<double>());
                    await client.UpdateDigitalTwinAsync(deviceId, updateTwinData);
                    // </Update_twin_with_device_temperature>
                }
            }
            catch (Exception ex)
            {
                log.LogError($"Error in ingest function: {ex.Message}");
            }
        }
    }
}
保存函数代码。
使用 IoTHubtoTwins.cs 函数将项目发布到 Azure 中的函数应用。
若要了解如何使用 Visual Studio 发布函数,请参阅使用 Visual Studio 开发 Azure Functions。 若要了解如何使用 Visual Studio Code 发布函数,请参阅使用 Visual Studio Code 在 Azure 中创建 C# 函数。 若要了解如何使用 Azure CLI 发布函数,请参阅在 Azure 中从命令行创建 C# 函数。
完成发布函数过程后,可使用此 Azure CLI 命令来验证发布是否成功。 有资源组的占位符和函数应用的名称。 此命令将输出有关 IoTHubToTwins 函数的信息。
az functionapp function show --resource-group <your-resource-group> --name <your-function-app> --function-name IoTHubToTwins
配置函数应用
若要访问 Azure 数字孪生,函数应用需要一个有权访问 Azure 数字孪生实例的系统分配的托管标识。 本部分将通过为函数分配访问角色并配置应用程序设置来设置该权限,以便能够访问 Azure 数字孪生实例。
在 Azure Cloud Shell 或本地 Azure CLI 中运行以下命令。
注意
此部分必须由有权管理用户对 Azure 资源的用户访问权限(包括授予和委派权限)的 Azure 用户完成。 满足此要求的常见角色包括“所有者”、“帐户管理员”或“用户访问管理员”和“参与者”的组合。 有关 Azure 数字孪生角色的权限要求的详细信息,请参阅设置实例和身份验证。
分配访问角色
Azure 函数需要将持有者令牌传递给它。 为确保传递了持有者令牌,请为函数应用授予 Azure 数字孪生实例的“Azure 数字孪生数据所有者”角色,这将授予函数应用在实例上执行数据平面活动的权限。
使用以下命令为函数创建系统托管标识(如果该函数已有一个,此命令将输出其详细信息)。 记下输出中的
principalId字段。 你将使用此 ID 来引用函数,以便可以在下一步中授予其权限。az functionapp identity assign --resource-group <your-resource-group> --name <your-function-app-name>使用以下命令中的
principalId值为函数赋予 Azure 数字孪生实例的“Azure 数字孪生数据所有者”角色。az dt role-assignment create --dt-name <your-Azure-Digital-Twins-instance> --assignee "<principal-ID>" --role "Azure Digital Twins Data Owner"
配置应用程序设置
接下来,通过为其设置 环境变量 ,使 Azure 数字孪生实例的 URL 可供函数访问。
提示
通过将 https:// 添加到实例主机名的开头,创建 Azure 数字孪生实例的 URL。 若要查看主机名以及实例的所有属性,请运行 az dt show --dt-name <your-Azure-Digital-Twins-instance>。
以下命令为实例的 URL 设置环境变量,函数在需要访问实例时将使用该环境变量。
az functionapp config appsettings set --resource-group <your-resource-group> --name <your-function-app-name> --settings "ADT_SERVICE_URL=https://<your-Azure-Digital-Twins-instance-host-name>"
将函数连接到 IoT 中心
在本部分中,你会将函数设置为 IoT 中心设备数据的事件目标。 以此方式设置函数将确保来自 IoT 中心内恒温器设备的数据将发送到 Azure 函数进行处理。
使用以下 CLI 命令创建事件订阅,IoT 中心会使用该订阅将事件数据发送到 IoTHubtoTwins 函数。 有一个占位符可用于输入事件订阅的名称,还有一些占位符可用于输入订阅 ID、资源组、IoT 中心名称和函数应用的名称。
az eventgrid event-subscription create --name <name-for-hub-event-subscription> --event-delivery-schema eventgridschema --source-resource-id /subscriptions/<your-subscription-ID>/resourceGroups/<your-resource-group>/providers/Microsoft.Devices/IotHubs/<your-IoT-hub> --included-event-types Microsoft.Devices.DeviceTelemetry --endpoint-type azurefunction --endpoint /subscriptions/<your-subscription-ID>/resourceGroups/<your-resource-group>/providers/Microsoft.Web/sites/<your-function-app>/functions/IoTHubtoTwins
输出将显示有关已创建的事件订阅的信息。 可通过验证结果中的 provisioningState 值来确认操作已成功完成:
"provisioningState": "Succeeded",
使用模拟 IoT 数据进行测试
可使用连接端到端解决方案中的设备模拟器来测试新的 ingress 函数。 DeviceSimulator 项目包含一个模拟恒温器设备,用于发送示例温度数据。 要设置设备模拟器,请执行以下步骤:
导航到 Azure 数字孪生端到端示例项目存储库。 通过选择标题下方的“浏览代码”按钮,在计算机上获取示例项目。 此时会转到这些示例的 GitHub 存储库,你可以通过选择“代码”按钮然后再选择“下载 ZIP”将其下载为 .zip。
这会将 .zip 文件夹以 digital-twins-samples-main.zip 形式下载到计算机上。 解压缩文件夹并提取文件。 需要使用 DeviceSimulator 项目文件夹。
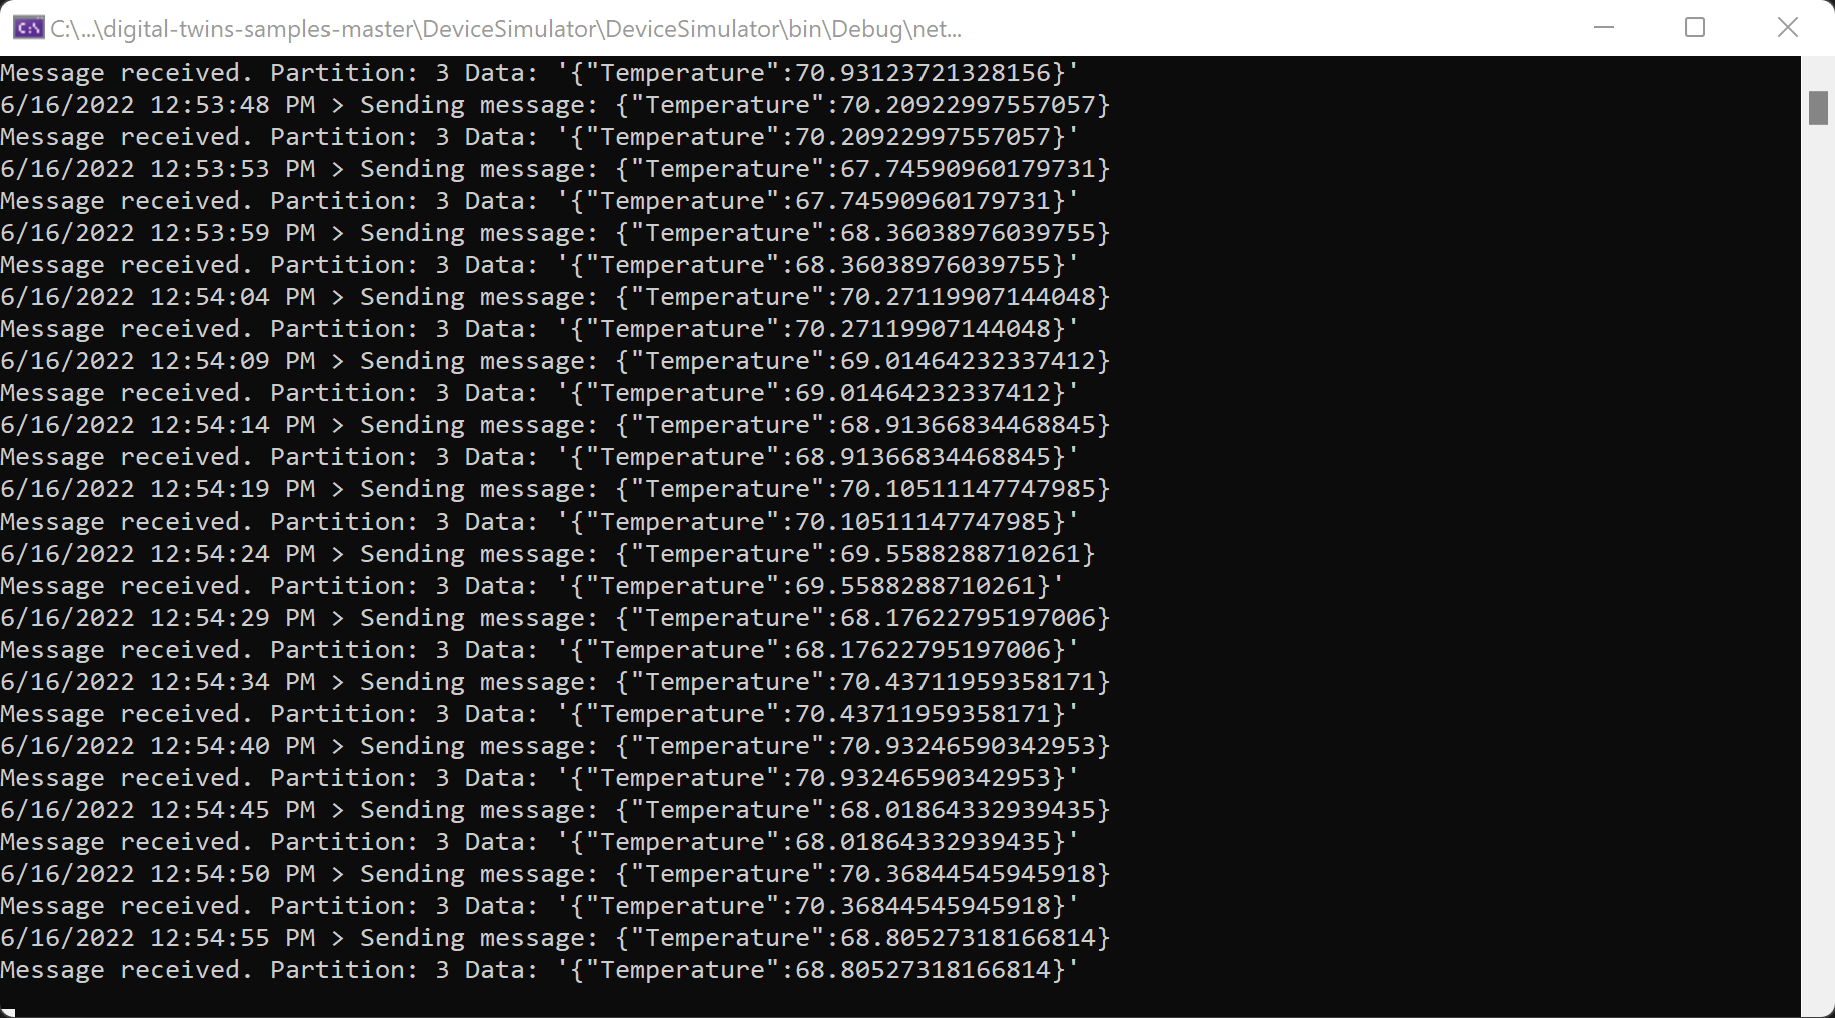
完成这些步骤后,应该会运行一个项目控制台窗口,并将模拟设备遥测数据发送到 IoT 中心。
验证结果
在运行上述设备模拟器时,将更改恒温器数字孪生体的温度值。 在 Azure CLI 中,运行以下命令以查看温度值。 实例的主机名有一个占位符(也可以使用实例的易记名称,但性能会略有下降)。
az dt twin query --query-command "SELECT * FROM digitaltwins WHERE \$dtId = 'thermostat67'" --dt-name <instance-hostname-or-name>
注意
如果在 Bash 环境中使用 Cloud Shell 以外的任何内容,则可能需要以不同的方式对查询中的 $ 字符进行转义,以便对其进行正确分析。 有关详细信息,请参阅在不同的 shell 中使用特殊字符。
输出应显示 thermostat67 孪生体的详细信息,包括温度值,如下所示:
{
  "result": [
    {
      "$dtId": "thermostat67",
      "$etag": "W/\"dbf2fea8-d3f7-42d0-8037-83730dc2afc5\"",
      "$metadata": {
        "$model": "dtmi:contosocom:DigitalTwins:Thermostat;1",
        "Temperature": {
          "lastUpdateTime": "2021-06-03T17:05:52.0062638Z"
        }
      },
      "Temperature": 70.20518558807913
    }
  ]
}
要查看 Temperature 值更改,请重复运行上面的查询命令。
后续步骤
了解 Azure 数字孪生的数据入口和出口: