你当前正在访问 Microsoft Azure Global Edition 技术文档网站。 如果需要访问由世纪互联运营的 Microsoft Azure 中国技术文档网站,请访问 https://docs.azure.cn。
教程:在 Azure IoT MQ 预览版和 Azure 事件网格之间配置 MQTT 桥
重要
Azure IoT 操作预览版(由 Azure Arc 启用)当前处于预览状态。 不应在生产环境中使用此预览版软件。
有关 beta 版本、预览版或尚未正式发布的版本的 Azure 功能所适用的法律条款,请参阅 Microsoft Azure 预览版的补充使用条款。
本教程介绍如何使用 Azure 事件网格 MQTT 代理 PaaS 为双向 MQTT 桥配置 IoT MQ。 可以使用此功能在边缘和云中处理 IoT 数据。 例如,可以使用 IoT MQ 在边缘处理遥测数据,然后将数据桥接到 Azure 事件网格,以便在云中进一步处理。
先决条件
设置环境变量。
使用 Azure CLI 登录:
az login
设置其余设置的环境变量。 将<>中的值替换为所选的有效值或名称。 会根据你提供的名称在 Azure 订阅中创建新的 Azure 事件网格命名空间和主题空间:
# For this tutorial, the steps assume the IoT Operations cluster and the Event Grid
# are in the same subscription, resource group, and location.

# Name of the resource group of Azure Event Grid and IoT Operations cluster
export RESOURCE_GROUP=<RESOURCE_GROUP_NAME>

# Azure region of Azure Event Grid and IoT Operations cluster
export LOCATION=<LOCATION>

# Name of the Azure Event Grid namespace
export EVENT_GRID_NAMESPACE=<EVENT_GRID_NAMESPACE>

# Name of the Arc-enabled IoT Operations cluster
export CLUSTER_NAME=<CLUSTER_NAME>

# Subscription ID of Azure Event Grid and IoT Operations cluster
export SUBSCRIPTION_ID=<SUBSCRIPTION_ID>
创建启用了 MQTT 代理的 Azure 事件网格命名空间
使用 Azure CLI 创建事件网格命名空间。 位置应与用于部署 Azure IoT 操作的位置相同。
az eventgrid namespace create \
  --namespace-name $EVENT_GRID_NAMESPACE \
  --resource-group $RESOURCE_GROUP \
  --location $LOCATION \
  --topic-spaces-configuration "{state:Enabled,maximumClientSessionsPerAuthenticationName:3}"
通过设置 topic-spaces-configuration,此命令会创建一个命名空间:
- 已启用 MQTT 代理
- 每个身份验证名称的最大客户端会话数为 3。
最大客户端会话选项允许 IoT MQ 生成多个实例,并且仍可连接。 若要了解详细信息,请参阅多会话支持。
创建主题空间
在 Azure 事件网格命名空间中,使用主题模板 telemetry/# 创建名为 tutorial 的主题空间。
az eventgrid namespace topic-space create \
  --resource-group $RESOURCE_GROUP \
  --namespace-name $EVENT_GRID_NAMESPACE \
  --name tutorial \
  --topic-templates "telemetry/#"
通过在主题模板中使用 # 通配符,可以发布到 telemetry 主题空间下的任何主题。 例如,telemetry/temperature 或 telemetry/humidity。
授予 Azure IoT MQ 预览版对事件网格主题空间的访问权限
使用 az k8s-extension show,查找 Azure IoT MQ Arc 扩展的主体 ID。 该命令将主体 ID 存储在变量中供以后使用。
export PRINCIPAL_ID=$(az k8s-extension show \
  --resource-group $RESOURCE_GROUP \
  --cluster-name $CLUSTER_NAME \
  --name mq \
  --cluster-type connectedClusters \
  --query identity.principalId -o tsv)
echo $PRINCIPAL_ID
记下 identity.principalId 的输出值,它是采用以下格式的 GUID 值:
d84481ae-9181-xxxx-xxxx-xxxxxxxxxxxx
然后,使用 Azure CLI 为创建的主题空间将发布服务器和订阅服务器角色分配给 IoT MQ。
分配发布者角色:
az role assignment create \
  --assignee $PRINCIPAL_ID \
  --role "EventGrid TopicSpaces Publisher" \
  --scope /subscriptions/$SUBSCRIPTION_ID/resourceGroups/$RESOURCE_GROUP/providers/Microsoft.EventGrid/namespaces/$EVENT_GRID_NAMESPACE/topicSpaces/tutorial
分配订阅者角色:
az role assignment create \
  --assignee $PRINCIPAL_ID \
  --role "EventGrid TopicSpaces Subscriber" \
  --scope /subscriptions/$SUBSCRIPTION_ID/resourceGroups/$RESOURCE_GROUP/providers/Microsoft.EventGrid/namespaces/$EVENT_GRID_NAMESPACE/topicSpaces/tutorial
提示
该范围与在上一步中使用 az eventgrid namespace topic-space create 创建的主题空间的 id 相匹配,可以在命令的输出中找到它。
事件网格 MQTT 代理主机名
使用 Azure CLI 获取事件网格 MQTT 代理主机名。
az eventgrid namespace show \
  --resource-group $RESOURCE_GROUP \
  --namespace-name $EVENT_GRID_NAMESPACE \
  --query topicSpacesConfiguration.hostname \
  -o tsv
记下 topicSpacesConfiguration.hostname 的输出值,其主机名值如下所示:
example.region-1.ts.eventgrid.azure.net
创建 MQTT 桥连接器和主题映射资源
在名为 bridge.yaml 的新文件中,指定 MQTT 桥连接器和主题映射配置。 将 remoteBrokerConnection endpoint 中的示例占位符值替换为上一步中的事件网格 MQTT 主机名。 包括端口号 8883。
apiVersion: mq.iotoperations.azure.com/v1beta1
kind: MqttBridgeConnector
metadata:
  name: tutorial-bridge
  namespace: azure-iot-operations
spec:
  image:
    repository: mcr.microsoft.com/azureiotoperations/mqttbridge
    tag: 0.4.0-preview
    pullPolicy: IfNotPresent
  protocol: v5
  bridgeInstances: 2
  logLevel: debug
  remoteBrokerConnection:
    endpoint: example.region-1.ts.eventgrid.azure.net:8883
    tls:
      tlsEnabled: true
    authentication:
      systemAssignedManagedIdentity:
        audience: https://eventgrid.azure.net
  localBrokerConnection:
    endpoint: aio-mq-dmqtt-frontend:8883
    tls:
      tlsEnabled: true
      trustedCaCertificateConfigMap: aio-ca-trust-bundle-test-only
    authentication:
      kubernetes: {}
---
apiVersion: mq.iotoperations.azure.com/v1beta1
kind: MqttBridgeTopicMap
metadata:
  name: tutorial-topic-map
  namespace: azure-iot-operations
spec:
  mqttBridgeConnectorRef: tutorial-bridge
  routes:
    - direction: local-to-remote
      name: publish
      source: tutorial/local
      target: telemetry/iot-mq
      qos: 1
    - direction: remote-to-local
      name: subscribe
      source: telemetry/#
      target: tutorial/cloud
      qos: 1
将 MQTT 桥连接器配置为:
- 使用 Azure 事件网格 MQTT 代理作为远程代理
- 使用本地 IoT MQ 代理作为本地代理
- 对远程和本地代理使用 TLS
- 使用系统分配的托管标识向远程代理进行身份验证
- 使用 Kubernetes 服务帐户向本地代理进行身份验证
- 使用主题映射将
tutorial/local主题映射到远程代理上的telemetry/iot-mq主题 - 使用主题映射将远程代理上的
telemetry/#主题映射到本地代理上的tutorial/cloud主题
发布到本地 IoT MQ 代理上的 tutorial/local 主题时,消息会桥接到远程 Azure 事件网格 MQTT 代理上的 telemetry/iot-mq 主题。 然后,消息会桥接回本地 IoT MQ 代理上的 tutorial/cloud 主题。 同样,在远程 Azure 事件网格 MQTT 代理上发布到 telemetry/iot-mq 主题时,消息会桥接到本地 IoT MQ 代理上的 tutorial/cloud 主题。
使用 kubectl 应用部署文件。
kubectl apply -f bridge.yaml
mqttbridgeconnector.mq.iotoperations.azure.com/tutorial-bridge created
mqttbridgetopicmap.mq.iotoperations.azure.com/tutorial-topic-map created
验证 MQTT 桥部署
使用 kubectl 检查两个桥实例是否已准备就绪并正在运行。
kubectl get pods -n azure-iot-operations -l app=aio-mq-mqttbridge
NAME                       READY   STATUS    RESTARTS   AGE
aio-mq-tutorial-bridge-0   1/1     Running   0          45s
aio-mq-tutorial-bridge-1   1/1     Running   0          45s
现在可以在本地代理上发布并订阅 Azure 事件网格 MQTT 代理,并验证消息流是否按预期运行。
部署 MQTT 客户端
若要验证 MQTT 桥是否正常工作,请将 MQTT 客户端部署到与 IoT MQ 相同的命名空间。 在名为 client.yaml 的新文件中,指定客户端部署:
apiVersion: v1
kind: Pod
metadata:
  name: mqtt-client
  namespace: azure-iot-operations
spec:
  serviceAccountName: mqtt-client
  containers:
  - image: alpine
    name: mqtt-client
    command: ["sh", "-c"]
    args: ["apk add mosquitto-clients mqttui && sleep infinity"]
    volumeMounts:
    - name: mq-sat
      mountPath: /var/run/secrets/tokens
    - name: trust-bundle
      mountPath: /var/run/certs
  volumes:
  - name: mq-sat
    projected:
      sources:
      - serviceAccountToken:
          path: mq-sat
          audience: aio-mq
          expirationSeconds: 86400
  - name: trust-bundle
    configMap:
      name: aio-ca-trust-bundle-test-only
使用 kubectl 应用部署文件。
kubectl apply -f client.yaml
pod/mqtt-client created
启动订阅服务器
使用 kubectl exec 在 mosquitto 客户端 Pod 中启动 shell。
kubectl exec --stdin --tty mqtt-client -n azure-iot-operations -- sh
在 shell 中,使用 mqttui 在 tutorial/# 主题空间上启动 IoT MQ 代理的订阅服务器。
mqttui log "tutorial/#" \
-b mqtts://aio-mq-dmqtt-frontend:8883 \
-u '$sat' \
--password $(cat /var/run/secrets/tokens/mq-sat) \
--insecure
使命令保持运行状态,并打开新的终端窗口。
通过桥将 MQTT 消息发布到云
在新的终端窗口中,在 mosquitto 客户端 Pod 中启动另一个 shell。
kubectl exec --stdin --tty mqtt-client -n azure-iot-operations -- sh
在 shell 中,使用 mosquitto 将五条消息发布到 tutorial/local 主题。
mosquitto_pub -h aio-mq-dmqtt-frontend -p 8883 \
-m "This message goes all the way to the cloud and back!" \
-t "tutorial/local" -u '$sat' -P $(cat /var/run/secrets/tokens/mq-sat) \
--cafile /var/run/certs/ca.crt \
--repeat 5 --repeat-delay 1 -d
查看订阅服务器中的消息
在订阅服务器 shell 中,可看到已发布的消息。
23:17:50.802 QoS:AtMostOnce  tutorial/local     Payload( 52): This message goes all the way to the cloud and back!
23:17:51.086 QoS:AtMostOnce  tutorial/cloud     Payload( 52): This message goes all the way to the cloud and back!
23:17:51.803 QoS:AtMostOnce  tutorial/local     Payload( 52): This message goes all the way to the cloud and back!
23:17:51.888 QoS:AtMostOnce  tutorial/cloud     Payload( 52): This message goes all the way to the cloud and back!
23:17:52.804 QoS:AtMostOnce  tutorial/local     Payload( 52): This message goes all the way to the cloud and back!
23:17:52.888 QoS:AtMostOnce  tutorial/cloud     Payload( 52): This message goes all the way to the cloud and back!
23:17:53.805 QoS:AtMostOnce  tutorial/local     Payload( 52): This message goes all the way to the cloud and back!
23:17:53.895 QoS:AtMostOnce  tutorial/cloud     Payload( 52): This message goes all the way to the cloud and back!
23:17:54.807 QoS:AtMostOnce  tutorial/local     Payload( 52): This message goes all the way to the cloud and back!
23:17:54.881 QoS:AtMostOnce  tutorial/cloud     Payload( 52): This message goes all the way to the cloud and back!
在这里,你将看到消息发布到本地 IoT MQ 代理并发布到 tutorial/local 主题,桥接到 Azure 事件网格 MQTT 代理,然后在 tutorial/cloud 主题上再次桥接回本地 IoT MQ 代理。 然后将消息传递到订阅服务器。 在此示例中,往返时间约为 80 毫秒。
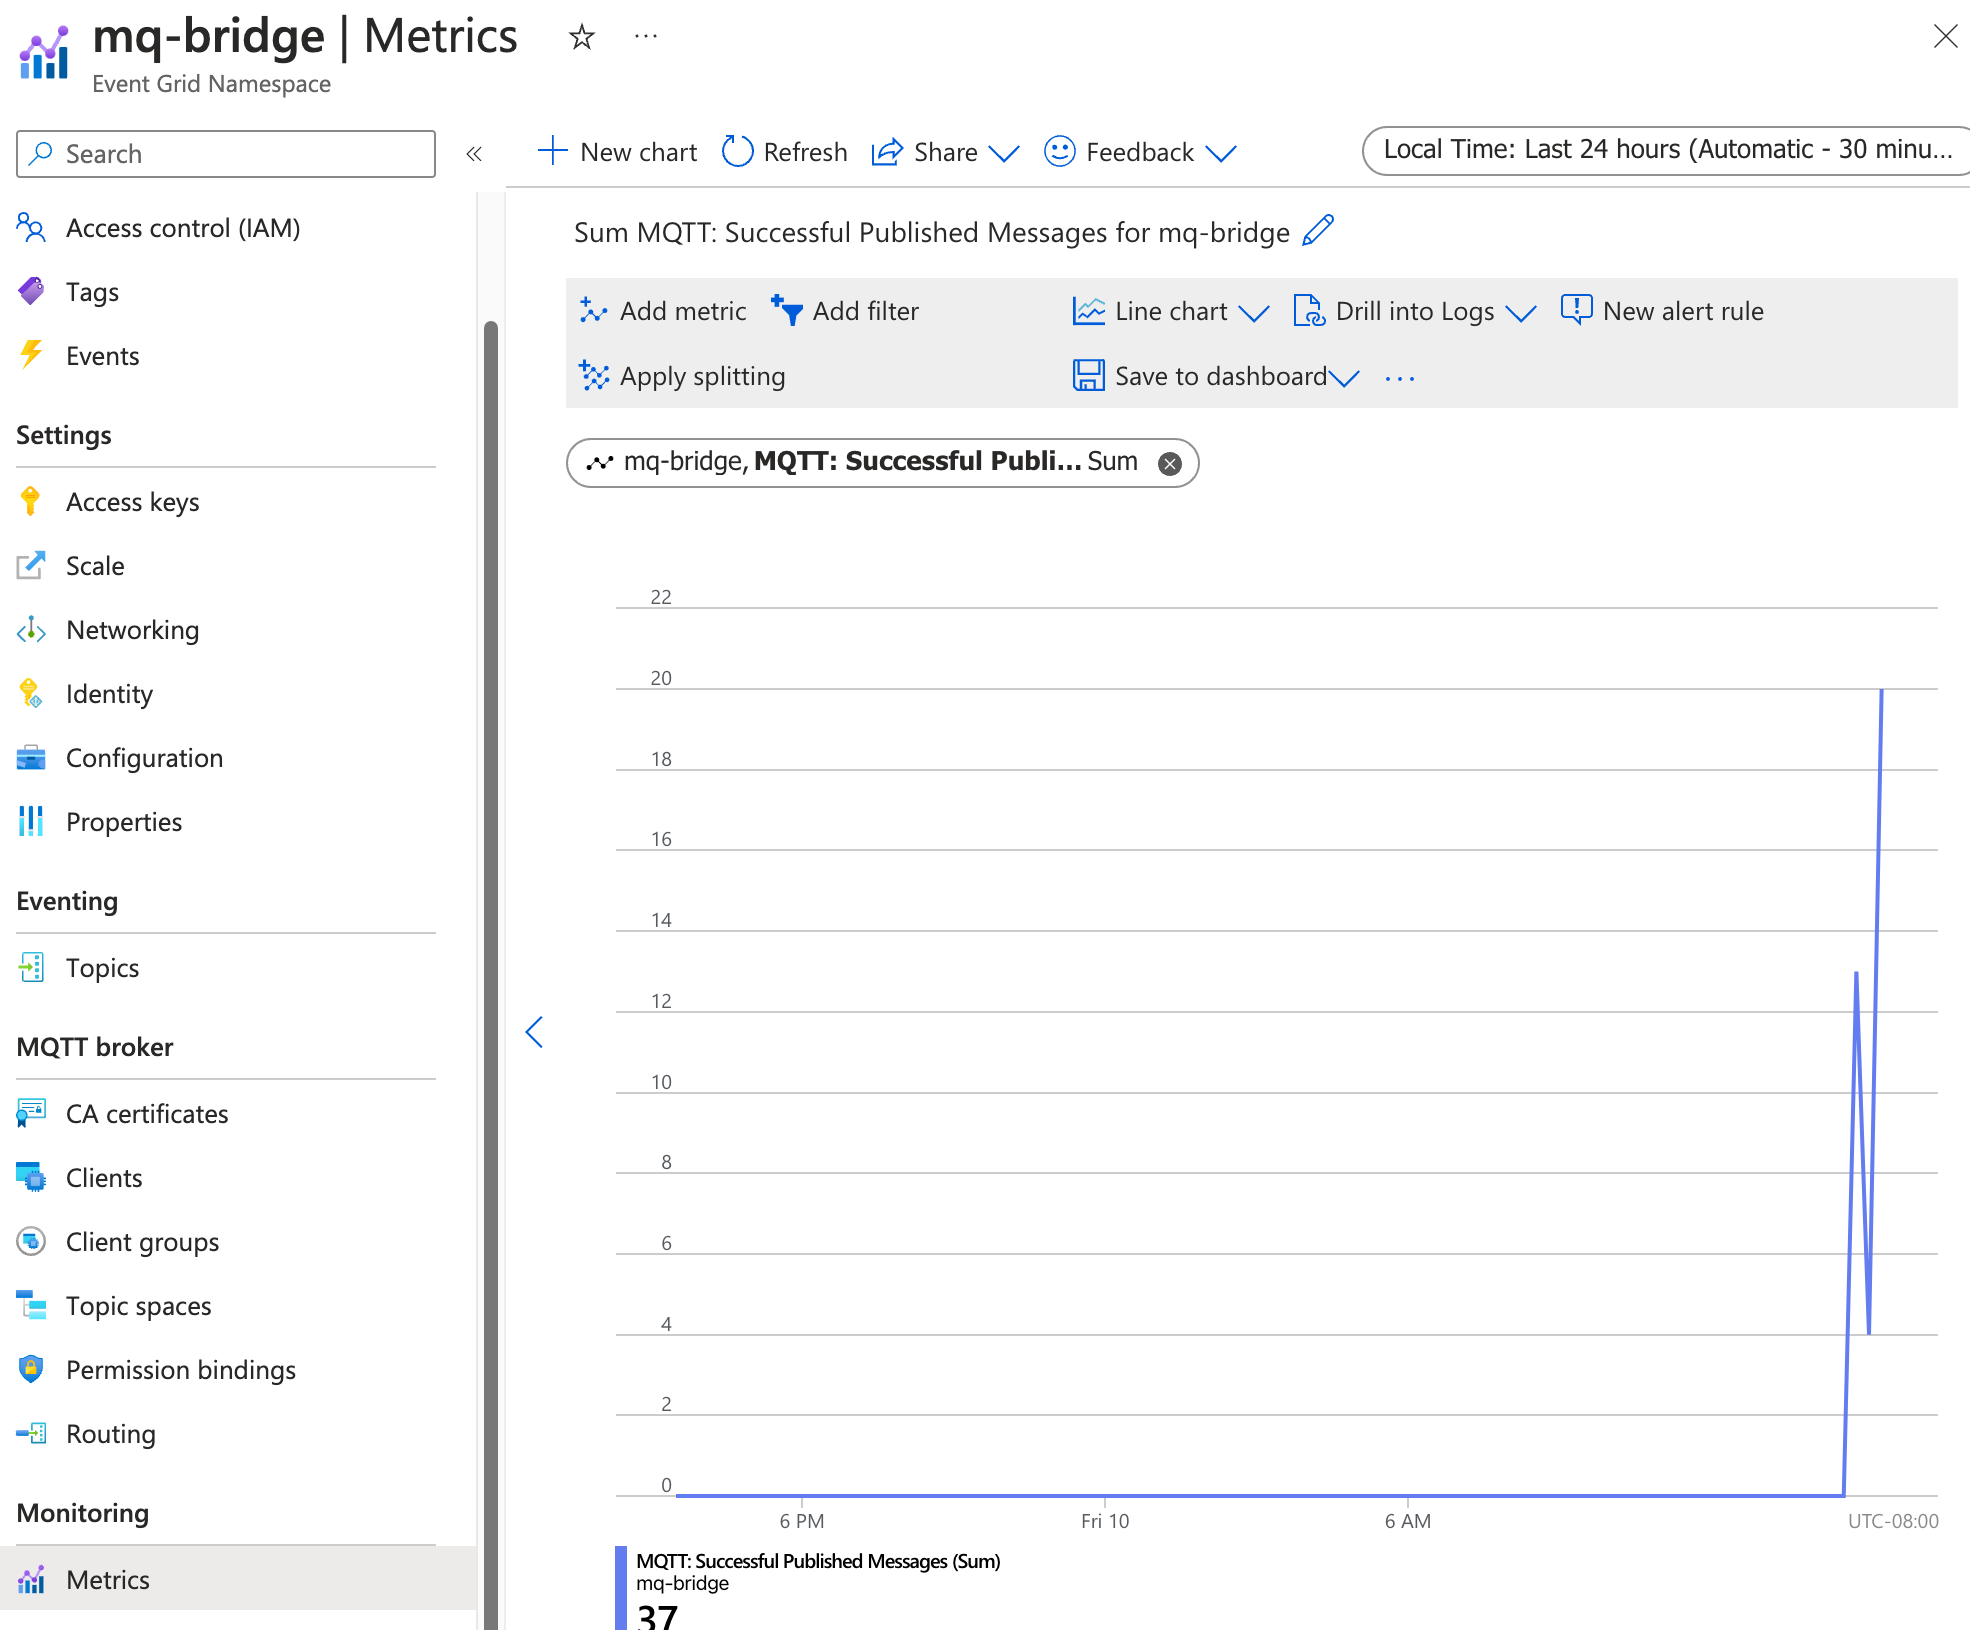
检查 Azure 事件网格指标以验证消息传递
还可以检查 Azure 事件网格指标,以验证消息是否已传递到 Azure 事件网格 MQTT 代理。 在 Microsoft Azure 门户中,导航到创建的事件网格命名空间。 在“指标”>“MQTT: 成功发布的消息”下。 在将消息发布到本地 IoT MQ 代理时,应会看到已发布和传递的消息数增加。
提示
可以使用 CLI 扩展az iot ops check --detail-level 2检查主题映射、QoS 和消息路由的配置。
后续步骤
本教程介绍了如何使用 Azure 事件网格 MQTT 代理为双向 MQTT 桥配置 IoT MQ。 后续步骤将探讨以下方案:
- 若要使用 MQTT 客户端将消息直接发布到 Azure 事件网格 MQTT 代理,请参阅将 MQTT 消息发布到事件网格 MQTT 代理。 为客户端提供与你创建的主题空间的发布服务器权限绑定,可以将消息发布到
telemetry下的任何主题,如telemetry/temperature或telemetry/humidity。 所有这些消息都桥接到本地 IoT MQ 代理上的tutorial/cloud主题。 - 若要为 Azure 事件网格 MQTT 代理设置传递规则,请参阅配置事件网格 MQTT 代理的传递规则。 可以使用传递规则根据主题名称将消息路由到不同的主题,或基于消息内容筛选消息。