在本快速入门中,了解如何使用 Azure 门户、Azure CLI、PowerShell、Bicep、ARM 模板和 Terraform 创建 NAT 网关。 NAT 网关服务为 Azure 中的虚拟机提供可缩放的出站连接。
创建 NAT 网关
在部署 NAT 网关资源和其他资源之前,需要一个资源组来包含部署的资源。 在以下步骤中,你将创建资源组、NAT 网关资源和公共 IP 地址。 可以使用一个或多个公共 IP 地址资源和/或公共 IP 前缀。
有关公共 IP 前缀和 NAT 网关的信息,请参阅管理 NAT 网关。
在门户顶部的搜索框中,输入“NAT 网关”。 在搜索结果中选择“NAT 网关”。
选择+ 新建。
在“创建网络地址转换(NAT)网关”中,在“基本信息”选项卡中输入或选择以下信息:
|
设置 |
价值 |
|
项目详细信息 |
|
| 订阅 |
选择 Azure 订阅。 |
| 资源组 |
选择“新建”。
输入 test-rg。
选择“确定”。 |
|
实例详细信息 |
|
| NAT 网关名称 |
输入 nat-gateway |
| 区域 |
选择“美国东部 2” |
| 可用性区域 |
选择“无区域”。 |
| TCP 空闲超时(分钟) |
保留默认值“4”。 |
有关可用性区域和 NAT 网关的信息,请参阅 NAT 网关和可用性区域。
选择“出站 IP”选项卡,或者选择“下一步:出站 IP”按钮(位于页面底部)。
在“出站 IP”选项卡中,输入或选择以下信息:
|
设置 |
价值 |
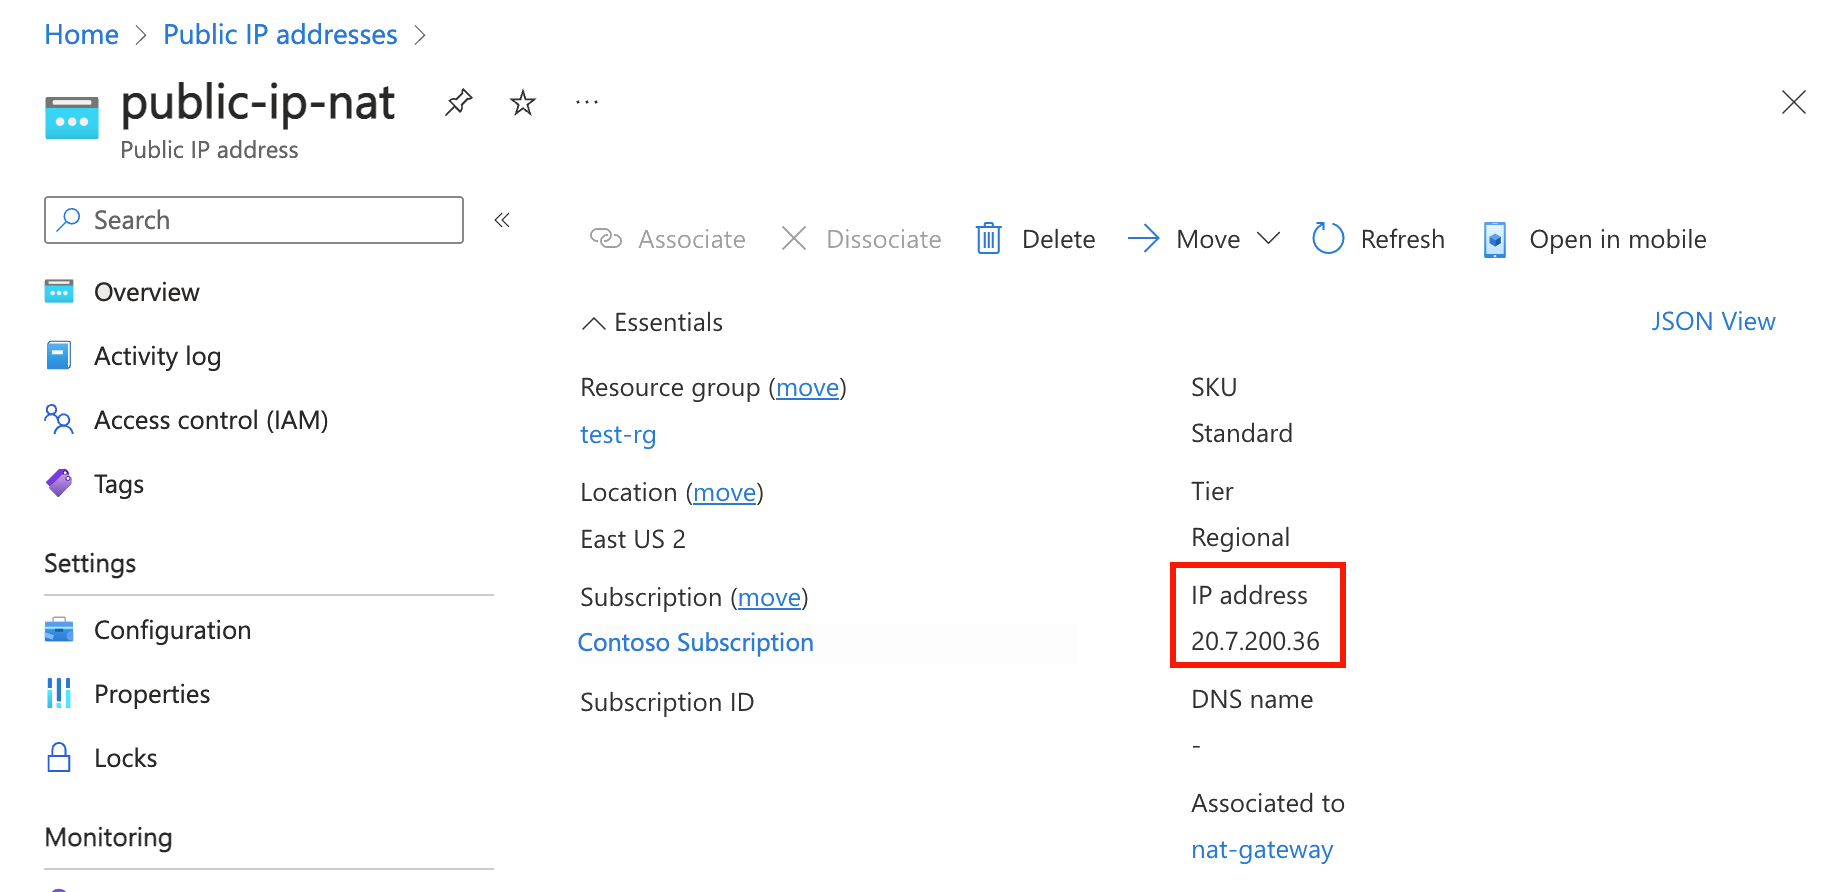
| 公共 IP 地址 |
选择“创建新的公共 IP 地址”。
在“名称”中输入 public-ip-nat。
选择“确定”。 |
选择“查看 + 创建”选项卡,或选择页面底部的“查看 + 创建”按钮 。
选择 创建。
创建虚拟网络和堡垒主机
以下过程创建包含资源子网、Azure Bastion 子网和 Azure Bastion 主机的虚拟网络。
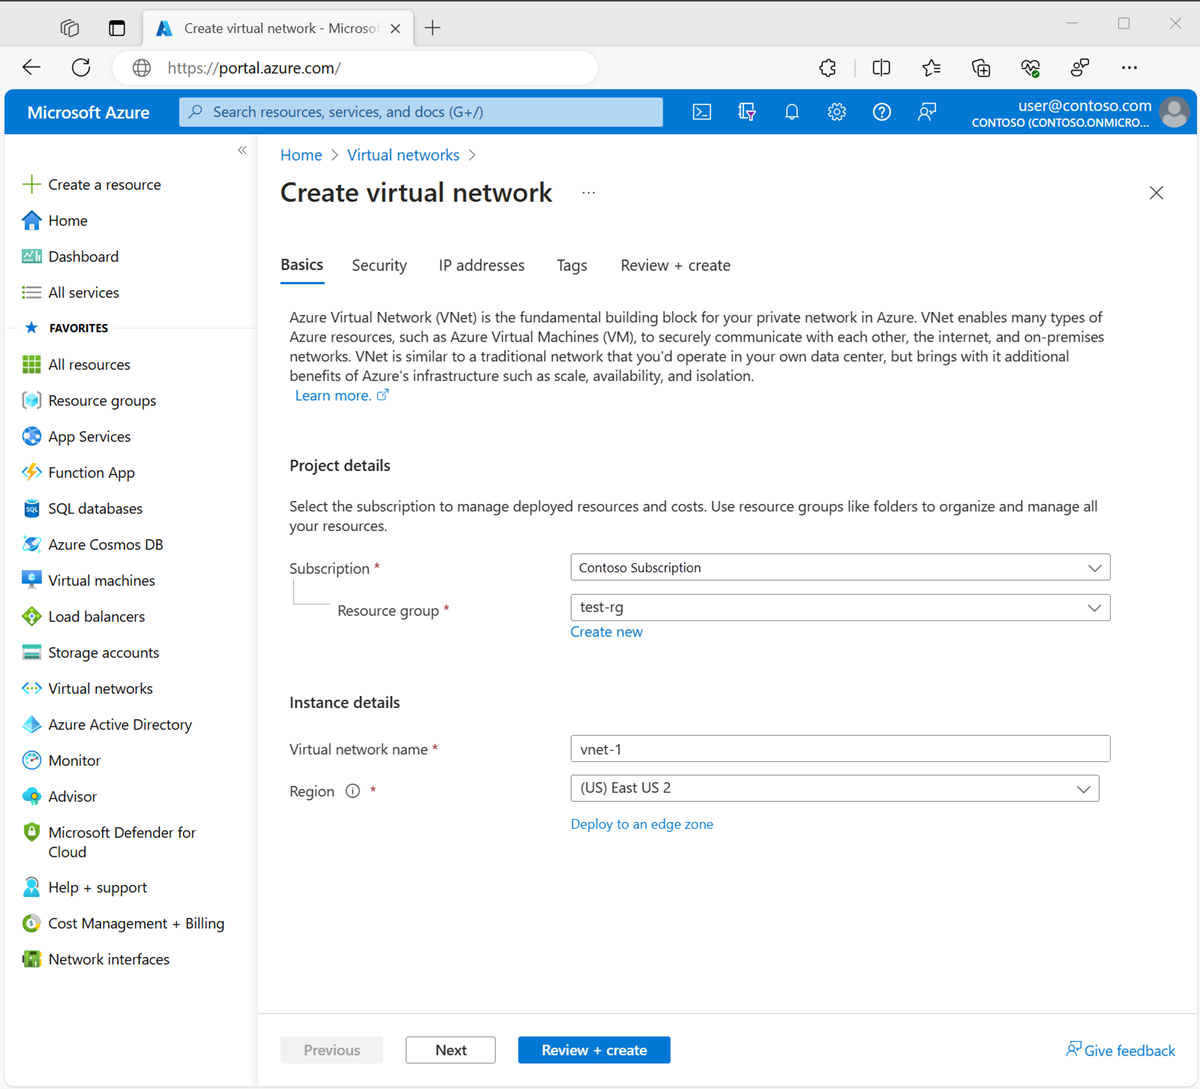
在门户中,搜索并选择“虚拟网络”。
在“虚拟网络”页面上,选择“+ 创建”。
在创建虚拟网络的基本信息选项卡上输入或选择以下信息:
| 设置 |
价值 |
|
项目详细信息 |
|
| 订阅 |
选择订阅。 |
| 资源组 |
选择 test-rg。 |
|
实例详细信息 |
|
| 名称 |
输入“vnet-1”。 |
| 区域 |
选择“(US)美国东部 2”。 |
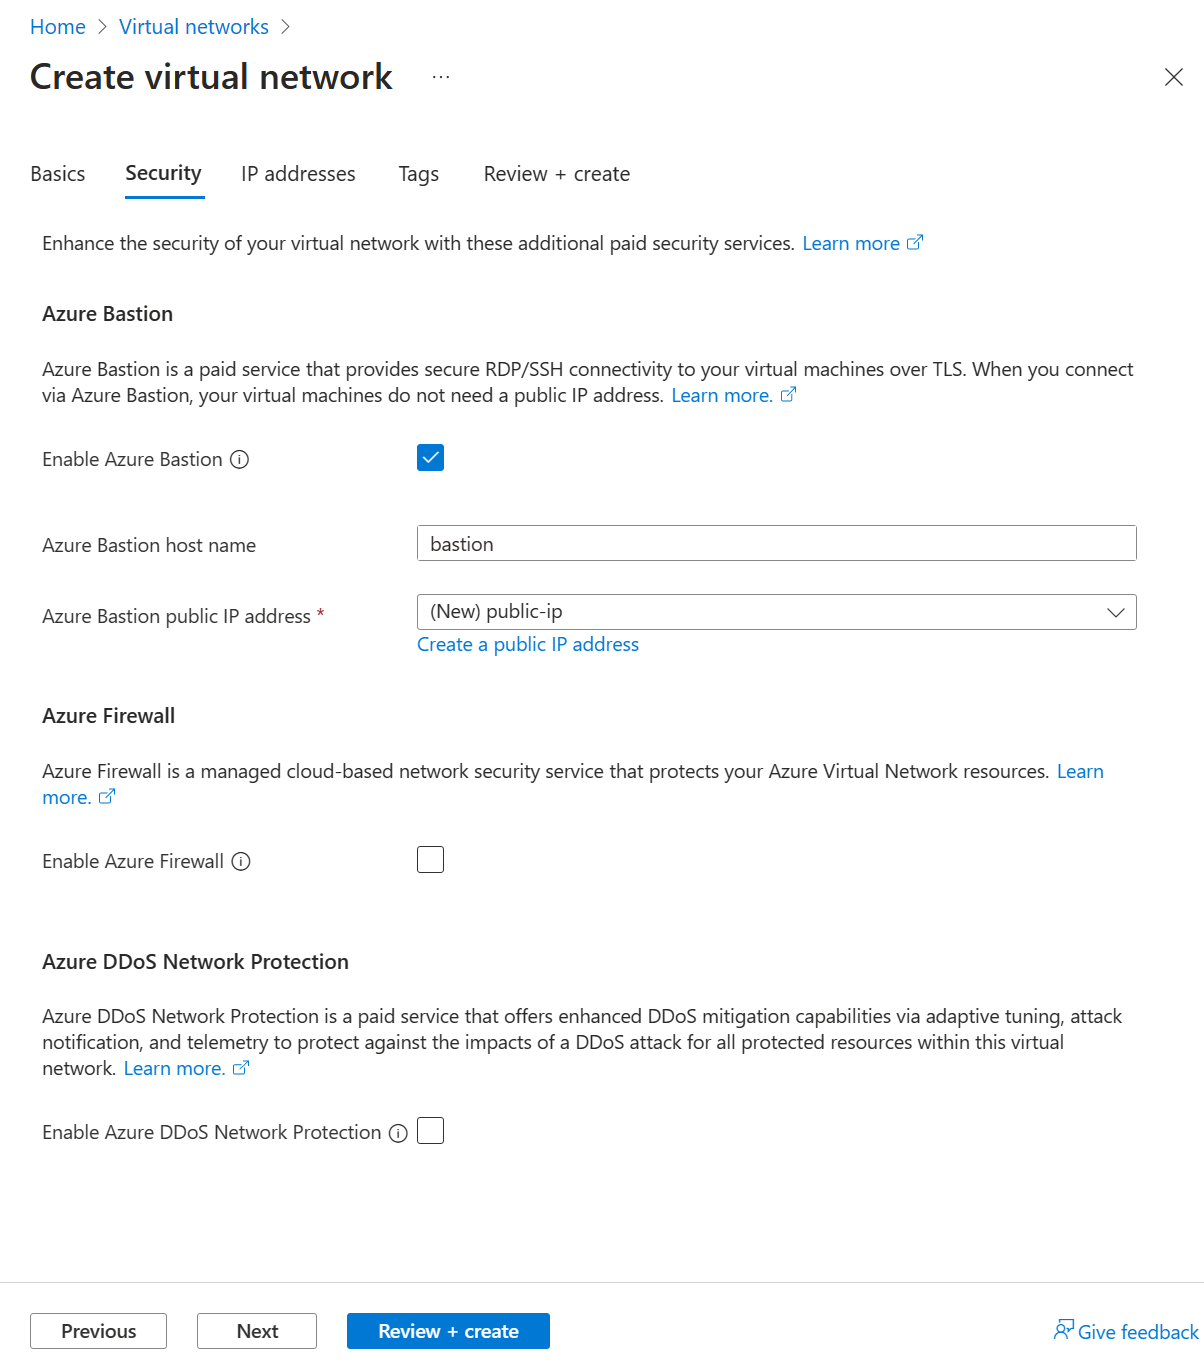
选择“下一步”,转到“安全性”选项卡。
在“安全性”选项卡的“Azure Bastion”部分,选择“启用 Azure Bastion”。
Azure Bastion 使用浏览器通过安全外壳 (SSH) 或远程桌面协议 (RDP),通过使用其专用 IP 地址连接虚拟网络中的虚拟机。 虚拟机不需要公共 IP 地址、客户端软件或特殊配置。 有关 Azure Bastion 的详细信息,请参阅 Azure Bastion
注释
无论出站数据使用情况如何,按小时定价都从部署 Bastion 的时间开始算起。 有关详细信息,请参阅定价和 SKU。 如果要将 Bastion 部署为教程或测试的一部分,建议在使用完此资源后将其删除。
在“Azure Bastion”中,输入或选择以下信息:
| 设置 |
价值 |
| Azure Bastion 主机名 |
输入 堡垒。 |
| Azure Bastion 公共 IP 地址 |
选择“创建公共 IP 地址”。
在名称中输入 public-ip-bastion。
选择“确定”。 |
选择下一步,转到IP 地址选项卡。
在“子网”的地址空间框中,选择“默认”子网。
在编辑子网中,输入或选择以下信息:
| 设置 |
价值 |
| 子网用途 |
保留默认值“默认”。 |
| 名称 |
输入subnet-1。 |
|
IPv4 |
|
| IPv4 地址范围 |
保留默认值“10.0.0.0/16”。 |
| 起始地址 |
保留默认值“10.0.0.0”。 |
| 尺寸 |
保留默认值“/24 (256 个地址)”。 |
|
安全性 |
|
| NAT 网关 |
选择“nat-gateway”。 |
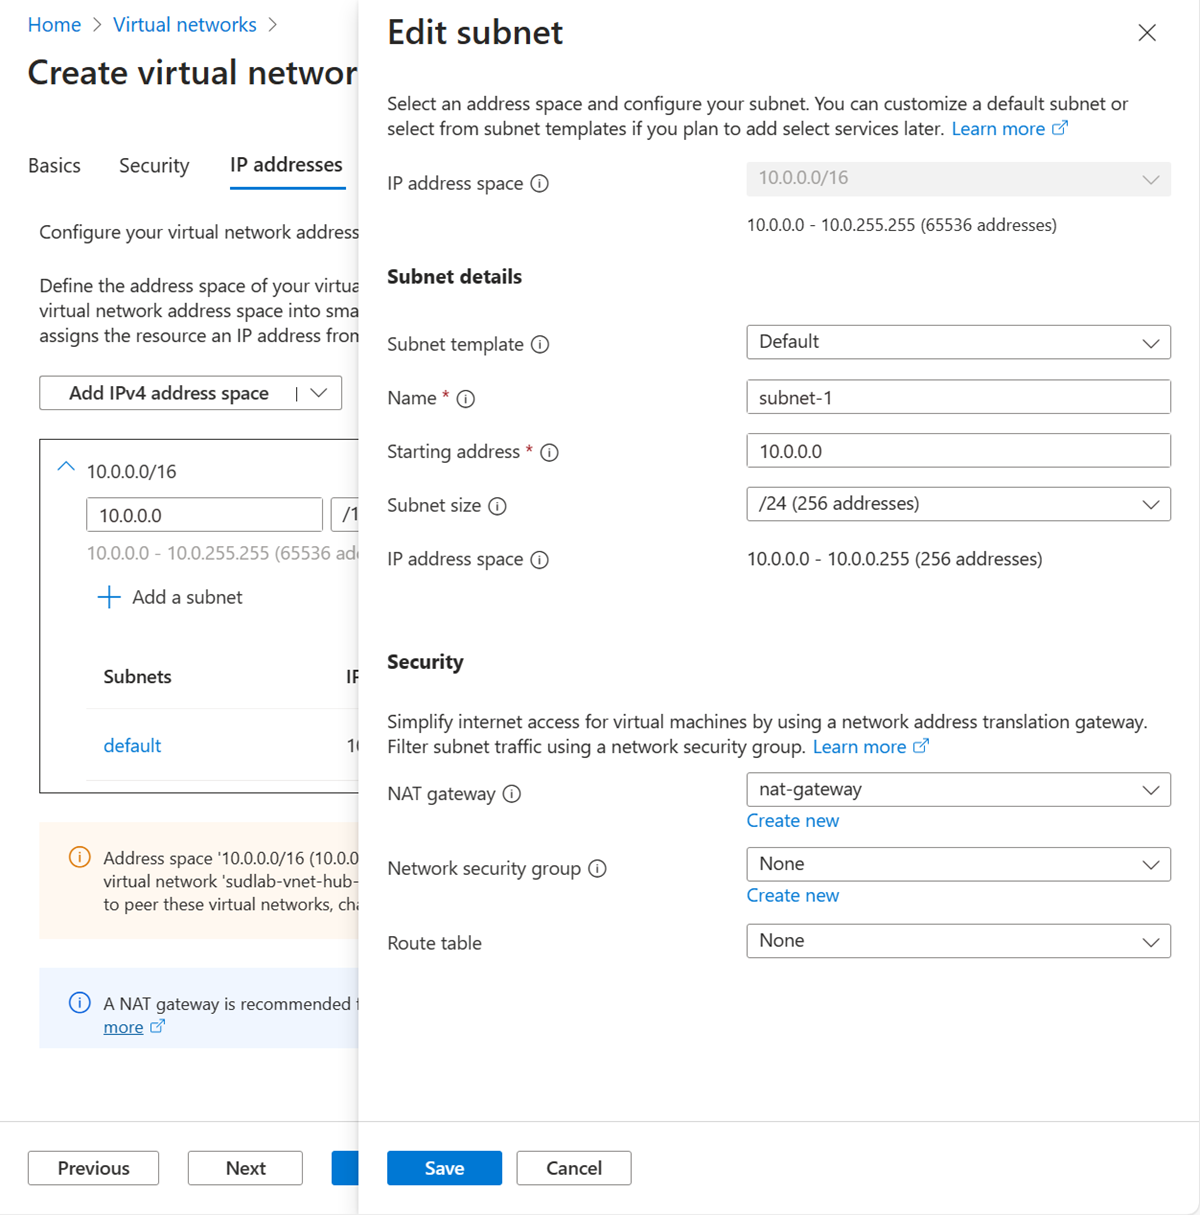
选择“保存”。
选择屏幕底部的“查看 + 创建”,然后在验证通过时选择“创建”。
创建测试虚拟机
以下过程会在虚拟网络中创建一个名为 vm-1 的测试虚拟机 (VM)。
在门户中,搜索并选择“虚拟机”。
在虚拟机中,选择+ 创建,然后选择Azure 虚拟机。
在“创建虚拟机”的“基本信息”选项卡上,输入或选择以下信息:
| 设置 |
价值 |
|
项目详细信息 |
|
| 订阅 |
选择订阅。 |
| 资源组 |
选择 test-rg。 |
|
实例详细信息 |
|
| 虚拟机名称 |
输入“vm-1”。 |
| 区域 |
选择“美国东部 2”。 |
| 可用性选项 |
选择“无需基础结构冗余”。 |
| 安全类型 |
保留默认值标准。 |
| 图像 |
选择“Ubuntu Server 22.04 LTS - x64 Gen2”。 |
| VM 架构 |
保留默认值“x64”。 |
| 尺寸 |
请选择尺寸。 |
|
管理员帐户 |
|
| 身份验证类型 |
选择密码。 |
| 用户名 |
输入“azureuser”。 |
| 密码 |
输入密码。 |
| 确认密码 |
重新输入密码。 |
|
入站端口规则 |
|
| 公共入站端口 |
选择无。 |
选择页面顶部的“网络”选项卡。
在“网络”选项卡中,输入或选择以下信息:
| 设置 |
价值 |
|
网络接口 |
|
| 虚拟网络 |
选择“vnet-1”。 |
| 子网 |
选择“subnet-1 (10.0.0.0/24)”。 |
| 公网 IP |
选择无。 |
| NIC 网络安全组 |
选择“高级”。 |
| 配置网络安全组 |
选择“新建”。
在“名称”中输入“nsg-1”。
将其余字段保留默认设置,然后选择“确定”。 |
将其余设置保留为默认值,然后选择“查看 + 创建”。
检查设置,然后选择“创建”。
注释
虚拟网络中具有堡垒主机的虚拟机不需要公共 IP 地址。 Bastion 提供公共 IP,虚拟机使用专用 IP 在网络中进行通信。 可以从堡垒托管的虚拟网络的任何虚拟机中删除公共 IP。 有关详细信息,请参阅 将公共 IP 地址与 Azure VM 取消关联。
注释
Azure 会为未分配公共 IP 地址的 VM 或位于内部基本 Azure 负载均衡器的后端池中的 VM 提供默认出站访问 IP。 默认出站访问 IP 机制会提供不可配置的出站 IP 地址。
发生以下事件之一时,将禁用默认出站访问 IP:
- 将公共 IP 地址分配给 VM。
- 虚拟机被放置在标准负载均衡器的后端池中,可以有出站规则,也可以没有。
- 向 VM 的子网分配了 Azure NAT 网关资源。
在灵活业务流程模式下通过使用虚拟机规模集创建的 VM 没有默认的出站访问权限。
有关 Azure 中的出站连接的详细信息,请参阅 Azure 中的默认出站访问,使用源网络地址转换(SNAT)进行出站连接。
创建资源组
使用 New-AzResourceGroup 创建资源组。 Azure 资源组是在其中部署和管理 Azure 资源的逻辑容器。
以下示例在 eastus2 位置创建名为“test-rg”的资源组:
$rsg = @{
    Name = 'test-rg'
    Location = 'eastus2'
}
New-AzResourceGroup @rsg
创建 NAT 网关
本部分介绍了如何创建 NAT 网关和支持资源。
## Create public IP address for NAT gateway ##
$ip = @{
    Name = 'public-ip-nat'
    ResourceGroupName = 'test-rg'
    Location = 'eastus2'
    Sku = 'Standard'
    AllocationMethod = 'Static'
    Zone = 1,2,3
}
$publicIP = New-AzPublicIpAddress @ip

## Create NAT gateway resource ##
$nat = @{
    ResourceGroupName = 'test-rg'
    Name = 'nat-gateway'
    IdleTimeoutInMinutes = '10'
    Sku = 'Standard'
    Location = 'eastus2'
    PublicIpAddress = $publicIP
}
$natGateway = New-AzNatGateway @nat

## Create subnet config and associate NAT gateway to subnet##
$subnet = @{
    Name = 'subnet-1'
    AddressPrefix = '10.0.0.0/24'
    NatGateway = $natGateway
}
$subnetConfig = New-AzVirtualNetworkSubnetConfig @subnet

## Create Azure Bastion subnet ##
$bastsubnet = @{
    Name = 'AzureBastionSubnet'
    AddressPrefix = '10.0.1.0/26'
}
$bastsubnetConfig = New-AzVirtualNetworkSubnetConfig @bastsubnet

## Create the virtual network ##
$net = @{
    Name = 'vnet-1'
    ResourceGroupName = 'test-rg'
    Location = 'eastus2'
    AddressPrefix = '10.0.0.0/16'
    Subnet = $subnetConfig,$bastsubnetConfig
}
$vnet = New-AzVirtualNetwork @net

## Create public IP address for bastion host ##
$ip = @{
    Name = 'public-ip'
    ResourceGroupName = 'test-rg'
    Location = 'eastus2'
    Sku = 'Standard'
    AllocationMethod = 'Static'
    Zone = 1,2,3
}
$publicip = New-AzPublicIpAddress @ip

## Create bastion host ##
$bastion = @{
    Name = 'bastion'
    ResourceGroupName = 'test-rg'
    PublicIpAddressRgName = 'test-rg'
    PublicIpAddressName = 'public-ip'
    VirtualNetworkRgName = 'test-rg'
    VirtualNetworkName = 'vnet-1'
    Sku = 'Basic'
}
New-AzBastion @bastion
堡垒主机可能需要几分钟时间才能完成部署。 在进入下一部分之前,请等待堡垒主机部署完毕。
创建虚拟机
在本部分中,将创建一个虚拟机来测试 NAT 网关并验证出站连接的公共 IP 地址。
# Set the administrator and password for the VM ##
$cred = Get-Credential

## Place the virtual network into a variable ##
$vnet = Get-AzVirtualNetwork -Name 'vnet-1' -ResourceGroupName 'test-rg'

## Create network interface for virtual machine ##
$nic = @{
    Name = "nic-1"
    ResourceGroupName = 'test-rg'
    Location = 'eastus2'
    Subnet = $vnet.Subnets[0]
}
$nicVM = New-AzNetworkInterface @nic

## Create a virtual machine configuration ##
$vmsz = @{
    VMName = 'vm-1'
    VMSize = 'Standard_DS1_v2'
}
$vmos = @{
    ComputerName = 'vm-1'
    Credential = $cred
}
$vmimage = @{
    PublisherName = 'Canonical'
    Offer = '0001-com-ubuntu-server-jammy'
    Skus = '22_04-lts-gen2'
    Version = 'latest'
}
$vmConfig = New-AzVMConfig @vmsz `
    | Set-AzVMOperatingSystem @vmos -Linux `
    | Set-AzVMSourceImage @vmimage `
    | Add-AzVMNetworkInterface -Id $nicVM.Id

## Create the virtual machine ##
$vm = @{
    ResourceGroupName = 'test-rg'
    Location = 'eastus2'
    VM = $vmConfig
}
New-AzVM @vm
请先等待虚拟机创建完成,然后再转到下一部分。
创建资源组
使用 az group create 创建资源组。 Azure 资源组是在其中部署和管理 Azure 资源的逻辑容器。
az group create \
    --name test-rg \
    --location eastus2
创建 NAT 网关
本部分介绍了如何创建 NAT 网关和支持资源。
创建公共 IP 地址
若要访问 Internet,需要 NAT 网关的一个或多个公共 IP 地址。 使用 az network public-ip create 创建公共 IP 地址资源。
az network public-ip create \
    --resource-group test-rg \
    --name public-ip-nat \
    --sku Standard \
    --allocation-method Static \
    --location eastus2 \
    --zone 1 2 3
创建 NAT 网关资源
使用 az network nat gateway create 创建 NAT 网关资源。 NAT 网关使用在上一步中创建的公共 IP 地址。 空闲超时设置为 10 分钟。
az network nat gateway create \
    --resource-group test-rg \
    --name nat-gateway \
    --public-ip-addresses public-ip-nat \
    --idle-timeout 10
创建虚拟网络和子网
使用 az network vnet create 创建一个名为 vnet-1 的虚拟网络,以及一个名为 subnet-1 的子网。 虚拟网络的 IP 地址空间为 10.0.0.0/16。 虚拟网络中的子网是 10.0.0.0/24。
az network vnet create \
    --resource-group test-rg \
    --name vnet-1 \
    --address-prefix 10.0.0.0/16 \
    --subnet-name subnet-1 \
    --subnet-prefixes 10.0.0.0/24
创建 Azure Bastion 子网
使用 az network vnet subnet create 创建一个名为 AzureBastionSubnet 的 Azure Bastion 子网:
az network vnet subnet create \
    --name AzureBastionSubnet \
    --resource-group test-rg \
    --vnet-name vnet-1 \
    --address-prefix 10.0.1.0/26
将 NAT 网关关联到子网
使用 az network vnet subnet update 将 NAT 网关关联到子网:
az network vnet subnet update \
    --resource-group test-rg \
    --vnet-name vnet-1 \
    --name subnet-1 \
    --nat-gateway nat-gateway
为 Bastion 主机创建公共 IP 地址
使用 az network public-ip create 为 Bastion 主机创建公共 IP 地址:
az network public-ip create \
    --resource-group test-rg \
    --name public-ip \
    --sku Standard \
    --location eastus2 \
    --zone 1 2 3
创建 Bastion 主机
使用 az network bastion create 创建 Azure Bastion 主机:
az network bastion create \
    --name bastion \
    --public-ip-address public-ip \
    --resource-group test-rg \
    --vnet-name vnet-1 \
    --location eastus2
Bastion 主机可能需要几分钟才能部署。 等待 Bastion 主机部署,然后再转到下一部分。
创建虚拟机
创建名为 vm-1 的虚拟机来测试 NAT 网关,并验证出站连接的公共 IP 地址。 使用 az vm create:
az vm create \
    --resource-group test-rg \
    --name vm-1 \
    --image Ubuntu2204 \
    --admin-username azureuser \
    --authentication-type password \
    --public-ip-address "" \
    --subnet subnet-1 \
    --vnet-name vnet-1
请先等待虚拟机创建完成,然后再转到下一部分。