你当前正在访问 Microsoft Azure Global Edition 技术文档网站。 如果需要访问由世纪互联运营的 Microsoft Azure 中国技术文档网站,请访问 https://docs.azure.cn。
快速入门:使用 Azure PowerShell 创建专用链接服务
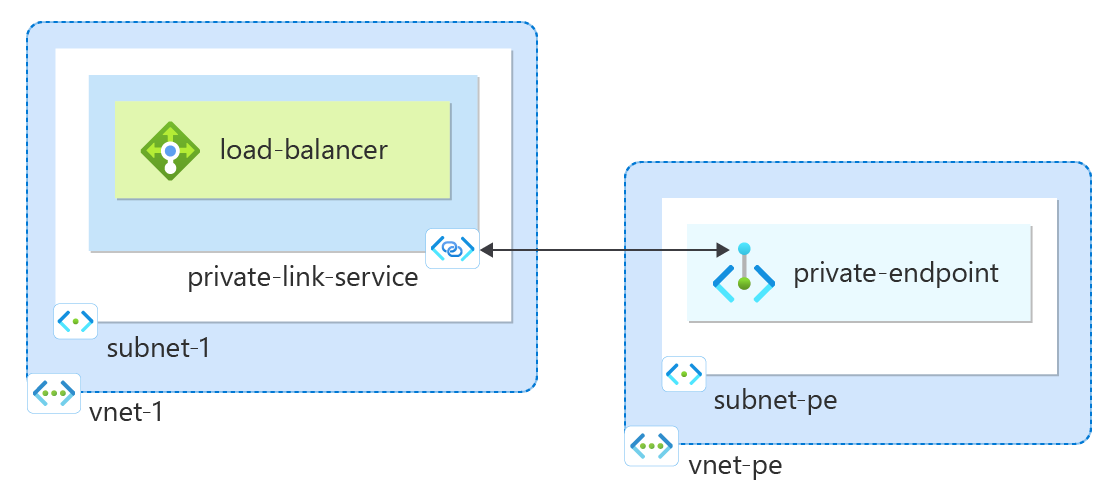
开始创建引用你的服务的专用链接服务。 向专用链接授予对 Azure 标准负载均衡器后面部署的服务或资源的访问权限。 服务的用户具有从其虚拟网络进行专用访问的权限。
先决条件
具有活动订阅的 Azure 帐户。 免费创建帐户。
Azure Cloud Shell 或 Azure PowerShell。
本快速入门中的步骤在 Azure Cloud Shell 中以交互方式运行 Azure PowerShell cmdlet 命令。 要在 Cloud Shell 中运行命令,请选择代码块右上角的“打开 Cloudshell”。 选择“复制”以复制代码,并将其粘贴到 Cloud Shell 以运行。 也可以从 Azure 门户中运行 Cloud Shell。
也可以在本地安装 Azure PowerShell 以运行 cmdlet。 本文中的示例需要版本 5.4.1 或更高版本的 Azure PowerShell 模块。 运行
Get-Module -ListAvailable Az来查找已安装的版本。 如果需要升级,请参阅更新 Azure PowerShell 模块。如要在本地运行 PowerShell,请运行
Connect-AzAccount以连接到 Azure。
创建资源组
Azure 资源组是在其中部署和管理 Azure 资源的逻辑容器。
使用 New-AzResourceGroup 创建资源组:
New-AzResourceGroup -Name 'test-rg' -Location 'eastus2'
创建内部负载均衡器
在本部分中,创建一个虚拟网络和一个内部 Azure 负载均衡器。
虚拟网络
在本部分,创建虚拟网络和子网来托管访问专用链接服务的负载均衡器。
- 使用 New-AzVirtualNetwork 创建虚拟网络。
## Create backend subnet config ##
$subnet = @{
    Name = 'subnet-1'
    AddressPrefix = '10.0.0.0/24'
}
$subnetConfig = New-AzVirtualNetworkSubnetConfig @subnet

## Create the virtual network ##
$net = @{
    Name = 'vnet-1'
    ResourceGroupName = 'test-rg'
    Location = 'eastus2'
    AddressPrefix = '10.0.0.0/16'
    Subnet = $subnetConfig
}
$vnet = New-AzVirtualNetwork @net
创建标准负载均衡器
本部分详细介绍如何创建和配置负载均衡器的以下组件:
使用 New-AzLoadBalancerFrontendIpConfig 为前端 IP 池创建前端 IP。 此 IP 在负载均衡器上接收传入流量
使用 New-AzLoadBalancerBackendAddressPoolConfig 为负载均衡器前端发送的流量创建后端地址池。 此池是后端虚拟机部署到的位置。
使用 Add-AzLoadBalancerProbeConfig 创建运行状况探测,用于确定后端 VM 实例的运行状况。
使用 Add-AzLoadBalancerRuleConfig 创建负载均衡器规则,用于定义将流量分配给 VM 的方式。
使用 New-AzLoadBalancer 创建公共负载均衡器。
## Place virtual network created in previous step into a variable. ##
$vnet = Get-AzVirtualNetwork -Name 'vnet-1' -ResourceGroupName 'test-rg'

## Create load balancer frontend configuration and place in variable. ##
$lbip = @{
    Name = 'frontend'
    PrivateIpAddress = '10.0.0.4'
    SubnetId = $vnet.subnets[0].Id
}
$feip = New-AzLoadBalancerFrontendIpConfig @lbip

## Create backend address pool configuration and place in variable. ##
$bepool = New-AzLoadBalancerBackendAddressPoolConfig -Name 'backend-pool'

## Create the health probe and place in variable. ##
$probe = @{
    Name = 'health-probe'
    Protocol = 'http'
    Port = '80'
    IntervalInSeconds = '360'
    ProbeCount = '5'
    RequestPath = '/'
}
$healthprobe = New-AzLoadBalancerProbeConfig @probe

## Create the load balancer rule and place in variable. ##
$lbrule = @{
    Name = 'http-rule'
    Protocol = 'tcp'
    FrontendPort = '80'
    BackendPort = '80'
    IdleTimeoutInMinutes = '15'
    FrontendIpConfiguration = $feip
    BackendAddressPool = $bePool
}
$rule = New-AzLoadBalancerRuleConfig @lbrule -EnableTcpReset

## Create the load balancer resource. ##
$loadbalancer = @{
    ResourceGroupName = 'test-rg'
    Name = 'load-balancer'
    Location = 'eastus2'
    Sku = 'Standard'
    FrontendIpConfiguration = $feip
    BackendAddressPool = $bePool
    LoadBalancingRule = $rule
    Probe = $healthprobe
}
New-AzLoadBalancer @loadbalancer
禁用网络策略
在虚拟网络中创建专用链接服务之前,必须禁用设置 privateLinkServiceNetworkPolicies。
- 使用 Set-AzVirtualNetwork 禁用网络策略。
## Place the subnet name into a variable. ##
$subnet = 'subnet-1'

## Place the virtual network configuration into a variable. ##
$net = @{
    Name = 'vnet-1'
    ResourceGroupName = 'test-rg'
}
$vnet = Get-AzVirtualNetwork @net

## Set the policy as disabled on the virtual network. ##
($vnet | Select -ExpandProperty subnets | Where-Object {$_.Name -eq $subnet}).privateLinkServiceNetworkPolicies = "Disabled"

## Save the configuration changes to the virtual network. ##
$vnet | Set-AzVirtualNetwork
创建专用链接服务
在本部分中,创建一项专用链接服务来使用上一步中创建的标准 Azure 负载均衡器。
通过 New-AzPrivateLinkServiceIpConfig 创建专用链接服务 IP 配置。
通过 New-AzPrivateLinkService 创建专用链接服务。
## Place the virtual network into a variable. ##
$vnet = Get-AzVirtualNetwork -Name 'vnet-1' -ResourceGroupName 'test-rg'

## Create the IP configuration for the private link service. ##
$ipsettings = @{
    Name = 'ipconfig-1'
    PrivateIpAddress = '10.0.0.5'
    Subnet = $vnet.subnets[0]
}
$ipconfig = New-AzPrivateLinkServiceIpConfig @ipsettings

## Place the load balancer frontend configuration into a variable. ##
$par = @{
    Name = 'load-balancer'
    ResourceGroupName = 'test-rg'
}
$fe = Get-AzLoadBalancer @par | Get-AzLoadBalancerFrontendIpConfig

## Create the private link service for the load balancer. ##
$privlinksettings = @{
    Name = 'private-link-service'
    ResourceGroupName = 'test-rg'
    Location = 'eastus2'
    LoadBalancerFrontendIpConfiguration = $fe
    IpConfiguration = $ipconfig
}
New-AzPrivateLinkService @privlinksettings
专用链接服务已创建,可接收流量。 若要查看流量流,请在标准负载均衡器后面配置应用程序。
创建专用终结点
在本部分中,你将专用链接服务映射到专用终结点。 虚拟网络包含用于专用链接服务的专用终结点。 此虚拟网络包含将访问专用链接服务的资源。
创建专用终结点虚拟网络
- 使用 New-AzVirtualNetwork 创建虚拟网络。
## Create backend subnet config ##
$subnet = @{
    Name = 'subnet-pe'
    AddressPrefix = '10.1.0.0/24'
}
$subnetConfig = New-AzVirtualNetworkSubnetConfig @subnet

## Create the virtual network ##
$net = @{
    Name = 'vnet-pe'
    ResourceGroupName = 'test-rg'
    Location = 'eastus2'
    AddressPrefix = '10.1.0.0/16'
    Subnet = $subnetConfig
}
$vnetpe = New-AzVirtualNetwork @net
创建终结点和连接
使用 Get-AzPrivateLinkService 将之前创建的专用链接服务的配置置于变量中供以后使用。
使用 New-AzPrivateLinkServiceConnection 创建连接配置。
使用 New-AzPrivateEndpoint 创建终结点。
## Place the private link service configuration into variable. ##
$par1 = @{
    Name = 'private-link-service'
    ResourceGroupName = 'test-rg'
}
$pls = Get-AzPrivateLinkService @par1

## Create the private link configuration and place in variable. ##
$par2 = @{
    Name = 'connection-1'
    PrivateLinkServiceId = $pls.Id
}
$plsConnection = New-AzPrivateLinkServiceConnection @par2

## Place the virtual network into a variable. ##
$par3 = @{
    Name = 'vnet-pe'
    ResourceGroupName = 'test-rg'
}
$vnetpe = Get-AzVirtualNetwork @par3

## Create private endpoint ##
$par4 = @{
    Name = 'private-endpoint'
    ResourceGroupName = 'test-rg'
    Location = 'eastus2'
    Subnet = $vnetpe.subnets[0]
    PrivateLinkServiceConnection = $plsConnection
}
New-AzPrivateEndpoint @par4 -ByManualRequest
批准专用终结点连接
本部分将批准在前面步骤中创建的连接。
- 使用 Approve-AzPrivateEndpointConnection 批准连接。
## Place the private link service configuration into variable. ##
$par1 = @{
    Name = 'private-link-service'
    ResourceGroupName = 'test-rg'
}
$pls = Get-AzPrivateLinkService @par1

$par2 = @{
    Name = $pls.PrivateEndpointConnections[0].Name
    ServiceName = 'private-link-service'
    ResourceGroupName = 'test-rg'
    Description = 'Approved'
    PrivateLinkResourceType = 'Microsoft.Network/privateLinkServices'
}
Approve-AzPrivateEndpointConnection @par2
专用终结点的 IP 地址
在本部分,你将找到与负载均衡器和专用链接服务对应的专用终结点的 IP 地址。
- 使用 Get-AzPrivateEndpoint 检索 IP 地址。
## Get private endpoint and the IP address and place in a variable for display. ##
$par1 = @{
    Name = 'private-endpoint'
    ResourceGroupName = 'test-rg'
    ExpandResource = 'networkinterfaces'
}
$pe = Get-AzPrivateEndpoint @par1

## Display the IP address by expanding the variable. ##
$pe.NetworkInterfaces[0].IpConfigurations[0].PrivateIpAddress
❯ $pe.NetworkInterfaces[0].IpConfigurations[0].PrivateIpAddress
10.1.0.4
清理资源
如果不再需要资源组、负载均衡器和剩余资源,可以使用 Remove-AzResourceGroup 命令将其删除。
Remove-AzResourceGroup -Name 'test-rg'
后续步骤
在本快速入门中,请执行以下操作:
创建了虚拟网络和内部 Azure 负载均衡器。
创建了专用链接服务
若要详细了解 Azure 专用终结点,请继续学习:
