示例:使用 Python (存档) 创建自定义技能
此示例已存档,不受支持。 其中介绍了如何使用 Python 和 Visual Studio Code 创建 Web API 自定义技能。 该示例使用了实现自定义技能接口的 Azure 函数 。
先决条件
参阅自定义技能接口,以查看自定义技能应实现的输入和输出。
设置环境 我们按照快速入门:在 Azure 中使用 Visual Studio Code 创建 Python 函数来使用 Visual Studio Code 和 Python 扩展设置无服务器 Azure 函数。 本快速入门将引导你安装以下工具和组件:
创建 Azure 函数
此示例使用 Azure 函数来演示托管 Web API 的概念,但也可以使用其他方法。 只要满足认知技能的接口需求,采用的方法并不重要。 但是,可通过 Azure Functions 轻松创建自定义技能。
为函数创建项目
使用 Visual Studio Code 中的 Azure Functions 项目模板可创建一个本地项目,该项目可发布到 Azure 中的函数应用。 函数应用可将函数分组为一个逻辑单元,以用于管理、部署和共享资源。
- 在 Visual Studio Code 中,按 F1 键打开命令面板。 在命令面板中,搜索并选择
Azure Functions: Create new project...。 - 为项目工作区选择目录位置,然后选择“选择” 。 不要使用已成为另一个工作区的一部分的项目文件夹。
- 选择函数应用项目的语言。 对于本教程,请选择“Python”。
- 选择 Python 版本(Azure Functions 支持版本 3.7.5)。
- 为项目的第一个函数选择模板。 选择“HTTP 触发器”,在新的函数应用中创建一个 HTTP 触发的函数。
- 提供函数名称。 在本例中,我们将使用名称 Concatenator
- 选择“函数”作为授权级别。 需使用函数访问密钥来调用函数的 HTTP 终结点。
- 指定打开项目的方式。 对于此步骤,请选择“添加到工作区”,在当前工作区中创建函数应用。
Visual Studio Code 将在新的工作区中创建函数应用项目。 此项目包含 host.json 和 local.settings.jsonconfiguration 文件,以及任何特定于语言的项目文件。
同时会在函数应用项目的 Concatenator 文件夹中创建一个新的 HTTP 触发函数。 此文件夹中有一个名为“__init__.py”的包含以下内容的文件:
import logging

import azure.functions as func


def main(req: func.HttpRequest) -> func.HttpResponse:
    logging.info('Python HTTP trigger function processed a request.')

    name = req.params.get('name')
    if not name:
        try:
            req_body = req.get_json()
        except ValueError:
            pass
        else:
            name = req_body.get('name')

    if name:
        return func.HttpResponse(f"Hello {name}!")
    else:
        return func.HttpResponse(
             "Please pass a name on the query string or in the request body",
             status_code=400
        )
现在,让我们修改该代码以遵循自定义技能接口。 将默认代码替换为以下内容:
import logging
import azure.functions as func
import json

def main(req: func.HttpRequest) -> func.HttpResponse:
    logging.info('Python HTTP trigger function processed a request.')

    try:
        body = json.dumps(req.get_json())
    except ValueError:
        return func.HttpResponse(
             "Invalid body",
             status_code=400
        )

    if body:
        result = compose_response(body)
        return func.HttpResponse(result, mimetype="application/json")
    else:
        return func.HttpResponse(
             "Invalid body",
             status_code=400
        )


def compose_response(json_data):
    values = json.loads(json_data)['values']

    # Prepare the Output before the loop
    results = {}
    results["values"] = []

    for value in values:
        output_record = transform_value(value)
        if output_record != None:
            results["values"].append(output_record)
    return json.dumps(results, ensure_ascii=False)

## Perform an operation on a record
def transform_value(value):
    try:
        recordId = value['recordId']
    except AssertionError  as error:
        return None

    # Validate the inputs
    try:
        assert ('data' in value), "'data' field is required."
        data = value['data']
        assert ('text1' in data), "'text1' field is required in 'data' object."
        assert ('text2' in data), "'text2' field is required in 'data' object."
    except AssertionError  as error:
        return (
            {
            "recordId": recordId,
            "errors": [ { "message": "Error:" + error.args[0] }   ]
            })

    try:
        concatenated_string = value['data']['text1'] + " " + value['data']['text2']
        # Here you could do something more interesting with the inputs

    except:
        return (
            {
            "recordId": recordId,
            "errors": [ { "message": "Could not complete operation for record." }   ]
            })

    return ({
            "recordId": recordId,
            "data": {
                "text": concatenated_string
                    }
            })
transform_value 方法对单个记录执行操作。 可以根据具体的需求修改该方法。 请记得执行任何必要的输入验证,并在无法完成操作时返回任何错误和警告。
在本地调试代码
在 Visual Studio Code 中可以轻松调试代码。 按 F5,或转到“调试”菜单并选择“开始调试”。
在关注的行中按 F9 可以在代码中设置任何断点。
开始调试后,函数将在本地运行。 可以使用 Postman 或 Fiddler 等工具向 localhost 发出请求。 请注意终端窗口中本地终结点的位置。
在 Azure 中创建一个函数应用
当你对函数行为满意时,可将其发布。 到目前为止,你一直在本地工作。 在本部分,将在 Azure 中创建函数应用,然后将本地项目部署到所创建的应用。
从 Visual Studio Code 创建应用
在 Visual Studio Code 中,按 F1 键打开命令面板。 在命令面板中,搜索并选择“在 Azure 中创建函数应用”。
如果你有多个有效订阅,请选择用于此应用的订阅。
输入函数应用的全局唯一名称。 键入对 URL 有效的名称。
选择一个运行时堆栈并选择你一直在本地运行的语言版本。
为你的应用选择一个位置。 如果可能,请选择还用于托管你的搜索服务的同一区域。
创建应用需要几分钟时间。 就绪后,你将在有效订阅的“资源”和“函数应用”下看到新应用。
部署到 Azure
仍在 Visual Studio Code 中,按 F1 打开命令面板。 在命令面板中,搜索并选择“部署到函数应用...”。
选择你创建的函数应用。
确认你要继续,然后选择“部署”。 可以在输出窗口中监视部署状态。
切换到 Azure 门户,然后导航到“所有资源”。 使用上一步中提供的全局唯一名称搜索你部署的函数应用。
提示
还可以在 Visual Studio Code 中右键单击该函数应用,然后选择“在门户中打开”。
在门户中的左侧选择“函数”,然后选择你创建的函数。
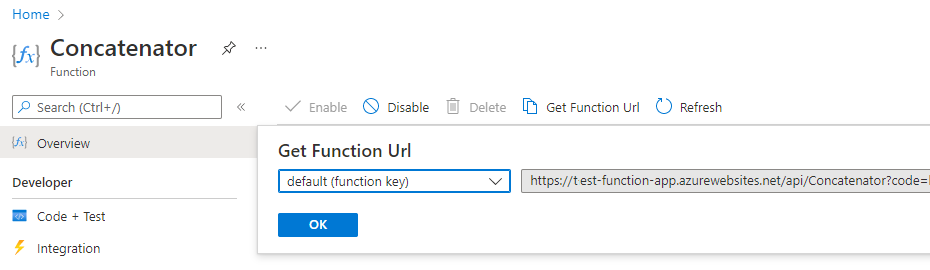
在函数的概述页中,选择顶部命令栏中的“获取函数 URL”。 可以复制该 URL 来调用函数。
在 Azure 中测试函数
使用复制的默认主机密钥和 URL,从Azure 门户中测试函数。
在左侧的“开发人员”下,选择“代码 + 测试”。
在命令栏中选择“测试/运行”。
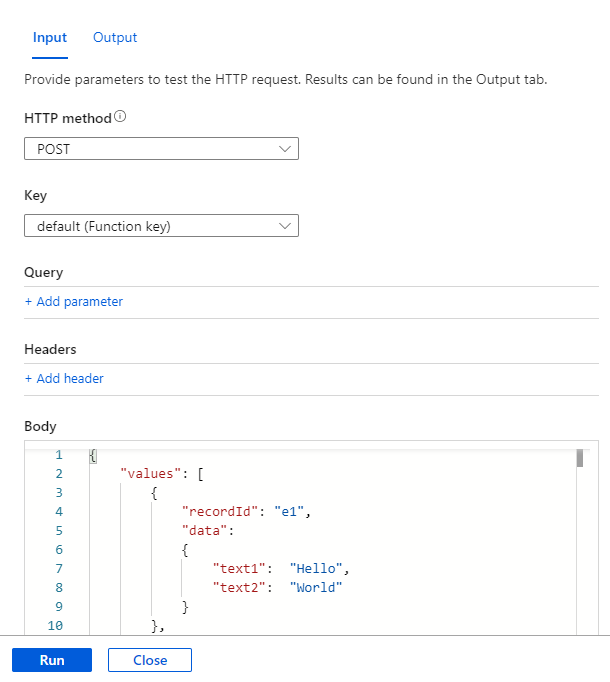
对于输入,请使用“Post”、默认密钥,然后将以下代码粘贴到请求正文中:
{
    "values": [
        {
            "recordId": "e1",
            "data":
            {
                "text1":  "Hello",
                "text2":  "World"
            }
        },
        {
            "recordId": "e2",
            "data": "This is an invalid input"
        }
    ]
}
选择“运行”。
此示例生成的结果应与之前在本地环境中运行函数时看到的结果相同。
添加到技能组
现在有了新的自定义技能,可将其添加到技能组合。 以下示例演示如何调用技能,以将文档的标题和作者串联到名为 merged_title_author 的单个字段中。
请将 [your-function-url-here] 替换为新 Azure 函数的 URL。
{
    "skills": [
      "[... other existing skills in the skillset are here]",
      {
        "@odata.type": "#Microsoft.Skills.Custom.WebApiSkill",
        "description": "Our new search custom skill",
        "uri": "https://[your-function-url-here]",
          "context": "/document/merged_content/organizations/*",
          "inputs": [
            {
              "name": "text1",
              "source": "/document/metadata_title"
            },
            {
              "name": "text2",
              "source": "/document/metadata_author"
            },
          ],
          "outputs": [
            {
              "name": "text",
              "targetName": "merged_title_author"
            }
          ]
      }
  ]
}
请记得在索引器定义中添加“outputFieldMapping”,以将“merged_title_author”发送到搜索索引中的“fullname”字段。
"outputFieldMappings": [
    {
        "sourceFieldName": "/document/content/merged_title_author",
        "targetFieldName": "fullname"
    }
]