你当前正在访问 Microsoft Azure Global Edition 技术文档网站。 如果需要访问由世纪互联运营的 Microsoft Azure 中国技术文档网站,请访问 https://docs.azure.cn。
教程:使用 Yeoman 将容器打包并部署为 Service Fabric 应用程序
本教程是一个系列中的第二部分。 在本教程中,模板生成器工具 (Yeoman) 用于生成 Service Fabric 应用程序定义。 然后此应用程序可用于将容器部署到 Service Fabric。 本教程介绍如何执行下列操作:
- 安装 Yeoman
- 使用 Yeoman 创建应用程序包
- 将应用程序包中的设置配置为与容器一同使用
- 构建应用程序
- 部署并运行应用程序
- 清理应用程序
必备条件
安装 Yeoman
Service Fabric 提供基架工具,有助于使用 Yeoman 模板生成器从终端创建应用程序。 执行以下步骤以确保具有 Yeoman 模板生成器。
在计算机上安装 nodejs 和 Node 包管理器。 如果使用 macOS X,则必须使用包管理器 Homebrew。
curl -o- https://raw.githubusercontent.com/creationix/nvm/v0.33.0/install.sh | bash
nvm install node
通过 Node 包管理器在计算机上安装 Yeoman 模板生成器:
npm install -g yo安装 Service Fabric Yeoman 容器生成器
npm install -g generator-azuresfcontainer
使用 Yeoman 打包 Docker 映像容器
若要创建 Service Fabric 容器应用程序,请在克隆存储库的“container-tutorial”目录中运行以下命令。
yo azuresfcontainer请键入“TestContainer”来命名应用程序
请键入“azurevotefront”来命名应用程序服务。
为前端存储库(例如“<acrName>.azurecr.io/azure-vote-front:v1”)提供 ACR 中的容器映像路径。 <acrName> 字段必须与前面教程中使用的值相同。
按 Enter 以使“命令”部分为空。
指定实例计数 1。
下面显示了运行 yo 命令的输入和输出:
? Name your application TestContainer
? Name of the application service: azurevotefront
? Input the Image Name: <acrName>.azurecr.io/azure-vote-front:v1
? Commands:
? Number of instances of guest container application: 1
   create TestContainer/TestContainer/ApplicationManifest.xml
   create TestContainer/TestContainer/azurevotefrontPkg/ServiceManifest.xml
   create TestContainer/TestContainer/azurevotefrontPkg/config/Settings.xml
   create TestContainer/TestContainer/azurevotefrontPkg/code/Dummy.txt
   create TestContainer/install.sh
   create TestContainer/uninstall.sh
若要将其他容器服务添加到已使用 Yeoman 创建的应用程序,请执行以下步骤:
- 将一级目录更改到 TestContainer 目录,例如, ./TestContainer
yo azuresfcontainer:AddService运行 {2}- 将服务命名为“azurevoteback”
- 为 Redis 提供容器映像路径 - 'redis:alpine'
- 按 Enter 以使“命令”部分为空
- 指定实例计数“1”。
所有用于添加服务的条目都将显示:
? Name of the application service: azurevoteback
? Input the Image Name: redis:alpine
? Commands:
? Number of instances of guest container application: 1
   create TestContainer/azurevotebackPkg/ServiceManifest.xml
   create TestContainer/azurevotebackPkg/config/Settings.xml
   create TestContainer/azurevotebackPkg/code/Dummy.txt
在本教程的其余部分中,将在“TestContainer” 目录中工作。 例如, ./TestContainer/TestContainer。 此目录的内容应如下所示。
$ ls
ApplicationManifest.xml azurevotefrontPkg azurevotebackPkg
使用 Azure 容器注册表的凭据配置应用程序清单
为了让 Service Fabric 能够从 Azure 容器注册表提取容器映像,我们需要提供“ApplicationManifest.xml” 中的凭据。
登录到 ACR 实例。 使用 az acr login 命令完成此操作。 请提供创建容器注册表时所使用的唯一名称。
az acr login --name <acrName>
完成后,该命令会返回“登录成功” 消息。
接下来,运行以下命令以获取容器注册表的密码。 此密码供 Service Fabric 用于对 ACR 进行验证以提取容器映像。
az acr credential show -n <acrName> --query passwords[0].value
在“ApplicationManifest.xml” 中,会在前端服务的“ServiceManifestImport” 元素下添加代码片段。 为“AccountName”字段插入 acrName,从上一命令返回的密码将用于“密码”字段。 本文档末尾提供完整的“ApplicationManifest.xml” 。
<Policies>
  <ContainerHostPolicies CodePackageRef="Code">
    <RepositoryCredentials AccountName="<acrName>" Password="<password>" PasswordEncrypted="false"/>
  </ContainerHostPolicies>
</Policies>
配置通信和容器端口到主机端口映射
配置通信端口
配置 HTTP 终结点,使客户端能够与服务通信。 打开 ./TestContainer/azurevotefrontPkg/ServiceManifest.xml 文件,并在“ServiceManifest” 元素中声明终结点资源。 添加协议、端口和名称。 在本教程中,服务会在端口 80 上进行侦听。 以下代码片段放置在资源中的 ServiceManifest 标记下。
<Resources>
  <Endpoints>
    <!-- This endpoint is used by the communication listener to obtain the port on which to
            listen. Please note that if your service is partitioned, this port is shared with
            replicas of different partitions that are placed in your code. -->
    <Endpoint Name="azurevotefrontTypeEndpoint" UriScheme="http" Port="80" Protocol="http"/>
  </Endpoints>
</Resources>
同样,修改后端服务的服务清单。 打开 ./TestContainer/azurevotebackPkg/ServiceManifest.xml,并在“ServiceManifest” 元素中声明终结点资源。 在本教程中,保留 redis 默认值 6379。 以下代码片段放置在资源中的 ServiceManifest 标记下。
<Resources>
  <Endpoints>
    <!-- This endpoint is used by the communication listener to obtain the port on which to
            listen. Please note that if your service is partitioned, this port is shared with
            replicas of different partitions that are placed in your code. -->
    <Endpoint Name="azurevotebackTypeEndpoint" Port="6379" Protocol="tcp"/>
  </Endpoints>
</Resources>
提供 UriScheme 即可向 Service Fabric 命名服务自动注册容器终结点,确保其可以被发现。 本文末尾提供后端服务完整的 ServiceManifest.xml 示例文件作为示例。
将容器端口映射到服务
为了公开群集中的容器,我们还需要在“ApplicationManifest.xml”中创建一个端口绑定。 “PortBinding”策略引用了我们在“ServiceManifest.xml”文件中定义的“终结点”。 对这些终结点的传入请求将映射到此处打开和绑定的容器端口。 在“ApplicationManifest.xml” 件中,添加以下代码以将端口 80 和 6379 绑定到终结点。 本文档末尾提供完整的“ApplicationManifest.xml” 。
<ContainerHostPolicies CodePackageRef="Code">
    <PortBinding ContainerPort="80" EndpointRef="azurevotefrontTypeEndpoint"/>
</ContainerHostPolicies>
<ContainerHostPolicies CodePackageRef="Code">
    <PortBinding ContainerPort="6379" EndpointRef="azurevotebackTypeEndpoint"/>
</ContainerHostPolicies>
将 DNS 名称添加到后端服务
为了 Service Fabric 将此 DNS 名称分配给后端服务,需要在“ApplicationManifest.xml” 中指定名称。 将“ServiceDnsName” 属性添加到“Service” 元素,如下所示:
<Service Name="azurevoteback" ServiceDnsName="redisbackend.testapp">
  <StatelessService ServiceTypeName="azurevotebackType" InstanceCount="1">
    <SingletonPartition/>
  </StatelessService>
</Service>
前端服务读取环境变量以了解 Redis 实例的 DNS 名称。 用于生成 Docker 映像的 Dockerfile 中已定义了此环境变量,因此此处不需要执行任何操作。
ENV REDIS redisbackend.testapp
以下代码片段演示前端 Python 代码如何提取 Dockerfile 中所述的环境变量。 此处不需要执行任何操作。
# Get DNS Name
redis_server = os.environ['REDIS']

# Connect to the Redis store
r = redis.StrictRedis(host=redis_server, port=6379, db=0)
在教程中,此时服务包应用程序模板可供部署到群集。 在后续的教程中,会在 Service Fabric 群集中部署并运行此应用程序。
创建 Service Fabric 群集
若要将应用程序部署到 Azure,需要通过 Service Fabric 群集来运行该应用程序。 以下命令在 Azure 中创建一个五节点群集。 这些命令还会创建一个自签名证书,将其添加到密钥保管库,并将证书作为 PEM 文件下载到本地。 新证书用来在群集进行部署时保护群集,还用来对客户端进行身份验证。
#!/bin/bash

# Variables
ResourceGroupName="containertestcluster"
ClusterName="containertestcluster"
Location="eastus"
Password="q6D7nN%6ck@6"
Subject="containertestcluster.eastus.cloudapp.azure.com"
VaultName="containertestvault"
VmPassword="Mypa$$word!321"
VmUserName="sfadminuser"

# Login to Azure and set the subscription
az login

az account set --subscription <mySubscriptionID>

# Create resource group
az group create --name $ResourceGroupName --location $Location

# Create secure five node Linux cluster. Creates a key vault in a resource group
# and creates a certficate in the key vault. The certificate's subject name must match
# the domain that you use to access the Service Fabric cluster.
# The certificate is downloaded locally as a PEM file.
az sf cluster create --resource-group $ResourceGroupName --location $Location \
--certificate-output-folder . --certificate-password $Password --certificate-subject-name $Subject \
--cluster-name $ClusterName --cluster-size 5 --os UbuntuServer1804 --vault-name $VaultName \
--vault-resource-group $ResourceGroupName --vm-password $VmPassword --vm-user-name $VmUserName
注意
Web 前端服务配置为侦听端口 80 上是否有传入流量。 默认情况下,会在群集 VM 和 Azure 负载均衡器上打开端口 80。
若要详细了解如何创建自己的群集,请参阅在 Azure 上创建 Service Fabric 群集。
生成应用程序并将其部署到群集
可以使用 Service Fabric CLI 将应用程序部署到 Azure 群集。 如果计算机上未安装 Service Fabric CLI,请按照此处的说明进行安装。
连接到 Azure 中的 Service Fabric 群集。 将示例终结点替换为自己的终结点。 终结点必须是类似于下面的完整 URL。 PEM 文件是以前创建的自签名证书。
sfctl cluster select --endpoint https://containertestcluster.eastus.cloudapp.azure.com:19080 --pem containertestcluster22019013100.pem --no-verify
使用“TestContainer” 目录中提供的安装脚本可将应用程序包复制到群集的映像存储、注册应用程序类型并创建应用程序的实例。
./install.sh
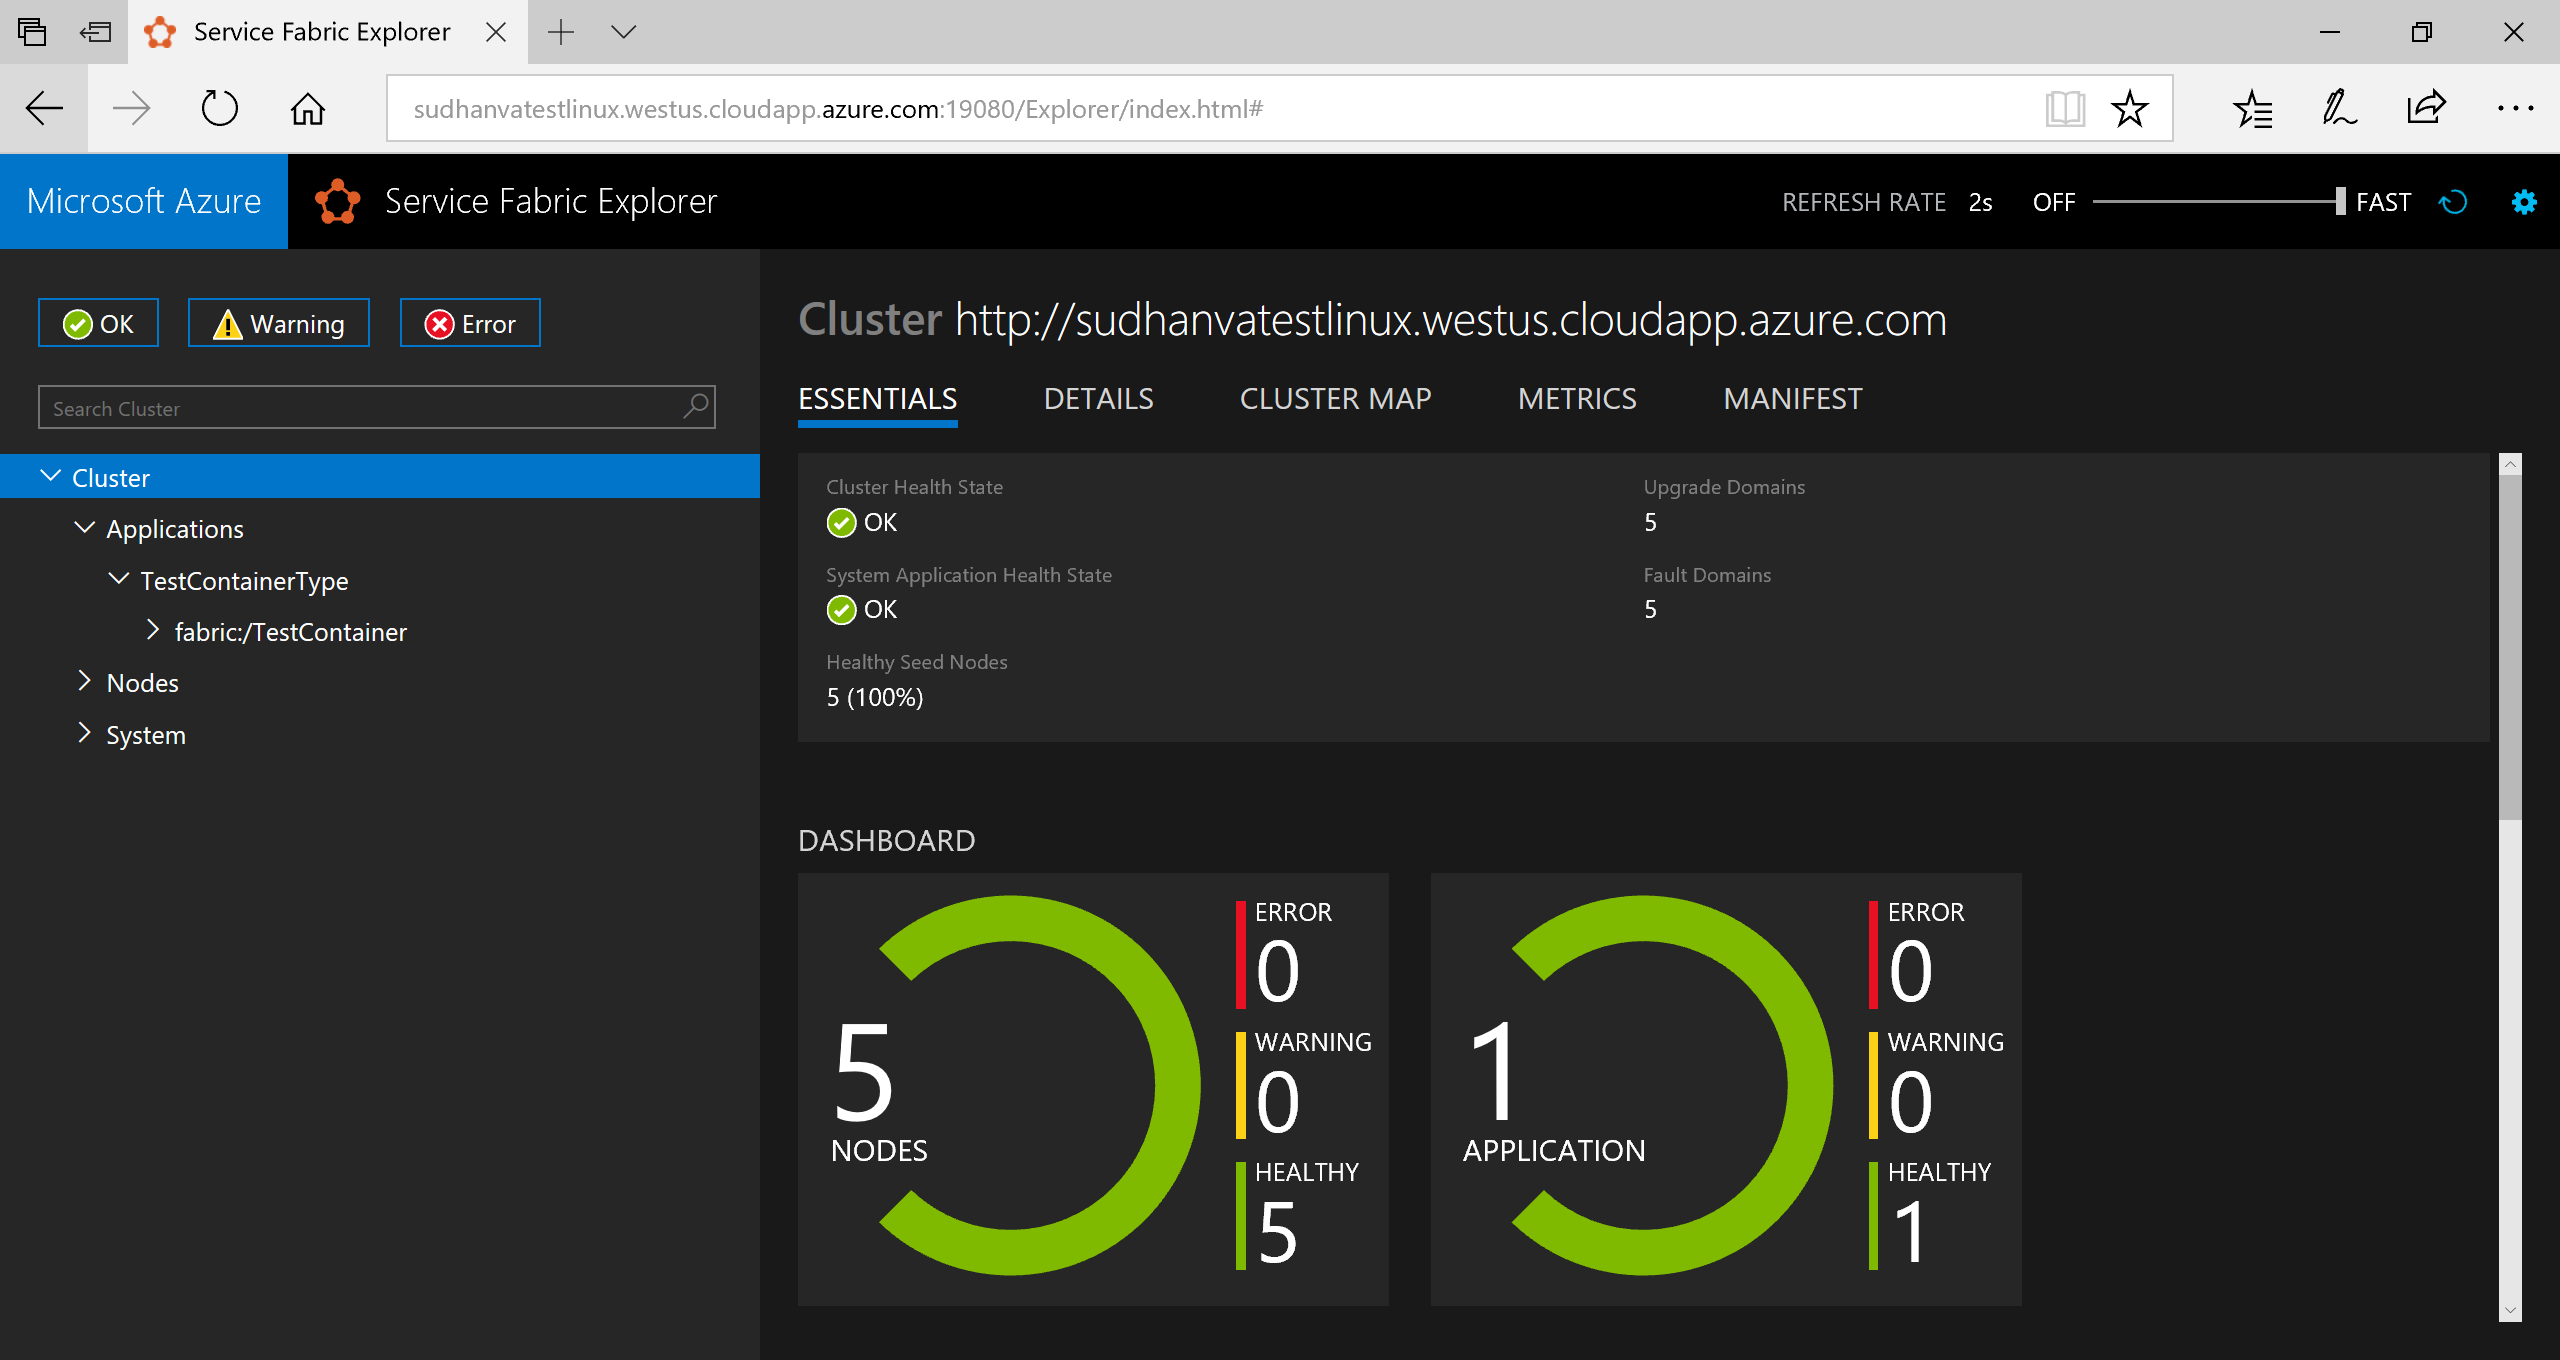
打开 Web 浏览器,并导航到 Service Fabric Explorer (https://containertestcluster.eastus.cloudapp.azure.com:19080/Explorer.) 展开应用程序节点,注意有一个条目是用于应用程序类型,另一个条目用于实例。
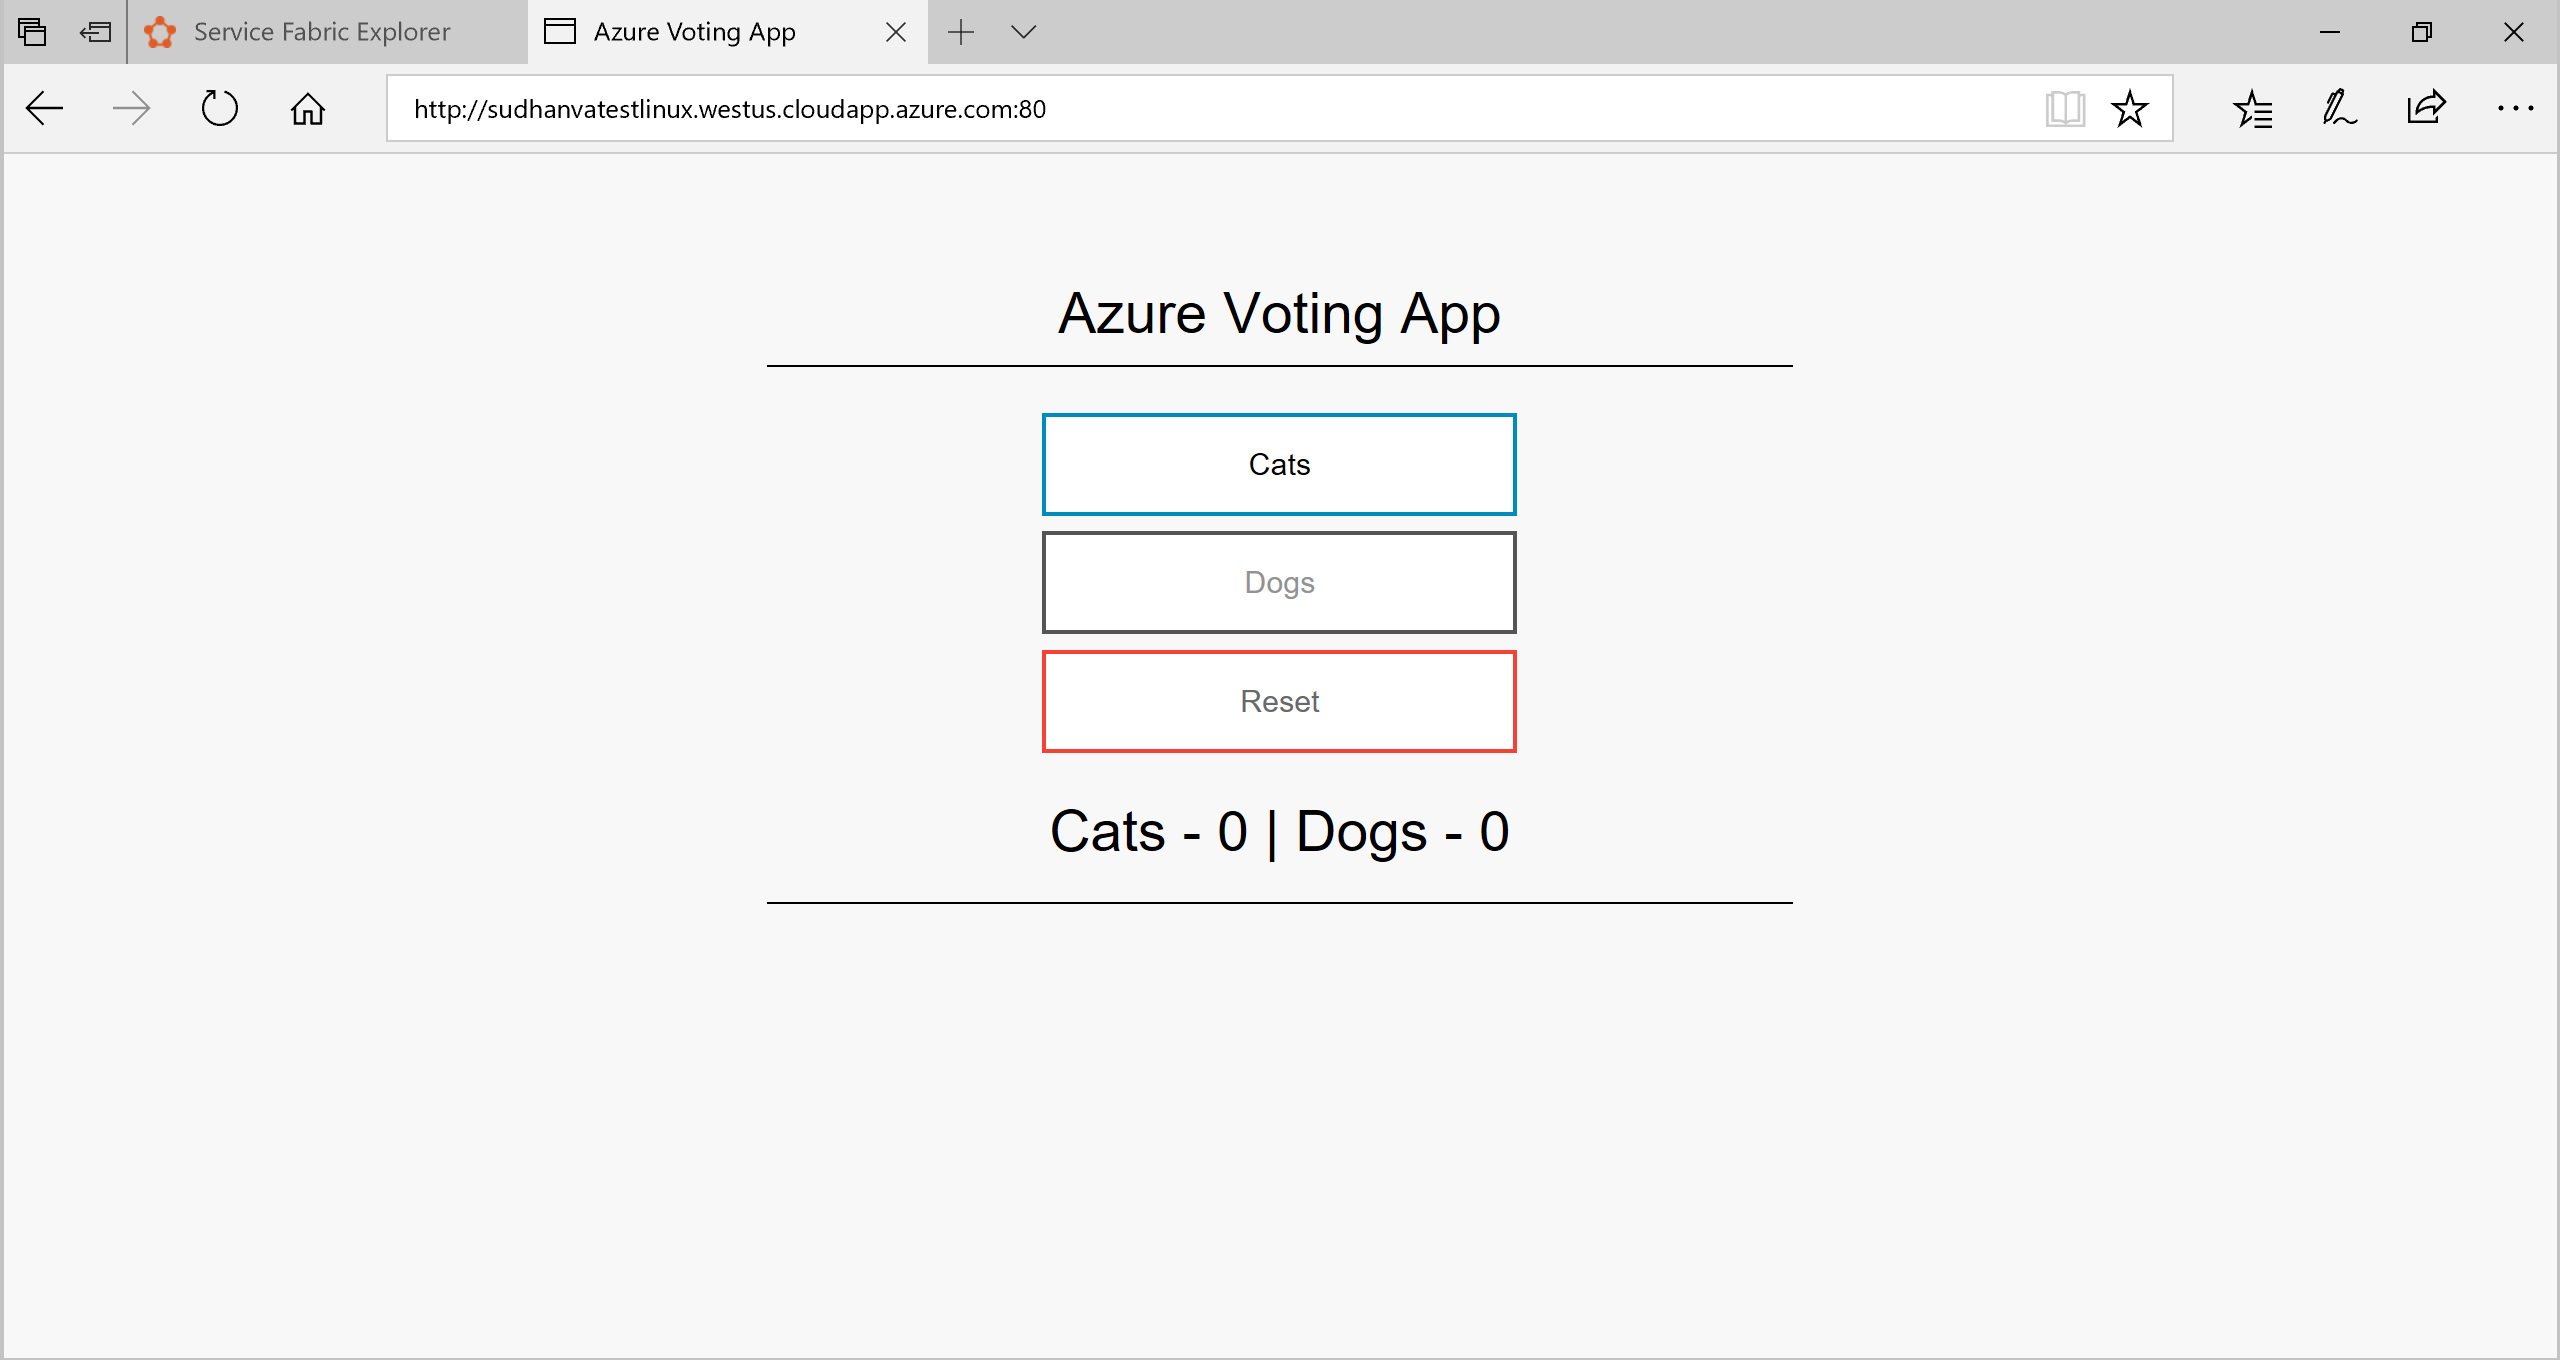
若要连接到正在运行的应用程序,请打开 Web 浏览器并转到群集 url,例如 http://containertestcluster.eastus.cloudapp.azure.com:80. 在 Web UI 中应会显示投票应用程序。
清除
使用模板中提供的卸载脚本从群集中删除应用程序实例并取消注册应用程序类型。 此命令会花费一段时间来清理实例,完成此脚本后不能立即运行“install.sh”命令。
./uninstall.sh
已完成的清单示例
ApplicationManifest.xml
<?xml version="1.0" encoding="UTF-8" standalone="yes"?>
<ApplicationManifest ApplicationTypeName="TestContainerType" ApplicationTypeVersion="1.0.0" xmlns="http://schemas.microsoft.com/2011/01/fabric" xmlns:xsd="https://www.w3.org/2001/XMLSchema" xmlns:xsi="https://www.w3.org/2001/XMLSchema-instance">
  <ServiceManifestImport>
    <ServiceManifestRef ServiceManifestName="azurevotefrontPkg" ServiceManifestVersion="1.0.0"/>
    <Policies>
    <ContainerHostPolicies CodePackageRef="Code">
        <RepositoryCredentials AccountName="myaccountname" Password="<password>" PasswordEncrypted="false"/>
        <PortBinding ContainerPort="80" EndpointRef="azurevotefrontTypeEndpoint"/>
    </ContainerHostPolicies>
        </Policies>
  </ServiceManifestImport>
  <ServiceManifestImport>
    <ServiceManifestRef ServiceManifestName="azurevotebackPkg" ServiceManifestVersion="1.0.0"/>
      <Policies>
        <ContainerHostPolicies CodePackageRef="Code">
          <PortBinding ContainerPort="6379" EndpointRef="azurevotebackTypeEndpoint"/>
        </ContainerHostPolicies>
      </Policies>
  </ServiceManifestImport>
  <DefaultServices>
    <Service Name="azurevotefront">
      <StatelessService ServiceTypeName="azurevotefrontType" InstanceCount="1">
        <SingletonPartition/>
      </StatelessService>
    </Service>
    <Service Name="azurevoteback" ServiceDnsName="redisbackend.testapp">
      <StatelessService ServiceTypeName="azurevotebackType" InstanceCount="1">
        <SingletonPartition/>
      </StatelessService>
    </Service>
  </DefaultServices>
</ApplicationManifest>
前端 ServiceManifest.xml
<?xml version="1.0" encoding="utf-8"?>
<ServiceManifest Name="azurevotefrontPkg" Version="1.0.0"
                 xmlns="http://schemas.microsoft.com/2011/01/fabric" xmlns:xsd="https://www.w3.org/2001/XMLSchema" xmlns:xsi="https://www.w3.org/2001/XMLSchema-instance" >

   <ServiceTypes>
      <StatelessServiceType ServiceTypeName="azurevotefrontType" UseImplicitHost="true">
   </StatelessServiceType>
   </ServiceTypes>

   <CodePackage Name="code" Version="1.0.0">
      <EntryPoint>
         <ContainerHost>
            <ImageName>acrName.azurecr.io/azure-vote-front:v1</ImageName>
            <Commands></Commands>
         </ContainerHost>
      </EntryPoint>
      <EnvironmentVariables>
      </EnvironmentVariables>
   </CodePackage>

  <Resources>
    <Endpoints>
      <!-- This endpoint is used by the communication listener to obtain the port on which to
           listen. Please note that if your service is partitioned, this port is shared with
           replicas of different partitions that are placed in your code. -->
      <Endpoint Name="azurevotefrontTypeEndpoint" UriScheme="http" Port="80" Protocol="http"/>
    </Endpoints>
  </Resources>

 </ServiceManifest>
Redis ServiceManifest.xml
<?xml version="1.0" encoding="utf-8"?>
<ServiceManifest Name="azurevotebackPkg" Version="1.0.0"
                 xmlns="http://schemas.microsoft.com/2011/01/fabric" xmlns:xsd="https://www.w3.org/2001/XMLSchema" xmlns:xsi="https://www.w3.org/2001/XMLSchema-instance" >

   <ServiceTypes>
      <StatelessServiceType ServiceTypeName="azurevotebackType" UseImplicitHost="true">
   </StatelessServiceType>
   </ServiceTypes>

   <CodePackage Name="code" Version="1.0.0">
      <EntryPoint>
         <ContainerHost>
            <Commands></Commands>
         </ContainerHost>
      </EntryPoint>
      <EnvironmentVariables>
      </EnvironmentVariables>
   </CodePackage>
     <Resources>
    <Endpoints>
      <!-- This endpoint is used by the communication listener to obtain the port on which to
           listen. Please note that if your service is partitioned, this port is shared with
           replicas of different partitions that are placed in your code. -->
      <Endpoint Name="azurevotebackTypeEndpoint" Port="6379" Protocol="tcp"/>
    </Endpoints>
  </Resources>
 </ServiceManifest>
后续步骤
在本教程中,已使用 Yeoman 将多个容器打包到 Service Fabric 应用程序。 然后此应用程序会在 Service Fabric 群集上进行部署和运行。 已完成以下步骤:
- 安装 Yeoman
- 使用 Yeoman 创建应用程序包
- 将应用程序包中的设置配置为与容器一同使用
- 构建应用程序
- 部署并运行应用程序
- 清理应用程序
继续学习下一个教程,了解如何在 Service Fabric 中故障转移和缩放应用程序。