从 Visual Studio 17.8 开始,Visual Studio 可帮助你分析 C++ #include 文件:
- 显示使用每个头文件中的内容的频率和位置。
- 显示每个
#include文件的生成时间 - 这有助于确定优化生成时间的机会。
启用 C++ Include 诊断和 CodeLens
默认情况下,C++ Include 诊断功能处于关闭状态。 若要打开它,请在代码编辑器中右键单击以显示上下文菜单,然后选择“Include 指令”>“打开 #include 诊断”。
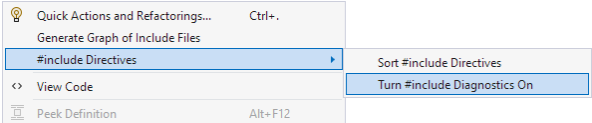
上下文菜单会显示突出显示的 include 指令选项,其中包含两个选项:排序 # include 指令和打开 # include 诊断。
有关 #include 文件的信息通过 CodeLens 显示,它默认关闭。 若要打开相关的 CodeLens 设置,请导航到“工具”>“选项”>“文本编辑器”>“所有语言”>“CodeLens”,然后确认“显示 C++ #include 引用”和“显示 C++ 编译时间”均已启用。
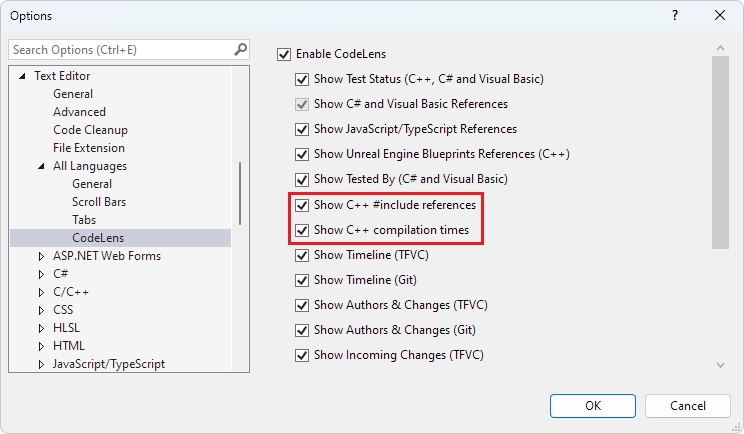
选项窗口设置为“文本编辑器 > 所有语言 > CodeLens”。 “显示 C++ # include 引用”和“显示 C++ 编译时间”选项被突出显示。
查看 #include 引用
若要尝试 Include 诊断,请创建新的 C++ 控制台项目。 将主 .cpp 文件的内容替换为以下代码:
#include <iostream>
#include <vector>

// a function that takes a vector of integers and prints them out
void print(std::vector<int> &vec)
{
    for (int i : vec)
    {
        std::cout << i << std::endl;
    }
    std::cout << std::endl;
}

// a function that takes a vector of integers and adds 10 to each element of the vector and store the result in a new vector
std::vector<int> add10(std::vector<int>& vec)
{
    std::vector<int> newVec;
    for (int i : vec)
    {
        newVec.push_back(i + 10);
    }
    return newVec;
}

int main()
{
    std::vector<int> vec = { 7, 5, 16, 8 };

    print(vec);
    auto newVec = add10(vec);
    print(newVec);
}
当打开 C++ Include 诊断时,当前代码文件中引用头文件中的代码的次数显示在头文件上方。 对于前面的代码示例,它如下所示:
6 references
#include <iostream>
5 references
#include <vector>
在代码编辑器中,选择 #include <vector> 上的 5 个引用,然后会显示此文件中使用 <vector> 中的代码的位置摘要:
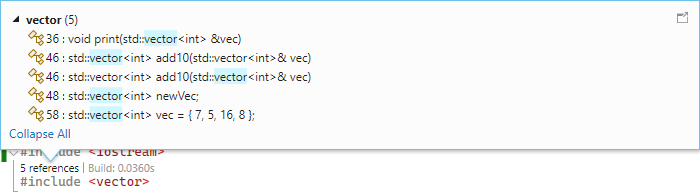
C++ Include 诊断上下文窗口显示,代码中有五个位置,在这些位置来自矢量头文件的代码用于当前代码文件中。 例如,它在 add10 函数的定义上使用了两次,作为返回值和参数。 它在 newVec 的声明中的第 17 行被使用,等等。
选择要在代码中转到其位置的项。
查看 #include 生成时间
若要查看你 #include 的每个文件的生成时间,请先使用 Build Insights 进行生成。
选择“生成”>“在解决方案上运行 Build Insights”>“生成”,从主菜单栏中打开 Build Insights。 生成完成后,将显示一个窗口,列出编译的各种文件的生成时间。 返回到源代码窗口,CodeLens 中会显示每个 #include 文件的生成时间。 它类似于下例:
6 references | Build: 0.3560s
#include <iostream>
5 references | Build 0.0360s
#include <vector>
如果你有一个不经常使用但显著影响编译时间的 #include 指令,那么此工具可以帮助你识别它。
在本文中,你了解了如何打开 C++ Include 诊断和 CodeLens,以及如何使用 C++ Include 诊断分析包含文件中的内容的使用频率以及 #include 如何影响生成时间。