通过Microsoft Defender for Endpoint API 进行合作伙伴访问
适用于:
重要
高级搜寻功能不包括在 Defender for Business 中。
希望体验 Microsoft Defender for Endpoint? 注册免费试用版。
注意
如果你是美国政府客户,请使用美国政府客户Microsoft Defender for Endpoint中列出的 URI。
提示
为了提高性能,可以使用离地理位置更近的服务器:
- us.api.security.microsoft.com
- eu.api.security.microsoft.com
- uk.api.security.microsoft.com
- au.api.security.microsoft.com
- swa.api.security.microsoft.com
本页介绍如何创建Microsoft Entra应用程序,以便代表客户以编程方式访问Microsoft Defender for Endpoint。
Microsoft Defender for Endpoint通过一组编程 API 公开其大部分数据和操作。 这些 API 可帮助你自动执行工作流,并根据Microsoft Defender for Endpoint功能进行创新。 API 访问需要 OAuth2.0 身份验证。 有关详细信息,请参阅 OAuth 2.0 授权代码流。
通常,需要执行以下步骤才能使用 API:
- Create多租户Microsoft Entra应用程序。
- 获取授权 (许可) ,以便应用程序访问所需的 Defender for Endpoint 资源。
- 使用此应用程序获取访问令牌。
- 使用令牌访问Microsoft Defender for Endpoint API。
以下步骤指导如何创建Microsoft Entra应用程序、获取访问令牌以Microsoft Defender for Endpoint并验证令牌。
Create多租户应用
使用具有全局管理员角色的用户登录到 Azure 租户。
导航到Microsoft Entra ID>应用注册>“新建注册”。
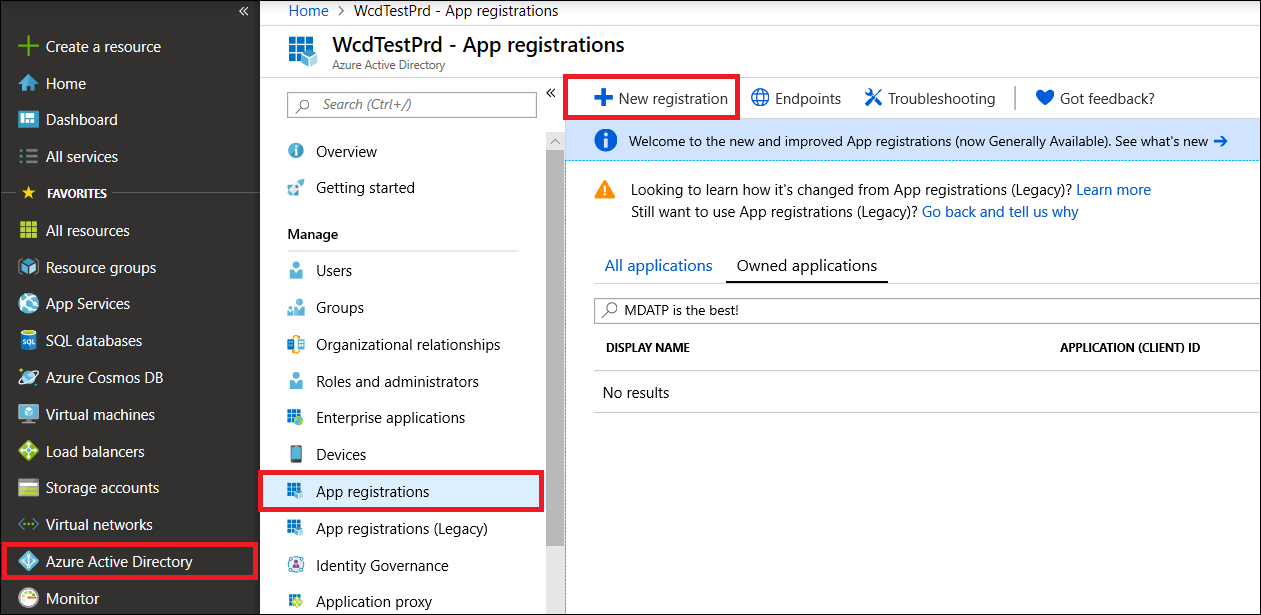
在注册表单中:
为应用程序选择一个名称。
支持的帐户类型 - 任何组织目录中的帐户。
重定向 URI - 类型:Web、URI: https://portal.azure.com

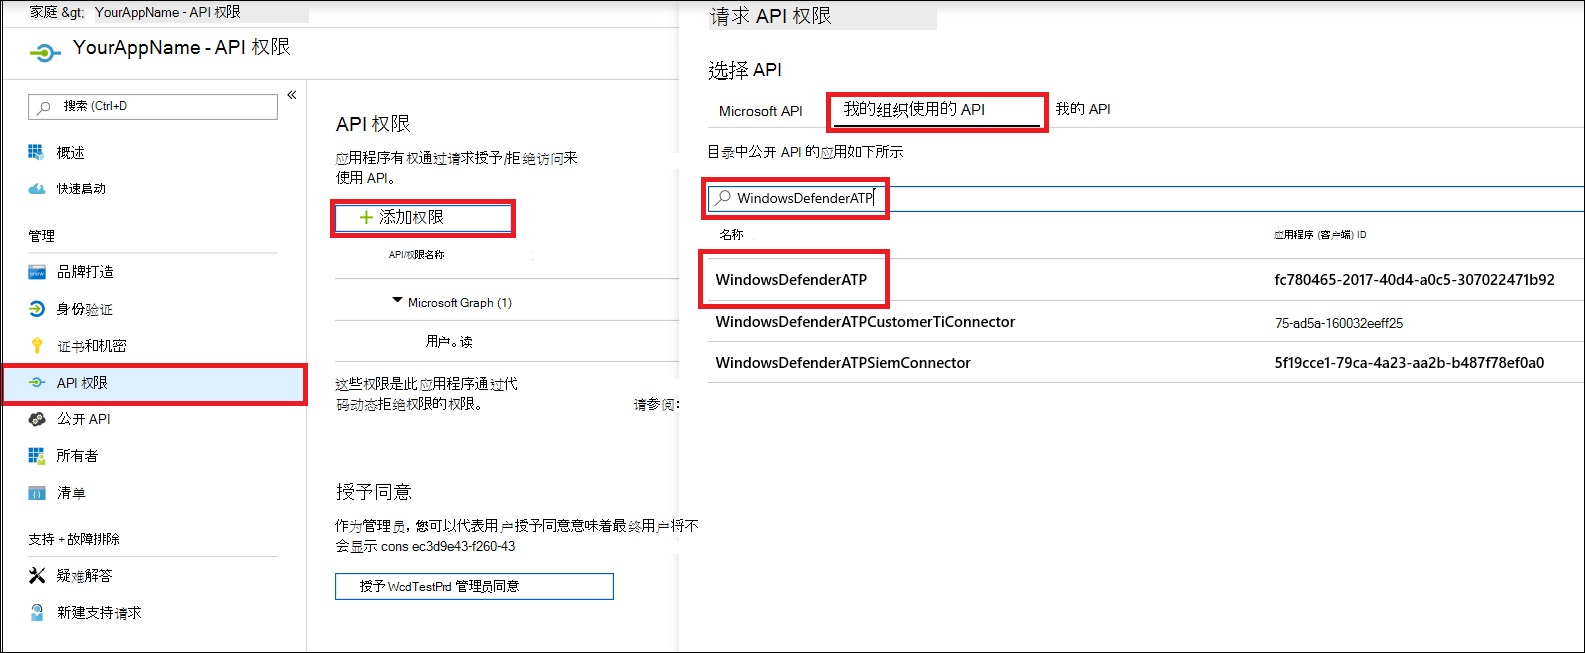
允许应用程序访问Microsoft Defender for Endpoint,并为其分配完成集成所需的最小权限集。
在应用程序页上,选择“ API 权限>添加权限>API 我的组织使用>WindowsDefenderATP ”类型,然后在 WindowsDefenderATP 上选择。
请注意, WindowsDefenderATP 不会显示在原始列表中。 开始在文本框中写入其名称以查看其显示。


请求 API 权限
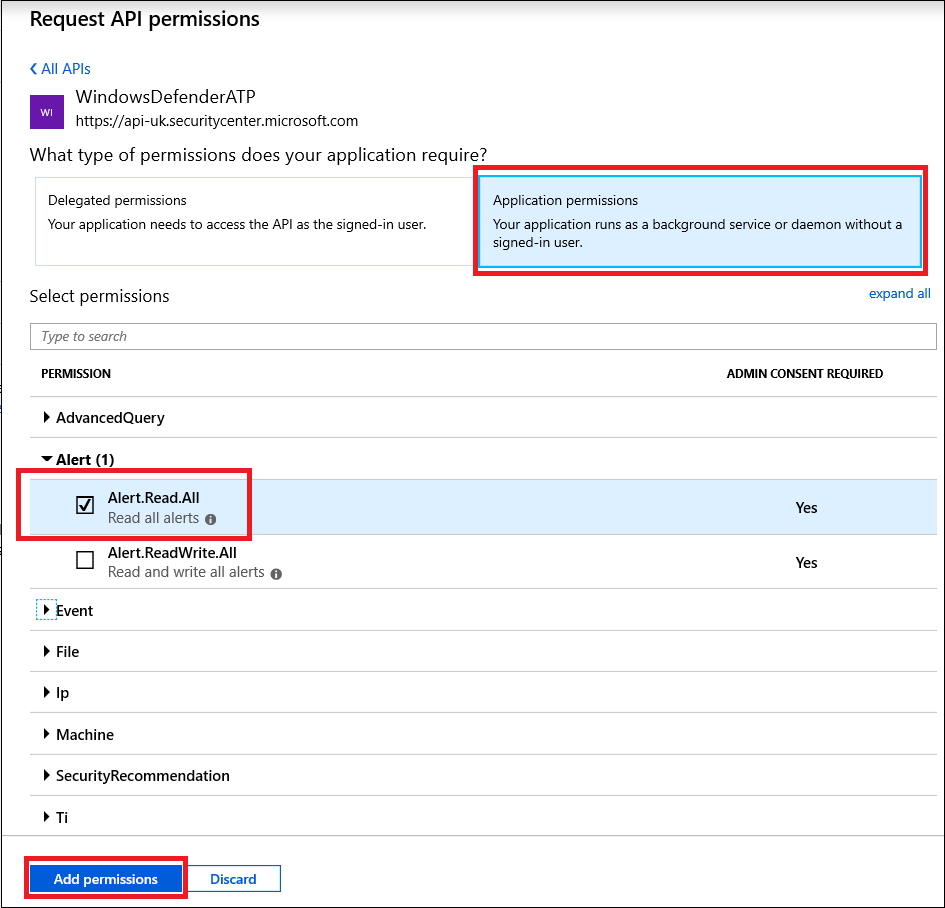
若要确定所需的权限,请查看要调用的 API 中的 “权限” 部分。 例如:
在以下示例中,我们使用 “读取所有警报” 权限:
在“添加权限”上选择“应用程序权限>警报”。Read.All> 选择
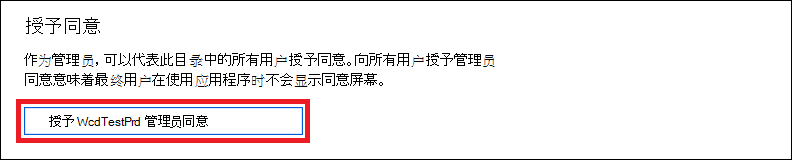
选择“授予同意”
- 注意:每次添加权限时,都必须选择“ 授予同意 ”,使新权限生效。
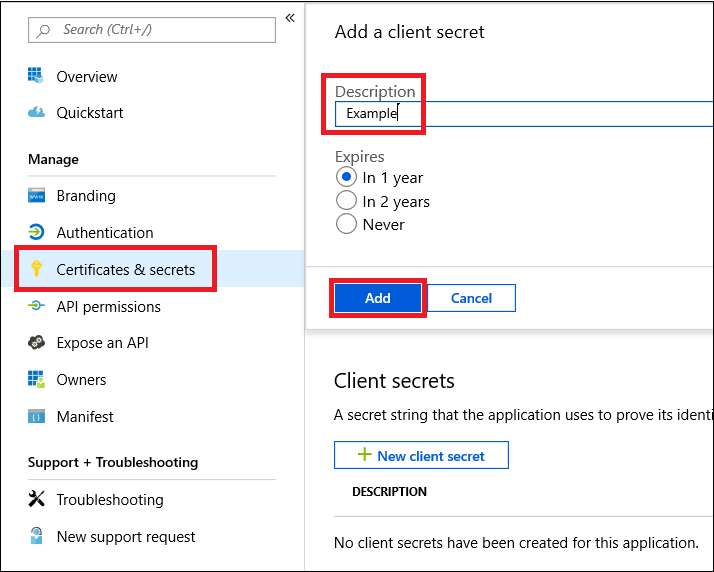
将机密添加到应用程序。
- 选择“ 证书 & 机密”,向机密添加说明,然后选择“ 添加”。
重要提示:选择“ 添加”后,请确保复制生成的机密值。 离开后将无法检索它!
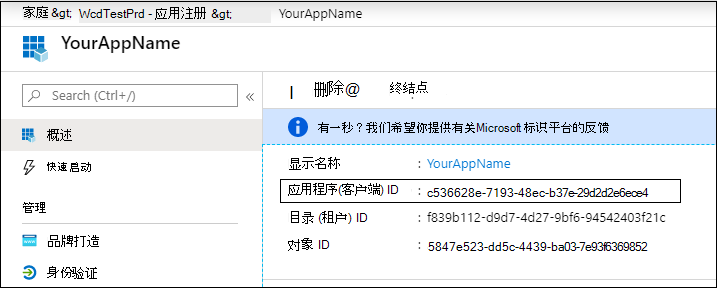
记下应用程序 ID:
在应用程序页上,转到 “概述” 并复制以下信息:
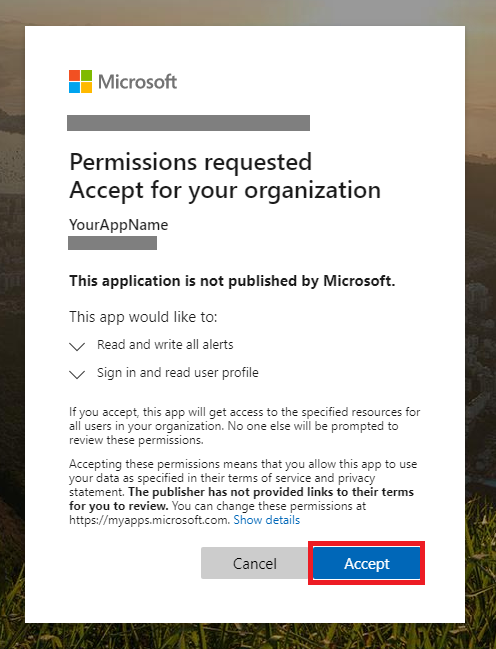
将应用程序添加到客户的租户。
需要在要使用的每个客户租户中批准应用程序。 此审批是必需的,因为应用程序代表客户与Microsoft Defender for Endpoint应用程序交互。
客户租户中具有 全局管理员 的用户需要选择同意链接并批准应用程序。
同意链接的格式如下:
https://login.microsoftonline.com/common/oauth2/authorize?prompt=consent&client_id=00000000-0000-0000-0000-000000000000&response_type=code&sso_reload=true其中 000000000-0000-0000-0000-000000000000 应替换为应用程序 ID
单击同意链接后,使用客户租户的全局管理员登录并许可应用程序。
此外,还需要要求客户提供其租户 ID,并在获取令牌时保存该 ID 以供将来使用。
完成! 已成功注册应用程序! 有关令牌获取和验证,请参阅以下示例。


获取访问令牌示例
注意: 若要代表客户获取访问令牌,请在以下令牌获取中使用客户的租户 ID。
有关Microsoft Entra令牌的详细信息,请参阅Microsoft Entra教程。
使用 PowerShell
# That code gets the App Context Token and save it to a file named "Latest-token.txt" under the current directory
# Paste below your Tenant ID, App ID and App Secret (App key).

$tenantId = '' ### Paste your tenant ID here
$appId = '' ### Paste your Application ID here
$appSecret = '' ### Paste your Application key here

$resourceAppIdUri = 'https://api.securitycenter.microsoft.com'
$oAuthUri = "https://login.microsoftonline.com/$TenantId/oauth2/token"
$authBody = [Ordered] @{
    resource = "$resourceAppIdUri"
    client_id = "$appId"
    client_secret = "$appSecret"
    grant_type = 'client_credentials'
}
$authResponse = Invoke-RestMethod -Method Post -Uri $oAuthUri -Body $authBody -ErrorAction Stop
$token = $authResponse.access_token
Out-File -FilePath "./Latest-token.txt" -InputObject $token
return $token
使用 C#
以下代码已使用 Nuget Microsoft.Identity.Client 进行测试
重要
Microsoft.IdentityModel.Clients.ActiveDirectory NuGet 包和 Azure AD 身份验证 库 (ADAL) 已弃用。 自 2020 年 6 月 30 日以来,未添加任何新功能。 强烈建议升级,请参阅 迁移指南 了解更多详细信息。
Create新的控制台应用程序
安装 NuGet Microsoft.Identity.Client
使用 添加以下
using Microsoft.Identity.Client;在应用程序中复制/粘贴以下代码 (不要忘记更新三个变量:
tenantId、appId和appSecret)string tenantId = "00000000-0000-0000-0000-000000000000"; // Paste your own tenant ID here string appId = "11111111-1111-1111-1111-111111111111"; // Paste your own app ID here string appSecret = "22222222-2222-2222-2222-222222222222"; // Paste your own app secret here for a test, and then store it in a safe place! const string authority = https://login.microsoftonline.com; const string audience = https://api.securitycenter.microsoft.com; IConfidentialClientApplication myApp = ConfidentialClientApplicationBuilder.Create(appId).WithClientSecret(appSecret).WithAuthority($"{authority}/{tenantId}").Build(); List<string> scopes = new List<string>() { $"{audience}/.default" }; AuthenticationResult authResult = myApp.AcquireTokenForClient(scopes).ExecuteAsync().GetAwaiter().GetResult(); string token = authResult.AccessToken;
使用 Python
请参阅 使用 Python 获取令牌。
使用 Curl
注意
计算机上已安装以下适用于 Windows 的 Curl 过程
打开命令窗口。
将CLIENT_ID设置为 Azure 应用程序 ID。
将CLIENT_SECRET设置为 Azure 应用程序机密。
将TENANT_ID设置为希望使用应用程序访问Microsoft Defender for Endpoint应用程序的客户的 Azure 租户 ID。
运行以下命令:
curl -i -X POST -H "Content-Type:application/x-www-form-urlencoded" -d "grant_type=client_credentials" -d "client_id=%CLIENT_ID%" -d "scope=https://securitycenter.onmicrosoft.com/windowsatpservice/.default" -d "client_secret=%CLIENT_SECRET%" "https://login.microsoftonline.com/%TENANT_ID%/oauth2/v2.0/token" -k你会收到以下表单的答案:
{"token_type":"Bearer","expires_in":3599,"ext_expires_in":0,"access_token":"eyJ0eXAiOiJKV1QiLCJhbGciOiJSUzI1NiIsIn <truncated> aWReH7P0s0tjTBX8wGWqJUdDA"}
验证令牌
确认你收到了正确的令牌。
将上一步中获取的令牌复制/粘贴到 JWT 中,以便对其进行解码。
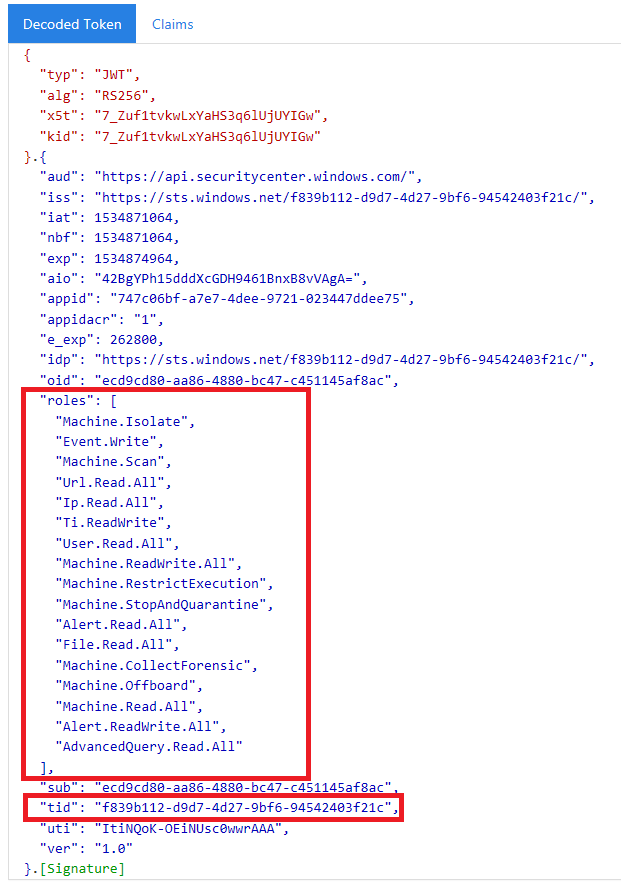
确认你获得了具有所需权限的“roles”声明。
在以下屏幕截图中,可以看到从应用程序获取的解码令牌,该令牌具有多个Microsoft Defender for Endpoint权限:
“tid”声明是令牌所属的租户 ID。

使用令牌访问Microsoft Defender for Endpoint API
选择要使用的 API。 有关详细信息,请参阅支持的Microsoft Defender for Endpoint API。
在发送到“持有者 {token}”的 Http 请求中设置 Authorization 标头, (持有者是授权方案) 。 令牌的过期时间为 1 小时, (可以发送多个具有相同令牌的请求) 。
下面是使用 C# 发送请求以获取警报列表的示例
var httpClient = new HttpClient();

var request = new HttpRequestMessage(HttpMethod.Get, "https://api.securitycenter.microsoft.com/api/alerts");

request.Headers.Authorization = new AuthenticationHeaderValue("Bearer", token);

var response = httpClient.SendAsync(request).GetAwaiter().GetResult();

 // Do something useful with the response
另请参阅
提示
想要了解更多信息? Engage技术社区中的 Microsoft 安全社区:Microsoft Defender for Endpoint技术社区。
反馈
即将发布:在整个 2024 年,我们将逐步淘汰作为内容反馈机制的“GitHub 问题”,并将其取代为新的反馈系统。 有关详细信息,请参阅:https://aka.ms/ContentUserFeedback。
提交和查看相关反馈