macOS Big Sur 的新配置文件和 macOS 的较新版本
适用于:
希望体验 Microsoft Defender for Endpoint? 注册免费试用版。
如果已通过 JAMF、Intune 或其他 MDM 解决方案) (在托管环境中的 macOS 上部署了Microsoft Defender for Endpoint,则必须部署新的配置文件。 未能执行这些步骤将导致用户收到运行这些新组件的审批提示。
JAMF
JAMF 系统扩展策略
若要批准系统扩展,请创建以下有效负载:
在 “计算机 > 配置配置文件 ”中 ,选择“选项 > 系统扩展”。
从 “系统扩展 类型”下拉列表中选择“允许 的系统扩展 ”。
对团队 ID 使用 UBF8T346G9 。
将以下捆绑标识符添加到 “允许的系统扩展 ”列表:
- com.microsoft.wdav.epsext
- com.microsoft.wdav.netext
隐私首选项策略控制
添加以下 JAMF 有效负载以授予对 Microsoft Defender for Endpoint Endpoint Security Extension 的完全磁盘访问权限。 此策略是在设备上运行扩展的先决条件。
选择 “选项>”“隐私首选项策略控制”。
用作
com.microsoft.wdav.epsext标识符和Bundle ID捆绑包类型。将“代码要求”设置为
identifier "com.microsoft.wdav.epsext" and anchor apple generic and certificate 1[field.1.2.840.113635.100.6.2.6] /* exists */ and certificate leaf[field.1.2.840.113635.100.6.1.13] /* exists */ and certificate leaf[subject.OU] = UBF8T346G9将 “应用或服务 ”设置为 “SystemPolicyAllFiles” ,并将“访问权限”设置为 “允许”。
网络扩展策略
作为终结点检测和响应功能的一部分,macOS 上的Microsoft Defender for Endpoint会检查套接字流量,并将此信息报告给Microsoft Defender门户。 以下策略允许网络扩展执行此功能。
注意
JAMF 没有对内容筛选策略的内置支持,这是启用设备上 macOS 上安装Microsoft Defender for Endpoint网络扩展的先决条件。 此外,JAMF 有时会更改要部署的策略的内容。 因此,以下步骤提供了一种涉及对配置文件进行签名的解决方法。
使用文本编辑器将以下内容保存到设备
com.microsoft.network-extension.mobileconfig:<?xml version="1.0" encoding="UTF-8"?><!DOCTYPE plist PUBLIC "-//Apple//DTD PLIST 1.0//EN" "http://www.apple.com/DTDs/PropertyList-1.0.dtd"> <plist version="1"> <dict> <key>PayloadUUID</key> <string>DA2CC794-488B-4AFF-89F7-6686A7E7B8AB</string> <key>PayloadType</key> <string>Configuration</string> <key>PayloadOrganization</key> <string>Microsoft Corporation</string> <key>PayloadIdentifier</key> <string>DA2CC794-488B-4AFF-89F7-6686A7E7B8AB</string> <key>PayloadDisplayName</key> <string>Microsoft Defender Network Extension</string> <key>PayloadDescription</key> <string/> <key>PayloadVersion</key> <integer>1</integer> <key>PayloadEnabled</key> <true/> <key>PayloadRemovalDisallowed</key> <true/> <key>PayloadScope</key> <string>System</string> <key>PayloadContent</key> <array> <dict> <key>PayloadUUID</key> <string>2BA070D9-2233-4827-AFC1-1F44C8C8E527</string> <key>PayloadType</key> <string>com.apple.webcontent-filter</string> <key>PayloadOrganization</key> <string>Microsoft Corporation</string> <key>PayloadIdentifier</key> <string>CEBF7A71-D9A1-48BD-8CCF-BD9D18EC155A</string> <key>PayloadDisplayName</key> <string>Approved Network Extension</string> <key>PayloadDescription</key> <string/> <key>PayloadVersion</key> <integer>1</integer> <key>PayloadEnabled</key> <true/> <key>FilterType</key> <string>Plugin</string> <key>UserDefinedName</key> <string>Microsoft Defender Network Extension</string> <key>PluginBundleID</key> <string>com.microsoft.wdav</string> <key>FilterSockets</key> <true/> <key>FilterDataProviderBundleIdentifier</key> <string>com.microsoft.wdav.netext</string> <key>FilterDataProviderDesignatedRequirement</key> <string>identifier "com.microsoft.wdav.netext" and anchor apple generic and certificate 1[field.1.2.840.113635.100.6.2.6] /* exists */ and certificate leaf[field.1.2.840.113635.100.6.1.13] /* exists */ and certificate leaf[subject.OU] = UBF8T346G9</string> </dict> </array> </dict> </plist>通过在终端中运行
plutil实用工具,验证是否已正确复制上述文件:$ plutil -lint <PathToFile>/com.microsoft.network-extension.mobileconfig例如,如果文件存储在“文档”中:
$ plutil -lint ~/Documents/com.microsoft.network-extension.mobileconfig验证命令是否输出
OK。<PathToFile>/com.microsoft.network-extension.mobileconfig: OK按照 此页上 的说明使用 JAMF 的内置证书颁发机构创建签名证书。
创建证书并将其安装到设备后,从终端运行以下命令对文件进行签名:
$ security cms -S -N "<CertificateName>" -i <PathToFile>/com.microsoft.network-extension.mobileconfig -o <PathToSignedFile>/com.microsoft.network-extension.signed.mobileconfig例如,如果证书名称为 SignedsignedCertificate ,并且签名文件将存储在 Documents 中:
$ security cms -S -N "SigningCertificate" -i ~/Documents/com.microsoft.network-extension.mobileconfig -o ~/Documents/com.microsoft.network-extension.signed.mobileconfig在 JAMF 门户中,导航到 “配置文件” ,然后单击“ 上传 ”按钮。 在提示输入文件时选择
com.microsoft.network-extension.signed.mobileconfig。
Intune
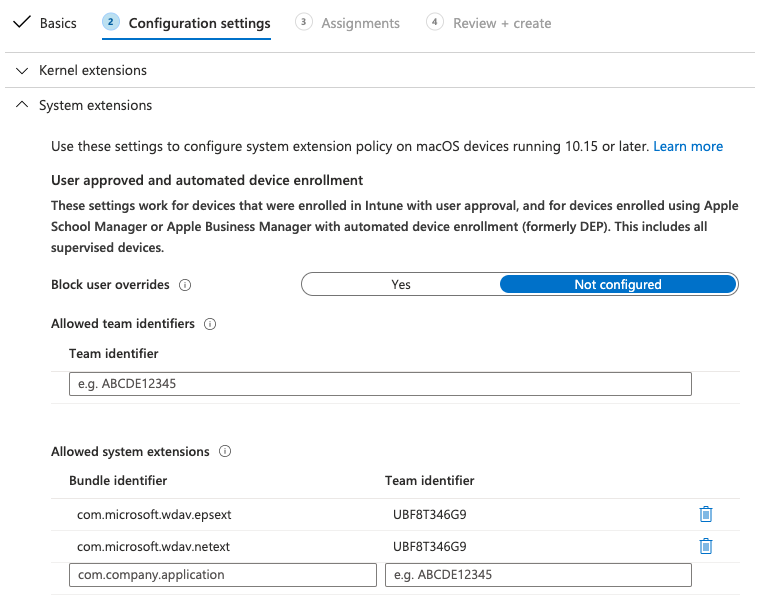
Intune系统扩展策略
批准系统扩展:
在“Intune”中,打开“管理>设备配置”。 选择“ 管理>配置文件>”“创建配置文件”。
为配置文件选择名称。 将 Platform=macOS 更改为 Profile type=Extensions。 选择“创建”。
在
Basics选项卡中,为此新配置文件命名。在
Configuration settings选项卡中,在 节中添加以下条目Allowed system extensions:
| 捆绑标识符 | 团队标识符 |
|---|---|
| com.microsoft.wdav.epsext | UBF8T346G9 |
| com.microsoft.wdav.netext | UBF8T346G9 |
- 在
Assignments选项卡中,将此配置文件分配给 所有用户 & 所有设备。 - 查看并创建此配置文件。
创建和部署自定义配置文件
以下配置文件启用网络扩展,并授予对 Endpoint Security 系统扩展的完全磁盘访问权限。
将以下内容保存到名为 sysext.xml的文件:
<?xml version="1.0" encoding="UTF-8"?><!DOCTYPE plist PUBLIC "-//Apple//DTD PLIST 1.0//EN" "http://www.apple.com/DTDs/PropertyList-1.0.dtd">
<plist version="1">
<dict>
<key>PayloadUUID</key>
<string>7E53AC50-B88D-4132-99B6-29F7974EAA3C</string>
<key>PayloadType</key>
<string>Configuration</string>
<key>PayloadOrganization</key>
<string>Microsoft Corporation</string>
<key>PayloadIdentifier</key>
<string>7E53AC50-B88D-4132-99B6-29F7974EAA3C</string>
<key>PayloadDisplayName</key>
<string>Microsoft Defender System Extensions</string>
<key>PayloadDescription</key>
<string/>
<key>PayloadVersion</key>
<integer>1</integer>
<key>PayloadEnabled</key>
<true/>
<key>PayloadRemovalDisallowed</key>
<true/>
<key>PayloadScope</key>
<string>System</string>
<key>PayloadContent</key>
<array>
<dict>
<key>PayloadUUID</key>
<string>2BA070D9-2233-4827-AFC1-1F44C8C8E527</string>
<key>PayloadType</key>
<string>com.apple.webcontent-filter</string>
<key>PayloadOrganization</key>
<string>Microsoft Corporation</string>
<key>PayloadIdentifier</key>
<string>CEBF7A71-D9A1-48BD-8CCF-BD9D18EC155A</string>
<key>PayloadDisplayName</key>
<string>Approved Network Extension</string>
<key>PayloadDescription</key>
<string/>
<key>PayloadVersion</key>
<integer>1</integer>
<key>PayloadEnabled</key>
<true/>
<key>FilterType</key>
<string>Plugin</string>
<key>UserDefinedName</key>
<string>Microsoft Defender Network Extension</string>
<key>PluginBundleID</key>
<string>com.microsoft.wdav</string>
<key>FilterSockets</key>
<true/>
<key>FilterDataProviderBundleIdentifier</key>
<string>com.microsoft.wdav.netext</string>
<key>FilterDataProviderDesignatedRequirement</key>
<string>identifier "com.microsoft.wdav.netext" and anchor apple generic and certificate 1[field.1.2.840.113635.100.6.2.6] /* exists */ and certificate leaf[field.1.2.840.113635.100.6.1.13] /* exists */ and certificate leaf[subject.OU] = UBF8T346G9</string>
</dict>
<dict>
<key>PayloadUUID</key>
<string>56105E89-C7C8-4A95-AEE6-E11B8BEA0366</string>
<key>PayloadType</key>
<string>com.apple.TCC.configuration-profile-policy</string>
<key>PayloadOrganization</key>
<string>Microsoft Corporation</string>
<key>PayloadIdentifier</key>
<string>56105E89-C7C8-4A95-AEE6-E11B8BEA0366</string>
<key>PayloadDisplayName</key>
<string>Privacy Preferences Policy Control</string>
<key>PayloadDescription</key>
<string/>
<key>PayloadVersion</key>
<integer>1</integer>
<key>PayloadEnabled</key>
<true/>
<key>Services</key>
<dict>
<key>SystemPolicyAllFiles</key>
<array>
<dict>
<key>Identifier</key>
<string>com.microsoft.wdav.epsext</string>
<key>CodeRequirement</key>
<string>identifier "com.microsoft.wdav.epsext" and anchor apple generic and certificate 1[field.1.2.840.113635.100.6.2.6] /* exists */ and certificate leaf[field.1.2.840.113635.100.6.1.13] /* exists */ and certificate leaf[subject.OU] = UBF8T346G9</string>
<key>IdentifierType</key>
<string>bundleID</string>
<key>StaticCode</key>
<integer>0</integer>
<key>Allowed</key>
<integer>1</integer>
</dict>
</array>
</dict>
</dict>
</array>
</dict>
</plist>
验证是否正确复制了上述文件。 在终端中运行以下命令,并验证它是否输出 OK:
$ plutil -lint sysext.xml
sysext.xml: OK
若要部署此自定义配置文件,请执行以下作:
在“Intune”中,打开“管理>设备配置”。 选择“ 管理>配置文件”>“创建配置文件”。
为配置文件选择名称。 更改 Platform=macOS 和 Profile type=Custom。 选择“配置”。
打开配置文件并上传 sysext.xml。 此文件是在上一步中创建的。
选择“确定”。
在
Assignments选项卡中,将此配置文件分配给 所有用户 & 所有设备。查看并创建此配置文件。
提示
想要了解更多信息? Engage技术社区中的Microsoft安全社区:Microsoft Defender for Endpoint技术社区。


