图像处理概述
本主题介绍 Microsoft Windows Presentation Foundation 图像处理组件。 借助 WPF 图像处理,开发人员可以显示、转换图像和设置图像的格式。
WPF 图像处理组件
WPF 图像处理显着增强了 Microsoft Windows 中的图像处理功能。 图像处理功能(例如显示位图或在公共控件上使用图像)以前依赖于 Microsoft Windows 图形设备接口 (GDI) 或 Microsoft Windows GDI+ 库。 这些 API 提供了基线图像处理功能,但缺乏诸如编解码器扩展性支持和高保真图像支持之类的功能。 WPF 图像处理的设计克服了 GDI 和 GDI+ 的缺点,提供新的 API 集以在应用程序内显示和使用图像。
有两种方式可以访问 WPF 图像处理 API:托管组件和非托管组件。 非托管组件提供以下功能。
适用于新的或专用图像格式的扩展性模型。
改进了本机图像格式的性能和安全性,包括位图 (BMP)、联合图像专家组 (JPEG)、可移植网络图形格式 (PNG)、标记图像文件格式 (TIFF)、Microsoft Windows Media 照片、图形交换格式 (GIF) 和图标 (.ico)。
高位深图像数据最多保留 8 位/通道(32 位/像素)。
非破坏性图像缩放、剪切和旋转。
简化的颜色管理。
对文件内的专用元数据的支持。
托管组件利用非托管基础结构提供图像与其他 WPF 功能(如用户界面 (UI)、动画和图形)的无缝集成。 托管组件还可以从 Windows Presentation Foundation (WPF) 图像处理编解码器扩展性模型中获益,利用该模型可以自动识别 WPF 应用程序中的新图像格式。
大多数托管 WPF 图像处理 API 都驻留在 System.Windows.Media.Imaging 命名空间中,但有几个重要的类型(例如 ImageBrush 和 ImageDrawing)驻留在 System.Windows.Media 命名空间中,而 Image 驻留在 System.Windows.Controls 命名空间中。
本主题提供有关托管组件的其他信息。 有关非托管 API 的详细信息,请参阅非托管 WPF 图像处理组件文档。
WPF 图像格式
编解码器用于对特定媒体格式进行解码或编码。 WPF 图像处理包括针对 BMP、JPEG、PNG、TIFF、Windows Media 照片、GIF 和 ICON 图像格式的编解码器。 利用上述每个编解码器,应用程序可以对其各自的图像格式进行解码(ICON 除外)和编码。
BitmapSource 是一个重要的类,用于对图像进行解码和编码。 它是 WPF 图像处理管道的基本构建基块,表示具有特定大小和分辨率的单个不变的像素集。 BitmapSource 可以是多个帧图像中的单个帧,也可以是在 BitmapSource 上执行转换的结果。 它是 WPF 图像处理中使用的许多主要类(如 BitmapFrame)的父级。
BitmapFrame 用于存储图像格式的实际位图数据。 许多图像格式仅支持一个 BitmapFrame,不过 GIF 和 TIFF 等格式支持每个图像有多个帧。 帧由解码器用作输入数据,并传递到编码器以创建图像文件。
以下示例演示如何通过 BitmapSource 创建 BitmapFrame,然后将其添加到 TIFF 图像。
BitmapSource image5 = BitmapSource.Create(
    width,
    height,
    96,
    96,
    PixelFormats.Indexed1,
    BitmapPalettes.WebPalette,
    pixels,
    stride);

FileStream stream5 = new FileStream("palette.tif", FileMode.Create);
TiffBitmapEncoder encoder5 = new TiffBitmapEncoder();
encoder5.Frames.Add(BitmapFrame.Create(image5));
encoder5.Save(stream5);
Dim image5 As BitmapSource = System.Windows.Media.Imaging.BitmapSource.Create(width, height, 96, 96, PixelFormats.Indexed1, BitmapPalettes.WebPalette, pixels, stride)

Dim stream5 As New FileStream("palette.tif", FileMode.Create)
Dim encoder5 As New TiffBitmapEncoder()
encoder5.Frames.Add(BitmapFrame.Create(image5))
encoder5.Save(stream5)
图像格式解码
图像解码是指将某种图像格式转换为可以由系统使用的图像数据。 然后,此图像数据可以用于显示、处理或编码为其他格式。 根据图像格式选择解码器。 自动选择编解码器,除非指定了特定解码器。 在 WPF 中显示图像一节中的示例演示了自动解码。 使用非托管 WPF 图像处理界面开发并向系统注册的自定义格式解码器会自动加入到解码器选择队列。 这将使得自定义格式可以自动显示在 WPF 应用程序中。
以下示例演示使用位图解码器对 BMP 格式图像进行解码。
// Open a Uri and decode a BMP image
System::Uri^ myUri = gcnew System::Uri("tulipfarm.bmp", UriKind::RelativeOrAbsolute);
BmpBitmapDecoder^ decoder2 = gcnew BmpBitmapDecoder(myUri, BitmapCreateOptions::PreservePixelFormat, BitmapCacheOption::Default);
BitmapSource^ bitmapSource2 = decoder2->Frames[0];

// Draw the Image
Image^ myImage2 = gcnew Image();
myImage2->Source = bitmapSource2;
myImage2->Stretch = Stretch::None;
myImage2->Margin = System::Windows::Thickness(20);
// Open a Uri and decode a BMP image
Uri myUri = new Uri("tulipfarm.bmp", UriKind.RelativeOrAbsolute);
BmpBitmapDecoder decoder2 = new BmpBitmapDecoder(myUri, BitmapCreateOptions.PreservePixelFormat, BitmapCacheOption.Default);
BitmapSource bitmapSource2 = decoder2.Frames[0];

// Draw the Image
Image myImage2 = new Image();
myImage2.Source = bitmapSource2;
myImage2.Stretch = Stretch.None;
myImage2.Margin = new Thickness(20);
' Open a Uri and decode a BMP image
Dim myUri As New Uri("tulipfarm.bmp", UriKind.RelativeOrAbsolute)
Dim decoder2 As New BmpBitmapDecoder(myUri, BitmapCreateOptions.PreservePixelFormat, BitmapCacheOption.Default)
Dim bitmapSource2 As BitmapSource = decoder2.Frames(0)

' Draw the Image
Dim myImage2 As New Image()
myImage2.Source = bitmapSource2
myImage2.Stretch = Stretch.None
myImage2.Margin = New Thickness(20)
图像格式编码
图像编码是指将图像数据转换为特定的图像格式。 然后,已编码的图像数据可以用于创建新的图像文件。 WPF 图像处理为上面介绍的每种图像格式提供编码器。
以下示例演示使用编码器保存一个新创建的位图图像。
FileStream^ stream = gcnew FileStream("new.bmp", FileMode::Create);
BmpBitmapEncoder^ encoder = gcnew BmpBitmapEncoder();
TextBlock^ myTextBlock = gcnew TextBlock();
myTextBlock->Text = "Codec Author is: " + encoder->CodecInfo->Author->ToString();
encoder->Frames->Add(BitmapFrame::Create(image));
encoder->Save(stream);
FileStream stream = new FileStream("new.bmp", FileMode.Create);
BmpBitmapEncoder encoder = new BmpBitmapEncoder();
TextBlock myTextBlock = new TextBlock();
myTextBlock.Text = "Codec Author is: " + encoder.CodecInfo.Author.ToString();
encoder.Frames.Add(BitmapFrame.Create(image));
encoder.Save(stream);
Dim stream As New FileStream("new.bmp", FileMode.Create)
Dim encoder As New BmpBitmapEncoder()
Dim myTextBlock As New TextBlock()
myTextBlock.Text = "Codec Author is: " + encoder.CodecInfo.Author.ToString()
encoder.Frames.Add(BitmapFrame.Create(image))
encoder.Save(stream)
在 WPF 中显示图像
可通过多种方式在 Windows Presentation Foundation (WPF) 应用程序中显示图像。 可以使用 Image 控件显示图像,使用 ImageBrush 在视觉对象上绘制图像,或使用 ImageDrawing 绘制图像。
使用 Image 控件
Image 是一个框架元素,也是在应用程序中显示图像的一种主要方式。 在 XAML 中,有两种方式可以使用 Image:特性语法或属性语法。 以下示例演示如何使用特性语法或属性标记语法来呈现宽度为 200 像素的图像。 有关特性语法和属性语法的详细信息,请参阅依赖属性概述。
<!-- Simple image rendering. However, rendering an image this way may not
     result in the best use of application memory. See markup below which
     creates the same end result but using less memory. -->
<Image Width="200"
Source="C:\Documents and Settings\All Users\Documents\My Pictures\Sample Pictures\Water Lilies.jpg"/>

<Image Width="200">
  <Image.Source>
    <!-- To save significant application memory, set the DecodePixelWidth or
     DecodePixelHeight of the BitmapImage value of the image source to the desired
     height and width of the rendered image. If you don't do this, the application will
     cache the image as though it were rendered as its normal size rather than just
     the size that is displayed. -->
    <!-- Note: In order to preserve aspect ratio, only set either DecodePixelWidth
         or DecodePixelHeight but not both. -->
    <BitmapImage DecodePixelWidth="200"
     UriSource="C:\Documents and Settings\All Users\Documents\My Pictures\Sample Pictures\Water Lilies.jpg" />
  </Image.Source>
</Image>
许多示例使用 BitmapImage 对象引用图像文件。 BitmapImage 是一个专用的 BitmapSource,已针对 Extensible Application Markup Language (XAML) 加载进行了优化,也是一种将图像显示为 Image 控件的 Source 的简单方法。
下面的示例演示如何使用代码呈现宽为 200 像素的图像。
注意
BitmapImage 实现 ISupportInitialize 接口,以对多个属性的初始化进行优化。 只能在对象初始化过程中进行属性更改。 调用 BeginInit 以指示初始化已开始,调用 EndInit 以指示初始化已结束。 初始化后,将忽略所做的属性更改。
// Create Image Element
Image myImage = new Image();
myImage.Width = 200;

// Create source
BitmapImage myBitmapImage = new BitmapImage();

// BitmapImage.UriSource must be in a BeginInit/EndInit block
myBitmapImage.BeginInit();
myBitmapImage.UriSource = new Uri(@"C:\Documents and Settings\All Users\Documents\My Pictures\Sample Pictures\Water Lilies.jpg");

// To save significant application memory, set the DecodePixelWidth or
// DecodePixelHeight of the BitmapImage value of the image source to the desired
// height or width of the rendered image. If you don't do this, the application will
// cache the image as though it were rendered as its normal size rather than just
// the size that is displayed.
// Note: In order to preserve aspect ratio, set DecodePixelWidth
// or DecodePixelHeight but not both.
myBitmapImage.DecodePixelWidth = 200;
myBitmapImage.EndInit();
//set image source
myImage.Source = myBitmapImage;
' Create Image Element
Dim myImage As New Image()
myImage.Width = 200

' Create source
Dim myBitmapImage As New BitmapImage()

' BitmapImage.UriSource must be in a BeginInit/EndInit block
myBitmapImage.BeginInit()
myBitmapImage.UriSource = New Uri("C:\Documents and Settings\All Users\Documents\My Pictures\Sample Pictures\Water Lilies.jpg")

' To save significant application memory, set the DecodePixelWidth or
' DecodePixelHeight of the BitmapImage value of the image source to the desired
' height or width of the rendered image. If you don't do this, the application will
' cache the image as though it were rendered as its normal size rather than just
' the size that is displayed.
' Note: In order to preserve aspect ratio, set DecodePixelWidth
' or DecodePixelHeight but not both.
myBitmapImage.DecodePixelWidth = 200
myBitmapImage.EndInit()
'set image source
myImage.Source = myBitmapImage
旋转、转换和剪切图像
WPF 支持用户通过使用 BitmapImage 的属性或使用其他 BitmapSource 对象(例如 CroppedBitmap 或 FormatConvertedBitmap)来转换图像。 上述图像转换可以缩放或旋转图像、更改图像的像素格式或剪切图像。
使用 BitmapImage 的 Rotation 属性可执行图像旋转。 只能以 90 度为增量进行旋转。 在以下示例中,图像旋转了 90 度。
<Image Width="150" Margin="5" Grid.Column="0" Grid.Row="1">
  <Image.Source>
    <TransformedBitmap Source="/sampleImages/watermelon.jpg" >
      <TransformedBitmap.Transform>
        <RotateTransform Angle="90"/>
      </TransformedBitmap.Transform>
    </TransformedBitmap>
  </Image.Source>
</Image>
// Create Image element.
Image rotated90 = new Image();
rotated90.Width = 150;

// Create the TransformedBitmap to use as the Image source.
TransformedBitmap tb = new TransformedBitmap();

// Create the source to use as the tb source.
BitmapImage bi = new BitmapImage();
bi.BeginInit();
bi.UriSource = new Uri(@"sampleImages/watermelon.jpg", UriKind.RelativeOrAbsolute);
bi.EndInit();

// Properties must be set between BeginInit and EndInit calls.
tb.BeginInit();
tb.Source = bi;
// Set image rotation.
RotateTransform transform = new RotateTransform(90);
tb.Transform = transform;
tb.EndInit();
// Set the Image source.
rotated90.Source = tb;
' Create Image element.
Dim rotated90 As New Image()
rotated90.Width = 150

' Create the TransformedBitmap to use as the Image source.
Dim tb As New TransformedBitmap()

' Create the source to use as the tb source.
Dim bi As New BitmapImage()
bi.BeginInit()
bi.UriSource = New Uri("sampleImages/watermelon.jpg", UriKind.RelativeOrAbsolute)
bi.EndInit()

' Properties must be set between BeginInit and EndInit calls.
tb.BeginInit()
tb.Source = bi
' Set image rotation.
Dim transform As New RotateTransform(90)
tb.Transform = transform
tb.EndInit()
' Set the Image source.
rotated90.Source = tb
使用 FormatConvertedBitmap 将图像转换为不同的像素格式(如灰度)。 在以下示例中,图像转换为 Gray4。
<!-- Grayscale XAML Image -->
<Image Width="200" Grid.Column="0" Grid.Row="1">
   <Image.Source>
      <FormatConvertedBitmap Source="/sampleImages/rocks.jpg"  DestinationFormat="Gray4" />
   </Image.Source>
</Image>
//Create Image Element
Image grayImage = new Image();
grayImage.Width = 200;
grayImage.Margin = new Thickness(5);

//Create source using xaml defined resource.
FormatConvertedBitmap fcb = new FormatConvertedBitmap(
   (BitmapImage)this.Resources["masterImage"],PixelFormats.Gray4,null,0);
//set image source
grayImage.Source = fcb;
'Create Image Element
Dim grayImage As New Image()
grayImage.Width = 200
grayImage.Margin = New Thickness(5)

'Create source using xaml defined resource.
Dim fcb As New FormatConvertedBitmap(CType(Me.Resources("masterImage"), BitmapImage), PixelFormats.Gray4, Nothing, 0)
'set image source
grayImage.Source = fcb
若要裁剪图像,可以使用 Image 的 Clip 属性或 CroppedBitmap。 通常情况下,如果只想显示图像的一部分,应使用 Clip。 如果需要编码和保存剪切后的图像,应使用 CroppedBitmap。 在以下示例中,使用 EllipseGeometry 和 Clip 属性来裁剪图像。
<!-- Cropping an Image using Clip -->
<Image Width="200" Grid.Column="0" Grid.Row="5" Margin="5"
   Source="/sampleImages/gecko.jpg">
  <Image.Clip>
    <EllipseGeometry Center="75,50" RadiusX="50" RadiusY="25" />
  </Image.Clip>
</Image>
//Create the image for clipping
Image clipImage = new Image();
clipImage.Width = 200;
clipImage.Margin = new Thickness(5);

//Create & Set source
BitmapImage bi = new BitmapImage();
//BitmapImage.UriSource must be in a BeginInit/EndInit block
bi.BeginInit();
bi.UriSource = new Uri("pack://application:,,/sampleImages/gecko.jpg");
bi.EndInit();
clipImage.Source = bi;

//Clip the using an EllipseGeometry
EllipseGeometry clipGeometry = new EllipseGeometry(new Point(75, 50), 50, 25);
clipImage.Clip = clipGeometry;
' Create the image for clipping
Dim clipImage As New Image()
clipImage.Width = 200
clipImage.Margin = New Thickness(5)

'Create & Set source
Dim bi As New BitmapImage()
' BitmapImage properties must be in a BeginInit/EndInit block
bi.BeginInit()
bi.UriSource = New Uri("pack://application:,,/sampleImages/gecko.jpg")
bi.EndInit()
clipImage.Source = bi

' Clip the using an EllipseGeometry
Dim clipGeometry As New EllipseGeometry(New System.Windows.Point(75, 50), 50, 25)
clipImage.Clip = clipGeometry
拉伸图像
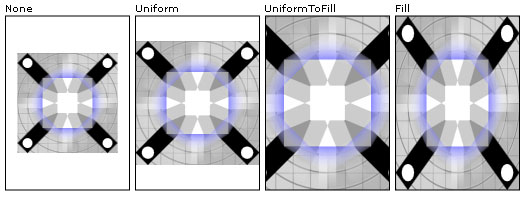
Stretch 属性控制如何拉伸一个图像以使其填充容器。 Stretch 属性接受由 Stretch 枚举定义的以下值:
None:不会拉伸图像以填充输出区域。 如果图像比输出区域大,将图像绘制到输出区域,剪裁掉无法容纳的内容。
Fill:缩放图像以适应输出区域。 由于图像的高度和宽度独立进行缩放,因此图像的原始纵横比可能不会保留。 也就是说,为了完全填充输出容器,图像可能会扭曲。
Uniform:缩放图像,使其完全适应输出区域。 图像的纵横比会保留。
UniformToFill:缩放图像,以便在保留图像的原始纵横比的同时完全填充输出区域。
以下示例将每个可用的 Stretch 枚举应用于 Image。
下图显示示例的输出,并演示了不同的 Stretch 设置在应用到图像时的效果。

不同的拉伸设置
<Page xmlns="http://schemas.microsoft.com/winfx/2006/xaml/presentation"
  xmlns:x="http://schemas.microsoft.com/winfx/2006/xaml" >
  <DockPanel>

    <Border DockPanel.Dock="Top" Background="Black">
      <TextBlock Foreground="White" HorizontalAlignment="Stretch" FontSize="20">
        Stretching an Image
      </TextBlock>
    </Border>

    <Grid Name="simpleGrid" Background="{StaticResource CheckeredBrushResource}"
       Margin="10"
       ShowGridLines="True"
       VerticalAlignment="Center"
       HorizontalAlignment="Center">
      <Grid.ColumnDefinitions>
        <ColumnDefinition Width="175" />
        <ColumnDefinition Width="175" />
        <ColumnDefinition Width="175" />
        <ColumnDefinition Width="175" />
      </Grid.ColumnDefinitions>
      <Grid.RowDefinitions>
        <RowDefinition />
        <RowDefinition Height="200"/>
      </Grid.RowDefinitions>
      <!-- Labels -->
      <TextBlock Style="{StaticResource Header1}"
        Grid.Column="0" Grid.Row="0">None</TextBlock>
      <TextBlock Style="{StaticResource Header1}"
        Grid.Column="1" Grid.Row="0">Uniform</TextBlock>
      <TextBlock Style="{StaticResource Header1}"
        Grid.Column="2" Grid.Row="0">UniformToFill</TextBlock>
      <TextBlock Style="{StaticResource Header1}"
        Grid.Column="3" Grid.Row="0">Fill</TextBlock>
      <Border Grid.Column="0" Grid.Row="1" BorderThickness="1" BorderBrush="Black">
        <!-- None: Image is not scaled. If image is larger than the
             output area, the image will be cropped to the size of the output area.-->
        <Image
          Source="sampleImages/gecko.jpg"
          Stretch="None" />
      </Border>
      <Border Grid.Column="1" Grid.Row="1" BorderThickness="1" BorderBrush="Black">
        <!-- Uniform: Scale to fit output area.
             Aspect ratio is preserved.-->
        <Image
          Source="sampleImages/gecko.jpg"
          Stretch="Uniform" />
      </Border>
      <Border Grid.Column="2" Grid.Row="1" BorderThickness="1" BorderBrush="Black">
        <!-- UniformToFill: Scale to completely fill output area.
             Aspect ratio is preserved. Cropping may occur.-->
        <Image
          Source="sampleImages/gecko.jpg"
        Stretch="UniformToFill" />
      </Border>
      <Border Grid.Column="3" Grid.Row="1" BorderThickness="1" BorderBrush="Black">
      <!-- Fill: Scale to completely fill output area.
             Aspect ratio may not be preserved.-->
      <Image
        Source="sampleImages/gecko.jpg"
        Stretch="Fill" />
      </Border>
    </Grid>
  </DockPanel>
</Page>
使用图像进行绘制
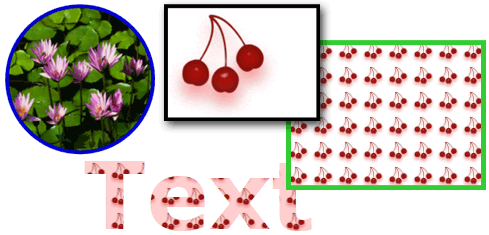
还可以利用 Brush 进行绘制,从而在应用程序中显示图像。 借助画笔,可以利用任意内容(从简单的纯色到复杂的图案和图像集)绘制 UI 对象。 若要使用图像进行绘制,请使用 ImageBrush。 ImageBrush 是一种 TileBrush 类型,用于将其内容定义为位图图像。 ImageBrush 显示由其 ImageSource 属性指定的单个图像。 可以控制图像的拉伸、对齐和平铺方式,从而防止失真并生成图案和其他效果。 下图显示了可以通过 ImageBrush 达到的一些效果。

图像画笔可以填充形状、控件、文本等
以下示例演示如何使用 ImageBrush 绘制带图像的按钮的背景。
<!-- Sets the button's Background property with an ImageBrush. The resulting
     button has an image as its background. -->
<Button Grid.Row="3" Grid.Column="2"
 Height="75" Width="100" Foreground="White" FontWeight="Bold"
 HorizontalAlignment="Left">
  A Button
  <Button.Background>
    <ImageBrush ImageSource="sampleImages\blueberries.jpg" />
  </Button.Background>
</Button>
有关 ImageBrush 和绘制图像的详细信息,请参阅使用图像、绘图和视觉对象进行绘制。
图像元数据
某些图像文件包含用于描述文件的内容或特征的元数据。 例如,大多数数数字相机创建的图像中包含用于捕获该图像的照相机品牌和型号的元数据。 每种图像格式处理元数据的方式不同,但 WPF 图像处理为存储和检索每种受支持图像格式的元数据提供了一种统一方式。
通过 BitmapSource 对象的 Metadata 属性,可以访问元数据。 Metadata 返回一个 BitmapMetadata 对象,其中包括图像所包含的所有元数据。 此数据可以位于一个元数据架构中或位于不同架构的组合中。 WPF 图像处理支持以下图像元数据架构:可交换图像文件格式 (Exif)、tEXt(PNG 文本数据)、图像文件目录 (IFD)、国际新闻通信委员会 (IPTC) 和 eXtensible Metadata Platform (XMP)。
为了简化读取元数据的过程,BitmapMetadata 提供了几个可以轻松访问的命名属性,例如 Author、Title 和 CameraModel。 许多命名属性还可以用于编写元数据。 元数据查询读取器提供对读取元数据的其他支持。 GetQuery 方法用于通过提供字符串查询(例如“/app1/exif/”)来检索元数据查询读取器。 在以下示例中,GetQuery 用于获取存储在“/Text/Description”位置中的文本。
// Add the metadata of the bitmap image to the text block.
TextBlock^ myTextBlock = gcnew TextBlock();
myTextBlock->Text = "The Description metadata of this image is: " + pngInplace->GetQuery("/Text/Description")->ToString();
// Add the metadata of the bitmap image to the text block.
TextBlock myTextBlock = new TextBlock();
myTextBlock.Text = "The Description metadata of this image is: " + pngInplace.GetQuery("/Text/Description").ToString();
' Add the metadata of the bitmap image to the text block.
Dim myTextBlock As New TextBlock()
myTextBlock.Text = "The Description metadata of this image is: " + pngInplace.GetQuery("/Text/Description").ToString()
若要编写元数据,请使用元数据查询编写器。 SetQuery 包含查询编写器并设置所需的值。 在以下示例中,SetQuery 用于编写存储在“/Text/Description”位置中的文本。
Stream^ pngStream = gcnew FileStream("smiley.png", FileMode::Open, FileAccess::ReadWrite, FileShare::ReadWrite);
PngBitmapDecoder^ pngDecoder = gcnew PngBitmapDecoder(pngStream, BitmapCreateOptions::PreservePixelFormat, BitmapCacheOption::Default);
BitmapFrame^ pngFrame = pngDecoder->Frames[0];
InPlaceBitmapMetadataWriter^ pngInplace = pngFrame->CreateInPlaceBitmapMetadataWriter();
if (pngInplace->TrySave() == true)
{
   pngInplace->SetQuery("/Text/Description", "Have a nice day.");
}
pngStream->Close();
Stream pngStream = new System.IO.FileStream("smiley.png", FileMode.Open, FileAccess.ReadWrite, FileShare.ReadWrite);
PngBitmapDecoder pngDecoder = new PngBitmapDecoder(pngStream, BitmapCreateOptions.PreservePixelFormat, BitmapCacheOption.Default);
BitmapFrame pngFrame = pngDecoder.Frames[0];
InPlaceBitmapMetadataWriter pngInplace = pngFrame.CreateInPlaceBitmapMetadataWriter();
if (pngInplace.TrySave() == true)
{ pngInplace.SetQuery("/Text/Description", "Have a nice day."); }
pngStream.Close();
Dim pngStream As New System.IO.FileStream("smiley.png", FileMode.Open, FileAccess.ReadWrite, FileShare.ReadWrite)
Dim pngDecoder As New PngBitmapDecoder(pngStream, BitmapCreateOptions.PreservePixelFormat, BitmapCacheOption.Default)
Dim pngFrame As BitmapFrame = pngDecoder.Frames(0)
Dim pngInplace As InPlaceBitmapMetadataWriter = pngFrame.CreateInPlaceBitmapMetadataWriter()
If pngInplace.TrySave() = True Then
    pngInplace.SetQuery("/Text/Description", "Have a nice day.")
End If
pngStream.Close()
编解码器扩展性
WPF 图像处理的核心功能是用于新图像编解码器的扩展性模型。 通过这些非托管的接口,编解码器开发人员可以将编解码器与 WPF 集成,这样 WPF 应用程序就可以自动使用新的图像格式。
有关扩展性 API 的示例,请参阅 Win32 示例编解码器。 此示例演示如何为自定义图像格式创建解码器和编码器。
注意
编解码器必须进行数字签名,系统才能够识别它。
另请参阅
反馈
即将发布:在整个 2024 年,我们将逐步淘汰作为内容反馈机制的“GitHub 问题”,并将其取代为新的反馈系统。 有关详细信息,请参阅:https://aka.ms/ContentUserFeedback。
提交和查看相关反馈
