警告
此文档不适用于 Windows 服务的最新版本。 有关使用 BackgroundService 的 Windows 服务上的最新内容和辅助角色服务模板,请参阅:
本文演示了如何在 Visual Studio 中创建可向事件日志中写入消息的 Windows 服务应用程序。
创建服务
首先,创建项目并设置服务正常运行所必需的值。
从 Visual Studio“文件”菜单中,选择“新建”>“项目”(或按 Ctrl+Shift+N),打开“新建项目”窗口。
找到到并选择“Windows 服务 (.NET Framework)”项目模板。
备注
如果未看到“Windows 服务”模板,建议使用 Visual Studio 安装程序安装“.NET 桌面开发”工作负载
对于“名称”,请输入 MyNewService,然后选择“确定” 。
将出现“设计”选项卡(“Service1.cs [Design]”或“Service1.vb [Design]”) 。
项目模板包括从 System.ServiceProcess.ServiceBase 继承的名为
Service1的组件类。 它包括许多基本服务代码,例如用于启动服务的代码。
对服务进行重命名
将服务从 Service1 重命名为 MyNewService。
在“解决方案资源管理器”中,选择“Service1.cs”或“Service1.vb”,然后从快捷菜单中选择“重命名”。 将文件重命名为“MyNewService.cs”或“MyNewService.vb”,然后按 Enter
随即将出现一个弹出窗口,询问是否要重命名对代码元素 Service1 的所有引用 。
在弹出窗口中,选择“是” 。

在“设计”选项卡中,从快捷菜单中选择“属性” 。 在“属性”窗口中,将“ServiceName”值更改为 MyNewService 。

从“文件”菜单中选择“全部保存” 。
向服务添加功能
在本节中,你会添加自定义事件日志到 Windows 服务。 EventLog 组件是可以添加到 Windows 服务的组件类型的示例。
添加自定义事件日志功能
在“解决方案资源管理器”中,从“MyNewService.cs”或“MyNewService.vb”的快捷菜单中,选择“查看设计器”。
在“工具箱”中,展开“组件”,然后将“EventLog”组件拖到“Service1.cs [Design]”或“Service1.vb [Design]”标签。
在“解决方案资源管理器”中,从“MyNewService.cs”或“MyNewService.vb”的快捷菜单中,选择“查看代码”。
定义自定义事件日志。
对于 C#,请编辑现有
MyNewService()构造函数,如以下代码片段所示。 对于 Visual Basic,请添加New()构造函数,如以下代码片段所示。public MyNewService() { InitializeComponent(); eventLog1 = new System.Diagnostics.EventLog(); if (!System.Diagnostics.EventLog.SourceExists("MySource")) { System.Diagnostics.EventLog.CreateEventSource( "MySource","MyNewLog"); } eventLog1.Source = "MySource"; eventLog1.Log = "MyNewLog"; }' To access the constructor in Visual Basic, select New from the ' method name drop-down list. Public Sub New() MyBase.New() InitializeComponent() Me.EventLog1 = New System.Diagnostics.EventLog If Not System.Diagnostics.EventLog.SourceExists("MySource") Then System.Diagnostics.EventLog.CreateEventSource("MySource", "MyNewLog") End If EventLog1.Source = "MySource" EventLog1.Log = "MyNewLog" End Sub将
using语句添加到“MyNewService.cs”(如果它尚不存在)或者,对于 System.Diagnostics 命名空间,将Imports语句添加到“MyNewService.vb”:using System.Diagnostics;Imports System.Diagnostics从“文件”菜单中选择“全部保存” 。
定义服务启动时发生的情况
在“MyNewService.cs”或“MyNewService.vb”的代码编辑器中,找到 OnStart 方法。 创建项目时,Visual Studio 会自动创建一个空方法定义。 添加代码,以在服务启动时向事件日志写入一个条目:
protected override void OnStart(string[] args)
{
    eventLog1.WriteEntry("In OnStart.");
}
' To access the OnStart in Visual Basic, select OnStart from the
' method name drop-down list.
Protected Overrides Sub OnStart(ByVal args() As String)
    EventLog1.WriteEntry("In OnStart")
End Sub
轮询
由于服务应用程序设计为长时间运行,因此它通常会轮询或监视你在 OnStart 方法中设置的系统。 在服务操作开始后,OnStart 方法必须返回操作系统,以便不阻止系统。
若要设置简单的轮询机制,请使用 System.Timers.Timer 组件。 计时器定期引发 Elapsed 事件,此时你的服务可以进行监视。 可按如下方式使用 Timer 组件:
设置轮询机制
将
using语句添加到“MyNewService.cs”,或者,对于 System.Timers 命名空间,将Imports语句添加到“MyNewService.vb”:using System.Timers;Imports System.Timers在
MyNewService.OnStart事件中添加以下代码以设置轮询机制:// Set up a timer that triggers every minute. Timer timer = new Timer(); timer.Interval = 60000; // 60 seconds timer.Elapsed += new ElapsedEventHandler(this.OnTimer); timer.Start();' Set up a timer that triggers every minute. Dim timer As Timer = New Timer() timer.Interval = 60000 ' 60 seconds AddHandler timer.Elapsed, AddressOf Me.OnTimer timer.Start()在
MyNewService类中,添加成员变量。 它包含下一个要写入事件日志的事件的标识符:private int eventId = 1;Private eventId As Integer = 1在
MyNewService类中,添加OnTimer方法来处理 Timer.Elapsed 事件:public void OnTimer(object sender, ElapsedEventArgs args) { // TODO: Insert monitoring activities here. eventLog1.WriteEntry("Monitoring the System", EventLogEntryType.Information, eventId++); }Private Sub OnTimer(sender As Object, e As Timers.ElapsedEventArgs) ' TODO: Insert monitoring activities here. eventLog1.WriteEntry("Monitoring the System", EventLogEntryType.Information, eventId) eventId = eventId + 1 End Sub
可以使用后台工作线程来运行任务,而不是在主线程上运行所有工作。 有关详细信息,请参阅 System.ComponentModel.BackgroundWorker。
定义服务停止时发生的情况
向 OnStop 方法插入代码行,以在服务停止时向事件日志添加一个条目:
protected override void OnStop()
{
    eventLog1.WriteEntry("In OnStop.");
}
Protected Overrides Sub OnStop()
    EventLog1.WriteEntry("In OnStop.")
End Sub
定义服务的其他操作
可以重写 OnPause、OnContinue 和 OnShutdown 方法来定义对组件的其他处理。
以下代码显示了如何替代 MyNewService 类中的 OnContinue 方法:
protected override void OnContinue()
{
    eventLog1.WriteEntry("In OnContinue.");
}
Protected Overrides Sub OnContinue()
    EventLog1.WriteEntry("In OnContinue.")
End Sub
设置服务状态
服务向服务控制管理器报告其状态,以便用户可以判断服务是否运行正常。 默认情况下,从 ServiceBase 继承的服务会报告一组有限的状态设置,包括 SERVICE_STOPPED、SERVICE_PAUSED 和 SERVICE_RUNNING。 如果服务需要一段时间才能启动,则报告 SERVICE_START_PENDING 状态非常有用。
可以通过添加调用 Windows SetServiceStatus 函数的代码来实现 SERVICE_START_PENDING 和 SERVICE_STOP_PENDING 状态设置。
实现服务挂起状态
将
using语句添加到“MyNewService.cs”,或者,对于 System.Runtime.InteropServices 命名空间,将Imports语句添加到“MyNewService.vb”:using System.Runtime.InteropServices;Imports System.Runtime.InteropServices将以下代码添加到 MyNewService.cs 或 MyNewService.vb,声明
ServiceState值和添加你将在平台调用中使用的状态结构:public enum ServiceState { SERVICE_STOPPED = 0x00000001, SERVICE_START_PENDING = 0x00000002, SERVICE_STOP_PENDING = 0x00000003, SERVICE_RUNNING = 0x00000004, SERVICE_CONTINUE_PENDING = 0x00000005, SERVICE_PAUSE_PENDING = 0x00000006, SERVICE_PAUSED = 0x00000007, } [StructLayout(LayoutKind.Sequential)] public struct ServiceStatus { public int dwServiceType; public ServiceState dwCurrentState; public int dwControlsAccepted; public int dwWin32ExitCode; public int dwServiceSpecificExitCode; public int dwCheckPoint; public int dwWaitHint; };Public Enum ServiceState SERVICE_STOPPED = 1 SERVICE_START_PENDING = 2 SERVICE_STOP_PENDING = 3 SERVICE_RUNNING = 4 SERVICE_CONTINUE_PENDING = 5 SERVICE_PAUSE_PENDING = 6 SERVICE_PAUSED = 7 End Enum <StructLayout(LayoutKind.Sequential)> Public Structure ServiceStatus Public dwServiceType As Long Public dwCurrentState As ServiceState Public dwControlsAccepted As Long Public dwWin32ExitCode As Long Public dwServiceSpecificExitCode As Long Public dwCheckPoint As Long Public dwWaitHint As Long End Structure备注
服务控制管理器使用 SERVICE_STATUS 结构的
dwWaitHint和dwCheckpoint成员来确定等待 Windows 服务启动或关闭所需的时间。 如果OnStart和OnStop方法运行时间较长,服务可以使用递增的dwCheckPoint值再次调用SetServiceStatus来请求更多时间。在
MyNewService类中,使用平台调用声明 SetServiceStatus 函数:[DllImport("advapi32.dll", SetLastError = true)] private static extern bool SetServiceStatus(System.IntPtr handle, ref ServiceStatus serviceStatus);Declare Auto Function SetServiceStatus Lib "advapi32.dll" (ByVal handle As IntPtr, ByRef serviceStatus As ServiceStatus) As Boolean若要实现“SERVICE_START_PENDING”状态,请将以下代码添加到 OnStart 方法的开头:
// Update the service state to Start Pending.
ServiceStatus serviceStatus = new ServiceStatus();
serviceStatus.dwCurrentState = ServiceState.SERVICE_START_PENDING;
serviceStatus.dwWaitHint = 100000;
SetServiceStatus(this.ServiceHandle, ref serviceStatus);
' Update the service state to Start Pending. Dim serviceStatus As ServiceStatus = New ServiceStatus() serviceStatus.dwCurrentState = ServiceState.SERVICE_START_PENDING serviceStatus.dwWaitHint = 100000 SetServiceStatus(Me.ServiceHandle, serviceStatus)将代码添加到
OnStart方法的末尾,可将状态设置为 SERVICE_RUNNING:// Update the service state to Running. serviceStatus.dwCurrentState = ServiceState.SERVICE_RUNNING; SetServiceStatus(this.ServiceHandle, ref serviceStatus);' Update the service state to Running. serviceStatus.dwCurrentState = ServiceState.SERVICE_RUNNING SetServiceStatus(Me.ServiceHandle, serviceStatus)(可选)如果 OnStop 是长时间运行的方法,请在
OnStop方法中重复此过程。 实现 SERVICE_STOP_PENDING 状态并在OnStop方法退出之前返回 SERVICE_STOPPED 状态。例如:
// Update the service state to Stop Pending.
ServiceStatus serviceStatus = new ServiceStatus();
serviceStatus.dwCurrentState = ServiceState.SERVICE_STOP_PENDING;
serviceStatus.dwWaitHint = 100000;
SetServiceStatus(this.ServiceHandle, ref serviceStatus);

// Update the service state to Stopped.
serviceStatus.dwCurrentState = ServiceState.SERVICE_STOPPED;
SetServiceStatus(this.ServiceHandle, ref serviceStatus);
' Update the service state to Stop Pending. Dim serviceStatus As ServiceStatus = New ServiceStatus() serviceStatus.dwCurrentState = ServiceState.SERVICE_STOP_PENDING serviceStatus.dwWaitHint = 100000 SetServiceStatus(Me.ServiceHandle, serviceStatus) ' Update the service state to Stopped. serviceStatus.dwCurrentState = ServiceState.SERVICE_STOPPED SetServiceStatus(Me.ServiceHandle, serviceStatus)
向服务添加安装程序
需要先安装 Windows 服务然后才能运行,这会将其注册到服务控制管理器。 将安装程序添加到项目以处理注册详细信息。
在“解决方案资源管理器”中,从“MyNewService.cs”或“MyNewService.vb”的快捷菜单中,选择“查看设计器” 。
在“设计”视图中,选择背景区域,然后从快捷菜单中选择“添加安装程序” 。
默认情况下,Visual Studio 会向项目中添加一个名为
ProjectInstaller的组件类,其中包含两个安装程序。 这些安装程序是为你的服务以及服务的相关过程准备的。在“ProjectInstaller”的“设计”视图中,为 Visual C# 项目选择“serviceInstaller1”,或为 Visual Basic 项目选择“ServiceInstaller1”,然后选择快捷菜单中的“属性” 。
在“属性”窗口中,验证 ServiceName 属性是否已设置为“MyNewService”。
将文本添加到 Description 属性,例如“一个示例服务”。
此文本显示在“服务”窗口的“说明”列中,并向用户说明了该服务 。

将文本添加到 DisplayName 属性。 例如,“MyNewService 显示名称” 。
此文本显示在“服务”窗口的“显示名称”列中 。 此名称可以不同于 ServiceName 属性,它是系统使用的名称(例如,用于启动服务的
net start命令的名称)。完成后,“属性”窗口应如下图所示 :

在“ProjectInstaller”的“设计”视图中,为 Visual C# 项目选择“serviceProcessInstaller1”,或为 Visual Basic 项目选择“serviceProcessInstaller1”,然后选择快捷菜单中的“属性” 。 从下拉列表中将 Account 属性设置为 LocalSystem。
此设置将安装服务并使用本地系统帐户运行它。
重要
LocalSystem 帐户具有广泛的权限,包括能够写入事件日志。 使用此帐户时要特别小心,因为它会增加你受到恶意软件攻击的风险。 对于其他任务,请考虑使用 LocalService 帐户,该帐户用作本地计算机上的非特权用户,并向任意远程服务器提供匿名凭据。 如果你尝试使用 LocalService 账户,此例子将失败,因为它需要写入事件日志的权限。
有关安装程序的详细信息,请参阅如何:将安装程序添加到服务应用程序。
(可选)设置启动参数
备注
在决定添加启动参数前,请考虑这是否是向你的服务传递信息的最好办法。 虽然它们易于使用和分析,而且用户可以轻松地替代它们,但是如果没有相关的文档说明,用户可能较难发现和使用它们。 通常情况下,如果服务需要不止几个启动参数,则应改用注册表或配置文件。
Windows 服务可以接受命令行参数或启动参数。 将代码添加到进程启动参数后,用户可以在服务属性窗口中使用自己的自定义启动参数启动服务。 但是,这些启动参数不会保留到下一次服务启动。 若要永久设置启动参数,请在注册表中设置它们。
每个 Windows 服务在“HKEY_LOCAL_MACHINE\SYSTEM\CurrentControlSet\Services”子项下都有一个注册表项 。 在每个服务的子项下,使用“参数”子项存储服务可以访问的信息 。 你可以使用 Windows 服务的应用程序配置文件,与使用其他类型的程序一样。 有关示例代码,请参阅 ConfigurationManager.AppSettings。
添加启动参数
选择“Program.cs”或“MyNewService.Designer.vb”,然后从快捷菜单中选择“查看代码” 。 在
Main方法中,更改代码以添加输入参数并将其传递给服务构造函数:static void Main(string[] args) { ServiceBase[] ServicesToRun; ServicesToRun = new ServiceBase[] { new MyNewService(args) }; ServiceBase.Run(ServicesToRun); }Shared Sub Main(ByVal cmdArgs() As String) Dim ServicesToRun() As System.ServiceProcess.ServiceBase = New System.ServiceProcess.ServiceBase() {New MyNewService(cmdArgs)} System.ServiceProcess.ServiceBase.Run(ServicesToRun) End Sub在“MyNewService.cs”或“MyNewService.vb”中,更改
MyNewService构造函数以处理输入参数,如下所示:using System.Diagnostics; public MyNewService(string[] args) { InitializeComponent(); string eventSourceName = "MySource"; string logName = "MyNewLog"; if (args.Length > 0) { eventSourceName = args[0]; } if (args.Length > 1) { logName = args[1]; } eventLog1 = new EventLog(); if (!EventLog.SourceExists(eventSourceName)) { EventLog.CreateEventSource(eventSourceName, logName); } eventLog1.Source = eventSourceName; eventLog1.Log = logName; }Imports System.Diagnostics Public Sub New(ByVal cmdArgs() As String) InitializeComponent() Dim eventSourceName As String = "MySource" Dim logName As String = "MyNewLog" If (cmdArgs.Count() > 0) Then eventSourceName = cmdArgs(0) End If If (cmdArgs.Count() > 1) Then logName = cmdArgs(1) End If eventLog1 = New EventLog() If (Not EventLog.SourceExists(eventSourceName)) Then EventLog.CreateEventSource(eventSourceName, logName) End If eventLog1.Source = eventSourceName eventLog1.Log = logName End Sub此代码根据用户提供的启动参数设置事件源和日志名称。 如果未提供参数,则使用默认值。
若要指定命令行参数,请将以下代码添加到“ProjectInstaller.cs”或“ProjectInstaller.vb”中的
ProjectInstaller类:protected override void OnBeforeInstall(IDictionary savedState) { string parameter = "MySource1\" \"MyLogFile1"; Context.Parameters["assemblypath"] = "\"" + Context.Parameters["assemblypath"] + "\" \"" + parameter + "\""; base.OnBeforeInstall(savedState); }Protected Overrides Sub OnBeforeInstall(ByVal savedState As IDictionary) Dim parameter As String = "MySource1"" ""MyLogFile1" Context.Parameters("assemblypath") = """" + Context.Parameters("assemblypath") + """ """ + parameter + """" MyBase.OnBeforeInstall(savedState) End Sub通常,此值包含 Windows 服务的可执行文件的完整路径。 要使服务正确启动,用户必须为路径和每个参数提供引号。 用户可以更改“ImagePath”注册表项中的参数,以更改 Windows 服务的启动参数 。 但是,更好的方法是以编程方式更改值,并以用户友好的方式公开功能,例如使用管理或配置实用程序。
生成服务
在“解决方案资源管理器”中,从“MyNewService”项目的快捷菜单中选择“属性” 。
项目的属性页面会显示出来。
在“应用程序”选项卡上,在“启动对象”列表中,为 Visual Basic 项目选择 “MyNewService.Program” 或 “Sub Main” 。
要在“解决方案资源管理器”中生成项目,请从项目的快捷菜单中选择“生成”(或按 Ctrl+Shift+B)。
安装服务
由于已经生成了 Windows 服务,你现在可以安装它。 要安装 Windows 服务,必须在安装它的计算机上拥有管理员凭据。
使用管理凭据打开“Visual Studio 开发人员命令提示”。
在“Visual Studio 的开发人员命令提示”中,导航到包含项目输出的文件夹(默认情况下,它是项目的 \bin\Debug 子目录)。
输入以下命令:
installutil MyNewService.exe如果服务成功安装,该命令将报告成功。
如果系统找不到 installutil.exe,请确保你的计算机上存在该安装程序 。 此工具随 .NET Framework 安装在 %windir%\Microsoft.NET\Framework[64]\<framework version> 文件夹。 例如,64 位版本的默认路径是 %windir%\Microsoft.NET\Framework64\v4.0.30319\InstallUtil.exe 。
如果“installutil.exe”进程失败,请查看安装日志以找出原因 。 默认情况下,该日志与服务可执行文件位于同一文件夹中。 在以下情况下安装可能会失败:
ProjectInstaller类中不存在 RunInstallerAttribute 类。- 该属性未设置为
true。 ProjectInstaller类未定义为public。
有关详细信息,请参阅如何:安装和卸载服务。
启动并运行服务
在 Windows 中,打开 “服务”桌面应用程序。 按“Windows 徽标键+R”以打开“运行”框,然后输入 services.msc 并按 Enter 或单击“确定”。
你会看到 “服务”中列出的服务按其设置的显示名称的字母顺序显示。
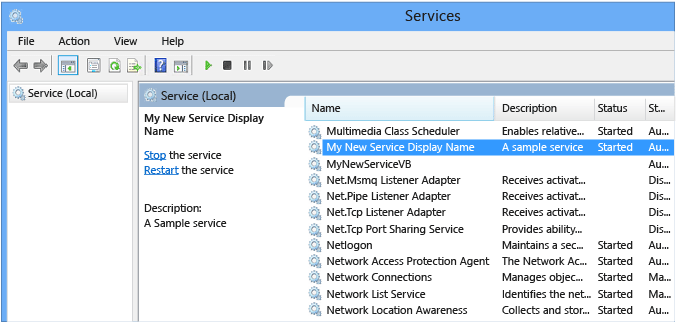
若要启动该服务,请从服务的快捷菜单中选择“启动” 。
若要停止该服务,请从服务的快捷菜单中选择“停止” 。
(可选)可在命令行使用“net start<服务名称>”和“net stop<服务名称>”来启动和停止服务。
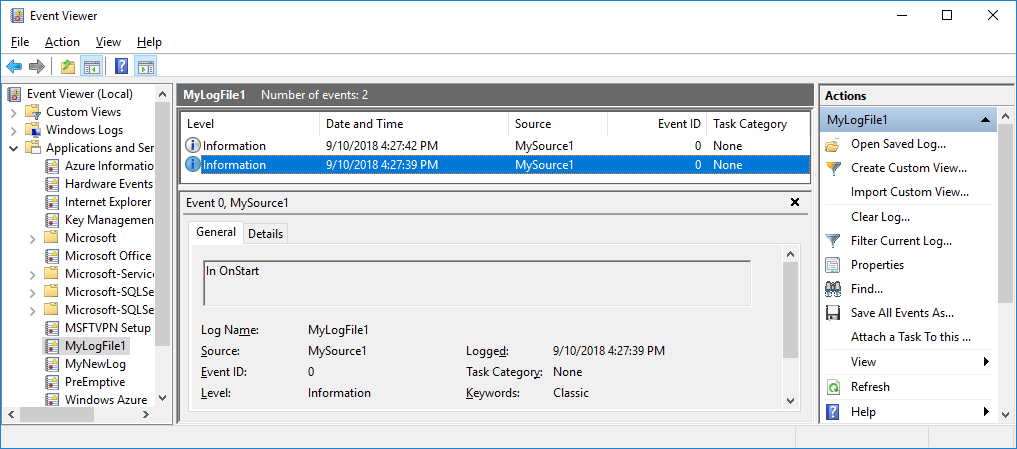
验证服务的事件日志输出
在 Windows 中,打开“事件查看器”桌面应用 。 在 Windows 搜索栏中输入事件查看器,然后从搜索结果中选择“事件查看器” 。
提示
在 Visual Studio 中,可通过从“查看”菜单(或按 Ctrl+Alt+S)打开“服务器资源管理器”并展开本地计算机的“事件日志”节点来访问事件日志。
在 “事件查看器”中,展开“应用程序和服务日志” 。
找到“MyNewLog”(如果按照过程来添加命令行参数,则找到“MyLogFile1”)列表并将其展开 。 你会看到你的服务所执行的两个操作(启动和停止)的条目。
清理资源
如果不再需要 Windows 服务应用,则可以将其删除。
使用管理凭据打开 “Visual Studio 开发人员命令提示” 。
在“Visual Studio 的开发人员命令提示”窗口中,导航到包含项目输出的文件夹 。
输入以下命令:
installutil.exe /u MyNewService.exe如果服务成功卸载,该命令将报告已成功删除服务。 有关详细信息,请参阅如何:安装和卸载服务。
后续步骤
创建服务后,现在可以:
为其他人创建一个独立的安装程序,用于安装 Windows 服务。 使用 WiX 工具集为 Windows 服务创建安装程序。 有关其他提示,请参阅创建安装程序包。
探索 ServiceController 组件,以便将命令发送到已安装的服务。
不是在应用程序运行时创建事件日志,而是在安装应用程序时使用安装程序创建事件日志。 卸载应用程序时,安装程序将删除事件日志。 有关详细信息,请参阅 EventLogInstaller。