如何:使用颜色矩阵对单色进行变换
GDI+ 提供 Image 和 Bitmap 类用于存储和操作图像。 Image 和 Bitmap 对象将每个像素的颜色存储为 32 位数字:红色、绿色、蓝色和 Alpha 各 8 位。 四个分量中的每一个都是一个从 0 到 255 的数字,其中 0 表示无强度,而 255 表示全强度。 Alpha 分量指定颜色的透明度:0 表示完全透明,255 表示完全不透明。
颜色向量是一个 4 元组的形式(红、绿、蓝、Alpha)。 例如,颜色矢量 (0, 255, 0, 255) 表示不透明的颜色,它没有红色或蓝色,但在全强度下具有绿色。
另一种表示颜色的约定使用数字 1 表示全强度。 使用该约定,上一段中描述的颜色将由向量 (0, 1, 0, 1) 表示。 GDI+ 在执行颜色转换时使用 1 作为全强度的约定。
可以通过将颜色向量乘以 4×4 矩阵来对颜色向量应用线性转换(旋转、缩放等)。 但是,不能使用 4×4 矩阵来执行平移(非线性)。 如果为每个颜色向量添加一个虚拟的第五坐标(例如数字 1),则可以使用 5×5 矩阵来应用线性转换和平移的任意组合。 由线性转换和平移组成的转换称为仿射变换。
例如,假设想从颜色 (0.2, 0.0, 0.4, 1.0) 开始并应用以下转换:
将红色分量翻倍
向红色、绿色和蓝色分量增加 0.2
以下矩阵乘法将按列出的顺序执行这对转换。
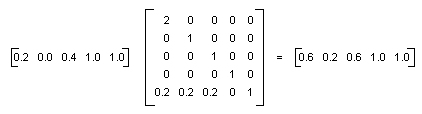
颜色矩阵的元素先按行索引,然后按列索引(从零开始)。 例如,矩阵 M 的第五行第三列中的条目由 M[4][2] 表示。
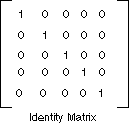
5×5 单位矩阵(如下图所示)在对角线上有 1,其他位置均为 0。 如果将颜色向量乘以单位矩阵,则颜色向量不会改变。 形成颜色转换矩阵的一种简便方法是从单位矩阵入手,进行小的更改以生成所需的转换。
有关矩阵和转换的更详细讨论,请参阅坐标系和坐标转换。
示例
以下示例采用全为一种颜色 (0.2, 0.0, 0.4, 1.0) 的图像并应用前面段落中描述的转换。
下图左侧显示原始图像,右侧显示转换后的图像。

以下示例中的代码使用以下步骤执行重新着色:
初始化一个 ColorMatrix 对象。
创建一个 ImageAttributes 对象并将 ColorMatrix 对象传递给 ImageAttributes 对象的 SetColorMatrix 方法。
将 ImageAttributes 对象传递给 Graphics 对象的 DrawImage 方法。
Image image = new Bitmap("InputColor.bmp");
ImageAttributes imageAttributes = new ImageAttributes();
int width = image.Width;
int height = image.Height;

float[][] colorMatrixElements = {
   new float[] {2,  0,  0,  0, 0},        // red scaling factor of 2
   new float[] {0,  1,  0,  0, 0},        // green scaling factor of 1
   new float[] {0,  0,  1,  0, 0},        // blue scaling factor of 1
   new float[] {0,  0,  0,  1, 0},        // alpha scaling factor of 1
   new float[] {.2f, .2f, .2f, 0, 1}};    // three translations of 0.2

ColorMatrix colorMatrix = new ColorMatrix(colorMatrixElements);

imageAttributes.SetColorMatrix(
   colorMatrix,
   ColorMatrixFlag.Default,
   ColorAdjustType.Bitmap);

e.Graphics.DrawImage(image, 10, 10);

e.Graphics.DrawImage(
   image,
   new Rectangle(120, 10, width, height),  // destination rectangle
   0, 0,        // upper-left corner of source rectangle
   width,       // width of source rectangle
   height,      // height of source rectangle
   GraphicsUnit.Pixel,
   imageAttributes);
Dim image As New Bitmap("InputColor.bmp")
Dim imageAttributes As New ImageAttributes()
Dim width As Integer = image.Width
Dim height As Integer = image.Height

' The following matrix consists of the following transformations:
' red scaling factor of 2
' green scaling factor of 1
' blue scaling factor of 1
' alpha scaling factor of 1
' three translations of 0.2
Dim colorMatrixElements As Single()() = { _
   New Single() {2, 0, 0, 0, 0}, _
   New Single() {0, 1, 0, 0, 0}, _
   New Single() {0, 0, 1, 0, 0}, _
   New Single() {0, 0, 0, 1, 0}, _
   New Single() {0.2F, 0.2F, 0.2F, 0, 1}}

Dim colorMatrix As New ColorMatrix(colorMatrixElements)

imageAttributes.SetColorMatrix(colorMatrix, ColorMatrixFlag.Default, ColorAdjustType.Bitmap)

e.Graphics.DrawImage(image, 10, 10)

e.Graphics.DrawImage( _
   image, _
   New Rectangle(120, 10, width, height), _
   0, _
   0, _
   width, _
   height, _
   GraphicsUnit.Pixel, _
   imageAttributes)
编译代码
前面的示例专用于 Windows 窗体,它需要 PaintEventArgse,后者是 Paint 事件处理程序的参数。
另请参阅
反馈
即将发布:在整个 2024 年,我们将逐步淘汰作为内容反馈机制的“GitHub 问题”,并将其取代为新的反馈系统。 有关详细信息,请参阅:https://aka.ms/ContentUserFeedback。
提交和查看相关反馈