使用 WinForms 进行数据绑定
此分步演练演示如何将 POCO 类型绑定到“主-详细信息”窗体中的 Windows 窗体 (WinForms) 控件。 应用程序使用实体框架,用数据库中的数据填充对象、跟踪更改并将数据保存到数据库。
该模型定义了两种参与一对多关系的类型:Category (principal\master) 和 Product (dependent\detail)。 然后,使用 Visual Studio 工具将模型中定义的类型绑定到 WinForms 控件。 WinForms 数据绑定框架允许在相关对象之间导航:在主视图中选择行将导致详细信息视图使用相应的子数据进行更新。
本演练中的屏幕截图和代码列表取自 Visual Studio 2013,但你可以使用 Visual Studio 2012 或 Visual Studio 2010 完成本演练。
先决条件
需要安装 Visual Studio 2013、Visual Studio 2012 或 Visual Studio 2010 才能完成本演练。
如果使用 Visual Studio 2010,还必须安装 NuGet。 有关详细信息,请参阅安装 NuGet。
创建应用程序
- 打开 Visual Studio
- “文件”->“新建”->“项目…”
- 在左窗格中选择“Windows”,并在右窗格中选择“Windows FormsApplication”
- 输入“WinFormswithEFSample”作为名称
- 选择“确定”
安装实体框架 NuGet 包
- 在解决方案资源管理器中,右键单击“WinFormswithEFSample”项目
- 选择“管理 NuGet 包…”
- 在“管理 NuGet 包”对话框中,选择“联机”选项卡,然后选择 EntityFramework 包
- 单击“安装”
注意
除了 EntityFramework 程序集,还添加了对 System.ComponentModel.DataAnnotations 的引用。 如果项目引用了 System.Data.Entity,安装 EntityFramework 包时会将其删除。 System.Data.Entity 程序集不再用于 Entity Framework 6 应用程序。
为集合实现 IListSource
使用 Windows 窗体时,集合属性必须实现 IListSource 接口以启用使用排序的双向数据绑定。 为此,我们将扩展 ObservableCollection 以添加 IListSource 功能。
- 将 ObservableListSource 类添加到项目:
- 右键单击项目名称
- 选择“添加”->“新项”
- 选择“类”并输入 ObservableListSource 作为类名
- 将默认生成的代码替换为以下代码:
此类支持双向数据绑定和排序。 此类派生自 ObservableCollection<T> 并添加了 IListSource 的显式实现。 实现 IListSource 的 GetList() 方法是为了返回与 ObservableCollection 保持同步的 IBindingList 实现。 ToBindingList 生成的 IBindingList 实现支持排序。 ToBindingList 扩展方法在 EntityFramework 程序集中定义。
    using System.Collections;
    using System.Collections.Generic;
    using System.Collections.ObjectModel;
    using System.ComponentModel;
    using System.Diagnostics.CodeAnalysis;
    using System.Data.Entity;

    namespace WinFormswithEFSample
    {
        public class ObservableListSource<T> : ObservableCollection<T>, IListSource
            where T : class
        {
            private IBindingList _bindingList;

            bool IListSource.ContainsListCollection { get { return false; } }

            IList IListSource.GetList()
            {
                return _bindingList ?? (_bindingList = this.ToBindingList());
            }
        }
    }
定义模型
在此演练中,可选择使用 Code First 或 EF Designer 来实现模型。 请完成以下两部分之一。
选项 1:使用 Code First 定义模型
本部分演示如何使用 Code First 创建模型及其关联的数据库。 如果想要使用 Database First 通过 EF Designer 从数据库对模型实施反向工程,请跳到下一部分(选项 2:使用 Database First 定义模型)
使用 Code First 开发时,通常先编写定义概念(域)模型的 .NET Framework 类。
- 向项目添加一个新的“Product”类
- 将默认生成的代码替换为以下代码:
    using System;
    using System.Collections.Generic;
    using System.Linq;
    using System.Text;
    using System.Threading.Tasks;

    namespace WinFormswithEFSample
    {
        public class Product
        {
            public int ProductId { get; set; }
            public string Name { get; set; }

            public int CategoryId { get; set; }
            public virtual Category Category { get; set; }
        }
    }
- 向项目中添加“Category”类。
- 将默认生成的代码替换为以下代码:
    using System;
    using System.Collections.Generic;
    using System.Linq;
    using System.Text;
    using System.Threading.Tasks;

    namespace WinFormswithEFSample
    {
        public class Category
        {
            private readonly ObservableListSource<Product> _products =
                    new ObservableListSource<Product>();

            public int CategoryId { get; set; }
            public string Name { get; set; }
            public virtual ObservableListSource<Product> Products { get { return _products; } }
        }
    }
除定义实体外,还需要定义一个派生自 DbContext 并公开 DbSet<TEntity> 属性的类。 DbSet 属性让上下文知道要包括在模型中的类型。 DbContext 和 DbSet 类型在 EntityFramework 程序集中定义。
DbContext 派生类型的实例在运行时管理实体对象,其中包括使用数据库中的数据填充对象、更改跟踪以及将数据保存到数据库。
- 向项目中添加一个新的“ProductContext”类。
- 将默认生成的代码替换为以下代码:
    using System;
    using System.Collections.Generic;
    using System.Data.Entity;
    using System.Linq;
    using System.Text;

    namespace WinFormswithEFSample
    {
        public class ProductContext : DbContext
        {
            public DbSet<Category> Categories { get; set; }
            public DbSet<Product> Products { get; set; }
        }
    }
编译该项目。
选项 2:使用 Database First 定义模型
本部分演示如何使用 Database First,通过 EF Designer 从数据库对模型实施反向工程。 如果已经完成上一部分(选项 1:使用 Code First 定义模型),请跳过本部分,直接转到“延迟加载”部分。
创建现有数据库据
通常,当目标为现有数据库时,该数据库已经创建完成,但在本演练中,我们需要创建一个要访问的数据库。
随 Visual Studio 安装的数据库服务器因你安装的 Visual Studio 版本而异:
- 如果使用 Visual Studio 2010,你将创建一个 SQL Express 数据库。
- 如果使用 Visual Studio 2012,你将创建一个 LocalDB 数据库。
接下来,生成数据库。
“视图”->“服务器资源管理器”
右键单击“数据连接”->“添加连接...”
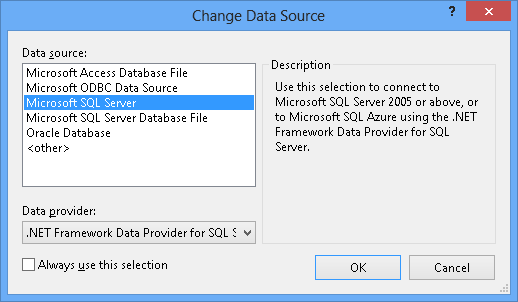
如果尚未从服务器资源管理器连接到数据库,则需要选择 Microsoft SQL Server 作为数据源
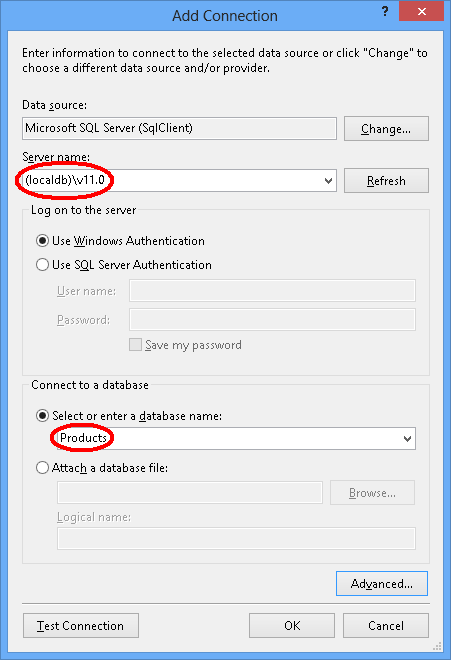
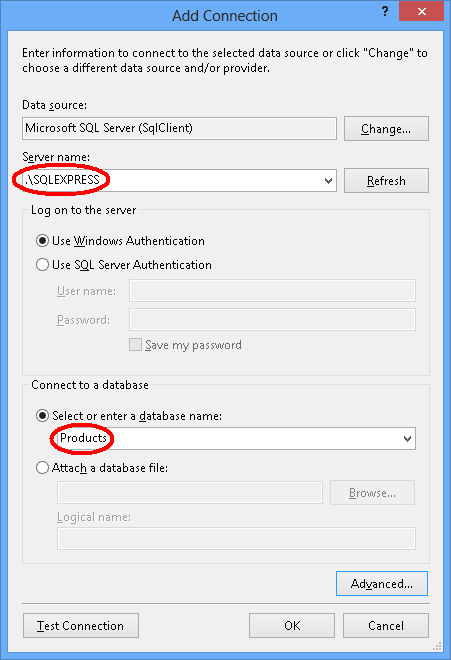
连接到 LocalDB 或 SQL Express,具体取决于你安装的是哪一个,然后输入 Products 作为数据库名称
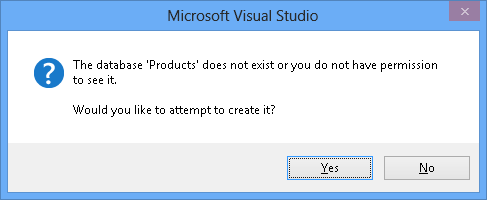
选择“确定”,系统会询问你是否要创建新数据库,请选择“是”
新数据库现在将出现在服务器资源管理器中,右键单击它并选择“新建查询”
将以下 SQL 复制到新查询中,然后右键单击该查询并选择“执行”
    CREATE TABLE [dbo].[Categories] (
        [CategoryId] [int] NOT NULL IDENTITY,
        [Name] [nvarchar](max),
        CONSTRAINT [PK_dbo.Categories] PRIMARY KEY ([CategoryId])
    )

    CREATE TABLE [dbo].[Products] (
        [ProductId] [int] NOT NULL IDENTITY,
        [Name] [nvarchar](max),
        [CategoryId] [int] NOT NULL,
        CONSTRAINT [PK_dbo.Products] PRIMARY KEY ([ProductId])
    )

    CREATE INDEX [IX_CategoryId] ON [dbo].[Products]([CategoryId])

    ALTER TABLE [dbo].[Products] ADD CONSTRAINT [FK_dbo.Products_dbo.Categories_CategoryId] FOREIGN KEY ([CategoryId]) REFERENCES [dbo].[Categories] ([CategoryId]) ON DELETE CASCADE
对模型实施反向工程
我们将使用 Visual Studio 中包含的实体框架设计器来创建模型。
“项目”->“添加新项...”
从左侧菜单中选择“数据”,然后选择“ADO.NET 实体数据模型”
输入“ProductModel”作为名称并单击“确定”
此操作将启动实体数据模型向导
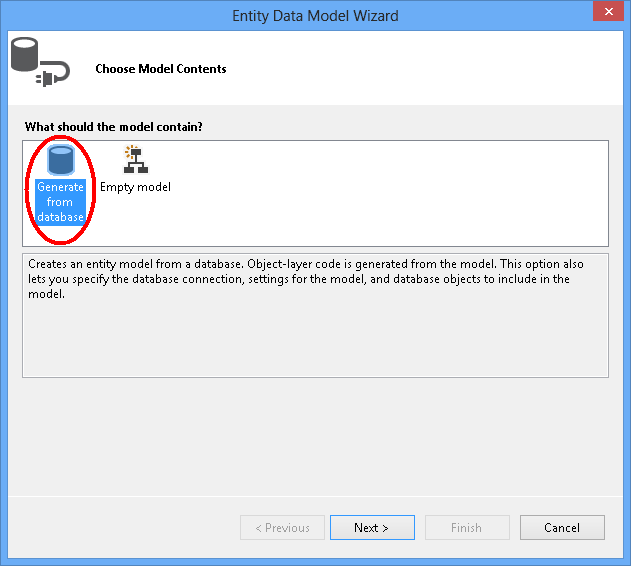
选择“从数据库生成”,然后单击“下一步”
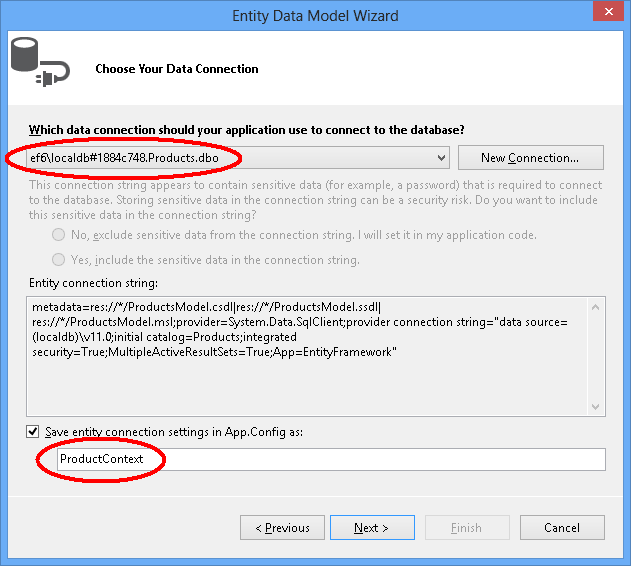
选择在第一部分中创建的数据库连接,输入“ProductContext”作为连接字符串的名称,然后单击“下一步”
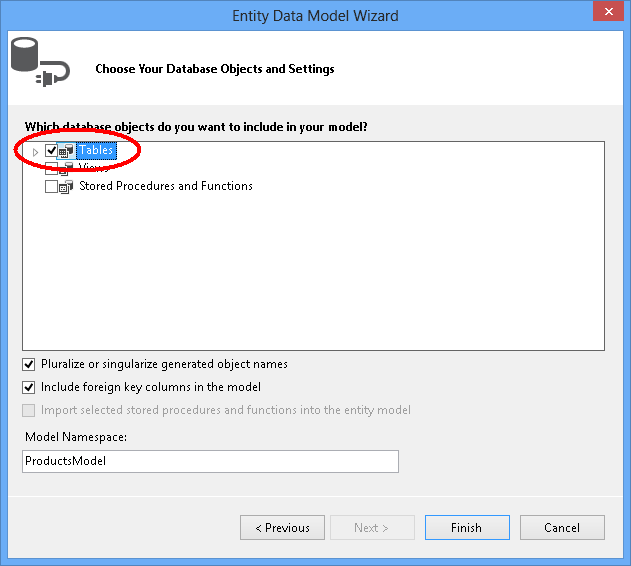
单击“表”旁边的复选框以导入所有表,然后单击“完成”
反向工程完成后,会将新模型添加到项目中并打开,以便在 Entity Framework Designer 中查看。 App.config 文件也已添加到项目中,其中包含数据库的连接详细信息。
Visual Studio 2010 中的其他步骤
如果使用 Visual Studio 2010,则需要更新 EF Designer 才能使用 EF6 代码生成。
- 在 EF 设计器中右键单击模型的空白处,然后选择“添加代码生成项...”
- 从左侧菜单中选择“联机模板”并搜索“DbContext”
- 选择“适用于 C# 的 EF 6.x DbContext 生成器”,输入 ProductsModel 作为名称,然后单击“添加”
更新数据绑定的代码生成
EF 使用 T4 模板从模型生成代码。 Visual Studio 附带的模板或从 Visual Studio 库下载的模板旨在用于常规用途。 这意味着根据这些模板生成的实体具有简单的 ICollection<T> 属性。 但是,在执行数据绑定时,需要具有实现 IListSource 的集合属性。 这是我们创建上述 ObservableListSource 类的原因,现在我们要修改模板以使用此类。
打开解决方案资源管理器并找到 ProductModel.edmx 文件
找到将嵌套在 ProductModel.edmx 文件下的 ProductModel.tt 文件
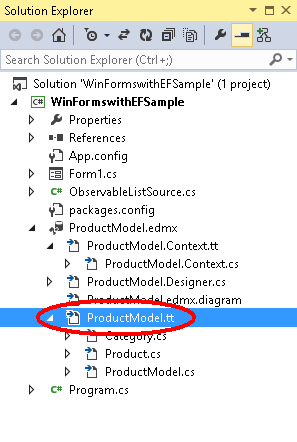
双击 ProductModel.tt 文件以在 Visual Studio 编辑器中打开
找到并用“ObservableListSource”替换两次出现的“ICollection”。 它们大约位于第 296 行和第 484 行。
找到并用“ObservableListSource”替换第一次出现的“HashSet”。 此内容大约位于第 50 行。 请勿替换代码中稍后第二次出现的 HashSet。
保存 ProductModel.tt 文件。 这应该会导致重新生成实体的代码。 如果未自动重新生成代码,则右键单击 ProductModel.tt,然后选择“运行自定义工具”。
如果现在打开 Category.cs 文件(嵌套在 ProductModel.tt 下),那么应该会看到“Products”集合的类型为 ObservableListSource<Product>。
编译该项目。
延迟加载
“类别”类上的“产品”属性和“产品”类上的“类别”属性是导航属性。 在实体框架中,导航属性提供了一种在两个实体类型之间导航关系的方法。
EF 提供了在首次访问导航属性时自动从数据库加载相关实体的选项。 如果使用此类型的加载(称为“延迟加载”),请注意,首次访问每个导航属性时,将对数据库执行单独的查询(如果内容不在上下文中)。
使用 POCO 实体类型时,EF 通过在运行时创建派生代理类型的实例,然后替代类中的虚拟属性以添加加载挂钩,来实现延迟加载。 若要获取相关对象的延迟加载,必须将导航属性 getter 声明为“公共”和“虚拟”(在 Visual Basic 中为 Overridable),并且不得密封类(在 Visual Basic 中为 NotOverridable)。 使用 Database First 时,会自动将导航属性设为虚拟,以启用延迟加载。 在 Code First 部分,出于同样的原因,我们选择将导航属性设为虚拟.
将对象绑定到控件
将在模型中定义的类作为此 WinForms 应用程序的数据源添加。
从主菜单中,选择“项目”->“添加新数据源...”(在 Visual Studio 2010 中,需要选择“数据”->“添加新数据源...”)
在“选择数据源类型”窗口中,选择“对象”并单击“下一步”
在“选择数据对象”对话框中,展开“WinFormswithEFSample”两次,并选择“Category”。无需选择“Product”数据源,因为我们将通过“Category”数据源上的“Product”的属性来获取。

单击“完成”。如果没有出现“数据源”窗口,选择“查看”->“其他窗口”->“数据源”
点击图钉图标,“数据源”窗口将不会自动隐藏。 如果窗口已可见,可能需要点击“刷新”按钮。

在解决方案资源管理器中,双击 Form1.cs 文件以在设计器中打开主窗体。
选择“Category”数据源,并将其拖到窗体上。 默认情况下,会将新的 DataGridView (categoryDataGridView) 和导航工具栏控件添加到设计器中。 这些控件将绑定到 BindingSource (categoryBindingSource) 和绑定导航器 (categoryBindingNavigator) 组件,这两个组件也需要创建。
编辑 categoryDataGridView 上的列。 需要将 CategoryId 列设置为只读。 保存数据后,数据库将生成 CategoryId 属性的值。
- 右键单击 DataGridView 控件,然后选择“编辑列…”
- 选择 CategoryId 列,然后将 ReadOnly 设置为 True
- 点击“确定”
选择“Category”数据源下的“Products”,并将其拖到窗体上。 productDataGridView 和 productBindingSource 将添加到窗体中。
编辑 productDataGridView 上的列。 我们想要隐藏“CategoryId”和“Category”列,并将 ProductId 设置为只读。 保存数据后,数据库将生成 ProductId 属性的值。
- 右键单击 DataGridView 控件,然后选择“编辑列…”。
- 选择 ProductId 列,然后将 ReadOnly 设置为 True。
- 选择“CategoryId”列并点击“删除”按钮。 对“Category”列执行相同的操作。
- 按“确定”。
目前为止,我们已在设计器中将 DataGridView 控件与 BindingSource 组件相关联。 在下一部分,我们将向代码隐藏添加代码,以便将 categoryBindingSource.DataSource 设置为 DbContext 当前跟踪的实体集合。 从“Category”下面拖放 Products 时,WinForms 会将 productsBindingSource.DataSource 属性设置为 categoryBindingSource,并将 productsBindingSource.DataMember 属性设置为 Products。 由于此绑定,productDataGridView 中将只显示属于当前所选“Category”的产品。
单击鼠标右键并选择“启用”,以启用“导航”工具栏上的“保存”按钮。

双击按钮,为保存按钮添加事件处理程序。 此操作可添加事件处理程序,并为你显示窗体的代码隐藏。 categoryBindingNavigatorSaveItem_Click 事件处理程序的代码将在下一部分进行添加。
添加处理数据交互的代码
现在,我们将添加代码,以使用 ProductContext 来执行数据访问。 更新主窗体窗口的代码,如下所示。
代码声明 ProductContext 的长时间运行的实例。 ProductContext 对象用于查询数据并将其保存到数据库。 然后从替代的 OnClosing 方法调用 ProductContext 实例上的 Dispose() 方法。 代码注释提供了有关代码功能的详细信息。
    using System;
    using System.Collections.Generic;
    using System.ComponentModel;
    using System.Data;
    using System.Drawing;
    using System.Linq;
    using System.Text;
    using System.Threading.Tasks;
    using System.Windows.Forms;
    using System.Data.Entity;

    namespace WinFormswithEFSample
    {
        public partial class Form1 : Form
        {
            ProductContext _context;
            public Form1()
            {
                InitializeComponent();
            }

            protected override void OnLoad(EventArgs e)
            {
                base.OnLoad(e);
                _context = new ProductContext();

                // Call the Load method to get the data for the given DbSet
                // from the database.
                // The data is materialized as entities. The entities are managed by
                // the DbContext instance.
                _context.Categories.Load();

                // Bind the categoryBindingSource.DataSource to
                // all the Unchanged, Modified and Added Category objects that
                // are currently tracked by the DbContext.
                // Note that we need to call ToBindingList() on the
                // ObservableCollection<TEntity> returned by
                // the DbSet.Local property to get the BindingList<T>
                // in order to facilitate two-way binding in WinForms.
                this.categoryBindingSource.DataSource =
                    _context.Categories.Local.ToBindingList();
            }

            private void categoryBindingNavigatorSaveItem_Click(object sender, EventArgs e)
            {
                this.Validate();

                // Currently, the Entity Framework doesn’t mark the entities
                // that are removed from a navigation property (in our example the Products)
                // as deleted in the context.
                // The following code uses LINQ to Objects against the Local collection
                // to find all products and marks any that do not have
                // a Category reference as deleted.
                // The ToList call is required because otherwise
                // the collection will be modified
                // by the Remove call while it is being enumerated.
                // In most other situations you can do LINQ to Objects directly
                // against the Local property without using ToList first.
                foreach (var product in _context.Products.Local.ToList())
                {
                    if (product.Category == null)
                    {
                        _context.Products.Remove(product);
                    }
                }

                // Save the changes to the database.
                this._context.SaveChanges();

                // Refresh the controls to show the values
                // that were generated by the database.
                this.categoryDataGridView.Refresh();
                this.productsDataGridView.Refresh();
            }

            protected override void OnClosing(CancelEventArgs e)
            {
                base.OnClosing(e);
                this._context.Dispose();
            }
        }
    }
测试 Windows 窗体应用程序
编译并运行应用程序,可以测试功能。

保存后,存储生成的键显示在屏幕上。

如果使用 Code First,则还会创建一个 WinFormswithEFSample.ProductContext 数据库。

