自跟踪实体演练
重要
我们不再建议使用自跟踪实体模板。 它将仅继续用于支持现有应用程序。 如果应用程序需要使用断开连接的实体图,请考虑其他替代方案,例如可跟踪实体,它与自跟踪实体类似,社区在更积极地开发这种技术,或使用低级别更改跟踪 API 编写自定义代码。
本演练演示 Windows Communication Foundation (WCF) 服务公开返回实体图的操作的方案。 接下来,一个客户端应用程序操作此关系图,并向一个使用实体框架来验证和保存对数据库所做的更新的服务操作提交修改内容。
完成本演练之前,请确保阅读自跟踪实体页。
此演练完成以下操作:
- 创建可访问的数据库。
- 创建包含模型的类库。
- 切换到自跟踪实体生成器模板。
- 将实体类移动到独立项目。
- 创建公开用于查询和保存实体的操作的 WCF 服务。
- 创建使用服务的客户端应用程序(控制台和 WPF)。
本演练将使用 Database First,但相同的方法同样适用于 Model First。
先决条件
若要完成本演练,需要最新版本的 Visual Studio。
创建数据库
随 Visual Studio 安装的数据库服务器因你安装的 Visual Studio 版本而异:
- 如果使用 Visual Studio 2012,你将创建一个 LocalDB 数据库。
- 如果使用 Visual Studio 2010,你将创建一个 SQL Express 数据库。
接下来,生成数据库。
- 打开 Visual Studio
- “视图”->“服务器资源管理器”
- 右键单击“数据连接”->“添加连接...”
- 如果尚未从服务器资源管理器连接到数据库,则需要选择 Microsoft SQL Server 作为数据源
- 连接 LocalDB 或 SQL Express,具体取决于安装的是哪一项
- 输入 STESample 作为数据库名称
- 选择“确定”,系统会询问你是否要创建新数据库,请选择“是”
- 新数据库现在将出现在服务器资源管理器中
- 如果你使用的是 Visual Studio 2012:
- 右键单击“服务器资源管理器”中的数据库,然后选择“新建查询”
- 将以下 SQL 复制到新查询中,然后右键单击该查询并选择“执行”
- 如果你使用的是 Visual Studio 2010:
- 选择“数据”->“Transact SQL 编辑器”->“新建查询连接...”
- 输入“.\SQLEXPRESS”作为服务器名称,然后单击“确定”
- 从查询编辑器顶部的下拉列表中选择“STESample”数据库
- 将以下 SQL 复制到新查询中,然后右键单击该查询并选择“执行 SQL”
    CREATE TABLE [dbo].[Blogs] (
        [BlogId] INT IDENTITY (1, 1) NOT NULL,
        [Name] NVARCHAR (200) NULL,
        [Url]  NVARCHAR (200) NULL,
        CONSTRAINT [PK_dbo.Blogs] PRIMARY KEY CLUSTERED ([BlogId] ASC)
    );

    CREATE TABLE [dbo].[Posts] (
        [PostId] INT IDENTITY (1, 1) NOT NULL,
        [Title] NVARCHAR (200) NULL,
        [Content] NTEXT NULL,
        [BlogId] INT NOT NULL,
        CONSTRAINT [PK_dbo.Posts] PRIMARY KEY CLUSTERED ([PostId] ASC),
        CONSTRAINT [FK_dbo.Posts_dbo.Blogs_BlogId] FOREIGN KEY ([BlogId]) REFERENCES [dbo].[Blogs] ([BlogId]) ON DELETE CASCADE
    );

    SET IDENTITY_INSERT [dbo].[Blogs] ON
    INSERT INTO [dbo].[Blogs] ([BlogId], [Name], [Url]) VALUES (1, N'ADO.NET Blog', N'blogs.msdn.com/adonet')
    SET IDENTITY_INSERT [dbo].[Blogs] OFF
    INSERT INTO [dbo].[Posts] ([Title], [Content], [BlogId]) VALUES (N'Intro to EF', N'Interesting stuff...', 1)
    INSERT INTO [dbo].[Posts] ([Title], [Content], [BlogId]) VALUES (N'What is New', N'More interesting stuff...', 1)
创建模型
首先,我们需要一个项目来放入模型。
- “文件”->“新建”->“项目...”
- 从左侧窗格中选择“Visual C#”,然后选择“类库”
- 输入“STESample”作为名称,然后单击“确定”
现在,我们将在 EF Designer 中创建一个简单的模型来访问数据库:
- “项目”->“添加新项...”
- 从左侧窗格中选择“数据”,然后选择“ADO.NET 实体数据模型”
- 输入 BloggingModel 作为名称并单击“确定”
- 选择“从数据库生成”,然后单击“下一步”。
- 输入在上一部分中创建的数据库的连接信息
- 输入“BloggingContext”作为连接字符串的名称,然后单击“下一步”
- 选中“表”旁边的框,然后单击“完成”
切换到 STE 代码生成
现在,我们需要禁用默认代码生成并切换到自跟踪实体。
如果你使用的是 Visual Studio 2012:
- 在“解决方案资源管理器”中展开“BloggingModel.edmx”,然后删除“BloggingModel.tt”和“BloggingModel.Context.tt”,这会禁用默认代码生成
- 右键单击 EF Designer 图面上的空白区域,然后选择“添加代码生成项...”
- 从左侧窗格选择“联机”,然后搜索“STE 生成器”
- 选择“适用于 C# 的 STE 生成器”模板,输入“STETemplate”作为名称,然后单击“添加”
- “STETemplate.tt”和“STETemplate.Context.tt”文件嵌套在 BloggingModel.edmx 文件下
如果使用的是 Visual Studio 2010
- 右键单击 EF Designer 图面上的空白区域,然后选择“添加代码生成项...”
- 从左侧窗格中选择“代码”,然后选择“ADO.NET 自跟踪实体生成器”
- 输入“STETemplate”作为名称,然后单击“添加”
- “STETemplate.tt”和“STETemplate.Context.tt”文件被直接添加到项目中
将实体类型移动到独立项目
若要使用自跟踪实体,则客户端应用程序需要访问从模型生成的实体类。 由于我们不想向客户端应用程序公开整个模型,因此我们可将实体类移动到独立项目中。
第一步是在现有项目中停止生成实体类:
- 右键单击“解决方案资源管理器”中的“STETemplate.tt”,然后选择“属性”。
- 在“属性”窗口中,从“CustomTool”属性中清除 TextTemplatingFileGenerator
- 在“解决方案资源管理器”中展开“STETemplate.tt”,然后删除嵌套在其下的所有文件
接下来,我们将添加新项目,并在其中生成实体类
“文件”->“添加”->“项目...”
从左侧窗格中选择“Visual C#”,然后选择“类库”
输入“STESample.Entities”作为名称,然后单击“确定”
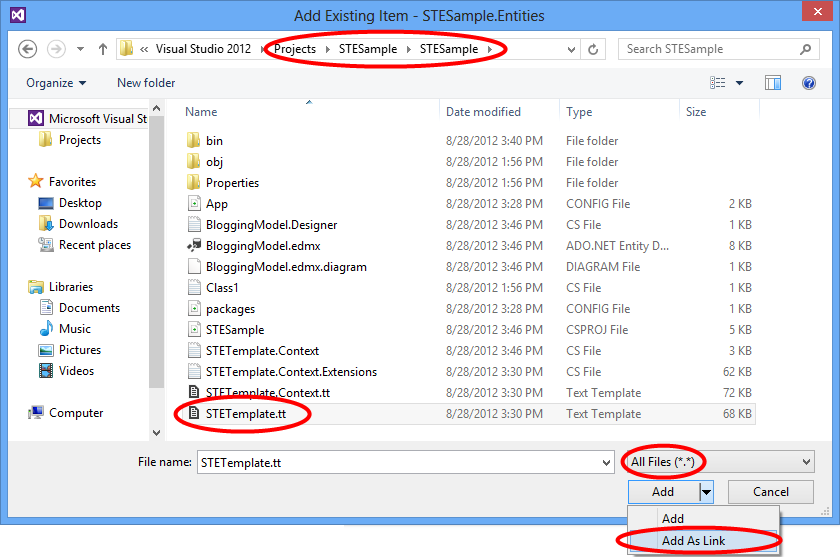
“项目”->“添加现有项...”
导航到“STESample”项目文件夹
选择以查看“所有文件(*.*)”
选择“STETemplate.tt”文件
单击“添加”按钮旁边的下拉箭头,然后选择“添加为链接”
我们还将确保在与上下文相同的命名空间中生成实体类。 这只是减少了我们需要在整个应用程序中添加的 using 语句的数量。
- 右键单击“解决方案资源管理器”中的链接“STETemplate.tt”,然后选择“属性”
- 在“属性”窗口中,将“自定义工具命名空间”设置为“STESample”
STE 模板生成的代码需要引用 System.Runtime.Serialization 才能进行编译。 在可序列化的实体类型上使用的 WCF DataContract 和 DataMember 属性均需要此库。
- 在“解决方案资源管理器”中右键单击“STESample.Entities”项目,然后选择“添加引用...”。
- 在 Visual Studio 2012 中,选中 System.Runtime.Serialization 旁边的框,然后单击“确定”
- 在 Visual Studio 2010 中,选择“System.Runtime.Serialization”,然后单击“确定”
最后,包含上下文的项目需要引用实体类型。
- 在“解决方案资源管理器”中右键单击“STESample”项目,然后选择“添加引用...”。
- 在 Visual Studio 2012 中,从左侧窗格中选择“解决方案”,选中 STESample.Entities 旁的框,然后单击“确定”
- 在 Visual Studio 2010 中,依次选择“项目”选项卡、“STESample.Entities”,然后单击“确定”
注意
将实体类型移动到单独项目的另一个选项是移动模板文件,而不是从默认位置链接它。 如果这样做,则需要更新模板中的 inputFile 变量,以提供 edmx 文件的相对路径(在本例中,该路径为 ..\BloggingModel.edmx)。
创建 WCF 服务
接下来添加 WCF 服务以公开数据,我们将从创建项目开始。
- “文件”->“添加”->“项目...”
- 从左侧窗格中选择“Visual C#”,然后选择“WCF 服务应用程序”
- 输入“STESample.Service”作为名称,然后单击“确定”
- 添加对 System.Data.Entity 程序集的引用
- 添加对 STESample 和 STESample.Entities 项目的引用
需要将 EF 连接字符串复制到此项目,以便在运行时找到它。
- 打开“STESample”项目的“App.Config”文件,然后复制“connectionStrings”元素
- 将“connectionStrings”元素作为“Web.Config”文件的“configuration”元素的子元素粘贴到 STESample.Service 项目中
接下来实现实际的服务。
- 打开 IService1.cs 并将内容替换为以下代码
    using System.Collections.Generic;
    using System.ServiceModel;

    namespace STESample.Service
    {
        [ServiceContract]
        public interface IService1
        {
            [OperationContract]
            List<Blog> GetBlogs();

            [OperationContract]
            void UpdateBlog(Blog blog);
        }
    }
- 打开 Service1.svc 并将内容替换为以下代码
    using System;
    using System.Collections.Generic;
    using System.Data;
    using System.Linq;

    namespace STESample.Service
    {
        public class Service1 : IService1
        {
            /// <summary>
            /// Gets all the Blogs and related Posts.
            /// </summary>
            public List<Blog> GetBlogs()
            {
                using (BloggingContext context = new BloggingContext())
                {
                    return context.Blogs.Include("Posts").ToList();
                }
            }

            /// <summary>
            /// Updates Blog and its related Posts.
            /// </summary>
            public void UpdateBlog(Blog blog)
            {
                using (BloggingContext context = new BloggingContext())
                {
                    try
                    {
                        // TODO: Perform validation on the updated order before applying the changes.

                        // The ApplyChanges method examines the change tracking information
                        // contained in the graph of self-tracking entities to infer the set of operations
                        // that need to be performed to reflect the changes in the database.
                        context.Blogs.ApplyChanges(blog);
                        context.SaveChanges();

                    }
                    catch (UpdateException)
                    {
                        // To avoid propagating exception messages that contain sensitive data to the client tier
                        // calls to ApplyChanges and SaveChanges should be wrapped in exception handling code.
                        throw new InvalidOperationException("Failed to update. Try your request again.");
                    }
                }
            }
        }
    }
从控制台应用程序使用服务
让我们创建一个使用服务的控制台应用程序。
- “文件”->“新建”->“项目...”
- 从左侧窗格中选择“Visual C#”,然后选择“控制台应用程序”
- 输入“STESample.ConsoleTest”作为名称,然后单击“确定”
- 添加对 STESample.Entities 项目的引用
我们需要具有对 WCF 服务的服务引用
- 在“解决方案资源管理器”中,右键单击“STESample.ConsoleTest”项目,并选择“添加服务引用...”。
- 单击“发现”
- 输入“BloggingService”作为命名空间,然后单击“确定”
现在,我们可以编写一些代码来使用该服务。
- 打开“Program.cs”并将内容替换为以下代码。
    using STESample.ConsoleTest.BloggingService;
    using System;
    using System.Linq;

    namespace STESample.ConsoleTest
    {
        class Program
        {
            static void Main(string[] args)
            {
                // Print out the data before we change anything
                Console.WriteLine("Initial Data:");
                DisplayBlogsAndPosts();

                // Add a new Blog and some Posts
                AddBlogAndPost();
                Console.WriteLine("After Adding:");
                DisplayBlogsAndPosts();

                // Modify the Blog and one of its Posts
                UpdateBlogAndPost();
                Console.WriteLine("After Update:");
                DisplayBlogsAndPosts();

                // Delete the Blog and its Posts
                DeleteBlogAndPost();
                Console.WriteLine("After Delete:");
                DisplayBlogsAndPosts();

                Console.WriteLine("Press any key to exit...");
                Console.ReadKey();
            }

            static void DisplayBlogsAndPosts()
            {
                using (var service = new Service1Client())
                {
                    // Get all Blogs (and Posts) from the service
                    // and print them to the console
                    var blogs = service.GetBlogs();
                    foreach (var blog in blogs)
                    {
                        Console.WriteLine(blog.Name);
                        foreach (var post in blog.Posts)
                        {
                            Console.WriteLine(" - {0}", post.Title);
                        }
                    }
                }

                Console.WriteLine();
                Console.WriteLine();
            }

            static void AddBlogAndPost()
            {
                using (var service = new Service1Client())
                {
                    // Create a new Blog with a couple of Posts
                    var newBlog = new Blog
                    {
                        Name = "The New Blog",
                        Posts =
                        {
                            new Post { Title = "Welcome to the new blog"},
                            new Post { Title = "What's new on the new blog"}
                        }
                    };

                    // Save the changes using the service
                    service.UpdateBlog(newBlog);
                }
            }

            static void UpdateBlogAndPost()
            {
                using (var service = new Service1Client())
                {
                    // Get all the Blogs
                    var blogs = service.GetBlogs();

                    // Use LINQ to Objects to find The New Blog
                    var blog = blogs.First(b => b.Name == "The New Blog");

                    // Update the Blogs name
                    blog.Name = "The Not-So-New Blog";

                    // Update one of the related posts
                    blog.Posts.First().Content = "Some interesting content...";

                    // Save the changes using the service
                    service.UpdateBlog(blog);
                }
            }

            static void DeleteBlogAndPost()
            {
                using (var service = new Service1Client())
                {
                    // Get all the Blogs
                    var blogs = service.GetBlogs();

                    // Use LINQ to Objects to find The Not-So-New Blog
                    var blog = blogs.First(b => b.Name == "The Not-So-New Blog");

                    // Mark all related Posts for deletion
                    // We need to call ToList because each Post will be removed from the
                    // Posts collection when we call MarkAsDeleted
                    foreach (var post in blog.Posts.ToList())
                    {
                        post.MarkAsDeleted();
                    }

                    // Mark the Blog for deletion
                    blog.MarkAsDeleted();

                    // Save the changes using the service
                    service.UpdateBlog(blog);
                }
            }
        }
    }
现在可以运行应用程序来查看其实际运行情况。
- 在“解决方案资源管理器”中,右键单击“STESample.ConsoleTest”项目,并选择“调试”->“启动新实例”
当应用程序执行时,你将看到以下输出:
Initial Data:
ADO.NET Blog
- Intro to EF
- What is New

After Adding:
ADO.NET Blog
- Intro to EF
- What is New
The New Blog
- Welcome to the new blog
- What's new on the new blog

After Update:
ADO.NET Blog
- Intro to EF
- What is New
The Not-So-New Blog
- Welcome to the new blog
- What's new on the new blog

After Delete:
ADO.NET Blog
- Intro to EF
- What is New

Press any key to exit...
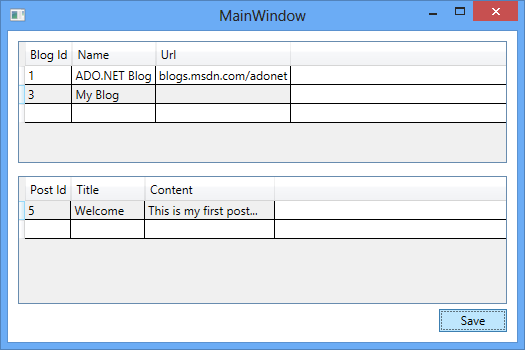
从 WPF 应用程序使用服务
让我们创建一个使用服务的 WPF 应用程序。
- “文件”->“新建”->“项目...”
- 从左侧窗格中选择“Visual C#”,然后选择“WPF 应用程序”
- 输入“STESample.WPFTest”作为名称,然后单击“确定”
- 添加对 STESample.Entities 项目的引用
我们需要具有对 WCF 服务的服务引用
- 在“解决方案资源管理器”中,右键单击“STESample.WPFTest”项目,并选择“添加服务引用...”
- 单击“发现”
- 输入“BloggingService”作为命名空间,然后单击“确定”
现在,我们可以编写一些代码来使用该服务。
- 打开“MainWindow.xaml”并将内容替换为以下代码。
    <Window
        xmlns="http://schemas.microsoft.com/winfx/2006/xaml/presentation"
        xmlns:x="http://schemas.microsoft.com/winfx/2006/xaml"
        xmlns:d="http://schemas.microsoft.com/expression/blend/2008"
        xmlns:mc="http://schemas.openxmlformats.org/markup-compatibility/2006"
        xmlns:STESample="clr-namespace:STESample;assembly=STESample.Entities"
        mc:Ignorable="d" x:Class="STESample.WPFTest.MainWindow"
        Title="MainWindow" Height="350" Width="525" Loaded="Window_Loaded">

        <Window.Resources>
            <CollectionViewSource
                x:Key="blogViewSource"
                d:DesignSource="{d:DesignInstance {x:Type STESample:Blog}, CreateList=True}"/>
            <CollectionViewSource
                x:Key="blogPostsViewSource"
                Source="{Binding Posts, Source={StaticResource blogViewSource}}"/>
        </Window.Resources>

        <Grid DataContext="{StaticResource blogViewSource}">
            <DataGrid AutoGenerateColumns="False" EnableRowVirtualization="True"
                      ItemsSource="{Binding}" Margin="10,10,10,179">
                <DataGrid.Columns>
                    <DataGridTextColumn Binding="{Binding BlogId}" Header="Id" Width="Auto" IsReadOnly="True" />
                    <DataGridTextColumn Binding="{Binding Name}" Header="Name" Width="Auto"/>
                    <DataGridTextColumn Binding="{Binding Url}" Header="Url" Width="Auto"/>
                </DataGrid.Columns>
            </DataGrid>
            <DataGrid AutoGenerateColumns="False" EnableRowVirtualization="True"
                      ItemsSource="{Binding Source={StaticResource blogPostsViewSource}}" Margin="10,145,10,38">
                <DataGrid.Columns>
                    <DataGridTextColumn Binding="{Binding PostId}" Header="Id" Width="Auto"  IsReadOnly="True"/>
                    <DataGridTextColumn Binding="{Binding Title}" Header="Title" Width="Auto"/>
                    <DataGridTextColumn Binding="{Binding Content}" Header="Content" Width="Auto"/>
                </DataGrid.Columns>
            </DataGrid>
            <Button Width="68" Height="23" HorizontalAlignment="Right" VerticalAlignment="Bottom"
                    Margin="0,0,10,10" Click="buttonSave_Click">Save</Button>
        </Grid>
    </Window>
- 打开 MainWindow (MainWindow.xaml.cs) 的代码隐藏,并将内容替换为以下代码
    using STESample.WPFTest.BloggingService;
    using System.Collections.Generic;
    using System.Linq;
    using System.Windows;
    using System.Windows.Data;

    namespace STESample.WPFTest
    {
        public partial class MainWindow : Window
        {
            public MainWindow()
            {
                InitializeComponent();
            }

            private void Window_Loaded(object sender, RoutedEventArgs e)
            {
                using (var service = new Service1Client())
                {
                    // Find the view source for Blogs and populate it with all Blogs (and related Posts)
                    // from the Service. The default editing functionality of WPF will allow the objects
                    // to be manipulated on the screen.
                    var blogsViewSource = (CollectionViewSource)this.FindResource("blogViewSource");
                    blogsViewSource.Source = service.GetBlogs().ToList();
                }
            }

            private void buttonSave_Click(object sender, RoutedEventArgs e)
            {
                using (var service = new Service1Client())
                {
                    // Get the blogs that are bound to the screen
                    var blogsViewSource = (CollectionViewSource)this.FindResource("blogViewSource");
                    var blogs = (List<Blog>)blogsViewSource.Source;

                    // Save all Blogs and related Posts
                    foreach (var blog in blogs)
                    {
                        service.UpdateBlog(blog);
                    }

                    // Re-query for data to get database-generated keys etc.
                    blogsViewSource.Source = service.GetBlogs().ToList();
                }
            }
        }
    }
现在可以运行应用程序来查看其实际运行情况。
- 在“解决方案资源管理器”中,右键单击“STESample.WPFTest”项目,并选择“调试”->“启动新实例”
- 可使用屏幕操作数据,并使用“保存”按钮通过服务器保存数据