教程:Microsoft Entra SSO 与 SAP Litmos 的集成
本教程介绍如何将 SAP Litmos 与 Microsoft Entra ID 相集成。 将 SAP Litmos 与 Microsoft Entra ID 集成后,可以:
- 在 Microsoft Entra ID 中控制谁有权访问 SAP Litmos。
- 让用户能够使用其 Microsoft Entra 帐户自动登录到 SAP Litmos。
- 在中心位置管理帐户。
先决条件
若要开始操作,需备齐以下项目:
- 一个 Microsoft Entra 订阅。 如果你没有订阅,可以获取一个免费帐户。
- 已启用 SAP Litmos 单一登录 (SSO) 的订阅。
方案描述
在本教程中,将在测试环境中配置并测试 Microsoft Entra SSO。
- SAP Litmos 支持 SP 和 IDP 发起的 SSO。
- SAP Litmos 支持“实时”用户预配。
- SAP Litmos 支持自动用户预配。
从库中添加 SAP Litmos
若要配置 SAP Litmos 与 Microsoft Entra ID 的集成,需要从库中将 SAP Litmos 添加到托管 SaaS 应用列表。
- 至少以云应用程序管理员身份登录到 Microsoft Entra 管理中心。
- 浏览至“标识”>“应用程序”>“企业应用程序”>“新建应用程序”。
- 在“从库中添加”部分的搜索框中,键入“SAP Litmos”。
- 从结果面板中选择“SAP Litmos”,然后添加该应用。 在该应用添加到租户时等待几秒钟。
或者,也可以使用企业应用配置向导。 在此向导中,可以将应用程序添加到租户、将用户/组添加到应用、分配角色,以及逐步完成 SSO 配置。 详细了解 Microsoft 365 向导。
配置并测试 SAP Litmos 的 Microsoft Entra SSO
使用名为 B.Simon 的测试用户配置并测试 SAP Litmos 的 Microsoft Entra SSO。 若要使 SSO 正常工作,需要在 Microsoft Entra 用户与 SAP Litmos 中的相关用户之间建立关联。
若要配置并测试 SAP Litmos 的 Microsoft Entra SSO,请执行以下步骤:
- 配置 Microsoft Entra SSO - 使用户能够使用此功能。
- 创建 Microsoft Entra 测试用户 - 使用 B.Simon 测试 Microsoft Entra 单一登录。
- 分配 Microsoft Entra 测试用户 - 使 B.Simon 能够使用 Microsoft Entra 单一登录。
- 配置 SAP Litmos SSO - 在应用程序端配置单一登录设置。
- 创建 SAP Litmos 测试用户 - 在 SAP Litmos 中创建 B.Simon 的对应用户,并将其链接到用户的 Microsoft Entra 表示形式。
- 测试 SSO - 验证配置是否正常工作。
配置 Microsoft Entra SSO
按照以下步骤启用 Microsoft Entra SSO。
至少以云应用程序管理员身份登录到 Microsoft Entra 管理中心。
浏览到“标识”>“应用程序”>“企业应用程序”>“SAP Litmos”>“单一登录”。
在“选择单一登录方法”页上选择“SAML” 。
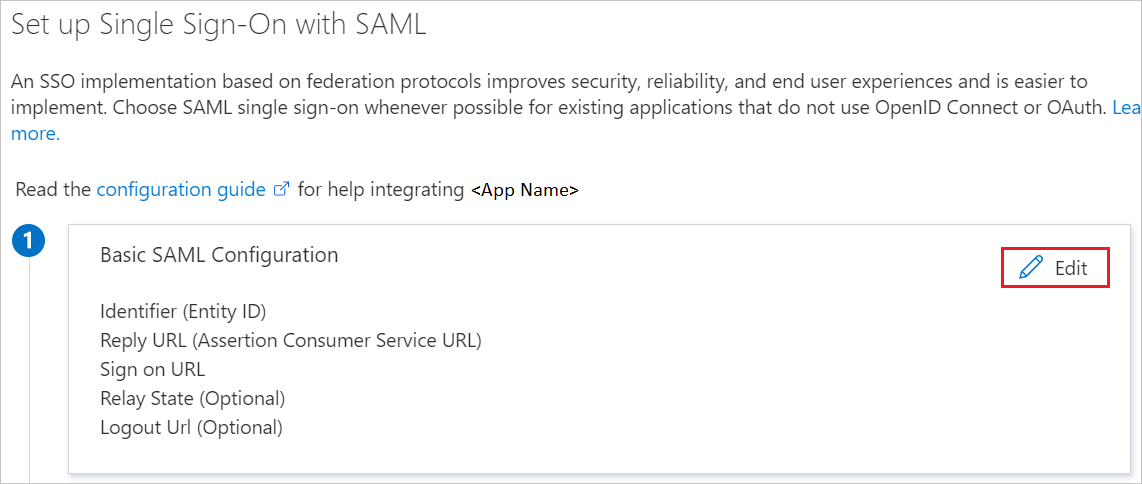
在“设置 SAML 单一登录”页面上,单击“基本 SAML 配置”旁边的铅笔图标以编辑设置 。

在“基本 SAML 配置” 部分中,按照以下步骤操作:
a. 在“标识符”文本框中,键入以下 URL 之一:
Identifier https://<CustomerName>.litmos.comhttps://<CustomerName>.litmos.com.auhttps://<CustomerName>.litmoseu.comb. 在“回复 URL”文本框中,键入以下 URL 之一:
回复 URL https://<CompanyName>.litmos.com/integration/sploginhttps://<CompanyName>.litmos.com/integration/splogin?IdP=1https://<CompanyName>.litmos.com/integration/splogin?IdP=2https://<CompanyName>.litmos.com/integration/splogin?IdP=3https://<CompanyName>.litmos.com/integration/splogin?IdP=14https://<CompanyName>.litmos.com.au/integration/sploginhttps://<CompanyName>.litmos.com.au/integration/splogin?IdP=1https://<CompanyName>.litmos.com.au/integration/splogin?IdP=2https://<CompanyName>.litmos.com.au/integration/splogin?IdP=3https://<CompanyName>.litmos.com.au/integration/splogin?IdP=14https://<CompanyName>.litmoseu.com/integration/sploginhttps://<CompanyName>.litmoseu.com/integration/splogin?IdP=1https://<CompanyName>.litmoseu.com/integration/splogin?IdP=2https://<CompanyName>.litmoseu.com/integration/splogin?IdP=3https://<CompanyName>.litmoseu.com/integration/splogin?IdP=14c. 在“登录 URL”文本框中,键入以下 URL 之一:
登录 URL https://<CompanyName>.litmos.com/integration/sploginhttps://<CompanyName>.litmos.com/integration/splogin?IdP=1https://<CompanyName>.litmos.com/integration/splogin?IdP=2https://<CompanyName>.litmos.com/integration/splogin?IdP=3https://<CompanyName>.litmos.com/integration/splogin?IdP=14https://<CompanyName>.litmos.com.au/integration/sploginhttps://<CompanyName>.litmos.com.au/integration/splogin?IdP=1https://<CompanyName>.litmos.com.au/integration/splogin?IdP=2https://<CompanyName>.litmos.com.au/integration/splogin?IdP=3https://<CompanyName>.litmos.com.au/integration/splogin?IdP=14https://<CompanyName>.litmoseu.com/integration/sploginhttps://<CompanyName>.litmoseu.com/integration/splogin?IdP=1https://<CompanyName>.litmoseu.com/integration/splogin?IdP=2https://<CompanyName>.litmoseu.com/integration/splogin?IdP=3https://<CompanyName>.litmoseu.com/integration/splogin?IdP=14d. 在“中继状态 URL”文本框中,键入以下 URL 之一:
中继状态 URL https://<CompanyName>.litmos.com/integration/splogin?RelayState=https://<CustomerName>.litmos.com/Course/12345https://<CompanyName>.litmos.com/integration/splogin?RelayState=https://<CustomerName>.litmos.com/LearningPath/12345注意
这些不是实际值。 使用实际标识符、回复 URL 和登录 URL 和中继状态 URL 更新这些值(本教程后面部分将进行介绍)或联系 SAP Litmos 客户端支持团队来获取这些值。 还可参考“基本 SAML 配置”部分中显示的模式。
在“使用 SAML 设置单一登录”页的“SAML 签名证书”部分中,找到“证书(Base64)”,选择“下载”以下载该证书并将其保存到计算机上 。

在“设置 SAP Litmos”部分,根据要求复制相应的 URL。

创建 Microsoft Entra 测试用户
在本部分,你将创建名为 B.Simon 的测试用户。
- 至少以用户管理员身份登录到 Microsoft Entra 管理中心。
- 浏览到“标识”>“用户”>“所有用户”。
- 选择屏幕顶部的“新建用户”>“创建新用户”。
- 在“用户”属性中执行以下步骤:
- 在“显示名称”字段中输入
B.Simon。 - 在“用户主体名称”字段中,输入 username@companydomain.extension。 例如
B.Simon@contoso.com。 - 选中“显示密码”复选框,然后记下“密码”框中显示的值。
- 选择“查看 + 创建”。
- 在“显示名称”字段中输入
- 选择“创建”。
分配 Microsoft Entra 测试用户
在本部分,你将通过授予 B.Simon 访问 SAP Litmos 的权限,使其能够使用单一登录。
- 至少以云应用程序管理员身份登录到 Microsoft Entra 管理中心。
- 浏览到“标识”>“应用程序”>“企业应用程序”>“SAP Litmos”。
- 在应用的概述页面中,选择“用户和组”。
- 选择“添加用户/组”,然后在“添加分配”对话框中选择“用户和组” 。
- 在“用户和组”对话框中,从“用户”列表中选择“B.Simon”,然后单击屏幕底部的“选择”按钮。
- 如果你希望将某角色分配给用户,可以从“选择角色”下拉列表中选择该角色。 如果尚未为此应用设置任何角色,你将看到选择了“默认访问权限”角色。
- 在“添加分配”对话框中,单击“分配”按钮。
配置 SAP Litmos SSO
在另一个 Web 浏览器窗口中,以管理员身份登录到 SAP Litmos 公司站点。
在左侧导航栏中,单击“帐户”。

单击“集成”选项卡。

在“集成”选项卡上,向下滚动到“第三方集成”,并单击“SAML 2.0”选项卡。

复制“Litmos 的 SAML 终结点:”下的值并将其粘贴到 Azure 门户中“Litmos 域和 URL”部分中的“回复 URL”文本框。

在 SAP Litmos 应用程序中,执行以下步骤:

a. 单击“启用 SAML”。
b. 在记事本中打开 base-64 编码证书,将其内容复制到剪贴板,再粘贴到“SAML X.509 证书”文本框中。
c. 单击 “保存更改” 。
创建 SAP Litmos 测试用户
本部分将在 SAP Litmos 中创建一个名为 B.Simon 的用户。 SAP Litmos 支持默认启用的实时用户预配。 此部分不存在任何操作项。 如果某个用户尚不存在于 SAP Litmos 中,则会在对其进行身份验证后新建此用户。
若要在 SAP Litmos 中创建名为 Britta Simon 的用户,请执行以下步骤:
在另一个 Web 浏览器窗口中,以管理员身份登录到 SAP Litmos 公司站点。
在左侧导航栏中,单击“帐户”。

单击“集成”选项卡。

在“集成”选项卡上,向下滚动到“第三方集成”,并单击“SAML 2.0”选项卡。

选择“自动生成用户”

测试 SSO
在本部分,你将使用以下选项测试 Microsoft Entra 单一登录配置。
SP 启动的:
单击“测试此应用程序”,这会重定向到 SAP Litmos 登录 URL,可以从那里启动登录流。
直接转到 SAP Litmos 登录 URL,从那里启动登录流。
IDP 启动的:
- 单击“测试此应用程序”,你应当会自动登录到为其设置了 SSO 的 SAP Litmos。
还可以使用 Microsoft“我的应用”在任何模式下测试此应用程序。 在“我的应用”中单击 SAP Litmos 磁贴时,如果是在 SP 模式下配置的,会重定向到应用程序登录页来启动登录流;如果是在 IDP 模式下配置的,则应会自动登录到为其设置了 SSO 的 SAP Litmos。 有关详细信息,请参阅 Microsoft Entra 我的应用。
后续步骤
配置 SAP Litmos 后,可强制实施会话控制,实时防止组织的敏感数据外泄和渗透。 会话控制从条件访问扩展而来。 了解如何通过 Microsoft Cloud App Security 强制实施会话控制。