应用程序池 <applicationPools>
概述
<applicationPools> 元素包含 Internet Information Services (IIS) 7 或更高版本服务器上运行的所有应用程序池的配置设置。 应用程序池定义包含一个或多个工作进程的组,这些组配置有通用设置,用于为分配给该应用程序池的一个或多个应用程序的请求提供服务。 由于应用程序池允许一组 Web 应用程序共享一个或多个配置类似的工作进程,因此它们提供了将一组 Web 应用程序与服务器计算机上的其他 Web 应用程序进行隔离的简便方法。 进程边界可分隔每个工作进程;因此,一个应用程序池中的应用程序问题不会影响其他应用程序池中的网站或应用程序。 应用程序池可显著提高 Web 基础结构的可靠性与可管理性。
可以选择在安装时使用 IIS 提供的默认应用程序池,也可以创建自己的应用程序池。 可以根据需要在 IIS 7 和更高版本服务器上运行任意数量的应用程序池,但这可能会影响服务器性能。 应用程序池可以包含一个或多个工作进程。 每个工作进程表示将为网站、Web 应用程序或 Web 服务完成的工作。 可以通过在单个应用程序池中运行多个工作进程来创建 Web 花园。
在 IIS 7 及更高版本中,每个应用程序池使用两种 .NET 集成模式中的一种模式来运行 ASP.NET 应用程序:“集成”或“经典”。 为应用程序池定义的 .NET 集成模式决定 IIS 如何处理对在该应用程序池中运行的站点、应用程序和 Web 服务的传入请求。
- “集成”模式允许 IIS 使用 IIS 7 和更高版本的集成管道处理应用程序池中的请求。 这允许 ASP.NET 模块参与 IIS 请求处理,而不考虑所请求的资源类型。 通过使用集成模式,ASP.NET 2.0 请求管道的可用功能将可用于对静态内容以及 ASP、PHP 和其他内容类型的请求。 默认情况下,IIS 7 和更高版本的应用程序池在此模式下运行。
- “经典”模式使用 IIS 6.0 处理管道来托管 ASP.NET 应用程序。 在此模式下,请求最初通过 IIS 7 及更高版本的模块进行处理,ASP.NET 请求由 aspnet_isapi.dll 进行进一步处理。 ASP.NET 处理管道独立于 IIS 7 及更高版本的处理管道,ASP.NET 请求处理管道功能不适用于其他资源类型。 这也意味着 ASP.NET 请求必须通过这两个进程模型中的身份验证和授权模块。 虽然此模式不如集成模式高效,但它支持在 IIS 7 及更高版本的服务器上运行使用 ASP.NET 版本 1.1 开发的应用程序,而无需修改应用程序以在集成模式下运行。
IIS 7.5 及更高版本中的新增功能
从 IIS 7.5 开始,可以使用 <add> 元素的 managedRuntimeLoader、CLRConfigFile 和 startMode 属性来配置应用程序自动启动。 这些属性分别配置为应用程序提供运行时加载的托管 DLL 名称、应用程序的公共语言运行时配置文件以及应用程序的启动类型。
IIS 7.5 及更高版本还为 <processModel> 元素的 identityType 属性新增了 ApplicationPoolIdentity 类型。 这种新的标识类型现在是应用程序的默认进程标识,可以设置内容区域的安全性,以允许特定应用程序池的访问。 为此,可以使用“IIS AppPool\DefaultAppPool”等语法,通过应用程序池的名称来设置安全性。此标识是动态创建的,因此大大减少了服务器的可攻击面。
兼容性
| 版本 | 说明 |
|---|---|
| IIS 10.0 | <applicationPools> 元素在 IIS 10.0 中未进行修改。 |
| IIS 8.5 | <applicationPools> 元素在 IIS 8.5 中未进行修改。 |
| IIS 8.0 | <applicationPools> 元素在 IIS 8.0 中未进行修改。 |
| IIS 7.5 | <applicationPools> 元素的 <add> 元素已在 IIS 7.5 中更新以包含一些属性,这些属性允许使用 managedRuntimeLoader、CLRConfigFile 和 startMode 属性预加载应用程序,以及使用新的 ApplicationPoolIdentity 运行应用程序。 |
| IIS 7.0 | <applicationPools> 元素是在 IIS 7.0 中引入的。 |
| IIS 6.0 | <applicationPools> 元素替换了 IIS 6.0 IIsApplicationPools 元数据库对象。 |
安装
在 IIS 7 及更高版本的默认安装中包含 <applicationPools> 集合。
操作方式
如何创建新应用程序池
打开 Internet Information Services (IIS) 管理器:
如果使用的是 Windows Server 2012 或 Windows Server 2012 R2:
- 在任务栏上,单击“服务器管理器”,单击“工具”,然后单击“Internet Information Services (IIS)管理器”。
如果使用的是 Windows 8 或 Windows 8.1:
- 按住 Windows 键,按字母 X,然后单击“控制面板”。
- 单击“管理工具”,然后双击“Internet Information Services (IIS)管理器”。
如果使用的是 Windows Server 2008 或 Windows Server 2008 R2:
- 在任务栏上,单击“开始”,指向“管理工具”,然后单击“Internet Information Services (IIS)管理器”。
如果使用的是 Windows Vista 或 Windows 7:
- 在任务栏上,单击“开始”,然后单击“控制面板”。
- 双击“管理工具”,然后双击“Internet Information Services (IIS)管理器”。
在“连接”窗格中,展开服务器名称,然后单击“应用程序池”。
在“操作”窗格中,单击“添加应用程序池...”。
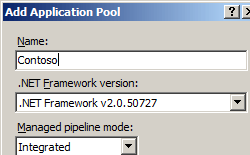
在“添加应用程序池”对话框中,在“名称:”框中输入应用程序池的名称,在“.NET Framework 版本:”下拉列表中选择站点或应用程序使用的 .NET Framework 版本,在“托管管道模式:”下拉列表中选择“集成”或“经典”,然后单击“确定”。

如何为现有站点或应用程序配置应用程序池
- 在“连接”窗格中,展开“站点”,然后导航到要添加到应用程序池的网站或应用程序。
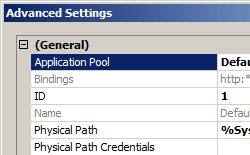
- 在“操作”窗格中,单击“高级设置...”
- 在“高级设置”对话框的“常规”部分中,单击“应用程序池”条目,然后单击省略号按钮。
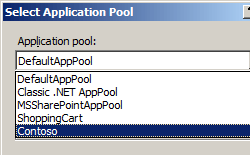
- 在“选择应用程序池”对话框中,从“应用程序池:”下拉列表框中选择应用程序池,单击“确定”,然后再次单击“确定”。

配置
<applicationPools> 元素包含 <add> 元素的集合。 集合中的每个元素都配置在 IIS 7 及更高版本上运行的应用程序池。 每个 <add> 元素至少包含一个 name 属性,用于将应用程序池标识为 GUI 和命令行管理工具。 <add> 元素包含用于配置应用程序池的进程模型、CPU 和回收设置的子元素。
<applicationPools> 元素还包含 <applicationPoolDefaults> 元素,该元素定义 IIS 7 及更高版本服务器上的所有应用程序池的默认设置。 若要更改服务器中的默认应用程序池设置,可以编辑 <applicationPoolDefaults> 元素。 创建新应用程序池时,该应用程序池的配置设置将覆盖 <applicationPoolDefaults> 元素中设置的默认值。
特性
无。
子元素
| 元素 | 说明 |
|---|---|
add |
将应用程序池添加到 applicationPools 部分。 |
applicationPoolDefaults |
必需的字符串属性。 为 applicationPools 部分中的所有应用程序池配置默认设置。 |
配置示例
以下配置示例使用应用程序池 <add> 和 <applicationPools> 元素来定义标准应用程序池和 IIS 的默认值。
<applicationPools>
   <add name="DefaultAppPool" />
   <add name="Classic .NET AppPool" managedPipelineMode="Classic" />
   <applicationPoolDefaults>
      <processModel identityType="NetworkService" />
   </applicationPoolDefaults>
</applicationPools>
代码示例
以下示例添加名为 Contoso 的应用程序池,并将托管管道模式设置为“集成”。
AppCmd.exe
appcmd.exe set config -section:system.applicationHost/applicationPools /+"[name='Contoso',autoStart='True',managedPipelineMode='Integrated']" /commit:apphost
注意
使用 AppCmd.exe 配置这些设置时,必须确保将 commit 参数设置为 apphost。 这会将配置设置提交到 ApplicationHost.config 文件中的相应位置部分。
C#
using System;
using System.Text;
using Microsoft.Web.Administration;

internal static class Sample {

   private static void Main() {

      using(ServerManager serverManager = new ServerManager()) {
      Configuration config = serverManager.GetApplicationHostConfiguration();

      ConfigurationSection applicationPoolsSection = config.GetSection("system.applicationHost/applicationPools");

      ConfigurationElementCollection applicationPoolsCollection = applicationPoolsSection.GetCollection();

      ConfigurationElement addElement = applicationPoolsCollection.CreateElement("add");
      addElement["name"] = @"Contoso";
      addElement["autoStart"] = true;
      addElement["managedPipelineMode"] = @"Integrated";
      applicationPoolsCollection.Add(addElement);

      serverManager.CommitChanges();
      }
   }
}
VB.NET
Imports System
Imports System.Text
Imports Microsoft.Web.Administration

Module Sample
   Sub Main()
      Dim serverManager As ServerManager = New ServerManager
      Dim config As Configuration = serverManager.GetApplicationHostConfiguration
      Dim applicationPoolsSection As ConfigurationSection = config.GetSection("system.applicationHost/applicationPools")
      Dim applicationPoolsCollection As ConfigurationElementCollection = applicationPoolsSection.GetCollection
      Dim addElement As ConfigurationElement = applicationPoolsCollection.CreateElement("add")
      addElement("name") = "Contoso"
      addElement("autoStart") = True
      addElement("managedPipelineMode") = "Integrated"
      applicationPoolsCollection.Add(addElement)
      serverManager.CommitChanges()
   End Sub
End Module
JavaScript
var adminManager = new ActiveXObject('Microsoft.ApplicationHost.WritableAdminManager');
adminManager.CommitPath = "MACHINE/WEBROOT/APPHOST";

var applicationPoolsSection = adminManager.GetAdminSection("system.applicationHost/applicationPools",
   "MACHINE/WEBROOT/APPHOST");

var applicationPoolsCollection = applicationPoolsSection.Collection;

var addElement = applicationPoolsCollection.CreateNewElement("add");
addElement.Properties.Item("name").Value = "Contoso";
addElement.Properties.Item("autoStart").Value = true;
addElement.Properties.Item("managedPipelineMode").Value = "Integrated";
applicationPoolsCollection.AddElement(addElement);

adminManager.CommitChanges();
VBScript
Set adminManager = CreateObject("Microsoft.ApplicationHost.WritableAdminManager")
adminManager.CommitPath = "MACHINE/WEBROOT/APPHOST"
Set applicationPoolsSection = adminManager.GetAdminSection("system.applicationHost/applicationPools","MACHINE/WEBROOT/APPHOST")
Set applicationPoolsCollection = applicationPoolsSection.Collection

Set addElement = applicationPoolsCollection.CreateNewElement("add")
addElement.Properties.Item("name").Value = "Contoso"
addElement.Properties.Item("autoStart").Value = True
addElement.Properties.Item("managedPipelineMode").Value = "Integrated"
applicationPoolsCollection.AddElement(addElement)

adminManager.CommitChanges()
反馈
即将发布:在整个 2024 年,我们将逐步淘汰作为内容反馈机制的“GitHub 问题”,并将其取代为新的反馈系统。 有关详细信息,请参阅:https://aka.ms/ContentUserFeedback。
提交和查看相关反馈