Threat hunting in Threat Explorer and Real-time detections in Microsoft Defender for Office 365
Tip
Did you know you can try the features in Microsoft Defender XDR for Office 365 Plan 2 for free? Use the 90-day Defender for Office 365 trial at the Microsoft Defender portal trials hub. Learn about who can sign up and trial terms here.
Microsoft 365 organizations that have Microsoft Defender for Office 365 included in their subscription or purchased as an add-on have Explorer (also known as Threat Explorer) or Real-time detections. These features are powerful, near real-time tools to help Security Operations (SecOps) teams investigate and respond to threats. For more information, see About Threat Explorer and Real-time detections in Microsoft Defender for Office 365.
Threat Explorer or Real-time detections allow you to take the following actions:
- See malware detected by Microsoft 365 security features.
- View phishing URL and click verdict data.
- Start an automated investigation and response process (Threat Explorer only).
- Investigate malicious email.
- And more.
Watch this short video to learn how to hunt and investigate email and collaboration-based threats using Defender for Office 365.
Tip
Advanced hunting in Microsoft Defender XDR supports an easy-to-use query builder that doesn't use the Kusto Query Language (KQL). For more information, see Build queries using guided mode.
The following information is available in this article:
- A general walkthrough of Threat Explorer and Real-time detections
- The threat hunting experience using Threat Explorer and Real-time detections
- Extended capabilities in Threat Explorer
Tip
For email scenarios using Threat Explorer and Real-time detections, see the following articles:
- Email security with Threat Explorer and Real-time detections in Microsoft Defender for Office 365
- Investigate malicious email that was delivered in Microsoft 365
If you're hunting for attacks based on malicious URLs embedded within QR codes, the URL Source filter value QR code in the All email, Malware, and Phish views in Threat Explorer or Real-time detections allows you to search for email message with URLs extracted from QR codes.
What do you need to know before you begin?
Threat Explorer is included in Defender for Office 365 Plan 2. Real-time detections is included in Defender for Office Plan 1:
- The differences between Threat Explorer and Real-time detections are described in About Threat Explorer and Real-time detections in Microsoft Defender for Office 365.
- The differences between Defender for Office 365 Plan 2 and Defender for Office Plan 1 are described in the Defender for Office 365 Plan 1 vs. Plan 2 cheat sheet.
For permissions and licensing requirements for Threat Explorer and Real-time detections, see Permissions and licensing for Threat Explorer and Real-time detections.
Threat Explorer and Real-time detections walkthrough
Threat Explorer or Real-time detections is available in the Email & collaboration section in the Microsoft Defender portal at https://security.microsoft.com:
Real-time detections is available in Defender for Office 365 Plan 1. The Real-time detections page is available directly at https://security.microsoft.com/realtimereportsv3.
Threat Explorer is available in Defender for Office 365 Plan 2. The Explorer page is available directly at https://security.microsoft.com/threatexplorerv3.


Threat Explorer contains the same information and capabilities as Real-time detections, but with the following additional features:
- More views.
- More property filtering options, including the option to save queries.
- Threat hunting and remediation actions.
For more information about the differences between Defender for Office 365 Plan 1 and Plan 2, see the Defender for Office 365 Plan 1 vs. Plan 2 cheat sheet.
Use the tabs (views) at the top of the page to start your investigation.
The available views in Threat Explorer and Real-time detections are described in the following table:
| View | Threat Explorer |
Real-time detections |
Description |
|---|---|---|---|
| All email | ✔ | Default view for Threat Explorer. Information about all email messages sent by external users into your organization, or email sent between internal users in your organization. | |
| Malware | ✔ | ✔ | Default view for Real-time detections. Information about email messages that contain malware. |
| Phish | ✔ | ✔ | Information about email messages that contain phishing threats. |
| Campaigns | ✔ | Information about malicious email that Defender for Office 365 Plan 2 identified as part of a coordinated phishing or malware campaign. | |
| Content malware | ✔ | ✔ | Information about malicious files detected by the following features: |
| URL clicks | ✔ | Information about user clicks on URLs in email messages, Teams messages, SharePoint files, and OneDrive files. |
Use the date/time filter and the available filter properties in the view to refine the results:
- For instructions to create filters, see Property filters in Threat Explorer and Real-time detections.
- The available filter properties for each view are described in the following locations:
- Filterable properties in the All email view in Threat Explorer
- Filterable properties in the Malware view in Threat Explorer and Real-time detections
- Filterable properties in the Phish view in Threat Explorer and Real-time detections
- Filterable properties in the Campaigns view in Threat Explorer
- Filterable properties in the Content malware view in Threat Explorer and Real-time detections
- Filterable properties in the URL clicks view in Threat Explorer
Tip
Remember to select Refresh after you create or update the filter. The filters affect the information in the chart and the details area of the view.
You can think of refining the focus in Threat Explorer or Real-time detections as layers to make retracing your steps easier:
- The first layer is the view you're using.
- The second later is the filters you're using in that view.
For example, you can retrace the steps you took to find a threat by recording your decisions like this: To find the issue in Threat Explorer, I used the Malware view and used a Recipient filter focus.
Also, be sure to test your display options. Different audiences (for example, management) might react better or worse to different presentations of the same data.
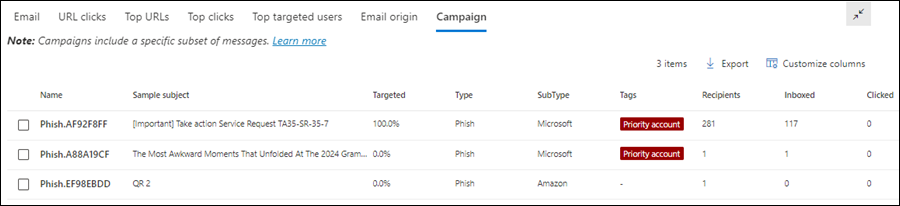
For example, in Threat Explorer the All email view, the Email origin and Campaigns views (tabs) are available in the details area at the bottom of the page:
For some audiences, the world map in the Email origin tab might do a better job of showing how widespread the detected threats are.

Others might find the detailed information in the table in the Campaigns tab more useful to convey the information.


You can use this information for the following results:
- To show the need for security and protection.
- To later demonstrate the effectiveness of any actions.
Email investigation
In the All email, Malware, or Phish views in Threat Explorer or Real-time detections, email message results are shown in a table in the Email tab (view) of the details area below the chart.
When you see a suspicious email message, click on the Subject value of an entry in the table. The details flyout that opens contains ![]() Open email entity at the top of the flyout.
Open email entity at the top of the flyout.

The Email entity page pulls together everything you need to know about the message and its contents so you can determine whether the message is a threat. For more information, see Email entity page overview.
Email remediation
After you determine that an email message is a threat, the next step is remediating the threat. You remediate the threat in Threat Explorer or Real-time detections using ![]() Take action.
Take action.
Take action is available in the All email, Malware, or Phish views in Threat Explorer or Real-time detections in the Email tab (view) of the details area below the chart:
Select one or more entries in the table by selecting the check box next to the first column.
 Take action is available directly in the tab.
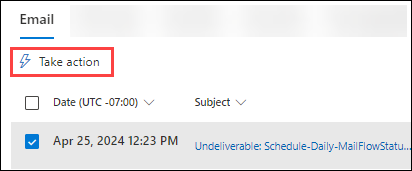
Tip
Take action replaces the Message actions drop down list.
If you select 100 or less entries, you can take multiple actions on the messages in the Take action wizard.
If you select 101 to 200,000 entries, only the following actions are available in the Take action wizard:
- Threat Explorer: Move to mailbox and Propose remediation are available, but they're mutually exclusive (you can select one or the other).
- Real-time detections: Only Submit to Microsoft for review and creating corresponding allow/block entries in the Tenant Allow/Block list are available.
Click on the Subject value of an entry in the table. The details flyout that opens contains
Take action at the top of the flyout.

Selecting ![]() Take action opens the Take action wizard in a flyout. The available actions in the Take action wizard in Threat Explorer (Defender for Office 365 Plan 2) and Real-time detections (Defender for Office 365 Plan 1) are listed in the following table:
Take action opens the Take action wizard in a flyout. The available actions in the Take action wizard in Threat Explorer (Defender for Office 365 Plan 2) and Real-time detections (Defender for Office 365 Plan 1) are listed in the following table:
| Action | Threat Explorer |
Real-time Detections |
|---|---|---|
| Move to mailbox folder | ✔¹ | |
| Submit to Microsoft for review | ✔ | ✔ |
| Allow or block entries in the Tenant Allow/Block List³ | ✔ | ✔ |
| Initiate automated investigation | ✔ | |
| Propose remediation | ✔ | ² |
¹ This action requires the Search and Purge role in Email & collaboration permissions. By default, this role is assigned only to the Data Investigator and Organization Management role groups. You can add users to those role groups, or you can create a new role group with the Search and Purge role assigned, and add the users to the custom role group.
² Although this action might appear available in Real-time detections, it's not available in Defender for Office 365 Plan 1.
³ This action is available under Submit to Microsoft for review.
The Take action wizard is described in the following list:
On the Choose response actions page, make the following selections:
Show all response actions: This option is available only in Threat Explorer.
By default, some actions are unavailable/grayed out based on the latest delivery location of the message. To show all available response actions, slide the toggle to
 On.
On.Email message actions section:
You can select multiple actions if you selected 100 or less messages from the Email tab (view) of the details area of the All email, Malware, or Phish views when you selected
Take action.You can also select multiple actions if you selected
Take action in the details flyout after you clicked on the Subject value of an entry.Select one or more of the available options:
Move to mailbox folder: Select one of the available values that appear:
- Junk: Move the message to the Junk Email folder.
- Inbox: Move the message to the Inbox.
- Deleted items: Move the message to the Deleted items folder.
- Soft deleted items: Delete the message from the Deleted items folder (move to the Recoverable Items\Deletions folder). The message is recoverable by the user and admins.
- Hard deleted items: Purge the deleted message. Admins can recover hard deleted items using single-item recovery. For more information about hard deleted and soft deleted items, see Soft-deleted and hard-deleted items.
Submit to Microsoft for review: Select one of the available values that appear:
I've confirmed it's clean: Select this value if you're sure that the message is clean. The following options appear:
- Allow messages like this: If you select this value, allow entries are added to the Tenant Allow/Block List for the sender and any related URLs or attachments in the message. The following options also appear:
- Remove entry after: The default value is 1 day, but you can also select 7 days, 30 days, or a Specific date that's less than 30 days.
- Allow entry note: Enter an optional note that contains additional information.
- Allow messages like this: If you select this value, allow entries are added to the Tenant Allow/Block List for the sender and any related URLs or attachments in the message. The following options also appear:
It appears clean or It appears suspicious: Select one of these values if you're unsure and you want a verdict from Microsoft.
I've confirmed it's a threat: Select this value if you're sure that the item is malicious, and then select one of the following values in the Choose a category section that appears:
- Phish
- Malware
- Spam
After you select one of those values, a Select entities to block flyout opens where you can select one or more entities associated with the message (sender address, sender domain, URLs, or file attachments) to add as block entries to the Tenant Allow/Block list.
After you select the items to block, select Add to block rule to close the Select entities to block flyout. Or, select no items and then select Cancel.
Back on the Choose response actions page, select an expiration option for the block entries:
 Expire on: Select a date for block entries to expire.
-
Never expire
The number of blocked entities is shown (for example, 4/4 entities to be blocked). Select
 Edit to reopen the Add to block rule and make changes.
Initiate automated investigation: Threat Explorer only. Select one of the following values that appear:
- Investigate email
- Investigate recipient
- Investigate sender: This value applies only to senders in your organization.
- Contact recipients
Propose remediation: Select one of the following values that appear:
Create new: This value triggers a soft delete email pending action that needs to be approved by an admin in the Action center. This result is otherwise known as two-step approval.
Add to existing: Use this value to apply actions to this email message from an existing remediation. In the Submit email to the following remediations box, select the existing remediation.
Tip
SecOps personnel who don't have enough permsissions can use this option to create a remediation, but someone with permissions needs to approve the action in the Action center.
When you're finished on the Choose response actions page, select Next.
On the Choose target entities page, configure the following options:
- Name and Description: Enter a unique, descriptive name and an optional description to track and identify the selected action.
The rest of the page is a table that lists the affected assets. The table is organized by the following columns:
- Impacted asset: The affected assets from the previous page. For example:
- Recipient email address
- Entire tenant
- Action: The selected actions for the assets from the previous page. For example:
- Values from Submit to Microsoft for review:
- Report as clean
- Report
- Report as malware, Report as spam, or Report as phishing
- Block sender
- Block sender domain
- Block URL
- Block attachment
- Values from Initiate automated investigation:
- Investigate email
- Investigate recipient
- Investigate sender
- Contact recipients
- Values from Propose remediation:
- Create new remediation
- Add to existing remediation
- Values from Submit to Microsoft for review:
- Target entity: For example:
- The Network Message ID value of the email message.
- The blocked sender email address.
- The blocked sender domain.
- The blocked URL.
- The blocked attachment.
- Expires on: Values exist only for allow or block entries in the Tenant/Allow Block List. For example:
- Never expire for block entries.
- The expiration date for allow or block entries.
- Scope: Typically, this value is MDO.
At this stage, you can also undo some actions. For example, if you only want to create a block entry in the Tenant Allow/Block List without submitting the entity to Microsoft, you can do that here.
When you're finished on the Choose target entities page, select Next.
On the Review and submit page, review your previous selections.
Select
 Export to export the impacted assets to a CSV file. By default, the filename is Impacted assets.csv located in the Downloads folder.
Select Back to go back and change your selections.
When you're finished on the Review and submit page, select Submit.
Tip
The actions might take time for to appear on the related pages, but the speed of the remediation isn't affected.
The threat hunting experience using Threat Explorer and Real-time detections
Threat Explorer or Real-time detections helps your security operations team investigate and respond to threats efficiently. The following subsections explain how Threat Explorer and Real-time detections can help you find threats.
Threat hunting from Alerts
The Alerts page is available in the Defender portal at Incidents & alerts > Alerts, or directly at https://security.microsoft.com/alerts.
Many alerts with the Detection source value MDO have the ![]() View messages in Explorer action available at the top of the alert details flyout.
View messages in Explorer action available at the top of the alert details flyout.
The alert details flyout opens when you click anywhere on the alert other than the check box next to the first column. For example:
- A potentially malicious URL click was detected
- Admin submission result completed
- Email messages containing malicious URL removed after delivery
- Email messages removed after delivery
- Messages containing malicious entity not removed after delivery
- Phish not zapped because ZAP is disabled

Selecting View messages in Explorer opens Threat Explorer in the All email view with the property filter Alert ID selected for the alert. The Alert ID value is a unique GUID value for the alert (for example, 89e00cdc-4312-7774-6000-08dc33a24419).
Alert ID is a filterable property in the following views in Threat Explorer and Real-time detections:
- The All email view in Threat Explorer.
- The Malware view in Threat Explorer and Real-time detections
- The **Phish view in Threat Explorer and Real-time detections
In those views, Alert ID is available as a selectable column in the details area below the chart in the following tabs (views):
- The Email view for the details area of the All email view in Threat Explorer
- The Email view for the details area of the Malware view in Threat Explorer and Real-time detections
- The Email view for the details area of the Phish view in Threat Explorer and Real-time detections
In the email details flyout that opens when you click on a Subject value from one of the entries, the Alert ID link is available in the Email details section of the flyout. Selecting the Alert ID link opens the View alerts page at https://security.microsoft.com/viewalertsv2 with the alert selected and the details flyout open for the alert.

Tags in Threat Explorer
In Defender for Office 365 Plan 2, if you use user tags to mark high value targets accounts (for example, the Priority account tag) you can use those tags as filters. This method shows phishing attempts directed at high value target accounts during a specific time period. For more information about user tags, see User tags.
User tags are available in the following locations in Threat Explorer:
- All email view:
- Malware view:
- Phish view:
- URL clicks view:
Threat information for email messages
Pre-delivery and post-delivery actions on email messages are consolidated into a single record, regardless of the different post-delivery events that affected the message. For example:
- Zero-hour auto purge (ZAP).
- Manual remediation (admin action).
- Dynamic Delivery.
The email details flyout from the Email tab (view) in the All email, Malware, or Phish views shows the associated threats and the corresponding detection technologies that are associated with the email message. A message can have zero, one, or multiple threats.
In the Delivery details section, the Detection technology property shows the detection technology that identified the threat. Detection technology is also available as a chart pivot or a column in the details table for many views in Threat Explorer and Real-time detections.
The URLs section shows specific Threat information for any URLs in the message. For example, Malware, Phish, **Spam, or None.
Tip
Verdict analysis might not necessarily be tied to entities. The filters evaluate content and other details of an email message before assigning a verdict. For example, an email message might be classified as phishing or spam, but no URLs in the message are stamped with a phishing or spam verdict.
Select ![]() Open email entity at the top of the flyout to see exhaustive details about the email message. For more information, see The Email entity page in Microsoft Defender for Office 365.
Open email entity at the top of the flyout to see exhaustive details about the email message. For more information, see The Email entity page in Microsoft Defender for Office 365.

Extended capabilities in Threat Explorer
The following subsections describe filters that are exclusive to Threat Explorer.
Exchange mail flow rules (transport rules)
To find messages that were affected by Exchange mail flow rules (also known as transport rules), you have the following options in the All email, Malware, and Phish views in Threat Explorer (not in Real-time detections):
- Exchange transport rule is a selectable value for the Primary override source, Override source, and Policy type filterable properties.
- Exchange transport rule is a filterable property. You enter a partial text value for the name of the rule.
For more information, see the following links:
- All email view in Threat Explorer
- Malware view in Threat Explorer and Real-time detections
- Phish view in Threat Explorer and Real-time detections
The Email tab (view) for the details area of the All email, Malware, and Phish views in Threat Explorer also have Exchange transport rule as an available column that's not selected by default. This column shows the name of the transport rule. For more information, see the following links:
- Email view for the details area of the All email view in Threat Explorer
- Email view for the details area of the Malware view in Threat Explorer and Real-time detections
- Email view for the details area of the Phish view in Threat Explorer and Real-time detections
Tip
For the permissions required to search for mail flow rules by name in Threat Explorer, see Permissions and licensing for Threat Explorer and Real-time detections. No special permissions are required to see rule names in email details flyouts, details tables, and exported results.
Inbound connectors
Inbound connectors specify specific settings for email sources for Microsoft 365. For more information, see Configure mail flow using connectors in Exchange Online.
To find messages that were affected by inbound connectors, you can use the Connector filterable property to search for connectors by name in the All email, Malware, and Phish views in Threat Explorer (not in Real-time detections). You enter a partial text value for the name of the connector. For more information, see the following links:
- All email view in Threat Explorer
- Malware view in Threat Explorer and Real-time detections
- Phish view in Threat Explorer and Real-time detections
The Email tab (view) for the details area of the All email, Malware, and Phish views in Threat Explorer also have Connector as an available column that's not selected by default. This column shows the name of the connector. For more information, see the following links:
- Email view for the details area of the All email view in Threat Explorer
- Email view for the details area of the Malware view in Threat Explorer and Real-time detections
- Email view for the details area of the Phish view in Threat Explorer and Real-time detections
Email security scenarios in Threat Explorer and Real-time detections
For specific scenarios, see the following articles:
- Email security with Threat Explorer and Real-time detections in Microsoft Defender for Office 365
- Investigate malicious email that was delivered in Microsoft 365
More ways to use Threat Explorer and Real-time detections
In addition to the scenarios outlined in this article, you have more options in Explorer or Real-time detections. For more information, see the following articles:
反馈
即将发布:在整个 2024 年,我们将逐步淘汰作为内容反馈机制的“GitHub 问题”,并将其取代为新的反馈系统。 有关详细信息,请参阅:https://aka.ms/ContentUserFeedback。
提交和查看相关反馈