在 Microsoft Visual Studio 中预配云资源
TeamsFx 与 Azure 和 Microsoft 365 云集成,允许使用单个命令将应用置于 Azure 中。 TeamsFx 与 Azure 资源管理器 (ARM) 集成,从而可以预配应用程序代码方法所需的 Azure 资源。
登录到 Azure 帐户
打开 Visual Studio。
打开 Microsoft Teams 应用项目。
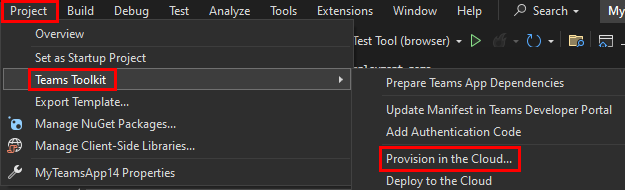
选择“云中的项目>Teams 工具包>预配”。
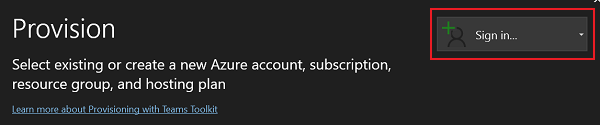
选择“ 登录...”。
注意
如果已登录,将显示用户名,或者可以选择 添加帐户。
使用凭据登录到 Azure 帐户后,浏览器会自动关闭。
预配云资源
在 Visual Studio 中打开项目后,若要预配云资源,请执行以下步骤:
选择“ 云中的项目>Teams 工具包>预配...”。
此时会显示 “预配 ”窗口。
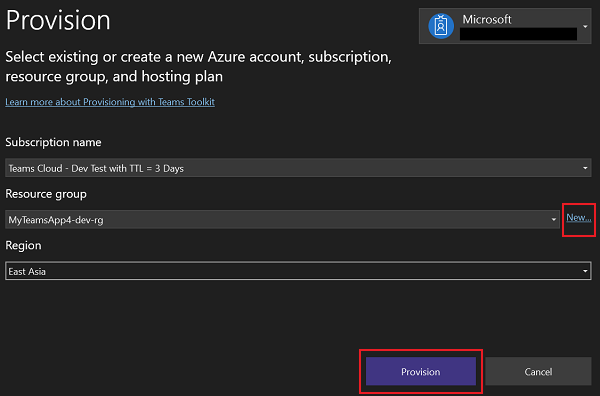
输入以下详细信息以预配资源:
- 从下拉菜单中选择 订阅名称 。
- 从下拉菜单中选择资源组,也可以通过选择“新建...”来创建新的资源组。
- 从下拉菜单中选择“ 区域 ”。
- 选择“ 预配”。
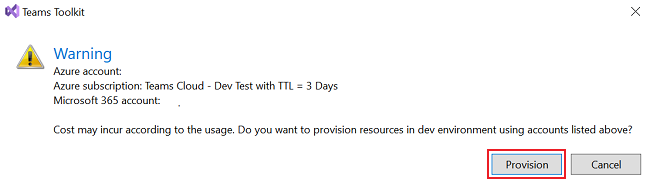
在出现的弹出窗口中,选择“ 预配”。
预配过程在 Azure 云中创建资源。 可以通过观察Microsoft Teams 工具包输出窗口来监视进度。
在出现的弹出窗口中,若要查看预配的所有资源,请选择“ 查看预配的资源”。

预配操作
以下操作设计用于预配:
- teamsApp/create
- teamsApp/update
- teamsApp/validateManifest
- teamsApp/validateAppPackage
- teamsApp/zipAppPackage
- teamsApp/publishAppPackage
- aadApp/create
- aadApp/update
- botAadApp/create
- arm/deploy
- azureStorage/enableStaticWebsite
- 脚本
teamsApp/create
如果存储 Teams 应用 ID 的环境变量为空,或者从 Teams 开发人员门户找不到应用 ID,则该 teamsApp/create 操作将创建新的 Teams 应用。 它在 Teams 开发人员门户中的 Teams 应用上运行。
  - uses: teamsApp/create
    with:
      # #required. Name of Teams app
      name: <your-preferred-app-name>
      # Write the information of created resources into environment file for the specified environment variable(s).
    writeToEnvironmentFile:
      # The id for Teams app
      teamsAppId: <your-preferred-env-var-name>
teamsApp/update
在 Teams 开发人员门户中将 Teams 应用清单应用于现有 Teams 应用时。 teamsApp/update action 使用 manifest.json 文件中的应用 ID 来确定要更新的 Teams 应用。 它在 Teams 开发人员门户中的 Teams 应用上运行。
- uses: teamsApp/update
    with:
      # Required. Relative path to the yaml file. This is the path for built zip file.
      appPackagePath: <path-to-teams-app-package-file>
teamsApp/validateManifest
该 teamsApp/validateManifest 操作使用环境变量呈现 Teams 应用清单模板,并使用其架构验证 Teams 应用清单文件。
- uses: teamsApp/validateManifest
    with:
      # Required. Relative path to the yaml file. Path to Teams app manifest file
    manifestPath: <path-to-manifest-file>
teamsApp/validateAppPackage
该 teamsApp/validateAppPackage 操作使用验证规则验证 Teams 应用包。
  - uses: teamsApp/validateAppPackage
      with:
      # Required. Relative path to the yaml file. This is the path for built zip file.
    appPackagePath: <path-to-teams-app-package-file>
teamsApp/zipAppPackage
该 teamsApp/zipAppPackage 操作使用环境变量呈现 Teams 应用清单模板,并将包含两个图标的清单文件压缩为 zip 文件。
- uses: teamsApp/zipAppPackage
    with:
      # Required. Relative path to the yaml file. This is the path for Teams app manifest file. Environment variables in manifest will be replaced before apply to Microsoft Entra app.
    manifestPath: <path-to-manifest-file>
      # Required. Relative path to the yaml file. This is the path for built zip file.
    outputZipPath: <path-to-generated-zip-file>
      # Required. Relative path to the yaml file. This is the path for built manifest json file.
    outputJsonPath: <path-to-generated-json-file>
teamsApp/publishAppPackage
该 teamsApp/publishAppPackage 操作将生成的 Teams 应用 zip 文件发布到租户应用目录。 它在 Microsoft 365 租户应用目录中运行。
- uses: teamsApp/publishAppPackage
    with:
      # Required. Relative path to this file. This is the path for built zip file.
    appPackagePath: <path-to-teams-app-package>
    # Write the information of created resources into environment file for the specified environment variable(s).
    writeToEnvironmentFile:
      # The Teams app id in tenant app catalog.
    publishedAppId: <your-preferred-env-var-name>
aadApp/create
如果存储 clientId 的环境变量为空,该aadApp/create操作会创建一个新的 Microsoft Entra 应用程序,以便对用户进行身份验证。 它在 Microsoft 365 租户Microsoft Entra ID 中运行。
- uses: aadApp/create
    with:
      # Required. The Microsoft Entra app's display name. When you run aadApp/update, the Microsoft Entra app name will be updated based on the definition in manifest. If you don't want to change the name, make sure the name in Microsoft Entra app manifest is the same with the name defined here.
      name: <your-application-name>
      # Required. If the value is false, the action will not generate client secret for you
      generateClientSecret: true
      # Required. Specifies what Microsoft accounts are supported for the current application. Supported values are: `AzureADMyOrg`, `AzureADMultipleOrgs`, `AzureADandPersonalMicrosoftAccount`, `PersonalMicrosoftAccount`.
      signInAudience: "AzureADMyOrg"
    # Write the information of created resources into environment file for the specified environment variable(s).
    writeToEnvironmentFile:
      # Required. The client (application) ID of Microsoft Entra application. The action will refer the environment variable defined here to determine whether to create a new Microsoft Entra app.
      clientId: <your-preferred-env-var-name>
      # Required when `generateClientSecret` is `true`. The action will refer the environment variable defined here to determine whether to create a new client secret. It's recommended to add `SECRET_` prefix to the environment variable name so it will be stored to the .env.{envName}.user environment file.
      clientSecret: <your-preferred-env-var-name>
      # Required. The object ID of Microsoft Entra application
      objectId: <your-preferred-env-var-name>
      # Optional. The tenant ID of Microsoft Entra tenant
      tenantId: <your-preferred-env-var-name>
      # Optional. The Microsoft Entra authority
      authority: <your-preferred-env-var-name>
      # Optional. The host name of Microsoft Entra authority
      authorityHost: <your-preferred-env-var-name>
aadApp/update
aadApp/update action 基于Microsoft Entra 应用清单更新Microsoft Entra 应用程序。 它引用Microsoft Entra 应用清单中的 ID 属性,以确定要更新的 Entra 应用Microsoft。 aadApp/update 对 Microsoft 365 租户中的 Microsoft Entra ID 进行操作。
- uses: aadApp/update
    with:
      # Required. Relative path to the yaml file. Path to the Microsoft Entra app manifest. Environment variables in manifest will be replaced before apply to Microsoft Entra app.
      manifestPath: <path-to-manifest-file>
      # Required. Relative path to the yaml folder. This action will output the final Microsoft Entra app manifest used to update Microsoft Entra app to this path.
      outputFilePath : <path-to-output-file>
botAadApp/create
该 botAadApp/create 操作将创建一个新的或重复使用现有的 Microsoft Entra 应用程序用于机器人。 它针对 Microsoft 365 租户中的 Microsoft Entra ID 进行操作。
- uses: botAadApp/create
    with:
      # Required. The Microsoft Entra app's display name
      name: <your-app-name>
    writeToEnvironmentFile:
      # The The Microsoft Entra app's client id created for bot.
      botId: <your-preferred-env-var-name>
      # The The Microsoft Entra app's client secret created for bot.
      botPassword: <your-preferred-env-var-name>
arm/deploy
该 arm/deploy 操作将并行部署给定的 ARM 模板。 它在 Azure 订阅上运行。
- uses: arm/deploy
    with:
      # Required. You can use built-in environment variable `AZURE_SUBSCRIPTION_ID` here. TeamsFx will ask you select one subscription if its value is empty. You're free to reference other environment variable here, but TeamsFx will not ask you to select subscription if it's empty in this case.
      subscriptionId: ${{AZURE_SUBSCRIPTION_ID}}
      # Required. You can use built-in environment variable `AZURE_RESOURCE_GROUP_NAME` here. TeamsFx will ask you to select or create one resource group if its value is empty. You're free to reference other environment variable here, but TeamsFx will not ask you to select or create resource group if it's empty in this case.
      resourceGroupName: ${{AZURE_RESOURCE_GROUP_NAME}}
      # Required. The ARM templates to be deployed.
      templates:
        # Required. Relative path to the yaml file.
      - path: <path-to-arm-template>
        # Optional. Relative path to the yaml file. TeamsFx will replace the environment variable reference with real value before deploy ARM template.
        parameters: <path-to-arm-template-parameter>
        # Required. Name of the ARM template deployment.
        deploymentName: <arm-deployment-name>
      # Optional. Teams Toolkit will download this bicep CLI version from github for you, will use bicep CLI in PATH if you remove this config.
      bicepCliVersion: v0.9.1
azureStorage/enableStaticWebsite
此操作 azureStorage/enableStaticWebsite 在 Azure 存储中启用静态网站设置。 它在 Azure 存储上运行。
- uses: azureStorage/enableStaticWebsite
    with:
      # Required. The resource id of Azure Storage
      storageResourceId: ${{<env-name-of-azure-storage-resource-id>}}
      # Required. The path to index page.
      indexPage: <path-to-index-page>
      # Required. The path to error page.
      errorPage: <path-to-error-page>
脚本
该 script 操作执行用户定义的脚本。
- uses: script
    with:
     # Required. Command to run or path to the script. Succeeds if exit code is 0. '::set-teamsfx-env key=value' is a special command to generate output variables into .env file, in this case, "mykey=abc" will be added the output in the corresponding .env file.
     run: $my_key="abc"; echo "::set-teamsfx-env mykey=${my_key}"
     # Optional. Available values are: bash, sh, powershell(Powershell Desktop), pwsh(powershell core), cmd. If omitted, it defaults to bash on Linux/MacOS, defaults to pwsh on windows.
     shell: <shell-name>
     # Optional. Current working directory. Defaults to the directory of this file.
     workingDirectory: <working-directory>
     # Optional. Timeout in ms.
     timeout: <timeout-in-ms>
     # Optional. Redirect stdout and stderr to a file.
     redirectTo: <path-to-output-file>
自定义资源预配
预配步骤在 teamsapp.yml 文件中的 属性下 provision 定义。 可以向 属性添加、删除或更新操作 provision ,以定义要在预配期间执行的预期操作。
在参数文件中引用环境变量
Teams 工具包支持引用文件中环境变量 teamsapp.yml 、Teams 应用清单、Microsoft Entra 应用清单和 Azure 参数文件中的值。 可以使用 语法 ${{ENV_VARIABLE_NAME}} 来引用环境变量。
以下示例将环境变量 MY_AZURE_SUBSCRIPTION_ID 的值设置为 subscriptionId:
subscriptionId: ${{MY_AZURE_SUBSCRIPTION_ID}}
自定义 ARM 模板文件
如果预定义模板不符合应用要求,可以创建自己的 ARM 模板或更新现有 ARM 模板,并提供操作路径 arm/deploy ,如下所示:
- uses: arm/deploy
    with:
      subscriptionId: ${{AZURE_SUBSCRIPTION_ID}}
      resourceGroupName: ${{AZURE_RESOURCE_GROUP_NAME}}
      templates:
      - path: <path-to-your-arm-template>
        parameters: <path-to-your-parameter-file>
        deploymentName: <arm-deployment-name>
      bicepCliVersion: <bicep-cli-version>
该 arm/deploy 操作支持以 bicep 和 json 格式编写的 ARM 模板。 如果使用 json 格式,则可以省略 bicepCliVersion 参数。 需要具备 Azure 资源管理器的基础知识。 有关详细信息,请参阅 Azure 资源管理器文档。
管理资源
可以登录到 Azure 门户 ,并管理使用 Teams 工具包创建的所有资源。
- 可以从现有列表或已创建的新资源组中选择资源组。
- 可以在目录的“概述”部分查看所选资源组的详细信息。
自定义 Teams 应用
可以通过添加环境变量来自定义机器人或 Teams 应用,以使用已创建的 Microsoft Entra 应用。 可以通过以下方式自定义 Teams 应用:
将现有 Microsoft Entra 应用用于 Teams 应用
若要使用为 Teams 应用创建的 Microsoft Entra 应用并将环境变量添加到 .env 文件,请执行以下步骤。
teamsapp.yml打开文件并查找操作aadApp/create。在 属性中
writeToEnvironmentFile查找存储 Microsoft Entra 应用信息的环境变量名称。 如果使用 Teams 工具包创建项目,则默认writeToenvironmentFile属性定义如下:writeToEnvironmentFile: clientId: AAD_APP_CLIENT_ID clientSecret: SECRET_AAD_APP_CLIENT_SECRET objectId: AAD_APP_OBJECT_ID tenantId: AAD_APP_TENANT_ID authority: AAD_APP_OAUTH_AUTHORITY authorityHost: AAD_APP_OAUTH_AUTHORITY_HOST为步骤 2 中的每个环境变量添加值。
将以下环境变量及其值添加到
env\.env.{env}文件中。 例如:AAD_APP_CLIENT_ID=<value of Microsoft Entra application's client id (application id)> # example: 00000000-0000-0000-0000-000000000000 AAD_APP_OBJECT_ID=<value of Microsoft Entra application's object id> # example: 00000000-0000-0000-0000-000000000000 AAD_APP_TENANT_ID=<value of Microsoft Entra's (tenant) id>> # example: 00000000-0000-0000-0000-000000000000 AAD_APP_OAUTH_AUTHORITY=<value of Microsoft Entra's authority> # example: https://login.microsoftonline.com/<Directory (tenant) ID> AAD_APP_OAUTH_AUTHORITY_HOST=<host of Microsoft Entra's authority> # example: https://login.microsoftonline.com AAD_APP_ACCESS_AS_USER_PERMISSION_ID=<id of access_as_user permission> # example: 00000000-0000-0000-0000-000000000000如果应用程序需要Microsoft Entra 应用客户端密码,请将以下环境变量及其值添加到
env\.env.{env}.user文件中。 例如:SECRET_AAD_APP_CLIENT_SECRET=<value of Microsoft Entra application's client secret>
如果你还没有Microsoft Entra 应用,或者你有一个但不知道在何处查找正确的值,请参阅 在 TeamsFx 项目中使用现有 Microsoft Entra 应用。
注意
- 如果在 中使用不同的名称,请记住更新示例中的环境变量名称
writeToEnvironmentFile。 - 如果不使用
aadApp/create操作创建 Microsoft Entra 应用程序,则可以使用首选名称添加必要的环境变量,而无需执行上述步骤。 - 确保不要在多个环境中共享相同的Microsoft Entra 应用。
为机器人使用现有的 Microsoft Entra 应用
可以按照步骤将环境变量添加到 .env 文件,以使用为 Teams 应用创建的 Microsoft Entra 应用。
teamsapp.yml打开文件并查找操作botAadApp/create。在 属性中
writeToEnvironmentFile查找存储 Microsoft Entra 应用信息的环境变量名称。 如果使用 Teams 工具包创建项目,则默认writeToEnvironmentFile定义如下:writeToEnvironmentFile: botId: BOT_ID botPassword: SECRET_BOT_PASSWORD为步骤 2 中的每个环境变量添加值。
将环境变量及其值添加到
env\.env.{env}文件中。 例如:BOT_ID=<value of Microsoft Entra application's client id (application id)> # example: 00000000-0000-0000-0000-000000000000将环境变量及其值添加到
env\.env.{env}.user文件中。 例如:SECRET_BOT_PASSWORD=<value of Microsoft Entra application's client secret>
如果你还没有适用于机器人的 Microsoft Entra 应用,或者你拥有一个但不知道在何处查找正确值的应用,请参阅 在 TeamsFx 项目中使用现有 Microsoft Entra 应用。
注意
- 如果在 中使用不同的名称,请记住更新示例中的环境变量名称
writeToEnvironmentFile。 - 如果不使用
botAadApp/create操作创建 Microsoft Entra 应用程序,则可以使用首选名称添加必要的环境变量,而无需执行上述步骤。 - 确保不要在多个环境中共享相同的Microsoft Entra 应用。
另请参阅
反馈
即将发布:在整个 2024 年,我们将逐步淘汰作为内容反馈机制的“GitHub 问题”,并将其取代为新的反馈系统。 有关详细信息,请参阅:https://aka.ms/ContentUserFeedback。
提交和查看相关反馈