教程:使用 .NET SDK 为搜索结果添加分页功能
了解如何实现这两个不同的分页系统,其中第一个基于页码,第二个基于无限滚动。 这两个分页系统都得到广泛使用,请根据要用于结果的用户体验选择合适的系统。
本教程介绍如何执行下列操作:
- 使用带编号的分页来扩展应用
- 使用无限滚动来扩展应用
概述
本教程将分页系统叠加到创建第一个搜索应用教程中所述的先前创建的项目中。
可以在以下项目中找到将在本教程中开发的代码的完成版本:
先决条件
- 1-basic-search-page (GitHub) 项目。 该项目可使用在上一教程中生成的版本,或 GitHub 中的副本。
使用带编号的分页来扩展应用
带编号的分页是主商业 Web 搜索引擎和许多其他搜索网站选定的分页系统。 通常除了一系列实际页码,带编号的分页还包含“上一页”和“下一页”选项。 可能还会提供“第一页”和“最后一页”选项。 通过这些选项,用户肯定能控制基于页面的结果导航。
在本教程中,你将添加一个系统,其中包含“第一页”、“上一页”、“下一页”和“最后一页”选项,且其页码不从 1 开始,而是显示与用户所在的当前页面相邻的页码(例如,如果用户正在查看第 10 页,则可能会显示第 8、9、10、11 和 12 页)。
该系统将足够灵活,能在全局变量中设置可见页码的编号。
该系统会将最右侧和最右侧的页码视为特殊值,这表示它们将触发对所示页码范围的更改。 例如,如果显示页码 8、9、10、11 和 12,而用户单击页码 8,则显示的页码范围更改为 6、7、8、9 和 10。 如果用户选择页码 12,也按类似方式向右移。
向模型添加分页字段
打开基本搜索页面解决方案。
打开 SearchData.cs 模型文件。
添加全局变量以支持分页。 在 MVC 中,全局变量是在其自己的静态类中声明的。 ResultsPerPage 会设置每一页的结果数 。 MaxPageRange 确定视图上可见页码的编号 。 “PageRangeDelta”决定在选中最左侧或最右侧的页码时,页面应向左或向右偏移多少页。 通常,后面这个数字大约是 MaxPageRange 的 1/2 。 将以下代码添加到命名空间。
public static class GlobalVariables
{
    public static int ResultsPerPage
    {
        get
        {
            return 3;
        }
    }
    public static int MaxPageRange
    {
        get
        {
            return 5;
        }
    }

    public static int PageRangeDelta
    {
        get
        {
            return 2;
        }
    }
}
提示
如果在屏幕更小的设备(例如笔记本电脑)上运行此项目,请考虑将 ResultsPerPage 更改为 2 。
将分页属性添加到“SearchData”类,“searchText”属性的后面 。
// The current page being displayed.
public int currentPage { get; set; }

// The total number of pages of results.
public int pageCount { get; set; }

// The left-most page number to display.
public int leftMostPage { get; set; }

// The number of page numbers to display - which can be less than MaxPageRange towards the end of the results.
public int pageRange { get; set; }

// Used when page numbers, or next or prev buttons, have been selected.
public string paging { get; set; }
将分页选项表添加到视图
打开 index.cshtml 文件,再添加以下代码,使其紧跟在结尾 </body> 标记的前面。 这个新代码会显示分页选项表,其中包含“第一页”、“上一页”、1、2、3、4、5、“下一页”和“最后一页”。
@if (Model != null && Model.pageCount > 1) { // If there is more than one page of results, show the paging buttons. <table> <tr> <td> @if (Model.currentPage > 0) { <p class="pageButton"> @Html.ActionLink("|<", "Page", "Home", new { paging = "0" }, null) </p> } else { <p class="pageButtonDisabled">|<</p> } </td> <td> @if (Model.currentPage > 0) { <p class="pageButton"> @Html.ActionLink("<", "PageAsync", "Home", new { paging = "prev" }, null) </p> } else { <p class="pageButtonDisabled"><</p> } </td> @for (var pn = Model.leftMostPage; pn < Model.leftMostPage + Model.pageRange; pn++) { <td> @if (Model.currentPage == pn) { // Convert displayed page numbers to 1-based and not 0-based. <p class="pageSelected">@(pn + 1)</p> } else { <p class="pageButton"> @Html.ActionLink((pn + 1).ToString(), "PageAsync", "Home", new { paging = @pn }, null) </p> } </td> } <td> @if (Model.currentPage < Model.pageCount - 1) { <p class="pageButton"> @Html.ActionLink(">", "PageAsync", "Home", new { paging = "next" }, null) </p> } else { <p class="pageButtonDisabled">></p> } </td> <td> @if (Model.currentPage < Model.pageCount - 1) { <p class="pageButton"> @Html.ActionLink(">|", "PageAsync", "Home", new { paging = Model.pageCount - 1 }, null) </p> } else { <p class="pageButtonDisabled">>|</p> } </td> </tr> </table> }我们使用 HTML 表来保持内容井然有序。 但是,所有操作都来自 @Html.ActionLink 语句,每个语句使用通过不同条目创建的新模型将控制器调用到之前添加的 paging 属性中 。
“第一页”和“最后一页”选项不会发送“first”和“last”之类的字符串,而是发送正确的页码。
将分页类添加到 hotels.css 文件中的 HTML 样式列表。 这里的“pageSelected”类用于在页码列表中标识当前页(通过对页码应用粗体格式)。
.pageButton {
    border: none;
    color: darkblue;
    font-weight: normal;
    width: 50px;
}

.pageSelected {
    border: none;
    color: black;
    font-weight: bold;
    width: 50px;
}

.pageButtonDisabled {
    border: none;
    color: lightgray;
    font-weight: bold;
    width: 50px;
}
将 Page 操作添加到控制器
打开“HomeController.cs”文件,然后添加“PageAsync”操作。 此操作会响应所选的任何页码选项。
public async Task<ActionResult> PageAsync(SearchData model)
{
    try
    {
        int page;

        switch (model.paging)
        {
            case "prev":
                page = (int)TempData["page"] - 1;
                break;

            case "next":
                page = (int)TempData["page"] + 1;
                break;

            default:
                page = int.Parse(model.paging);
                break;
        }

        // Recover the leftMostPage.
        int leftMostPage = (int)TempData["leftMostPage"];

        // Recover the search text and search for the data for the new page.
        model.searchText = TempData["searchfor"].ToString();

        await RunQueryAsync(model, page, leftMostPage);

        // Ensure Temp data is stored for next call, as TempData only stores for one call.
        TempData["page"] = (object)page;
        TempData["searchfor"] = model.searchText;
        TempData["leftMostPage"] = model.leftMostPage;
    }

    catch
    {
        return View("Error", new ErrorViewModel { RequestId = "2" });
    }
    return View("Index", model);
}
由于第三个参数(我们将稍作介绍),RunQueryAsync 方法现将显示一个语法错误 。
注意
对“TempData”的调用会在临时存储中存储一个值(一个对象),虽然此存储仅保留一个调用的时长 。 如果将某些内容存储在临时数据中,则可将其用于下一次对控制器操作的调用,但在此之后的调用中,这些内容肯定会消失。 由于保留期很短,因此我们会在每次调用“PageAsync”时,将搜索文本和分页属性重新存储到临时存储中。
更新“Index(model)”操作以存储临时变量,并将最左侧的页面参数添加到“RunQueryAsync”调用中 。
public async Task<ActionResult> Index(SearchData model)
{
    try
    {
        // Ensure the search string is valid.
        if (model.searchText == null)
        {
            model.searchText = "";
        }

        // Make the search call for the first page.
        await RunQueryAsync(model, 0, 0);

        // Ensure temporary data is stored for the next call.
        TempData["page"] = 0;
        TempData["leftMostPage"] = 0;
        TempData["searchfor"] = model.searchText;
    }

    catch
    {
        return View("Error", new ErrorViewModel { RequestId = "1" });
    }
    return View(model);
}
在上一课中引入的“RunQueryAsync”方法需要修改才能解决语法错误。 我们使用 SearchOptions 类的“Skip”、“Size”和“IncludeTotalCount”字段,从“Skip”设置开始,以请求仅相当于一页内容的结果 。 我们还需要为视图计算分页变量。 将整个方法替换为以下代码。
private async Task<ActionResult> RunQueryAsync(SearchData model, int page, int leftMostPage)
{
    InitSearch();

    var options = new SearchOptions
    {
        // Skip past results that have already been returned.
        Skip = page * GlobalVariables.ResultsPerPage,

        // Take only the next page worth of results.
        Size = GlobalVariables.ResultsPerPage,

        // Include the total number of results.
        IncludeTotalCount = true
    };

    // Add fields to include in the search results.
    options.Select.Add("HotelName");
    options.Select.Add("Description");

    // For efficiency, the search call should be asynchronous, so use SearchAsync rather than Search.
    model.resultList = await _searchClient.SearchAsync<Hotel>(model.searchText, options).ConfigureAwait(false);

    // This variable communicates the total number of pages to the view.
    model.pageCount = ((int)model.resultList.TotalCount + GlobalVariables.ResultsPerPage - 1) / GlobalVariables.ResultsPerPage;

    // This variable communicates the page number being displayed to the view.
    model.currentPage = page;

    // Calculate the range of page numbers to display.
    if (page == 0)
    {
        leftMostPage = 0;
    }
    else if (page <= leftMostPage)
    {
        // Trigger a switch to a lower page range.
        leftMostPage = Math.Max(page - GlobalVariables.PageRangeDelta, 0);
    }
    else if (page >= leftMostPage + GlobalVariables.MaxPageRange - 1)
    {
        // Trigger a switch to a higher page range.
        leftMostPage = Math.Min(page - GlobalVariables.PageRangeDelta, model.pageCount - GlobalVariables.MaxPageRange);
    }
    model.leftMostPage = leftMostPage;

    // Calculate the number of page numbers to display.
    model.pageRange = Math.Min(model.pageCount - leftMostPage, GlobalVariables.MaxPageRange);

    return View("Index", model);
}
最后,对视图进行小幅更改。 “resultList.Results.TotalCount”变量现将包含在一个页面中返回的结果数(在本例中为 3),而不是总数。 由于我们将“IncludeTotalCount”设置为了 true,因此“resultList.TotalCount”变量现包含结果总数 。 所以,要找到结果数在视图中显示的位置,并将其更改为以下代码。
// Show the result count.
<p class="sampleText">
    @Model.resultList.TotalCount Results
</p>

var results = Model.resultList.GetResults().ToList();

@for (var i = 0; i < results.Count; i++)
{
    // Display the hotel name and description.
    @Html.TextAreaFor(m => results[i].Document.HotelName, new { @class = "box1" })
    @Html.TextArea($"desc{1}", results[i].Document.Description, new { @class = "box2" })
}
注意
将“IncludeTotalCount”设置为 true 时,会对性能造成轻微的影响,因为此总数需要由 Azure 认知搜索计算。 使用复杂数据集时,会出现警告,指示返回的值是一个近似值。 由于酒店搜索语料库很小,因此该值将是准确的。
编译并运行应用
现在,选择“启动但不调试”(或按 F5 键) 。
搜索返回大量结果(例如“wifi”)的字符串。 能否通过页面熟练地浏览结果?
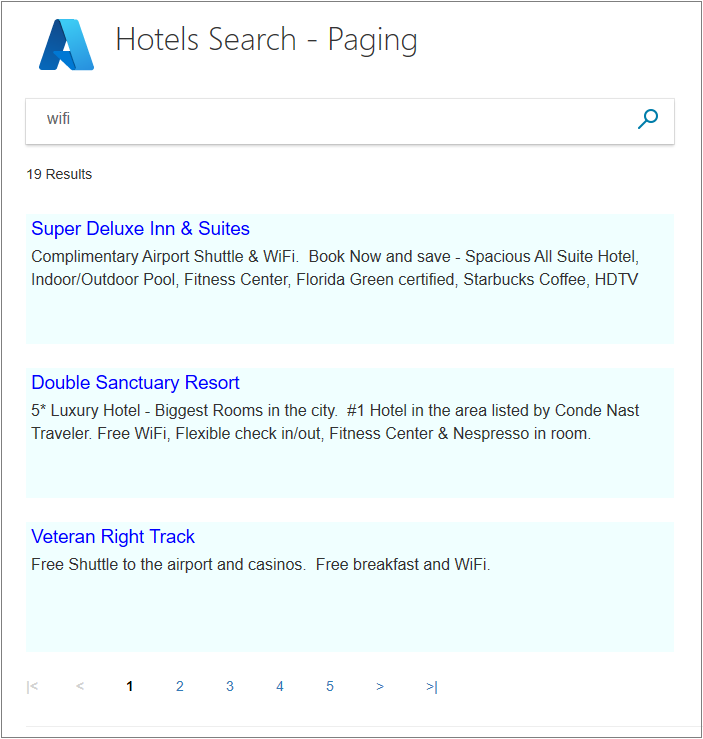
请尝试单击最右侧页码,然后单击最左侧页码。 页码是否适当调整,将你所在的页面居中显示?
“第一页”和“最后一页”选项是否有用? 某些商业搜索引擎使用这些选项,而另一些则不使用。
请转到结果的最后一页。 最后一页是唯一一个所含结果数可能少于 ResultsPerPage 结果数的页面 。

键入“城镇”,然后单击“搜索”。 如果结果少于一页,则不会显示分页选项。

保存此项目然后继续转到下一节,以了解另一种分页形式。
使用无限滚动来扩展应用
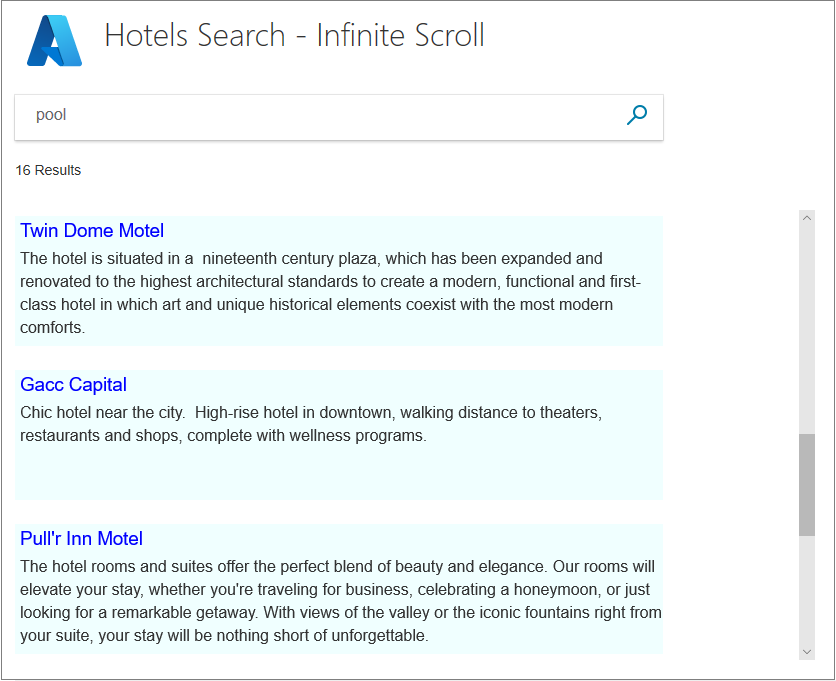
当用户将垂直滚动条滚动到正在显示的结果的最后,会触发无限滚动。 在此情况下,对搜索服务的调用是针对下一页结果进行的。 如果没有更多结果,则不返回任何内容,且垂直滚动条保持不变。 如有更多结果,这些结果会追加到当前页面上,而滚动条会更改,显示还有更多结果可用。
需要注意的一点是,当前页面不会被替换,而是会扩展以显示其他结果。 用户可始终滚回到搜索的第一批结果。
要实现无限滚动,首先要在添加任何页码滚动元素之前处理项目。 在 GitHub 上,这是 FirstAzureSearchApp 解决方案。
向模型添加分页字段
首先,向 SearchData.cs 模型文件中的 SearchData 类添加 paging 属性 。
// Record if the next page is requested.
public string paging { get; set; }
此变量是一个字符串;如果应发送下一页结果,或者这些结果对搜索的第一页而言为 null,则该字符串包含“next”。
在同一文件且在命名空间中,添加具有一个属性的全局变量类。 在 MVC 中,全局变量是在其自己的静态类中声明的。 ResultsPerPage 会设置每一页的结果数 。
public static class GlobalVariables
{
    public static int ResultsPerPage
    {
        get
        {
            return 3;
        }
    }
}
将垂直滚动条添加到视图
找到 index.cshtml 文件中显示结果的部分(它以 @if (Model != null) 开头)。
将此部分替换为以下代码。 新的 <div> 部分是围绕应可滚动的区域的,并添加了 overflow-y 属性和对名为“scrolled()”等的 onscroll 函数的调用 。
@if (Model != null)
{
    // Show the result count.
    <p class="sampleText">
        @Model.resultList.TotalCount Results
    </p>

    var results = Model.resultList.GetResults().ToList();

    <div id="myDiv" style="width: 800px; height: 450px; overflow-y: scroll;" onscroll="scrolled()">

        <!-- Show the hotel data. -->
        @for (var i = 0; i < results.Count; i++)
        {
            // Display the hotel name and description.
            @Html.TextAreaFor(m => results[i].Document.HotelName, new { @class = "box1" })
            @Html.TextArea($"desc{i}", results[i].Document.Description, new { @class = "box2" })
        }
在循环的正下文,在 </div> 标记的后面添加 scrolled 函数 。
<script>
    function scrolled() {
        if (myDiv.offsetHeight + myDiv.scrollTop >= myDiv.scrollHeight) {
            $.getJSON("/Home/NextAsync", function (data) {
                var div = document.getElementById('myDiv');

                // Append the returned data to the current list of hotels.
                for (var i = 0; i < data.length; i += 2) {
                    div.innerHTML += '\n<textarea class="box1">' + data[i] + '</textarea>';
                    div.innerHTML += '\n<textarea class="box2">' + data[i + 1] + '</textarea>';
                }
            });
        }
    }
</script>
上述脚本中的“if”语句会测试用户是否已滚动到垂直滚动条的底部。 如果已滚动到底部,则会对名为“NextAsync”的操作调用“Home”控制器 。 无需控制器提供任何其他信息,它将返回数据的下一页。 此数据随后按原始页面相同的 HTML 样式设置格式。 如果未返回任何结果,则不追加任何内容且原内容保持不变。
处理 Next 操作
只需要向控制器发送下列三个操作:应用的第一次运行(调用 Index())、用户的第一次搜索(调用 Index(model)),然后是通过 Next(model) 进行后续调用来查找更多结果 。
打开主控制器文件,从原始脚本中删除 RunQueryAsync 方法 。
将 Index(model) 操作替换为以下代码 。 它现可处理“分页”字段(为 null 时),或者设置为“下一步”并处理对 Azure 认知搜索的调用 。
public async Task<ActionResult> Index(SearchData model)
{
    try
    {
        InitSearch();

        int page;

        if (model.paging != null && model.paging == "next")
        {
            // Increment the page.
            page = (int)TempData["page"] + 1;

            // Recover the search text.
            model.searchText = TempData["searchfor"].ToString();
        }
        else
        {
            // First call. Check for valid text input.
            if (model.searchText == null)
            {
                model.searchText = "";
            }
            page = 0;
        }

        // Setup the search parameters.
        var options = new SearchOptions
        {
            SearchMode = SearchMode.All,

            // Skip past results that have already been returned.
            Skip = page * GlobalVariables.ResultsPerPage,

            // Take only the next page worth of results.
            Size = GlobalVariables.ResultsPerPage,

            // Include the total number of results.
            IncludeTotalCount = true
        };

        // Specify which fields to include in results.
        options.Select.Add("HotelName");
        options.Select.Add("Description");

        // For efficiency, the search call should be asynchronous, so use SearchAsync rather than Search.
        model.resultList = await _searchClient.SearchAsync<Hotel>(model.searchText, options).ConfigureAwait(false);

        // Ensure TempData is stored for the next call.
        TempData["page"] = page;
        TempData["searchfor"] = model.searchText;
    }
    catch
    {
        return View("Error", new ErrorViewModel { RequestId = "1" });
    }

    return View("Index", model);
}
与带编号的分页方法类似,我们使用“Skip”和“Size”搜索设置来请求仅返回所需的数据 。
向主控制器添加“NextAsync”操作。 请注意它返回列表的方式:每家酒店会向列表添加两个元素,即酒店名称和酒店说明。 设置此格式,使其与 scrolled 函数对视图中返回的数据的使用相一致 。
public async Task<ActionResult> NextAsync(SearchData model)
{
    // Set the next page setting, and call the Index(model) action.
    model.paging = "next";
    await Index(model).ConfigureAwait(false);

    // Create an empty list.
    var nextHotels = new List<string>();

    // Add a hotel name, then description, to the list.
    await foreach (var searchResult in model.resultList.GetResultsAsync())
    {
        nextHotels.Add(searchResult.Document.HotelName);
        nextHotels.Add(searchResult.Document.Description);
    }

    // Rather than return a view, return the list of data.
    return new JsonResult(nextHotels);
}
如果在“List<string>”上出现语法错误,请将以下 using 指令添加到控制器文件的开头 。
using System.Collections.Generic;
编译并运行项目
现在,选择“启动但不调试”(或按 F5 键) 。
输入一个会返回更多结果的词(例如“泳池”),然后测试垂直滚动条。 它会触发新的一页结果吗?
提示
要确保第一页上显示滚动条,第一页结果必须稍微超过当前显示这些结果的区域的高度。 在我们的示例中,.box1 具有 30 像素的高度,而 .box2 具有 100 像素的高度,其下边距为 24 像素 。 因此,每个条目都使用 154 像素。 三个条目占用的像素将为 3 x 154 = 462 个。 要确保显示垂直滚动条,必须将显示区域的高度设置为小于 462 像素(甚至可使用 461 像素)。 此问题只出现在第一页上,后续页面肯定会显示滚动条。 要更新的行为 <div id="myDiv" style="width:800px; height:450px; overflow-y: scroll;" onscroll="scrolled()"> 。
向下滚动一直到结果的底部。 请注意所有信息现在一个视图页面上的显示方式。 可一直滚动回顶部,而不触发任何服务器调用。
更复杂的无限滚动系统可能会使用鼠标滚轮或其他类似机制来触发新页结果的加载。 在这些教程中,我们将不再进一步执行无限滚动,尽管它具有一定的魅力,因为它能避免额外的鼠标点击,而你可能想要进一步研究其他选项。
要点
请考虑此项目中的以下要点:
- 带编号的分页非常适合结果顺序比较随意的搜索,这意味着后续页面上可能有用户感兴趣的内容。
- 如果结果的顺序非常重要,则无限滚动很适用。 例如,如果结果是按到目标城市中心的距离进行排序的。
- 通过带编号的分页,可更好地进行导航。 例如,用户可能记得第 6 页上有一个有趣的结果,但是无限滚动中没有此类简单的参考。
- 无限滚动有一种简单的魔力,你只需上下滚动而不必单击页码。
- 无限滚动的一项重要功能是,结果会追加到现有页面上而不是替代该页面,这很有效。
- 临时存储仅保存一个调用的时长,需要重置以经受住额外调用。
后续步骤
分页是搜索体验的基础。 在详细了解分页后,下一步是添加预先输入搜索,进一步改进用户体验。