发现使用路径进行描边和填充的各种路径效果
路径效果是 SKPathEffect 类的实例,该类由类定义的八种静态创建方法之一创建。 然后,SKPathEffect 对象被设置为 PathEffect 对象的 SKPaint 属性,以实现各种有趣的效果,例如,用复制的小路径绘制线条:
路径效果允许:
- 用点和短划线划线
- 用任何填充路径划线
- 用阴影线填充区域
- 使用平铺路径填充区域
- 圆润尖角
- 为线条和曲线添加随机“抖动”
此外,还可以组合两个或多个路径效果。
本文还演示如何使用 SKPaint 的 GetFillPath 方法,通过应用 SKPaint 的属性(包括 StrokeWidth 和 PathEffect)以将一条路径转换为另一条。 这会产生一些有趣的技术,例如获取一条身为其他路径轮廓的路径。 GetFillPath 对路径效果也有用。
点和短划线
点和短划线一文介绍了 PathEffect.CreateDash 方法的使用。 该方法的第一个参数是一个数组,其中包含两个或更多个值的偶数,交替表示短划线长度和短划线之间的间隔长度:
public static SKPathEffect CreateDash (Single[] intervals, Single phase)
这些值与笔划宽度无关。 例如,如果笔划宽度为 10,而你需要一条由正方形短划线和正方形间距组成的线条,那么需要将 intervals 数组设置为 { 10, 10 }。 phase 参数指示线条在短划线图案中的开始位置。 在此示例中,如果希望线条以正方形间距开头,则将 phase 设置为 10。
短划线的结尾由 SKPaint 的 StrokeCap 属性决定。 对于宽笔划宽度,通常将此属性设置为 SKStrokeCap.Round 以舍入短划线的结尾。 在这种情况下,intervals 数组中的值不包括舍入产生的额外长度。 这意味着圆点需要指定零的宽度。 笔划宽度为 10 的情况下,若要创建一条由圆点和相同直径的间隙组成的线条,请使用{ 0, 20 }的 intervals 数组。
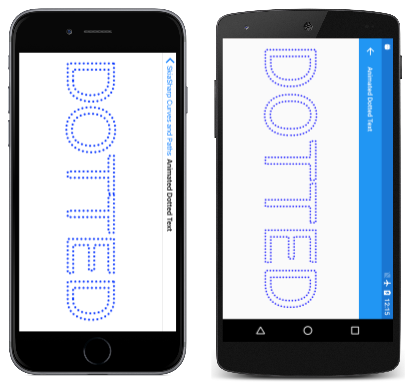
“动态虚线文本”页面类似于《集成文本和图形》一文中所述的“轮廓文本”页面,通过将 SKPaint 对象的 Style 属性设置为 SKPaintStyle.Stroke 来显示轮廓文本字符。 此外,“动态虚线文本”使用 SKPathEffect.CreateDash 赋予轮廓点状外观,并且程序还对 SKPathEffect.CreateDash 方法的 phase 参数进行动态处理,使点似乎绕着文本字符移动。 下面是横向模式下的页面:
AnimatedDottedTextPage 类首先定义一些常量,并重写动画的 OnAppearing 和 OnDisappearing 方法:
public class AnimatedDottedTextPage : ContentPage
{
    const string text = "DOTTED";
    const float strokeWidth = 10;
    static readonly float[] dashArray = { 0, 2 * strokeWidth };

    SKCanvasView canvasView;
    bool pageIsActive;

    public AnimatedDottedTextPage()
    {
        Title = "Animated Dotted Text";

        canvasView = new SKCanvasView();
        canvasView.PaintSurface += OnCanvasViewPaintSurface;
        Content = canvasView;
    }

    protected override void OnAppearing()
    {
        base.OnAppearing();
        pageIsActive = true;

        Device.StartTimer(TimeSpan.FromSeconds(1f / 60), () =>
        {
            canvasView.InvalidateSurface();
            return pageIsActive;
        });
    }

    protected override void OnDisappearing()
    {
        base.OnDisappearing();
        pageIsActive = false;
    }
    ...
}
PaintSurface 处理程序首先创建一个 SKPaint 对象以显示文本。 根据屏幕宽度调整 TextSize 属性:
public class AnimatedDottedTextPage : ContentPage
{
    ...
    void OnCanvasViewPaintSurface(object sender, SKPaintSurfaceEventArgs args)
    {
        SKImageInfo info = args.Info;
        SKSurface surface = args.Surface;
        SKCanvas canvas = surface.Canvas;

        canvas.Clear();

        // Create an SKPaint object to display the text
        using (SKPaint textPaint = new SKPaint
            {
                Style = SKPaintStyle.Stroke,
                StrokeWidth = strokeWidth,
                StrokeCap = SKStrokeCap.Round,
                Color = SKColors.Blue,
            })
        {
            // Adjust TextSize property so text is 95% of screen width
            float textWidth = textPaint.MeasureText(text);
            textPaint.TextSize *= 0.95f * info.Width / textWidth;

            // Find the text bounds
            SKRect textBounds = new SKRect();
            textPaint.MeasureText(text, ref textBounds);

            // Calculate offsets to center the text on the screen
            float xText = info.Width / 2 - textBounds.MidX;
            float yText = info.Height / 2 - textBounds.MidY;

            // Animate the phase; t is 0 to 1 every second
            TimeSpan timeSpan = new TimeSpan(DateTime.Now.Ticks);
            float t = (float)(timeSpan.TotalSeconds % 1 / 1);
            float phase = -t * 2 * strokeWidth;

            // Create dotted line effect based on dash array and phase
            using (SKPathEffect dashEffect = SKPathEffect.CreateDash(dashArray, phase))
            {
                // Set it to the paint object
                textPaint.PathEffect = dashEffect;

                // And draw the text
                canvas.DrawText(text, xText, yText, textPaint);
            }
        }
    }
}
在方法的末尾,使用定义为字段的 SKPathEffect.CreateDash 和动态 dashArray 值调用 phase 方法。 SKPathEffect 实例被设置为 SKPaint 对象的 PathEffect 属性以显示文本。
或者,可以在测量文本并在页面上居中之前将 SKPathEffect 对象设置为 SKPaint 对象。 但是,在这种情况下,动态的点和短划线会导致呈现的文本大小有一些变化,并且文本往往会有一点振动。 (试一下!)
你还会注意到,当动态点围着文本字符围绕时,每个封闭曲线中都有一处地方的点似乎在跳进跳出。 这是定义字符轮廓的路径开始和结束的位置。 如果路径长度不是短划线图案长度的整数倍(在本例中为 20 像素),则只有一部分图案可以容纳进路径末尾中。
可以调整短划线图案的长度以适应路径的长度,但需要确定路径的长度,这项技术在路径信息和枚举一文中有介绍。
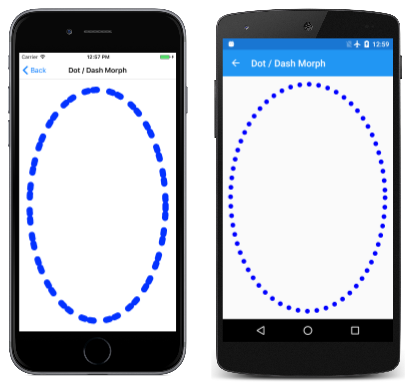
“点/短划线变形”程序对短划线图案本身进行动画处理,让短划线看起来似乎分割为点,然后又再组合成短划线:
和上一个程序一样,DotDashMorphPage 类替代 OnAppearing 和 OnDisappearing 方法,但类将 SKPaint 对象定义为字段:
public class DotDashMorphPage : ContentPage
{
    const float strokeWidth = 30;
    static readonly float[] dashArray = new float[4];

    SKCanvasView canvasView;
    bool pageIsActive = false;

    SKPaint ellipsePaint = new SKPaint
    {
        Style = SKPaintStyle.Stroke,
        StrokeWidth = strokeWidth,
        StrokeCap = SKStrokeCap.Round,
        Color = SKColors.Blue
    };
    ...
    void OnCanvasViewPaintSurface(object sender, SKPaintSurfaceEventArgs args)
    {
        SKImageInfo info = args.Info;
        SKSurface surface = args.Surface;
        SKCanvas canvas = surface.Canvas;

        canvas.Clear();

        // Create elliptical path
        using (SKPath ellipsePath = new SKPath())
        {
            ellipsePath.AddOval(new SKRect(50, 50, info.Width - 50, info.Height - 50));

            // Create animated path effect
            TimeSpan timeSpan = new TimeSpan(DateTime.Now.Ticks);
            float t = (float)(timeSpan.TotalSeconds % 3 / 3);
            float phase = 0;

            if (t < 0.25f)  // 1, 0, 1, 2 --> 0, 2, 0, 2
            {
                float tsub = 4 * t;
                dashArray[0] = strokeWidth * (1 - tsub);
                dashArray[1] = strokeWidth * 2 * tsub;
                dashArray[2] = strokeWidth * (1 - tsub);
                dashArray[3] = strokeWidth * 2;
            }
            else if (t < 0.5f)  // 0, 2, 0, 2 --> 1, 2, 1, 0
            {
                float tsub = 4 * (t - 0.25f);
                dashArray[0] = strokeWidth * tsub;
                dashArray[1] = strokeWidth * 2;
                dashArray[2] = strokeWidth * tsub;
                dashArray[3] = strokeWidth * 2 * (1 - tsub);
                phase = strokeWidth * tsub;
            }
            else if (t < 0.75f) // 1, 2, 1, 0 --> 0, 2, 0, 2
            {
                float tsub = 4 * (t - 0.5f);
                dashArray[0] = strokeWidth * (1 - tsub);
                dashArray[1] = strokeWidth * 2;
                dashArray[2] = strokeWidth * (1 - tsub);
                dashArray[3] = strokeWidth * 2 * tsub;
                phase = strokeWidth * (1 - tsub);
            }
            else               // 0, 2, 0, 2 --> 1, 0, 1, 2
            {
                float tsub = 4 * (t - 0.75f);
                dashArray[0] = strokeWidth * tsub;
                dashArray[1] = strokeWidth * 2 * (1 - tsub);
                dashArray[2] = strokeWidth * tsub;
                dashArray[3] = strokeWidth * 2;
            }

            using (SKPathEffect pathEffect = SKPathEffect.CreateDash(dashArray, phase))
            {
                ellipsePaint.PathEffect = pathEffect;
                canvas.DrawPath(ellipsePath, ellipsePaint);
            }
        }
    }
}
PaintSurface 处理程序基于页面的大小创建椭圆路径,并执行一长段代码来设置 dashArray 和 phase 变量。 由于 t 动态变量的范围为 0 至 1,if 块将时间分为四段,在每段时间中 tsub 也介于 0 到 1 之间。 最后,程序将创建 SKPathEffect 并将其设置为 SKPaint 对象进行绘图。
路径到路径
SKPaint 的 GetFillPath 方法根据 SKPaint 对象的设置转变路径。 若要查看其工作原理,请将上一个程序中的 canvas.DrawPath 调用替换为以下代码:
SKPath newPath = new SKPath();
bool fill = ellipsePaint.GetFillPath(ellipsePath, newPath);
SKPaint newPaint = new SKPaint
{
    Style = fill ? SKPaintStyle.Fill : SKPaintStyle.Stroke
};
canvas.DrawPath(newPath, newPaint);
在新代码中,GetFillPath 调用会将 ellipsePath(只是个椭圆)转换为 newPath,然后通过 newPaint 显示。 使用所有默认属性设置创建 newPaint 对象,但 Style 属性是根据 GetFillPath 返回的布尔值设置的。
视觉对象除了颜色以外都相同,颜色在 ellipsePaint(而不是 newPaint)中设置。 比起 ellipsePath 定义的单纯椭圆形,newPath 包含数条路径轮廓,能够定义一系列的点和短划线。 这是将各种 ellipsePaint 属性(特别是 StrokeWidth、StrokeCap 和 PathEffect)应用于 ellipsePath 并将结果路径放进 newPath 的结果。 GetFillPath 方法返回一个布尔值,指示是否填充目标路径;在此示例中,返回值为 true,填充路径。
试着将 newPaint 中的 Style 设置变为 SKPaintStyle.Stroke,你将看到单个路径的轮廓由单像素宽度的线条描绘。
使用路径绘制
SKPathEffect.Create1DPath 方法在概念上类似于 SKPathEffect.CreateDash,不同点在于你要规定一条路径,而不是短划线和间隙组成的图案。 路径被多次复制以绘制线条或曲线。
语法为:
public static SKPathEffect Create1DPath (SKPath path, Single advance,
                                         Single phase, SKPath1DPathEffectStyle style)
通常,传递到 Create1DPath 的路径是小路径,并围绕点(0,0)。 由于路径在线上复制,advance 参数指示路径中心之间的距离。 通常将该参数设置为路径的大致宽度。 phase 参数在这里的作用与 CreateDash 方法中的作用相同。
SKPath1DPathEffectStyle 有三个成员:
TranslateRotateMorph
Translate 成员使路径在被复制为线条或曲线的过程中,保持相同的方向。 对于 Rotate,路径根据曲线的正切值旋转。 对于水平线条,路径有法定方向。 Morph 与 Rotate 类似,只是路径本身也弯曲,以匹配要绘制线条的曲率。
“1D 路径效果”页演示了这三个选项。 “OneDimensionalPathEffectPage.xaml”文件定义了一个选取器,其中包含与枚举的三个成员对应的三个项:
<?xml version="1.0" encoding="utf-8" ?>
<ContentPage xmlns="http://xamarin.com/schemas/2014/forms"
             xmlns:x="http://schemas.microsoft.com/winfx/2009/xaml"
             xmlns:skia="clr-namespace:SkiaSharp.Views.Forms;assembly=SkiaSharp.Views.Forms"
             x:Class="SkiaSharpFormsDemos.Curves.OneDimensionalPathEffectPage"
             Title="1D Path Effect">
    <Grid>
        <Grid.RowDefinitions>
            <RowDefinition Height="Auto" />
            <RowDefinition Height="*" />
        </Grid.RowDefinitions>

        <Picker x:Name="effectStylePicker"
                Title="Effect Style"
                Grid.Row="0"
                SelectedIndexChanged="OnPickerSelectedIndexChanged">
            <Picker.ItemsSource>
                <x:Array Type="{x:Type x:String}">
                    <x:String>Translate</x:String>
                    <x:String>Rotate</x:String>
                    <x:String>Morph</x:String>
                </x:Array>
            </Picker.ItemsSource>
            <Picker.SelectedIndex>
                0
            </Picker.SelectedIndex>
        </Picker>

        <skia:SKCanvasView x:Name="canvasView"
                           PaintSurface="OnCanvasViewPaintSurface"
                           Grid.Row="1" />
    </Grid>
</ContentPage>
“OneDimensionalPathEffectPage.xaml.cs”代码隐藏文件将三个 SKPathEffect 对象定义为字段。 所有这些都是使用通过 SKPathEffect.Create1DPath 创建的,SKPath 对象通过 SKPath.ParseSvgPathData 创建。 第一个是简单的框,第二个是菱形,第三个是矩形。 它们用于演示三种效果样式:
public partial class OneDimensionalPathEffectPage : ContentPage
{
    SKPathEffect translatePathEffect =
        SKPathEffect.Create1DPath(SKPath.ParseSvgPathData("M -10 -10 L 10 -10, 10 10, -10 10 Z"),
                                  24, 0, SKPath1DPathEffectStyle.Translate);

    SKPathEffect rotatePathEffect =
        SKPathEffect.Create1DPath(SKPath.ParseSvgPathData("M -10 0 L 0 -10, 10 0, 0 10 Z"),
                                  20, 0, SKPath1DPathEffectStyle.Rotate);

    SKPathEffect morphPathEffect =
        SKPathEffect.Create1DPath(SKPath.ParseSvgPathData("M -25 -10 L 25 -10, 25 10, -25 10 Z"),
                                  55, 0, SKPath1DPathEffectStyle.Morph);

    SKPaint pathPaint = new SKPaint
    {
        Color = SKColors.Blue
    };

    public OneDimensionalPathEffectPage()
    {
        InitializeComponent();
    }

    void OnPickerSelectedIndexChanged(object sender, EventArgs args)
    {
        if (canvasView != null)
        {
            canvasView.InvalidateSurface();
        }
    }

    void OnCanvasViewPaintSurface(object sender, SKPaintSurfaceEventArgs args)
    {
        SKImageInfo info = args.Info;
        SKSurface surface = args.Surface;
        SKCanvas canvas = surface.Canvas;

        canvas.Clear();

        using (SKPath path = new SKPath())
        {
            path.MoveTo(new SKPoint(0, 0));
            path.CubicTo(new SKPoint(2 * info.Width, info.Height),
                         new SKPoint(-info.Width, info.Height),
                         new SKPoint(info.Width, 0));

            switch ((string)effectStylePicker.SelectedItem))
            {
                case "Translate":
                    pathPaint.PathEffect = translatePathEffect;
                    break;

                case "Rotate":
                    pathPaint.PathEffect = rotatePathEffect;
                    break;

                case "Morph":
                    pathPaint.PathEffect = morphPathEffect;
                    break;
            }

            canvas.DrawPath(path, pathPaint);
        }
    }
}
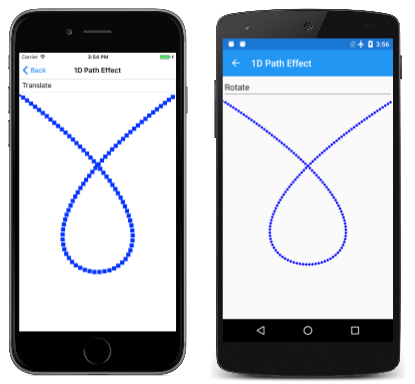
PaintSurface 处理程序创建一条贝兹曲线,该曲线围绕自身循环,并访问选取器以确定应使用哪个 PathEffect 绘制曲线。 从左到右显示三个选项(Translate、Rotate、Morph):
SKPathEffect.Create1DPath 方法指定的路径始终填充。 如果 SKPaint 对象的 PathEffect 属性设置为 1D 路径效果,则始终描绘 DrawPath 方法指定的路径。 请注意,pathPaint 对象没有 Style 设置,该设置通常默认为 Fill,但无论有没有都会绘制路径。
Translate 示例中使用的框为 20 像素的正方形,advance 参数设置为 24。 当线条大致为水平或垂直时,此差异会导致框之间产生间距,但当线条是对角线时,框会重叠一点,因为框的对角线为 28.3 像素。
Rotate 示例中的菱形也宽 20 像素。 advance 设置为 20,以便随着菱形演线条曲线旋转时,点能继续接触。
Morph 示例中的矩形宽 50 像素,advance 设置为 55,以便当矩形绕着贝兹曲线弯曲时,相互之间能保持一个小间距。
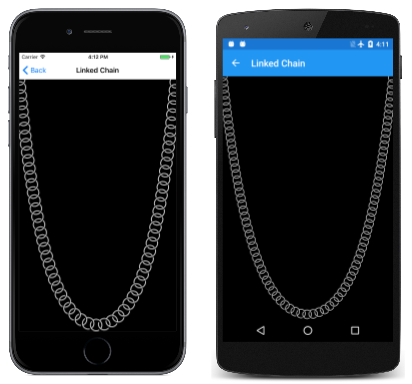
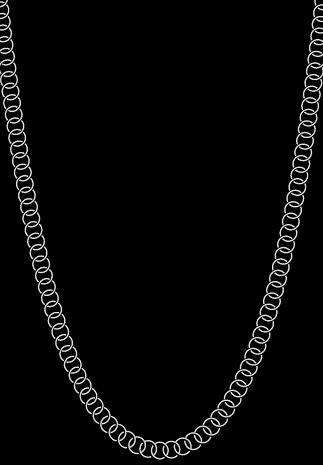
如果 advance 参数小于路径的大小,被复制的路径可能会重叠。 这可能会带来一些有趣的效果。 “连接链条”页显示一串重叠的圆圈,这些圆类似于连接起来的链条,以独特的吊索形状挂起:
仔细观察,你将看到这些并不是真的圆圈。 链条中的每个连接都是两个弧线,大小和位置被调整到看起来似乎与相邻的连接在一起。
一条重量均匀分布的链条或电缆,以吊索样式挂起。 由于重量压力均匀分布而得以形成反式吊索形式的拱形。 吊索的数学描述看似简单:
y = a · cosh(x / a)
cosh是双曲余弦函数。 x等于 0,双曲余弦为零,y 等于 a。 这是吊索的中心。 与余弦函数一样,双曲余弦被认为是偶数,这意味着 cosh(–x) 等于 cosh(x),正负参数随值的增加而增加。 这些值确定构成吊索边的曲线。
找到适宜的 a 值以让吊索适应手机页面尺寸,这一操作并不是直接的计算。 如果 w 和 h 是矩形的宽度和高度,则最佳的 a 值要满足以下公式:
cosh(w / 2 / a) = 1 + h / a
LinkedChainPage 类中的以下方法通过将等号左右两侧的两个表达式视作 left 和 right 来体现等式。 对于较小的 a 值,left 大于 right;对于较大的 a 值,left 小于 right。 while 循环在最佳 a 值下缩小:
float FindOptimumA(float width, float height)
{
    Func<float, float> left = (float a) => (float)Math.Cosh(width / 2 / a);
    Func<float, float> right = (float a) => 1 + height / a;

    float gtA = 1;         // starting value for left > right
    float ltA = 10000;     // starting value for left < right

    while (Math.Abs(gtA - ltA) > 0.1f)
    {
        float avgA = (gtA + ltA) / 2;

        if (left(avgA) < right(avgA))
        {
            ltA = avgA;
        }
        else
        {
            gtA = avgA;
        }
    }

    return (gtA + ltA) / 2;
}
连接的 SKPath 对象在类的构造函数中创建,SKPathEffect 结果对象随后被设置为 SKPaint 对象的 PathEffect 属性,保存为字段:
public class LinkedChainPage : ContentPage
{
    const float linkRadius = 30;
    const float linkThickness = 5;

    Func<float, float, float> catenary = (float a, float x) => (float)(a * Math.Cosh(x / a));

    SKPaint linksPaint = new SKPaint
    {
        Color = SKColors.Silver
    };

    public LinkedChainPage()
    {
        Title = "Linked Chain";

        SKCanvasView canvasView = new SKCanvasView();
        canvasView.PaintSurface += OnCanvasViewPaintSurface;
        Content = canvasView;

        // Create the path for the individual links
        SKRect outer = new SKRect(-linkRadius, -linkRadius, linkRadius, linkRadius);
        SKRect inner = outer;
        inner.Inflate(-linkThickness, -linkThickness);

        using (SKPath linkPath = new SKPath())
        {
            linkPath.AddArc(outer, 55, 160);
            linkPath.ArcTo(inner, 215, -160, false);
            linkPath.Close();

            linkPath.AddArc(outer, 235, 160);
            linkPath.ArcTo(inner, 395, -160, false);
            linkPath.Close();

            // Set that path as the 1D path effect for linksPaint
            linksPaint.PathEffect =
                SKPathEffect.Create1DPath(linkPath, 1.3f * linkRadius, 0,
                                          SKPath1DPathEffectStyle.Rotate);
        }
    }
    ...
}
PaintSurface 处理程序的主要作业是为吊索本身创建路径。 确定最佳 a 并将其存储在 optA 变量中后,还需要计算距离窗口顶部的偏移量。 然后,它可以累积一组吊索的 SKPoint 值,将其转换为路径,并使用之前创建的 SKPaint 对象绘制路径:
public class LinkedChainPage : ContentPage
{
    ...
    void OnCanvasViewPaintSurface(object sender, SKPaintSurfaceEventArgs args)
    {
        SKImageInfo info = args.Info;
        SKSurface surface = args.Surface;
        SKCanvas canvas = surface.Canvas;

        canvas.Clear(SKColors.Black);

        // Width and height of catenary
        int width = info.Width;
        float height = info.Height - linkRadius;

        // Find the optimum 'a' for this width and height
        float optA = FindOptimumA(width, height);

        // Calculate the vertical offset for that value of 'a'
        float yOffset = catenary(optA, -width / 2);

        // Create a path for the catenary
        SKPoint[] points = new SKPoint[width];

        for (int x = 0; x < width; x++)
        {
            points[x] = new SKPoint(x, yOffset - catenary(optA, x - width / 2));
        }

        using (SKPath path = new SKPath())
        {
            path.AddPoly(points, false);

            // And render that path with the linksPaint object
            canvas.DrawPath(path, linksPaint);
        }
    }
    ...
}
此程序定义 Create1DPath 中使用的路径,其中心在 (0, 0)。 这似乎是合理的,因为路径的 (0, 0) 点与它装饰的线条或曲线对齐。 但是可以使用非居中的 (0, 0) 点来达成某些特殊效果。
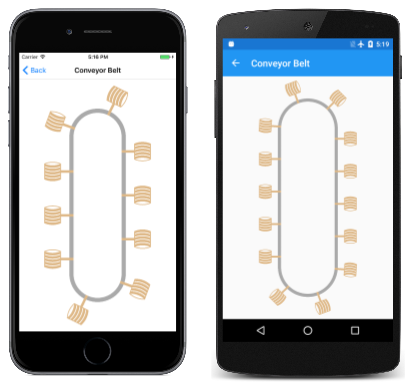
“传送带”页创建一条类似于长长的传送带的路径,其顶部和底部弯曲,大小为窗口尺寸。 该路径用一个简单的 20 像素宽的灰色 SKPaint 对象绘制,然后用另一个 SKPaint 对象再次绘制,该对象的 SKPathEffect 对象引用一个类似于小桶的路径:
桶路径的 (0, 0) 点是图柄,所以当 phase 参数是动态时,桶看起来像围绕传送带旋转,就像在底部挖水,然后在顶部倒水。
ConveyorBeltPage 类重写 OnAppearing 和 OnDisappearing 方法以实现动画。 桶的路径在页面的构造函数中定义:
public class ConveyorBeltPage : ContentPage
{
    SKCanvasView canvasView;
    bool pageIsActive = false;

    SKPaint conveyerPaint = new SKPaint
    {
        Style = SKPaintStyle.Stroke,
        StrokeWidth = 20,
        Color = SKColors.DarkGray
    };

    SKPath bucketPath = new SKPath();

    SKPaint bucketsPaint = new SKPaint
    {
        Color = SKColors.BurlyWood,
    };

    public ConveyorBeltPage()
    {
        Title = "Conveyor Belt";

        canvasView = new SKCanvasView();
        canvasView.PaintSurface += OnCanvasViewPaintSurface;
        Content = canvasView;

        // Create the path for the bucket starting with the handle
        bucketPath.AddRect(new SKRect(-5, -3, 25, 3));

        // Sides
        bucketPath.AddRoundedRect(new SKRect(25, -19, 27, 18), 10, 10,
                                  SKPathDirection.CounterClockwise);
        bucketPath.AddRoundedRect(new SKRect(63, -19, 65, 18), 10, 10,
                                  SKPathDirection.CounterClockwise);

        // Five slats
        for (int i = 0; i < 5; i++)
        {
            bucketPath.MoveTo(25, -19 + 8 * i);
            bucketPath.LineTo(25, -13 + 8 * i);
            bucketPath.ArcTo(50, 50, 0, SKPathArcSize.Small,
                             SKPathDirection.CounterClockwise, 65, -13 + 8 * i);
            bucketPath.LineTo(65, -19 + 8 * i);
            bucketPath.ArcTo(50, 50, 0, SKPathArcSize.Small,
                             SKPathDirection.Clockwise, 25, -19 + 8 * i);
            bucketPath.Close();
        }

        // Arc to suggest the hidden side
        bucketPath.MoveTo(25, -17);
        bucketPath.ArcTo(50, 50, 0, SKPathArcSize.Small,
                         SKPathDirection.Clockwise, 65, -17);
        bucketPath.LineTo(65, -19);
        bucketPath.ArcTo(50, 50, 0, SKPathArcSize.Small,
                         SKPathDirection.CounterClockwise, 25, -19);
        bucketPath.Close();

        // Make it a little bigger and correct the orientation
        bucketPath.Transform(SKMatrix.MakeScale(-2, 2));
        bucketPath.Transform(SKMatrix.MakeRotationDegrees(90));
    }
    ...
桶创建代码与两个转换配合,使桶变大一些并侧转。 应用这些转换比调整上一代码中的全部坐标要容易。
PaintSurface 处理程序首先定义传送带本身的路径。 这仅仅是一对用 20 像素宽的深灰色线条绘制的线条和半圆:
public class ConveyorBeltPage : ContentPage
{
    ...
    void OnCanvasViewPaintSurface(object sender, SKPaintSurfaceEventArgs args)
    {
        SKImageInfo info = args.Info;
        SKSurface surface = args.Surface;
        SKCanvas canvas = surface.Canvas;

        canvas.Clear();

        float width = info.Width / 3;
        float verticalMargin = width / 2 + 150;

        using (SKPath conveyerPath = new SKPath())
        {
            // Straight verticals capped by semicircles on top and bottom
            conveyerPath.MoveTo(width, verticalMargin);
            conveyerPath.ArcTo(width / 2, width / 2, 0, SKPathArcSize.Large,
                               SKPathDirection.Clockwise, 2 * width, verticalMargin);
            conveyerPath.LineTo(2 * width, info.Height - verticalMargin);
            conveyerPath.ArcTo(width / 2, width / 2, 0, SKPathArcSize.Large,
                               SKPathDirection.Clockwise, width, info.Height - verticalMargin);
            conveyerPath.Close();

            // Draw the conveyor belt itself
            canvas.DrawPath(conveyerPath, conveyerPaint);

            // Calculate spacing based on length of conveyer path
            float length = 2 * (info.Height - 2 * verticalMargin) +
                           2 * ((float)Math.PI * width / 2);

            // Value will be somewhere around 200
            float spacing = length / (float)Math.Round(length / 200);

            // Now animate the phase; t is 0 to 1 every 2 seconds
            TimeSpan timeSpan = new TimeSpan(DateTime.Now.Ticks);
            float t = (float)(timeSpan.TotalSeconds % 2 / 2);
            float phase = -t * spacing;

            // Create the buckets PathEffect
            using (SKPathEffect bucketsPathEffect =
                        SKPathEffect.Create1DPath(bucketPath, spacing, phase,
                                                  SKPath1DPathEffectStyle.Rotate))
            {
                // Set it to the Paint object and draw the path again
                bucketsPaint.PathEffect = bucketsPathEffect;
                canvas.DrawPath(conveyerPath, bucketsPaint);
            }
        }
    }
}
绘制传送带的逻辑在横向模式下不起作用。
桶应该在传送带上相隔约 200 像素。 但是,传送带的长度可能不是 200 像素的倍数,这意味着随着 SKPathEffect.Create1DPath 的 phase 参数成为动态,桶将跳进跳出。
因此,程序首先计算一个名为 length 的传送带长度值。 由于传送带由直线和半圆组成,因此计算比较简单。 接下来,通过将 200 除以 length 来计算桶数。 结果四舍五入为最接近的整数,然后再分成 length。 结果是整数桶的间距。 phase 参数只是其中的一小部分。
再次路径到路径
在“传送带”DrawSurface 处理程序的底部,注释掉 canvas.DrawPath 调用并替换为以下代码:
SKPath newPath = new SKPath();
bool fill = bucketsPaint.GetFillPath(conveyerPath, newPath);
SKPaint newPaint = new SKPaint
{
    Style = fill ? SKPaintStyle.Fill : SKPaintStyle.Stroke
};
canvas.DrawPath(newPath, newPaint);
与前面的 GetFillPath 示例一样,结果除了颜色以外都相同。 执行 GetFillPath 后, newPath 对象包含多个桶路径副本,每个副本位于动画在调用时定位的同一位置。
阴影化区域
SKPathEffect.Create2DLines 方法用平行线填充区域,通常称为阴影线。 方法采用以下语法:
public static SKPathEffect Create2DLine (Single width, SKMatrix matrix)
width 参数规定阴影线的绘制宽度。 matrix 参数组合缩放和非必须的旋转。 缩放系数规定 Skia 用于分隔阴影线的像素增量。 线之间的分隔为缩放系数减去 width 参数。 如果缩放系数小于等于 width 值,则阴影线之间不会有间隔,并且区域将显示为填充。 为水平和垂直缩放设定相同的值。
默认情况下,阴影线是水平线。 如果 matrix 参数包含旋转,则阴影线顺时针旋转。
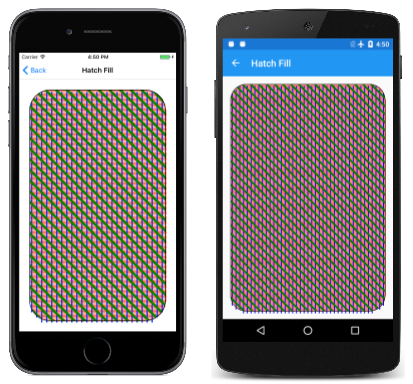
“阴影填充”页演示该路径效果。 HatchFillPage 类将三个路径效果定义为字段,第一个是宽度为 3 像素的水平阴影线,缩放系数规定相距 6 像素。 因此,线条之间的分隔是三个像素。 第二个路径效果是宽度为 6 像素、间隔 24 像素的垂直阴影线(因此分隔为 18 像素),第三个为 12 像素宽、36 像素间隔的对角线。
public class HatchFillPage : ContentPage
{
    SKPaint fillPaint = new SKPaint();

    SKPathEffect horzLinesPath = SKPathEffect.Create2DLine(3, SKMatrix.MakeScale(6, 6));

    SKPathEffect vertLinesPath = SKPathEffect.Create2DLine(6,
        Multiply(SKMatrix.MakeRotationDegrees(90), SKMatrix.MakeScale(24, 24)));

    SKPathEffect diagLinesPath = SKPathEffect.Create2DLine(12,
        Multiply(SKMatrix.MakeScale(36, 36), SKMatrix.MakeRotationDegrees(45)));

    SKPaint strokePaint = new SKPaint
    {
        Style = SKPaintStyle.Stroke,
        StrokeWidth = 3,
        Color = SKColors.Black
    };
    ...
    static SKMatrix Multiply(SKMatrix first, SKMatrix second)
    {
        SKMatrix target = SKMatrix.MakeIdentity();
        SKMatrix.Concat(ref target, first, second);
        return target;
    }
}
请注意矩阵 Multiply 方法。 由于水平和垂直的缩放系数相同,因此缩放和旋转矩阵加倍顺序并不重要。
PaintSurface 处理程序给三种路径效果三种不同的颜色,再配合 fillPaint 填充圆角矩形以适应页面。 忽略 fillPaint 上设置的 Style 属性;如果 SKPaint 对象包含从 SKPathEffect.Create2DLine 中创建的路径效果,则始终会填充区域:
public class HatchFillPage : ContentPage
{
    ...
    void OnCanvasViewPaintSurface(object sender, SKPaintSurfaceEventArgs args)
    {
        SKImageInfo info = args.Info;
        SKSurface surface = args.Surface;
        SKCanvas canvas = surface.Canvas;

        canvas.Clear();

        using (SKPath roundRectPath = new SKPath())
        {
            // Create a path
            roundRectPath.AddRoundedRect(
                new SKRect(50, 50, info.Width - 50, info.Height - 50), 100, 100);

            // Horizontal hatch marks
            fillPaint.PathEffect = horzLinesPath;
            fillPaint.Color = SKColors.Red;
            canvas.DrawPath(roundRectPath, fillPaint);

            // Vertical hatch marks
            fillPaint.PathEffect = vertLinesPath;
            fillPaint.Color = SKColors.Blue;
            canvas.DrawPath(roundRectPath, fillPaint);

            // Diagonal hatch marks -- use clipping
            fillPaint.PathEffect = diagLinesPath;
            fillPaint.Color = SKColors.Green;

            canvas.Save();
            canvas.ClipPath(roundRectPath);
            canvas.DrawRect(new SKRect(0, 0, info.Width, info.Height), fillPaint);
            canvas.Restore();

            // Outline the path
            canvas.DrawPath(roundRectPath, strokePaint);
        }
    }
    ...
}
仔细查看结果,你将看到红色和蓝色阴影线没有被精准地限制在圆角矩形上。 (这显然是基础 Skia 代码的一个特征。)如果这个结果不尽如人意,则绿色对角阴影线有一个替代方案:将圆角矩形用作剪裁路径,在整个页面上绘制阴影线。
PaintSurface 处理程序以直接绘制圆角矩形的调用结束,因此可以看到红色和蓝色阴影线的差异:
Android 屏幕看起来并不像这样:屏幕截图的缩放导致细红线和窄间隔合并为看似宽阔的红线和更宽的间隔。
使用路径填充
SKPathEffect.Create2DPath 可以使用水平和垂直复制的路径填充区域,从而有效平铺区域:
public static SKPathEffect Create2DPath (SKMatrix matrix, SKPath path)
SKMatrix 缩放系数规定复制路径的水平和垂直间距。 但是不能使用 matrix 参数旋转路径;如果要旋转路径,请使用 SKPath 定义的 Transform 方法旋转路径本身。
复制路径通常与屏幕的左上边缘对齐,而不是填充区域。 通过提供一个介于 0 和缩放系数之间的转换系数来指定从左侧和上侧的水平偏移量以及垂直偏移量,以此来替代此行为。
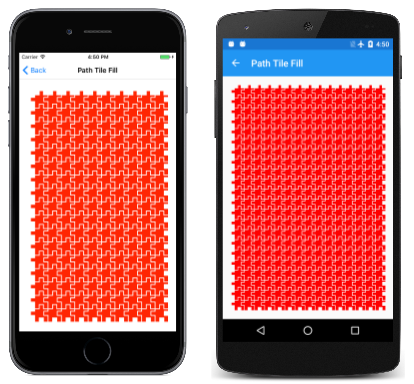
“路径平铺填充”页演示该路径效果。 用于平铺区域的路径被定义为 PathTileFillPage 类中的字段。 水平坐标和垂直坐标范围为 –40 到 40,这意味着此路径为 80 像素的方块:
public class PathTileFillPage : ContentPage
{
    SKPath tilePath = SKPath.ParseSvgPathData(
        "M -20 -20 L 2 -20, 2 -40, 18 -40, 18 -20, 40 -20, " +
        "40 -12, 20 -12, 20 12, 40 12, 40 40, 22 40, 22 20, " +
        "-2 20, -2 40, -20 40, -20 8, -40 8, -40 -8, -20 -8 Z");
    ...
    void OnCanvasViewPaintSurface(object sender, SKPaintSurfaceEventArgs args)
    {
        SKImageInfo info = args.Info;
        SKSurface surface = args.Surface;
        SKCanvas canvas = surface.Canvas;

        canvas.Clear();

        using (SKPaint paint = new SKPaint())
        {
            paint.Color = SKColors.Red;

            using (SKPathEffect pathEffect =
                   SKPathEffect.Create2DPath(SKMatrix.MakeScale(64, 64), tilePath))
            {
                paint.PathEffect = pathEffect;

                canvas.DrawRoundRect(
                    new SKRect(50, 50, info.Width - 50, info.Height - 50),
                    100, 100, paint);
            }
        }
    }
}
在 PaintSurface 处理程序中, SKPathEffect.Create2DPath 调用将水平和垂直间距设置为 64,导致 80 像素方形图块重叠。 幸运的是,路径类似于一个拼图片,与相邻的图块很好地吻合:
原始屏幕截图中的缩放会导致某些失真,尤其是在 Android 屏幕上。
请注意,这些图块始终显示为整个,并且永远不会被截断。 在前两个屏幕截图中,甚至不能明显看出被填充的区域是一个圆角矩形。 如果要将这些图块截断成特定的面积,请使用剪裁路径。
试着将 SKPaint 对象的 Style 属性设置为 Stroke,你将看到各图块被描边而不是填充。
还可以使用平铺位图填充区域,如 SkiaSharp 位图平铺一文中所示。
尖角倒圆
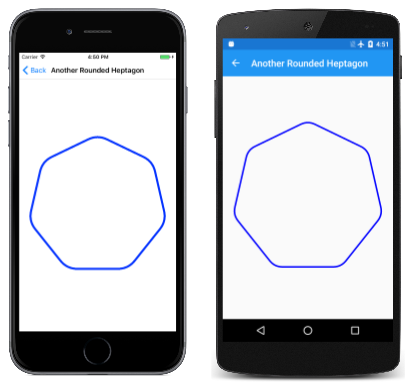
《三种方式绘制弧线》中介绍的“圆角七边形”使用正切弧来弯曲七边形的点。 “另一个圆角七边形”页展示了一种更简单的方法,该方法使用从 SKPathEffect.CreateCorner 方法创建的路径效果:
public static SKPathEffect CreateCorner (Single radius)
虽然单个参数被命名为 radius,但必须将它设置为所需圆角半径的一半。 (这显然是基础 Skia 代码的一个特征。)
下面是 AnotherRoundedHeptagonPage 类中的 PaintSurface 处理程序:
void OnCanvasViewPaintSurface(object sender, SKPaintSurfaceEventArgs args)
{
    SKImageInfo info = args.Info;
    SKSurface surface = args.Surface;
    SKCanvas canvas = surface.Canvas;

    canvas.Clear();

    int numVertices = 7;
    float radius = 0.45f * Math.Min(info.Width, info.Height);
    SKPoint[] vertices = new SKPoint[numVertices];
    double vertexAngle = -0.5f * Math.PI;       // straight up

    // Coordinates of the vertices of the polygon
    for (int vertex = 0; vertex < numVertices; vertex++)
    {
        vertices[vertex] = new SKPoint(radius * (float)Math.Cos(vertexAngle),
                                       radius * (float)Math.Sin(vertexAngle));
        vertexAngle += 2 * Math.PI / numVertices;
    }

    float cornerRadius = 100;

    // Create the path
    using (SKPath path = new SKPath())
    {
        path.AddPoly(vertices, true);

        // Render the path in the center of the screen
        using (SKPaint paint = new SKPaint())
        {
            paint.Style = SKPaintStyle.Stroke;
            paint.Color = SKColors.Blue;
            paint.StrokeWidth = 10;

            // Set argument to half the desired corner radius!
            paint.PathEffect = SKPathEffect.CreateCorner(cornerRadius / 2);

            canvas.Translate(info.Width / 2, info.Height / 2);
            canvas.DrawPath(path, paint);

            // Uncomment DrawCircle call to verify corner radius
            float offset = cornerRadius / (float)Math.Sin(Math.PI * (numVertices - 2) / numVertices / 2);
            paint.Color = SKColors.Green;
            // canvas.DrawCircle(vertices[0].X, vertices[0].Y + offset, cornerRadius, paint);
        }
    }
}
可以根据 SKPaint 对象的 Style 属性使用此效果进行勾勒或填充。 下面是运行的样子:
你将看到这个圆角七边形与之前的程序相同。 如果需要进一步的证据证明圆角半径确实为 100 而不是 SKPathEffect.CreateCorner 调用中指定的 50,则可以注释掉程序中的最后的语句,然后会看到边角上叠加了一个 100 半径的圆。
随机抖动
有时计算机图形完美无瑕的直线并不完全是你想要的,需要一点随机性。 在这种情况下,可以尝试此 SKPathEffect.CreateDiscrete 方法:
public static SKPathEffect CreateDiscrete (Single segLength, Single deviation, UInt32 seedAssist)
可以使用此路径效果进行勾勒或填充。 线条被分隔为连接的线段(其近似长度由 segLength 指定),并向不同的方向延伸。 相对原始线条的偏差范围由 deviation 指定。
最后一个参数是用于生成效果伪随机序列的种子。 对于不同的种子,抖动效果看起来会稍有不同。 参数的默认值为零,这意味着无论何时运行程序效果都相同。 如果希望在重新绘制屏幕时出现不同的抖动,可以将种子的 Millisecond 属性设置为 DataTime.Now 值(打比方)。
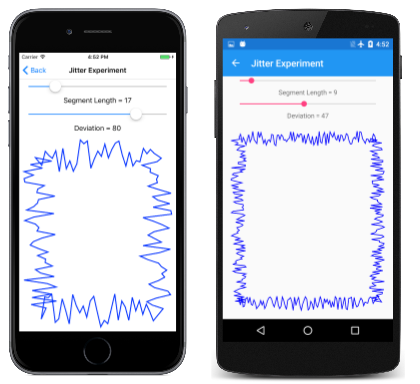
可以在“抖动试验 ”页上尝试在绘制矩形时使用不同的值:
程序非常简单。 JitterExperimentPage.xaml 文件将两个 Slider 元素和一个 SKCanvasView 实例化:
<ContentPage xmlns="http://xamarin.com/schemas/2014/forms"
             xmlns:x="http://schemas.microsoft.com/winfx/2009/xaml"
             xmlns:skia="clr-namespace:SkiaSharp.Views.Forms;assembly=SkiaSharp.Views.Forms"
             x:Class="SkiaSharpFormsDemos.Curves.JitterExperimentPage"
             Title="Jitter Experiment">
    <Grid>
        <Grid.RowDefinitions>
            <RowDefinition Height="Auto" />
            <RowDefinition Height="Auto" />
            <RowDefinition Height="Auto" />
            <RowDefinition Height="Auto" />
            <RowDefinition Height="*" />
        </Grid.RowDefinitions>

        <Grid.Resources>
            <ResourceDictionary>
                <Style TargetType="Label">
                    <Setter Property="HorizontalTextAlignment" Value="Center" />
                </Style>

                <Style TargetType="Slider">
                    <Setter Property="Margin" Value="20, 0" />
                    <Setter Property="Minimum" Value="0" />
                    <Setter Property="Maximum" Value="100" />
                </Style>
            </ResourceDictionary>
        </Grid.Resources>

        <Slider x:Name="segLengthSlider"
                Grid.Row="0"
                ValueChanged="sliderValueChanged" />

        <Label Text="{Binding Source={x:Reference segLengthSlider},
                              Path=Value,
                              StringFormat='Segment Length = {0:F0}'}"
               Grid.Row="1" />

        <Slider x:Name="deviationSlider"
                Grid.Row="2"
                ValueChanged="sliderValueChanged" />

        <Label Text="{Binding Source={x:Reference deviationSlider},
                              Path=Value,
                              StringFormat='Deviation = {0:F0}'}"
               Grid.Row="3" />

        <skia:SKCanvasView x:Name="canvasView"
                           Grid.Row="4"
                           PaintSurface="OnCanvasViewPaintSurface" />
    </Grid>
</ContentPage>
当 Slider 值发生变化时,JitterExperimentPage.xaml.cs 代码隐藏文件中的 PaintSurface 处理程序就会被调用。 它使用两 SKPathEffect.CreateDiscrete 值调用 Slider,并以此绘制矩形:
void OnCanvasViewPaintSurface(object sender, SKPaintSurfaceEventArgs args)
{
    SKImageInfo info = args.Info;
    SKSurface surface = args.Surface;
    SKCanvas canvas = surface.Canvas;

    canvas.Clear();

    float segLength = (float)segLengthSlider.Value;
    float deviation = (float)deviationSlider.Value;

    using (SKPaint paint = new SKPaint())
    {
        paint.Style = SKPaintStyle.Stroke;
        paint.StrokeWidth = 5;
        paint.Color = SKColors.Blue;

        using (SKPathEffect pathEffect = SKPathEffect.CreateDiscrete(segLength, deviation))
        {
            paint.PathEffect = pathEffect;

            SKRect rect = new SKRect(100, 100, info.Width - 100, info.Height - 100);
            canvas.DrawRect(rect, paint);
        }
    }
}
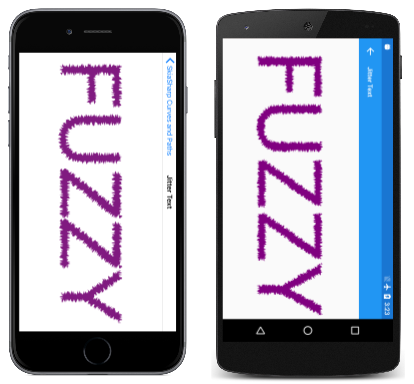
你还可以使用此效果进行填充,在这种情况下,填充区域的轮廓出现随机偏差。 “抖动文本”页演示如何使用此路径效果显示文本。 JitterTextPage 类 PaintSurface 处理程序中的大多数代码专用于调整文本大小和居中:
void OnCanvasViewPaintSurface(object sender, SKPaintSurfaceEventArgs args)
{
    SKImageInfo info = args.Info;
    SKSurface surface = args.Surface;
    SKCanvas canvas = surface.Canvas;

    canvas.Clear();

    string text = "FUZZY";

    using (SKPaint textPaint = new SKPaint())
    {
        textPaint.Color = SKColors.Purple;
        textPaint.PathEffect = SKPathEffect.CreateDiscrete(3f, 10f);

        // Adjust TextSize property so text is 95% of screen width
        float textWidth = textPaint.MeasureText(text);
        textPaint.TextSize *= 0.95f * info.Width / textWidth;

        // Find the text bounds
        SKRect textBounds = new SKRect();
        textPaint.MeasureText(text, ref textBounds);

        // Calculate offsets to center the text on the screen
        float xText = info.Width / 2 - textBounds.MidX;
        float yText = info.Height / 2 - textBounds.MidY;

        canvas.DrawText(text, xText, yText, textPaint);
    }
}
此处以横向模式运行:
路径描边
你已经看到了两个关于 SKPaint 的 GetFillPath 方法的小示例,其中存在两个版本:
public Boolean GetFillPath (SKPath src, SKPath dst, Single resScale = 1)

public Boolean GetFillPath (SKPath src, SKPath dst, SKRect cullRect, Single resScale = 1)
只有前两个参数是必需的。 该方法访问 src 参数引用的路径,根据 SKPaint 对象中笔划属性(包括 PathEffect 属性)修改路径数据,然后将结果写入 dst 路径。 resScale 参数可以降低精度以创建较小的目标路径,cullRect 参数可以消除矩形外部的轮廓。
此方法的一种基本用法根本不涉及路径效果:如果 SKPaint 对象的 Style 属性设置为 SKPaintStyle.Stroke,且没有设置 PathEffect,则 GetFillPath 会创建一个表示源路径轮廓的路径,就好像通过画图属性绘制的一样。
例如,如果 src 路径是一个半径为 500 的简单圆圈,并且 SKPaint 对象指定 100 的笔划宽度,则 dst 路径将变成两个同心圆,一个圆半径为 450,另一个半径为 550。 此方法被称作 GetFillPath,因为填充 dst 路径与绘制 src 路径相同。 但你也可以绘制 dst 路径来看看路径轮廓。
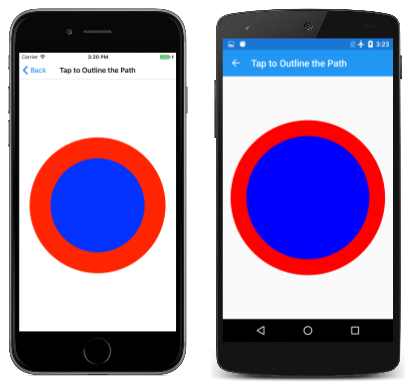
“点击以描边路径” 演示了此操作。 SKCanvasView 和 TapGestureRecognizer 在 TapToOutlineThePathPage.xaml 文件中被实例化。 TapToOutlineThePathPage.xaml.cs 代码隐藏文件将三个 SKPaint 对象定义为字段,两个对象以 100 和 20 的笔划宽度描绘,第三个对象用于填充:
public partial class TapToOutlineThePathPage : ContentPage
{
    bool outlineThePath = false;

    SKPaint redThickStroke = new SKPaint
    {
        Style = SKPaintStyle.Stroke,
        Color = SKColors.Red,
        StrokeWidth = 100
    };

    SKPaint redThinStroke = new SKPaint
    {
        Style = SKPaintStyle.Stroke,
        Color = SKColors.Red,
        StrokeWidth = 20
    };

    SKPaint blueFill = new SKPaint
    {
        Style = SKPaintStyle.Fill,
        Color = SKColors.Blue
    };

    public TapToOutlineThePathPage()
    {
        InitializeComponent();
    }

    void OnCanvasViewTapped(object sender, EventArgs args)
    {
        outlineThePath ^= true;
        (sender as SKCanvasView).InvalidateSurface();
    }
    ...
}
如果未点击屏幕,PaintSurface 处理程序将使用 blueFill 和 redThickStroke 绘制对象来呈现圆形路径:
public partial class TapToOutlineThePathPage : ContentPage
{
    ...
    void OnCanvasViewPaintSurface(object sender, SKPaintSurfaceEventArgs args)
    {
        SKImageInfo info = args.Info;
        SKSurface surface = args.Surface;
        SKCanvas canvas = surface.Canvas;

        canvas.Clear();

        using (SKPath circlePath = new SKPath())
        {
            circlePath.AddCircle(info.Width / 2, info.Height / 2,
                                 Math.Min(info.Width / 2, info.Height / 2) -
                                 redThickStroke.StrokeWidth);

            if (!outlineThePath)
            {
                canvas.DrawPath(circlePath, blueFill);
                canvas.DrawPath(circlePath, redThickStroke);
            }
            else
            {
                using (SKPath outlinePath = new SKPath())
                {
                    redThickStroke.GetFillPath(circlePath, outlinePath);

                    canvas.DrawPath(outlinePath, blueFill);
                    canvas.DrawPath(outlinePath, redThinStroke);
                }
            }
        }
    }
}
按照预期的方式填充和描绘圆形:
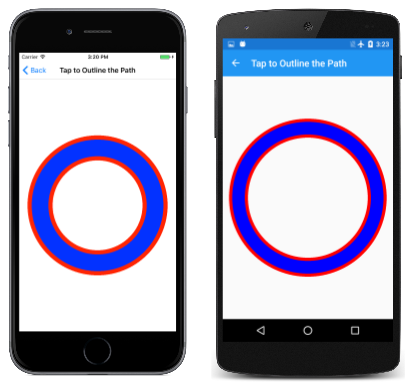
点击屏幕时,outlineThePath 将被设置为 true,PaintSurface 处理程序将创建一个新的 SKPath 对象,并 redThickStroke 绘图对象调用 GetFillPath 时使用该对象作为目标路径。 然后使用 redThinStroke 填充并描边该目标路径,结果如下所示:
两个红色圆圈清楚地表明原始圆形路径已转换为两个圆形轮廓。
此方法在开发用于 SKPathEffect.Create1DPath 方法的路径时非常有用。 复制路径时,始终填充这些方法中指定的路径。 如果不希望填充整个路径,则必须仔细定义轮廓。
例如,在“连接链条”示例中,使用一串四个弧线定义连接,每对弧线基于两个半径来描边要填充的路径区域。 可以替换 LinkedChainPage 类中的代码以略有不同的方式执行此操作。
首先,需要重新定义 linkRadius 常量:
const float linkRadius = 27.5f;
const float linkThickness = 5;
linkPath 现在只是基于单个半径的两个弧线,具有所需的起始角度和扫描角度:
using (SKPath linkPath = new SKPath())
{
    SKRect rect = new SKRect(-linkRadius, -linkRadius, linkRadius, linkRadius);
    linkPath.AddArc(rect, 55, 160);
    linkPath.AddArc(rect, 235, 160);

    using (SKPaint strokePaint = new SKPaint())
    {
        strokePaint.Style = SKPaintStyle.Stroke;
        strokePaint.StrokeWidth = linkThickness;

        using (SKPath outlinePath = new SKPath())
        {
            strokePaint.GetFillPath(linkPath, outlinePath);

            // Set that path as the 1D path effect for linksPaint
            linksPaint.PathEffect =
                SKPathEffect.Create1DPath(outlinePath, 1.3f * linkRadius, 0,
                                          SKPath1DPathEffectStyle.Rotate);

        }

    }
}
然后,在使用 strokePaint 属性描绘 linkPath 的轮廓时,outlinePath 对象是轮廓的接收方。
另一个使用此技术的示例将在稍后推出,演示方法中使用的路径。
组合路径效果
SKPathEffect 的最后两种静态创建方法是 SKPathEffect.CreateSum 和 SKPathEffect.CreateCompose:
public static SKPathEffect CreateSum (SKPathEffect first, SKPathEffect second)

public static SKPathEffect CreateCompose (SKPathEffect outer, SKPathEffect inner)
这两种方法都结合了两种路径效果来创建复合路径效果。 CreateSum 方法创建一个类似于两种路径效果分别应用的路径效果,而 CreateCompose 先应用一个路径效果 (inner),然后再对其应用 outer。
你已经了解了 SKPaint 的 GetFillPath 方法如何根据 SKPaint 属性(包括 PathEffect)来转换路径,那么 对象如何对 CreateSum 或 CreateCompose 方法规定的两种路径效果进行两次该操作也就不陌生了。
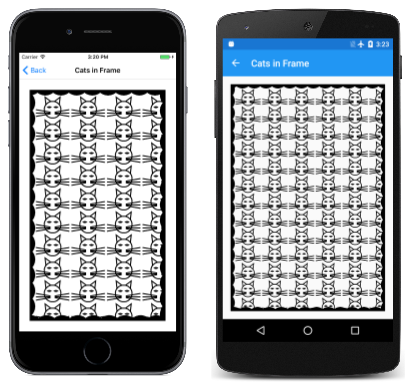
CreateSum 的一个明显用法是定义一个 SKPaint 对象,该对象用一个路径效果填充路径,然后用另一个路径效果描边路径。 这在“框中猫”示例中进行了演示,该示例在圆齿边缘的框内显示了一个猫阵列:
CatsInFramePage 类首先定义多个字段。 你可能在 SVG 路径数据一文的 PathDataCatPage 类中见过第一个字段。 第二个路径使用线条和弧线描绘框架的圆齿图案:
public class CatsInFramePage : ContentPage
{
    // From PathDataCatPage.cs
    SKPath catPath = SKPath.ParseSvgPathData(
        "M 160 140 L 150 50 220 103" +              // Left ear
        "M 320 140 L 330 50 260 103" +              // Right ear
        "M 215 230 L 40 200" +                      // Left whiskers
        "M 215 240 L 40 240" +
        "M 215 250 L 40 280" +
        "M 265 230 L 440 200" +                     // Right whiskers
        "M 265 240 L 440 240" +
        "M 265 250 L 440 280" +
        "M 240 100" +                               // Head
        "A 100 100 0 0 1 240 300" +
        "A 100 100 0 0 1 240 100 Z" +
        "M 180 170" +                               // Left eye
        "A 40 40 0 0 1 220 170" +
        "A 40 40 0 0 1 180 170 Z" +
        "M 300 170" +                               // Right eye
        "A 40 40 0 0 1 260 170" +
        "A 40 40 0 0 1 300 170 Z");

    SKPaint catStroke = new SKPaint
    {
        Style = SKPaintStyle.Stroke,
        StrokeWidth = 5
    };

    SKPath scallopPath =
        SKPath.ParseSvgPathData("M 0 0 L 50 0 A 60 60 0 0 1 -50 0 Z");

    SKPaint framePaint = new SKPaint
    {
        Color = SKColors.Black
    };
    ...
}
如果 SKPaint 对象的 Style 属性设置为 Stroke,则可在 SKPathEffect.Create2DPath 方法中使用 catPath。 但是,如果直接在程序中使用 catPath, 则猫的整个头将被填充,甚至看不见胡须。 (试一下!)必须获取该路径的轮廓并在 SKPathEffect.Create2DPath 方法中使用该轮廓。
构造函数可以完成这项操作。 它首先对 catPath 应用两次转换,将 (0, 0) 点移动到中心,并缩小尺寸。 GetFillPath 获取 outlinedCatPath 的所有轮廓,并在 SKPathEffect.Create2DPath 调用中使用该对象。 SKMatrix 值中的缩放系数略大于猫的水平和垂直大小,以在图块之间提供一点缓冲区,然后按经验获得转换系数,以便将整个猫显示在框架的左上角:
public class CatsInFramePage : ContentPage
{
    ...
    public CatsInFramePage()
    {
        Title = "Cats in Frame";

        SKCanvasView canvasView = new SKCanvasView();
        canvasView.PaintSurface += OnCanvasViewPaintSurface;
        Content = canvasView;

        // Move (0, 0) point to center of cat path
        catPath.Transform(SKMatrix.MakeTranslation(-240, -175));

        // Now catPath is 400 by 250
        // Scale it down to 160 by 100
        catPath.Transform(SKMatrix.MakeScale(0.40f, 0.40f));

        // Get the outlines of the contours of the cat path
        SKPath outlinedCatPath = new SKPath();
        catStroke.GetFillPath(catPath, outlinedCatPath);

        // Create a 2D path effect from those outlines
        SKPathEffect fillEffect = SKPathEffect.Create2DPath(
            new SKMatrix { ScaleX = 170, ScaleY = 110,
                           TransX = 75, TransY = 80,
                           Persp2 = 1 },
            outlinedCatPath);

        // Create a 1D path effect from the scallop path
        SKPathEffect strokeEffect =
            SKPathEffect.Create1DPath(scallopPath, 75, 0, SKPath1DPathEffectStyle.Rotate);

        // Set the sum the effects to frame paint
        framePaint.PathEffect = SKPathEffect.CreateSum(fillEffect, strokeEffect);
    }
    ...
}
然后,构造函数调用 SKPathEffect.Create1DPath 生成圆齿框架。 请注意,路径的宽度为 100 像素,但步进为 75 像素,以便复制路径在框架周围重叠。 构造函数的最后一个语句调用 SKPathEffect.CreateSum,以合并两个路径效果并将结果设置为 SKPaint 对象。
所有这些工作让 PaintSurface 处理程序变得非常简单。 它只需要定义一个矩形并使用 framePaint 绘制:
public class CatsInFramePage : ContentPage
{
    ...
    void OnCanvasViewPaintSurface(object sender, SKPaintSurfaceEventArgs args)
    {
        SKImageInfo info = args.Info;
        SKSurface surface = args.Surface;
        SKCanvas canvas = surface.Canvas;

        canvas.Clear();

        SKRect rect = new SKRect(50, 50, info.Width - 50, info.Height - 50);
        canvas.ClipRect(rect);
        canvas.DrawRect(rect, framePaint);
    }
}
路径效果背后的算法始终会造成用于绘制或填充的整个路径被显示出来,这可能导致某些视觉对象出现在矩形外部。 在 DrawRect 之前调用 ClipRect 可以让视觉对象更加简洁。 (试试不要剪裁完成操作!)
通常会使用 SKPathEffect.CreateCompose 给另一个路径效果添加一些抖动。 下面是一个略有不同的示例,当然,你也可以自行试验:
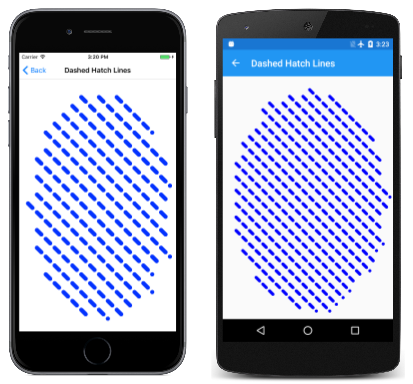
“虚线阴影线”用不连续的阴影线填充椭圆。 DashedHatchLinesPage 类的大多数工作都直接在字段定义中执行。 这些字段定义短划线效果和阴影效果。 它们被定义为 static,因为它们随后被引用在 SKPaint 定义的 SKPathEffect.CreateCompose 调用中:
public class DashedHatchLinesPage : ContentPage
{
    static SKPathEffect dashEffect =
        SKPathEffect.CreateDash(new float[] { 30, 30 }, 0);

    static SKPathEffect hatchEffect = SKPathEffect.Create2DLine(20,
        Multiply(SKMatrix.MakeScale(60, 60),
                 SKMatrix.MakeRotationDegrees(45)));

    SKPaint paint = new SKPaint()
    {
        PathEffect = SKPathEffect.CreateCompose(dashEffect, hatchEffect),
        StrokeCap = SKStrokeCap.Round,
        Color = SKColors.Blue
    };
    ...
    static SKMatrix Multiply(SKMatrix first, SKMatrix second)
    {
        SKMatrix target = SKMatrix.MakeIdentity();
        SKMatrix.Concat(ref target, first, second);
        return target;
    }
}
PaintSurface 处理程序只需要包含标准开销以及一次 DrawOval 调用:
public class DashedHatchLinesPage : ContentPage
{
    ...
    void OnCanvasViewPaintSurface(object sender, SKPaintSurfaceEventArgs args)
    {
        SKImageInfo info = args.Info;
        SKSurface surface = args.Surface;
        SKCanvas canvas = surface.Canvas;

        canvas.Clear();

        canvas.DrawOval(info.Width / 2, info.Height / 2,
                        0.45f * info.Width, 0.45f * info.Height,
                        paint);
    }
    ...
}
正如你所发现的,阴影线并没有被精确地限制在区域内部,在本示例中,它们总是从左侧以整条短划线开始:
现在,你已经了解了从简单的点和线到各种奇怪组合的路径效果,现在使用你的想象力,看看你可以创建什么吧。
