适用于: 2013 2016 2019
  Subscription Edition SharePoint in Microsoft 365
先决条件
使用 OpenID Connect (OIDC) 身份验证配置具有 Active Directory 联合身份验证服务 (AD FS) 的 SharePoint Server 时,需要以下资源来执行配置:
- SharePoint Server 订阅版场。
- 已在 Windows Server 2016 或更高版本中创建的 AD FS,并在文件中导出了
.cerAD FS 签名证书的公钥。
本文对 AD FS OIDC 设置使用以下示例值:
| 值 | 链接 |
|---|---|
| SharePoint 网站 URL | https://spsites.contoso.local/ |
| AD FS 网站 URL | https://adfs.contoso.local/adfs/ |
| AD FS 身份验证终结点 | https://adfs.contoso.local/adfs/oauth2/authorize |
| RegisteredIssuerName URL | https://adfs.contoso.local/adfs/ |
| AD FS SignoutURL | https://adfs.contoso.local/adfs/oauth2/logout |
| 标识声明类型 | http://schemas.xmlsoap.org/ws/2005/05/identity/claims/emailaddress |
| Windows 网站集管理员 | contoso\yvand |
| Email网站集管理员联合 (AD FS) 值 | yvand@contoso.local |
步骤 1:设置标识提供者
执行以下步骤以使用 AD FS 设置 OIDC:
在 AD FS 管理中,右键单击“ 应用程序组 ”,然后选择“ 添加应用程序组”。
转到“欢迎”页,在“名称”字段中输入 ADFSSSO,然后在“客户端-服务器应用程序”下,选择访问 Web 应用程序模板的 Web 浏览器。 然后,选择“下一步”。

转到 “本机应用程序 ”页并复制 “客户端标识符” 值。 稍后,它将在 SharePoint 配置期间用作参数的值
DefaultClientIdentifier。在 “重定向 URL” 字段下,输入
https://spsites.contoso.local/并选择“ 添加”。 然后,选择“下一步”。
转到 “摘要 ”页,然后选择“ 下一步”。

转到“ 完成 ”页,然后选择“ 关闭”。
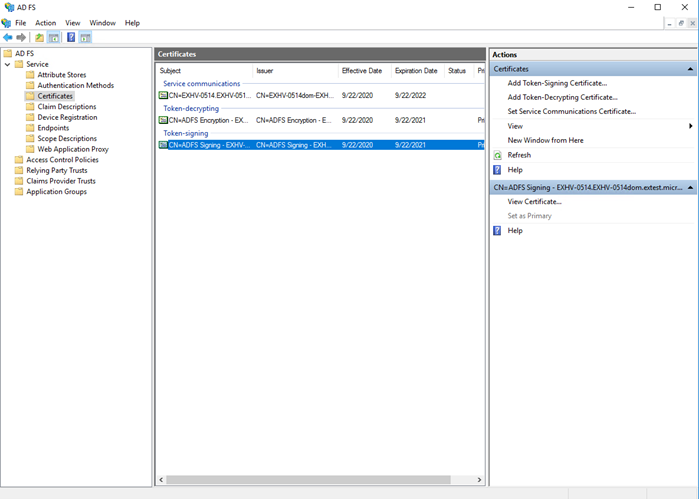
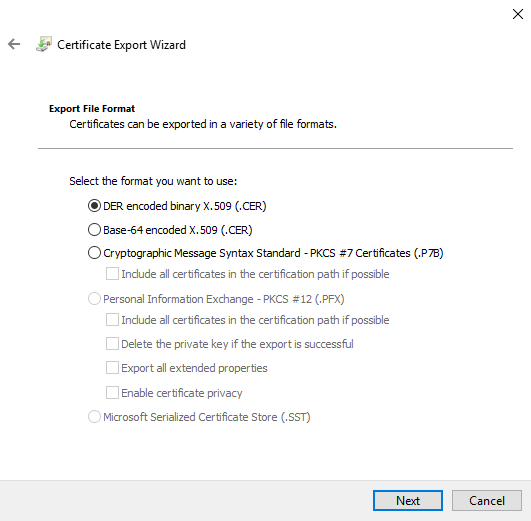
从 AD FS 导出 令牌签名 证书。 此令牌签名证书将在 SharePoint 设置中使用。 下图显示了如何从 AD FS 导出 令牌签名 证书:


确保所需的声明 ID 包含在来自 AD FS 的 中
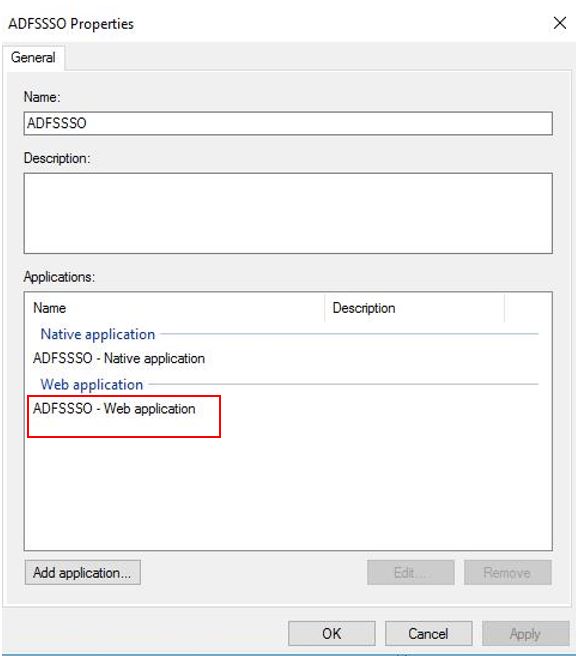
id_token。 让我们以电子邮件为例:假设 AD FS 已配置从属性存储(例如 AD)读取标识符声明的规则。 执行以下步骤,为之前在 AD FS 中创建的此特定 Web 应用程序创建 颁发转换规则 :
打开创建的 Web 应用程序,然后转到“ 问题转换规则 ”选项卡。
选择“ 添加规则 ”,然后从选项列表中选择“ 将 LDAP 属性作为声明发送 ”。


将声明规则命名为 AD,然后从“属性存储”下拉菜单中选择“Active Directory”。 使用下拉框创建两个映射,如下所示:
属性 值 电子邮件地址 电子邮件地址 Token-Groups - 按域名限定 Role 
选择 “完成 ”关闭“规则向导”,然后选择“ 确定 ”关闭 Web 应用程序属性。 再选择 一次“确定” 以完成规则。
如果要使用 SharePoint Server 设置 OIDC,则必须在创建的 Web 应用程序的 AD FS 服务器端配置 nbf 声明。 如果此 Web 应用程序中不存在 nbf 声明,请执行以下步骤来创建它:
打开创建的 Web 应用程序,然后转到“ 问题转换规则 ”选项卡。
选择 “添加规则 ”,然后选择“ 应用”。 在“添加转换声明规则向导”中,从“声明规则模板”选项中选择“使用自定义规则发送声明”。

选择“ 下一步 ”,并在“ 自定义规则 ”字段中输入以下字符串:
c:[Type == "http://schemas.microsoft.com/ws/2008/06/identity/claims/windowsaccountname"] => issue(Type = "nbf", Value = "0");
选择“完成”。
步骤 2:更改 SharePoint 场属性
在此步骤中,需要根据 SharePoint Server 场的版本修改 SharePoint Server 场属性。
- 有关为 SharePoint Server 订阅版 版本 24H1 配置 SharePoint 场属性的详细信息,请参阅配置 SPSE 版本 24H1 或更高版本。
- 有关为 24H1 之前的 SharePoint Server 订阅版 版本配置 SharePoint 场属性的详细信息,请参阅配置版本 24H1 之前的 SPSE。
使用早期发布功能首选项配置SharePoint Server 订阅版版本 24H1 或更高版本
从 SharePoint Server 订阅版 版本 24H1 () 2024 年 3 月起,如果为 SharePoint 场配置了提前发布功能首选项,则可以通过使用 SharePoint 证书管理来管理 nonce Cookie 证书来配置 SharePoint 服务器场属性。 nonce Cookie 证书是确保 OIDC 身份验证令牌安全的基础结构的一部分。 运行以下 PowerShell 脚本进行配置:
重要
若要使用此脚本,SharePoint 场必须设置为“早期发布”,如上所述。 否则,脚本将完成且不会出错,但调用$farm。UpdateNonceCertificate () 不会执行任何作。 如果不想为早期版本配置服务器场,则必须改用 “在版本 24H1 之前配置 SPSE ”步骤。
注意
以场管理员身份启动 SharePoint 命令行管理程序以运行以下脚本。 请仔细阅读以下 PowerShell 脚本中提到的说明。 需要在某些位置输入自己的特定于环境的值。
# Set up farm properties to work with OIDC

# Create the Nonce certificate
$cert = New-SelfSignedCertificate -CertStoreLocation Cert:\LocalMachine\My -Provider 'Microsoft Enhanced RSA and AES Cryptographic Provider' -Subject "CN=SharePoint Cookie Cert"

# Import certificate to Certificate Management
$certPath = "<path and file name to save the exported cert.  ex: c:\certs\nonce.pfx>"
$certPassword = ConvertTo-SecureString -String "<password>" -Force -AsPlainText
Export-PfxCertificate -Cert $cert -FilePath $certPath -Password $certPassword
$nonceCert = Import-SPCertificate -Path $certPath -Password $certPassword -Store "EndEntity" -Exportable:$true

# Update farm property
$farm = Get-SPFarm
$farm.UpdateNonceCertificate($nonceCert,$true)
配置版本 24H1 之前的SharePoint Server 订阅版
# Set up farm properties to work with OIDC
$cert = New-SelfSignedCertificate -CertStoreLocation Cert:\LocalMachine\My -Provider 'Microsoft Enhanced RSA and AES Cryptographic Provider' -Subject "CN=SharePoint Cookie Cert"
$rsaCert = [System.Security.Cryptography.X509Certificates.RSACertificateExtensions]::GetRSAPrivateKey($cert)
$fileName = $rsaCert.key.UniqueName

# If you have multiple SharePoint servers in the farm, you need to export the certificate by Export-PfxCertificate and import the certificate to all other SharePoint servers in the farm by Import-PfxCertificate.

# After the certificate is successfully imported to SharePoint Server, we will need to grant access permission to the certificate's private key.

$path = "$env:ALLUSERSPROFILE\Microsoft\Crypto\RSA\MachineKeys\$fileName"
$permissions = Get-Acl -Path $path

# Replace the <web application pool account> with the real application pool account of your web application
$access_rule = New-Object System.Security.AccessControl.FileSystemAccessRule(<Web application pool account>, 'Read', 'None', 'None', 'Allow')
$permissions.AddAccessRule($access_rule)
Set-Acl -Path $path -AclObject $permissions

# Update farm properties
$farm = Get-SPFarm
$farm.Properties['SP-NonceCookieCertificateThumbprint']=$cert.Thumbprint
$farm.Properties['SP-NonceCookieHMACSecretKey']='seed'
$farm.Update()
步骤 3:将 SharePoint 配置为信任标识提供者
在此步骤中,你将创建一个 SPTrustedTokenIssuer ,用于存储 SharePoint 信任 AD FS 作为 OIDC 提供程序所需的配置。 以场管理员身份启动 SharePoint 命令行管理程序,并运行以下脚本来创建它:
注意
请仔细阅读以下 PowerShell 脚本中提到的说明。 需要在多个位置输入特定于环境的值。
# Define claim types
$email = New-SPClaimTypeMapping "http://schemas.xmlsoap.org/ws/2005/05/identity/claims/emailaddress" -IncomingClaimTypeDisplayName "EmailAddress" -SameAsIncoming

# Public key of the AD FS signing certificate
$signingCert = New-Object System.Security.Cryptography.X509Certificates.X509Certificate2("C:\Data\Claims\ADFS Signing.cer")
# Set the AD FS URL where users are redirected to authenticate
$authendpointurl = "https://adfs.contoso.local/adfs/oauth2/authorize"
$registeredissuernameurl = "https://adfs.contoso.local/adfs"
$signouturl = "https://adfs.contoso.local/adfs/oauth2/logout"

# Replace <Client Identifier> with the value you saved in step #3 of AD FS Setup section
$clientIdentifier = "<Your Client Identifier>"

# Create a new SPTrustedIdentityTokenIssuer in SharePoint
New-SPTrustedIdentityTokenIssuer -Name "Contoso.local" -Description "Contoso.local" -ImportTrustCertificate $signingCert -ClaimsMappings $email -IdentifierClaim $email.InputClaimType  -RegisteredIssuerName $registeredissuernameurl  -AuthorizationEndPointUri $authendpointurl -SignOutUrl $signouturl -DefaultClientIdentifier $clientIdentifier
通过 New-SPTrustedIdentityTokenIssuer 使用以下参数扩展 PowerShell cmdlet 以支持 OIDC:
| 参数 | 说明 |
|---|---|
| 名称 | 为新令牌颁发者提供名称。 |
| 说明 | 为新的令牌颁发者提供说明。 |
| ImportTrustCertificate | 导入 X509 证书列表,该列表将用于从 OIDC 标识符进行验证 id_token 。 如果 OIDC IDP 使用多个证书对 进行数字签名 id_token,则导入这些证书,然后 SharePoint 将通过匹配使用这些证书生成的数字签名进行验证 id_token 。 |
| ClaimsMappings | 一个 SPClaimTypeMapping 对象,该对象将用于标识 中的 id_token 哪个声明将被视为 SharePoint 中的标识符。 |
| IdentifierClaim | 指定标识符的类型。 |
| RegisteredIssuerName | 指定颁发者标识符,该标识符颁发 。id_token 它将用于验证 id_token。 |
| AuthorizationEndPointUrl | 指定 OIDC 标识提供者的授权终结点。 |
| SignoutUrl | 指定 OIDC 标识提供者的注销终结点。 |
| DefaultClientIdentifier | 指定 client_id SharePoint 服务器的 ,该服务器由 OID 标识提供者分配。 这将针对 中的 id_tokenaud 声明进行验证。 |
| ResponseTypesSupported | 指定 IDP 的响应类型,此令牌颁发者可以接受该类型。 它可以接受两个字符串: id_token 和 code id_token。 如果未提供此参数,它将使用 code id_token 作为默认值。 |
重要
必须将相关证书添加到 SharePoint 根颁发机构证书存储,并且有两种可能的选项可以执行此作:
如果 AD FS 签名证书由证书颁发机构颁发, (出于安全原因) 最佳做法。
颁发者证书 (的公钥和所有中间) 必须添加到存储区。 启动 SharePoint 命令行管理程序并运行以下脚本以添加证书:
$rootCert = New-Object System.Security.Cryptography.X509Certificates.X509Certificate2("C:\Data\Claims\ADFS Signing issuer.cer")
New-SPTrustedRootAuthority -Name "adfs.contoso.local signing root authority" -Certificate $rootCert
如果 AD FS 签名证书是自签名证书 (出于安全原因不建议) 。
必须将 AD FS 签名证书的公钥添加到存储区。 启动 SharePoint 命令行管理程序并运行以下脚本以添加证书:
$rootCert = New-Object System.Security.Cryptography.X509Certificates.X509Certificate2("C:\Data\Claims\ADFS Signing.cer")
New-SPTrustedRootAuthority -Name "adfs.contoso.local signing certificate" -Certificate $rootCert
步骤 4:配置 SharePoint Web 应用程序
在此步骤中,你将使用在上一步中创建的 将 SharePoint 中的 Web 应用程序配置为使用 SPTrustedIdentityTokenIssuer AD FS OIDC 身份验证。
重要
- SharePoint Web 应用程序的默认区域必须启用Windows 身份验证。 这是搜索爬网程序所必需的。
- 必须使用 HTTPS 配置将使用 AD FS OIDC 联合身份验证的 SharePoint URL。
可以通过以下任一方式完成此配置:
在默认区域中创建新的 Web 应用程序并使用 Windows 和 AD FS OIDC 身份验证。 若要创建新的 Web 应用程序,请执行以下作:
启动 SharePoint 命令行管理程序并运行以下脚本以创建新的
SPAuthenticationProvider:# This script creates a trusted authentication provider for OIDC $sptrust = Get-SPTrustedIdentityTokenIssuer "contoso.local" $trustedAp = New-SPAuthenticationProvider -TrustedIdentityTokenIssuer $sptrust按照 在 SharePoint Server 中创建 Web 应用程序 ,在 contoso.local 上创建一个名为 SharePoint - OIDC 的 HTTPS/SSL 的新 Web 应用程序。
打开 SharePoint 管理中心网站。
打开创建的 Web 应用程序,在功能区中选择“身份验证提供程序”,单击“默认”区域的链接,并选择 contoso.local 作为 “受信任的标识提供者”。

导航到 “系统设置”“>配置备用访问映射>备用访问映射集合”。
使用新的 Web 应用程序筛选显示,并确认看到以下信息:

扩展现有 Web 应用程序以在新区域中设置 AD FS OIDC 身份验证。 若要扩展现有 Web 应用程序,请执行以下作:
启动 SharePoint 命令行管理程序并运行 PowerShell 以扩展 Web 应用程序:
示例:
# Get the trusted provider
$sptrust = Get-SPTrustedIdentityTokenIssuer "Contoso.local"
$ap = New-SPAuthenticationProvider -TrustedIdentityTokenIssuer $sptrust
# Get the web app
$wa = Get-SPWebApplication http://spsites
# Extend the web app to the "Intranet" zone using trusted provider auth and a SharePoint managed certificate called "SharePoint OIDC Site"
New-SPWebApplicationExtension -Identity $wa -Name "spsites" -port 443 -HostHeader 'spsites.contoso.local'-AuthenticationProvider $ap -SecureSocketsLayer -UseServerNameIndication -Certificate 'SharePoint OIDC Site' -Zone 'Intranet' -URL 'https://spsites.contoso.local'
导航到 “系统设置”“>配置备用访问映射>备用访问映射集合”。
使用已扩展的 Web 应用程序筛选显示,并确认看到以下信息:

步骤 5:确保 Web 应用程序配置了 SSL 证书
由于 OpenID Connect 1.0 身份验证只能使用 HTTPS 协议,因此必须在相应的 Web 应用程序上设置证书。 如果尚未执行此作,请执行以下步骤来设置证书:
生成站点证书:
注意
如果已生成证书,则可以跳过此步骤。
打开 SharePoint PowerShell 控制台。
运行以下脚本以生成自签名证书并将其添加到 SharePoint 场:
New-SPCertificate -FriendlyName "Contoso SharePoint (2021)" -KeySize 2048 -CommonName spsites.contoso.local -AlternativeNames extranet.contoso.local, onedrive.contoso.local -OrganizationalUnit "Contoso IT Department" -Organization "Contoso" -Locality "Redmond" -State "Washington" -Country "US" -Exportable -HashAlgorithm SHA256 -Path "\\server\fileshare\Contoso SharePoint 2021 Certificate Signing Request.txt"
Move-SPCertificate -Identity "Contoso SharePoint (2021)" -NewStore EndEntity
重要
自签名证书仅适用于测试目的。 在生产环境中,强烈建议改用证书颁发机构颁发的证书。
设置证书:
可以使用以下 PowerShell cmdlet 将证书分配给 Web 应用程序:
Set-SPWebApplication -Identity https://spsites.contoso.local -Zone Default -SecureSocketsLayer -Certificate "Contoso SharePoint (2021)"
步骤 6:创建网站集
在此步骤中,你将创建一个包含两个管理员的团队网站集:一个管理员作为 Windows 管理员,一个作为联合 (AD FS) 管理员。
打开 SharePoint 管理中心网站。
导航到 “应用程序管理>”“创建网站集”。
键入标题、URL,然后选择模板“团队网站”。
在“主网站集管理员”部分中,选择书籍图标以打开“人员选取器”对话框。
在“人员选取器”对话框中,键入 Windows 管理员帐户,例如 yvand。
选择“ 组织”,筛选左侧的列表。 下面是示例输出:

转到帐户并选择“ 确定”。
在“辅助网站集管理员”部分中,选择书籍图标以打开“人员选取器”对话框。
在“人员选取器”对话框中,键入 AD FS 管理员帐户的确切电子邮件值,例如 yvand@contoso.local。
选择 “Contoso.local”,筛选左侧的列表。 下面是示例输出:

转到帐户并选择“ 确定”。
选择“确定”,创建网站集。
创建网站集后,你应该能够使用 Windows 或联合 (AD FS OIDC) 网站集管理员帐户登录。
步骤 7:设置人员选取器
在 OIDC 身份验证中,人员选取器不会验证输入,这可能会导致拼写错误或用户意外选择了错误的声明类型。 可以通过使用自定义声明提供程序或使用SharePoint Server 订阅版中包含的新 UPA 支持的声明提供程序来解决此问题。 若要配置 UPA 支持的声明提供程序,请参阅用于新式身份验证的增强人员选取器。