练习:将选项卡页面与导航页面配合使用
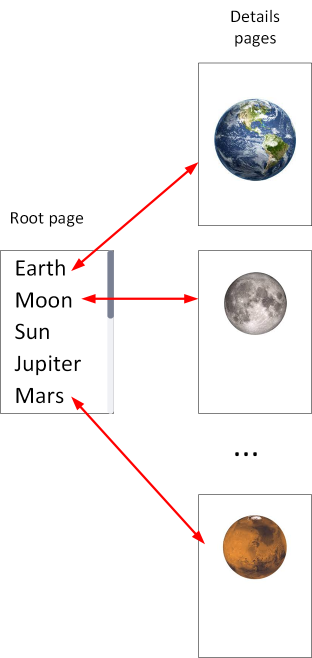
在天文应用中,你需要添加页面,使用户能够选择不同的天体并显示其详细信息。 由于可能存在任意数量的天体,因此为每个天体创建一个选项卡不是可行的做法。 于是,为使用户能够选择要查看的天体,你决定添加包含列表的另一个页面。 用户可以从此列表中选择天体,应用会在新页面中显示该天体的详细信息。 列表页面充当堆叠导航的根页面。 你将在现有用户界面中添加列表页面作为选项卡。
打开初学者解决方案
转到在本模块开头克隆的存储库中的 exercise3 文件夹,然后转到 start 文件夹。
使用 Visual Studio 在 Visual Studio Code 中打开 Astronomy.sln 解决方案或相应文件夹。
注意
此解决方案包含前面练习使用的应用版本所不包含的页面。
在“解决方案资源管理器”窗口中打开 Pages 文件夹。 除了 MoonPhasePage、SunrisePage 和 AboutPage 文件之外,此文件夹还包含其他两个页面:
AstronomicalBodiesPage。 此页面包含四个按钮,使用户能够选择太阳、月亮、地球或哈雷彗星的详细信息。 当前版本的应用只是一个概念证明。 将来,此页面会支持用户从更大的列表中进行选择。
AstronomicalBodyPage。 此页面用于显示天体的信息。
AstronomicalBodiesPage 已添加为单击 Astronomy 浮出控件时显示的页面上的选项卡。
为详细信息页面添加路线
要导航到“AstronomicalBodyPage”,需要通过在 AppShell 类的构造函数中注册路由来设置路由:
public AppShell()
{
    InitializeComponent();

    Routing.RegisterRoute("astronomicalbodydetails", typeof(AstronomicalBodyPage));
}
导航到详细信息页面
现在我们需要执行导航。 在 AstronomicalBodiesPage.xaml.cs 中,为页面上的每个
Button创建单击事件处理程序。public AstronomicalBodiesPage() { InitializeComponent(); btnComet.Clicked += async (s, e) => await Shell.Current.GoToAsync("astronomicalbodydetails"); btnEarth.Clicked += async (s, e) => await Shell.Current.GoToAsync("astronomicalbodydetails"); btnMoon.Clicked += async (s, e) => await Shell.Current.GoToAsync("astronomicalbodydetails"); btnSun.Clicked += async (s, e) => await Shell.Current.GoToAsync("astronomicalbodydetails"); }每当单击
Button时,应用会导航到“AstronomicalBodyPage”页面。 但是,我们仍然需要发送天体显示的类型。若要将数据发送到 AstronomicalBodyPage,请将查询参数字符串添加到路线信息中。 字符串的格式为
?astroName=astroBodyToDisplay。btnComet.Clicked += async (s, e) => await Shell.Current.GoToAsync("astronomicalbodydetails?astroName=comet"); btnEarth.Clicked += async (s, e) => await Shell.Current.GoToAsync("astronomicalbodydetails?astroName=earth"); btnMoon.Clicked += async (s, e) => await Shell.Current.GoToAsync("astronomicalbodydetails?astroName=moon"); btnSun.Clicked += async (s, e) => await Shell.Current.GoToAsync("astronomicalbodydetails?astroName=sun");若要接收 AstronomicalBodyPage 上的数据,请先创建一个类级属性来包含传入的数据。 将它命名为
AstroName。string astroName; public string AstroName { get => astroName; set { astroName = value; // this is a custom function to update the UI immediately UpdateAstroBodyUI(astroName); } }此处的
UpdateAstroBodyUI(astroName)是一个帮助程序函数,用于在设置AstroName属性后立即更新用户界面。然后,需要使用将传入的查询参数映射到所创建属性的注释来修饰该类。
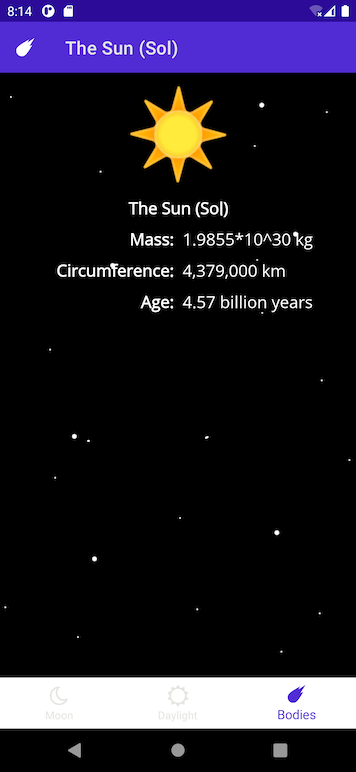
[QueryProperty(nameof(AstroName), "astroName")]
public partial class AstronomicalBodyPage
{
    ...
}
启动应用并选择标题为“Bodies”的选项卡。
选择“太阳”按钮。 应会显示太阳的详细信息。 导航栏应包含一个后退箭头,使用户能够返回到天体列表。 其余选项卡仍然可见并处于活动状态:
关闭应用并返回到 Visual Studio 或 Visual Studio Code。