练习 - 在本地和管道中运行 UI 测试
Andy 和 Amita 在管道中运行其测试之前,他们想验证自己的新 UI 测试是否按预期进行。 在本部分中,你将先在本地运行 Selenium UI 测试,然后在管道中运行。
就像编写任何其他类型的代码一样,编写自动测试是一个迭代过程。 对于你自己的应用,可能需要尝试一些方法,请参阅参考文档和示例代码,并修复生成错误。
可选:安装适用于 Microsoft Edge 的 Selenium 驱动程序
如果要查看在 Microsoft Edge 上本地运行的测试,请遵循此部分进行操作。
适用于 Chrome 和 Firefox 的 NuGet 包将驱动程序软件安装在 bin 目录下,并附带已编译的测试代码。 对于 Edge,需要手动安装驱动程序。 为此,请执行以下操作:
安装 Microsoft Edge。
打开 Edge 并导航到
edge://settings/help。 注意版本号。 下面是一个示例: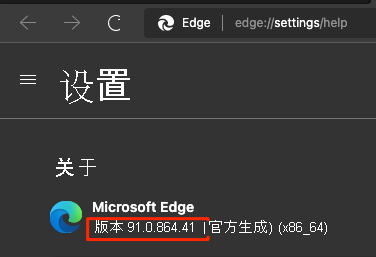
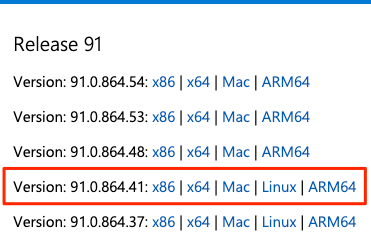
导航到 Microsoft Edge 驱动程序下载页,然后下载与 Edge 版本号匹配的驱动程序。 下面是一个示例:
将 .zip 文件解压缩到项目的 Tailspin.SpaceGame.Web.UITests 目录下的 bin/Release/net6.0 目录。 如果这些目录不存在,则创建它们。
在 macOS 上,你可能需要更新系统策略以允许运行 msedgedriver。 为此,从 Visual Studio Code 的终端中运行以下 spctl 命令:
spctl --add Tailspin.SpaceGame.Web.UITests/bin/Release/net6.0/msedgedriver
导出环境变量
在本模块稍后的部分中,你将在 Windows Server 2019 上运行 Selenium 测试。 此文档列出了已预安装的软件。
“Selenium Web 驱动程序”部分列出了可用于 Chrome、Firefox 和 Edge 的 Selenium 驱动程序版本。 下面是一个示例:
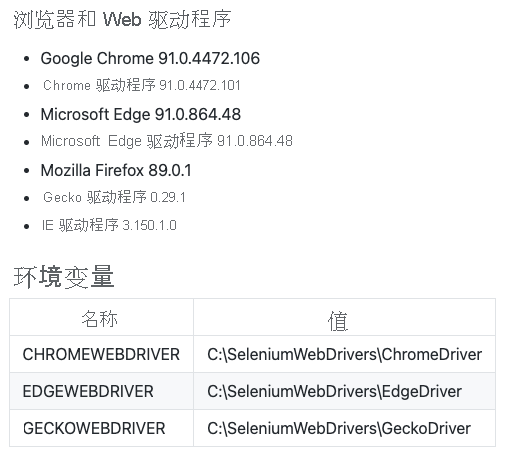
对于每个驱动程序,你都有映射到该驱动程序位置的环境变量。 例如,ChromeWebDriver 映射到 Chrome 驱动程序的位置。
单元测试代码已设置好,可读取这些环境变量。 这些变量告诉 Selenium 在哪里可以找到驱动程序可执行文件。 要在本地运行单元测试,需要导出这些相同的环境变量。
在 Visual Studio Code 中,转到终端。 然后运行这些命令。 将显示的路径替换为 mslearn-tailspin-spacegame-web-deploy 项目的完整路径。
重要
确保在用于运行测试的同一终端窗口中运行这些命令和设置环境变量。
driverDir="C:\Users\user\mslearn-tailspin-spacegame-web-deploy\Tailspin.SpaceGame.Web.UITests\bin\Release\net6.0"
export ChromeWebDriver=$driverDir
export EdgeWebDriver=$driverDir
export GeckoWebDriver=$driverDir
在本地运行 UI 测试
设置 Setup 成员变量后,HomePageTest.cs 中的 方法将导航到 Space Game 主页。
尽管可以对网站 URL 进行硬编码,但此处我们从名为 SITE_URL 的环境变量中读取了 URL。 这样,便可以针对不同的 URL 多次运行测试。
// Navigate to the site.
// The site name is stored in the SITE_URL environment variable to make
// the tests more flexible.
string url = Environment.GetEnvironmentVariable("SITE_URL");
driver.Navigate().GoToUrl(url + "/");
由于尚未将 Space Game 网站部署到应用服务环境,所以将使用 Microsoft 托管的网站在本地运行测试。
在本地运行测试:
在 Visual Studio Code中,转到集成终端并打开一个新的终端窗口。
在新终端窗口中运行以下命令。
dotnet build --configuration Release
dotnet run --configuration Release --no-build --project Tailspin.SpaceGame.Web
记下本地网站链接;在此示例中,它是
http://localhost:5000.切换回在上一步中设置环境变量的终端窗口,并确保位于项目的根目录中。 下面是一个示例:
cd ~/mslearn-tailspin-spacegame-web-deploy导出
SITE_URL环境变量。 使用从上一步获取的本地运行链接。export SITE_URL="http://localhost:5000"此变量指向 Microsoft 托管的 Space Game 网站。
运行 UI 测试。
dotnet test --configuration Release Tailspin.SpaceGame.Web.UITests此代码将运行位于 Tailspin.SpaceGame.Web.UITests 项目中的测试。
运行测试时,将显示一个或多个浏览器。 Selenium 将控制每个浏览器并遵循你定义的测试步骤。
备注
如果这三种浏览器均未出现,请不要担心。 例如,如果未安装 Chrome 或安装了不兼容的版本,则不会在 Chrome 上运行测试。 只要看到有一个浏览器,就可以放心地确保测试正在运行。 实际上,在本地开发环境中,你可能需要设置要测试的所有浏览器。 通过此设置,可以在在管道中运行测试之前,验证测试在每种配置下的表现是否均符合预期。
在终端中跟踪每个测试的输出。 另请注意末尾的测试运行摘要。
此示例显示,在九项测试中,所有九项都成功,零项跳过:
Passed! - Failed: 0, Passed: 9, Skipped: 0, Total: 9, Duration: 5 s
将 SITE_URL 变量添加到 Azure Pipelines
之前,你在本地设置了 SITE_URL 环境变量,因此你的测试知道将每个浏览器指向何处。 可以将此变量添加到 Azure Pipelines。 此过程类似于为应用服务实例添加变量的方式。 代理运行时,此变量将作为环境变量自动导出到代理。
在更新管道配置之前,让我们添加管道变量。 为此,请执行以下操作:
在 Azure DevOps 中,转到“Space Game - web - 功能测试”项目。
在“Pipelines”下,选择“Library”。
选择“发布”变量组。
在“变量”下,选择“+添加”。
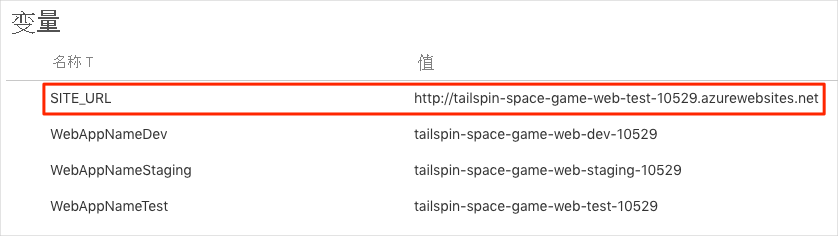
输入“SITE_URL”作为变量的名称。 作为其值,输入与 test 环境相对应的应用程序服务实例的 URL,例如 。
在页面顶部附近选择“Save”,将变量保存到管道中。
变量组应如下所示:
修改管道配置
在本部分中,将修改管道配置,以便在“测试”阶段运行 Selenium UI 测试。
在 Visual Studio Code 中,打开 azure-pipelines.yml 文件。 然后,如下所示修改文件:
提示
该文件包含一些更改,因此我们建议将整个文件替换为此处的内容。
trigger:
- '*'

variables:
  buildConfiguration: 'Release'
  dotnetSdkVersion: '8.x'

stages:
- stage: 'Build'
  displayName: 'Build the web application'
  jobs:
  - job: 'Build'
    displayName: 'Build job'
    pool:
      vmImage: 'ubuntu-20.04'
      demands:
      - npm

    variables:
      wwwrootDir: 'Tailspin.SpaceGame.Web/wwwroot'
      dotnetSdkVersion: '8.x'

    steps:
    - task: UseDotNet@2
      displayName: 'Use .NET SDK $(dotnetSdkVersion)'
      inputs:
        version: '$(dotnetSdkVersion)'

    - task: Npm@1
      displayName: 'Run npm install'
      inputs:
        verbose: false

    - script: './node_modules/.bin/node-sass $(wwwrootDir) --output $(wwwrootDir)'
      displayName: 'Compile Sass assets'

    - task: gulp@1
      displayName: 'Run gulp tasks'

    - script: 'echo "$(Build.DefinitionName), $(Build.BuildId), $(Build.BuildNumber)" > buildinfo.txt'
      displayName: 'Write build info'
      workingDirectory: $(wwwrootDir)

    - task: DotNetCoreCLI@2
      displayName: 'Restore project dependencies'
      inputs:
        command: 'restore'
        projects: '**/*.csproj'

    - task: DotNetCoreCLI@2
      displayName: 'Build the project - $(buildConfiguration)'
      inputs:
        command: 'build'
        arguments: '--no-restore --configuration $(buildConfiguration)'
        projects: '**/*.csproj'

    - task: DotNetCoreCLI@2
      displayName: 'Publish the project - $(buildConfiguration)'
      inputs:
        command: 'publish'
        projects: '$(System.DefaultWorkingDirectory)/**/Tailspin.SpaceGame.Web.csproj'
        publishWebProjects: false
        arguments: '--no-build --configuration $(buildConfiguration) --output $(Build.ArtifactStagingDirectory)/$(buildConfiguration)'
        zipAfterPublish: true

    - publish: '$(Build.ArtifactStagingDirectory)'
      artifact: drop

- stage: 'Dev'
  displayName: 'Deploy to the dev environment'
  dependsOn: Build
  jobs:
  - deployment: Deploy
    pool:
      vmImage: 'ubuntu-20.04'
    environment: dev
    variables:
    - group: Release
    strategy:
      runOnce:
        deploy:
          steps:
          - download: current
            artifact: drop
          - task: AzureWebApp@1
            displayName: 'Azure App Service Deploy: website'
            inputs:
              azureSubscription: 'Resource Manager - Tailspin - Space Game'
              appName: '$(WebAppNameDev)'
              package: '$(Pipeline.Workspace)/drop/$(buildConfiguration)/*.zip'

- stage: 'Test'
  displayName: 'Deploy to the test environment'
  dependsOn: Dev
  jobs:
  - deployment: Deploy
    pool:
      vmImage: 'ubuntu-20.04'
    environment: test
    variables:
    - group: 'Release'
    strategy:
      runOnce:
        deploy:
          steps:
          - download: current
            artifact: drop
          - task: AzureWebApp@1
            displayName: 'Azure App Service Deploy: website'
            inputs:
              azureSubscription: 'Resource Manager - Tailspin - Space Game'
              appName: '$(WebAppNameTest)'
              package: '$(Pipeline.Workspace)/drop/$(buildConfiguration)/*.zip'
  - job: RunUITests
    dependsOn: Deploy
    displayName: 'Run UI tests'
    pool:
      vmImage: 'windows-2019'
    variables:
    - group: 'Release'
    steps:
    - task: UseDotNet@2
      displayName: 'Use .NET SDK $(dotnetSdkVersion)'
      inputs:
        version: '$(dotnetSdkVersion)'
    - task: DotNetCoreCLI@2
      displayName: 'Build the project - $(buildConfiguration)'
      inputs:
        command: 'build'
        arguments: '--configuration $(buildConfiguration)'
        projects: '$(System.DefaultWorkingDirectory)/**/*UITests.csproj'
    - task: DotNetCoreCLI@2
      displayName: 'Run unit tests - $(buildConfiguration)'
      inputs:
        command: 'test'
        arguments: '--no-build --configuration $(buildConfiguration)'
        publishTestResults: true
        projects: '$(System.DefaultWorkingDirectory)/**/*UITests.csproj'

- stage: 'Staging'
  displayName: 'Deploy to the staging environment'
  dependsOn: Test
  jobs:
  - deployment: Deploy
    pool:
      vmImage: 'ubuntu-20.04'
    environment: staging
    variables:
    - group: 'Release'
    strategy:
      runOnce:
        deploy:
          steps:
          - download: current
            artifact: drop
          - task: AzureWebApp@1
            displayName: 'Azure App Service Deploy: website'
            inputs:
              azureSubscription: 'Resource Manager - Tailspin - Space Game'
              appName: '$(WebAppNameStaging)'
              package: '$(Pipeline.Workspace)/drop/$(buildConfiguration)/*.zip'
此文件包含以下三项更改:
dotnetSdkVersion变量移动到了文件顶部,以便多个阶段可以访问该文件。 在这里,“生成”阶段和“测试”阶段需要此版本的 .NET Core。“生成”阶段仅发布 Space Game 网站包作为生成工件。 先前,你发布了如下工件:
- task: DotNetCoreCLI@2
  displayName: 'Publish the project - $(buildConfiguration)'
  inputs:
    command: 'publish'
    projects: '**/*.csproj'
    publishWebProjects: false
    arguments: '--no-build --configuration $(buildConfiguration) --output $(Build.ArtifactStagingDirectory)/$(buildConfiguration)'
    zipAfterPublish: true
此任务将生成两个生成工件:Space Game 网站包和已编译的 UI 测试。 我们在生成阶段生成 UI 测试,以确保它们在测试阶段进行编译,但我们不需要发布已编译的测试代码。 测试运行时,我们将在“测试”阶段再次生成它。
“测试”阶段包括生成并运行测试的第二个作业。
回想一下,部署作业是一种特殊类型的作业,它在部署阶段中扮演着重要的角色。 第二个作业是在 Windows Server 2019 代理上运行 Selenium 测试的常规作业。 尽管我们使用 Linux 代理来生成应用程序,但此处我们使用 Windows 代理来运行 UI 测试。 我们使用 Windows 代理,因为 Amita 在 Windows 上运行手动测试,这也是大多数客户所使用的。
RunUITests作业依赖于Deploy作业,以确保作业按正确的顺序执行。 你将在运行 UI 测试之前将网站部署到应用服务。 如果未指定此依赖性,则阶段中的作业可以按任何顺序运行,也可以并行运行。
在集成终端中,将 azure pipelines.yml 添加到索引,提交更改,然后将分支推送到 GitHub。
git add azure-pipelines.yml
git commit -m "Run Selenium UI tests"
git push origin selenium
观察 Azure Pipelines 运行测试
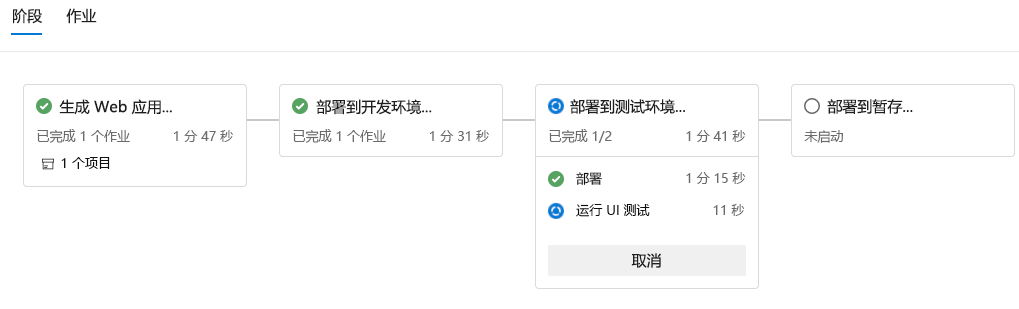
现在观察管道运行。 管道在“测试”阶段运行 Selenium UI 测试。
在 Azure Pipelines 中,转到生成并在运行时对其进行跟踪。
在生成过程中,会看到在部署网站后运行的自动测试。
生成完成后,转到摘要页。
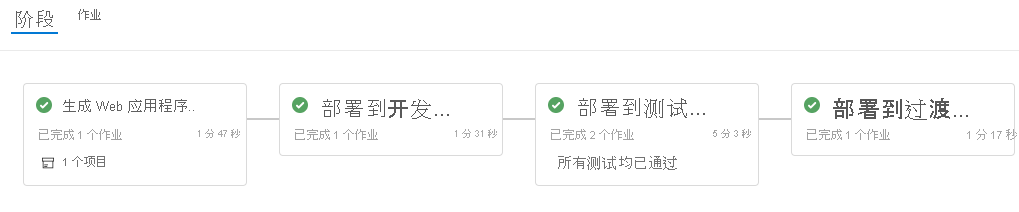
你会看到已成功完成部署和 UI 测试。
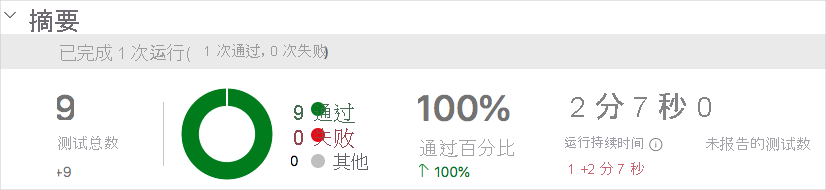
在页面顶部附近,注意摘要。
可看到 Space Game 网站的生成工件像往常一样发布。 另请注意“测试和覆盖率”部分,其中显示 Selenium 测试已通过。

选择“测试摘要”以查看完整的报告。
此报表显示所有九个测试均已通过。 这些测试包括跨三个浏览器的三个测试。
如果任何测试失败,将会显示失败测试的详细结果。 从其中,可以调查失败的根源,在本地进行修复,然后进行必要的更改以使测试通过管道。
Amita:这种自动化令人兴奋! 现在我有了可以在管道中运行的 UI 测试。 从长远来看,这些测试确实可以节省我们的时间。 我还可以遵循一种模式来添加更多测试。 最重要的是,UI 测试使我们对代码质量更加有信心。
Andy:完全正确。 请记住,反复手动运行的测试是自动化的最佳候选项。 祝你好运。 如果遇到问题或需要代码评审者,你知道该怎么联系我。