练习 - 向应用程序添加单元测试
在本单元中,我们将向使用 Microsoft Azure Pipelines 创建的自动化生成添加单元测试。 回归 bug 正在悄悄混进你的团队的代码,破坏排行榜的筛选功能。 具体来说,就是不断出现错误的游戏模式。
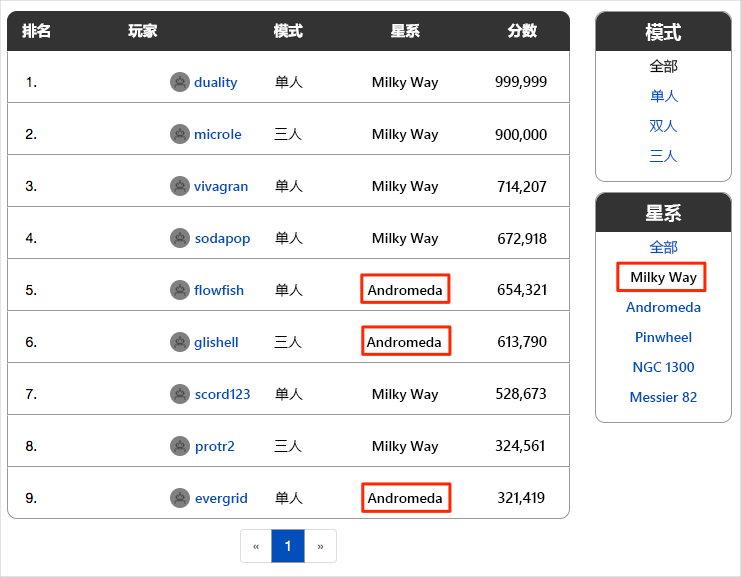
下图展示了这些问题。 当用户选择“Milky Way”以仅显示来自该游戏地图的分数时,他们将从其他游戏地图(如 Andromeda)获得结果。
团队希望在进行测试之前发现错误。 单元测试是自动测试回归 bug 的绝佳方法。
现在在此过程中添加单元测试将为团队在改进 Space Game Web 应用时赢得优势。 应用程序使用文档数据库来存储高分和玩家档案。 现在,它使用本地测试数据。 稍后,他们计划将应用连接到实时数据库。
许多单元测试框架可用于 C# 应用程序。 我们将使用 NUnit,因为广受欢迎。
下面是你正在进行的单元测试:
[TestCase("Milky Way")]
[TestCase("Andromeda")]
[TestCase("Pinwheel")]
[TestCase("NGC 1300")]
[TestCase("Messier 82")]
public void FetchOnlyRequestedGameRegion(string gameRegion)
{
    const int PAGE = 0; // take the first page of results
    const int MAX_RESULTS = 10; // sample up to 10 results

    // Form the query predicate.
    // This expression selects all scores for the provided game region.
    Expression<Func<Score, bool>> queryPredicate = score => (score.GameRegion == gameRegion);

    // Fetch the scores.
    Task<IEnumerable<Score>> scoresTask = _scoreRepository.GetItemsAsync(
        queryPredicate, // the predicate defined above
        score => 1, // we don't care about the order
        PAGE,
        MAX_RESULTS
    );
    IEnumerable<Score> scores = scoresTask.Result;

    // Verify that each score's game region matches the provided game region.
    Assert.That(scores, Is.All.Matches<Score>(score => score.GameRegion == gameRegion));
}
可按游戏类型和游戏地图的任何组合来筛选排行榜。
此测试会在排行榜中查询高分,并验证每个结果是否与提供的游戏地图匹配。
在 NUnit 测试方法中,TestCase 提供用于测试此方法的内联数据。 在这里,NUnit 会调用 FetchOnlyRequestedGameRegion 单元测试方法,如下所示:
FetchOnlyRequestedGameRegion("Milky Way");
FetchOnlyRequestedGameRegion("Andromeda");
FetchOnlyRequestedGameRegion("Pinwheel");
FetchOnlyRequestedGameRegion("NGC 1300");
FetchOnlyRequestedGameRegion("Messier 82");
请注意在测试结束时对 Assert.That 方法的调用。 断言是你声明为 true 的条件或语句。 如果条件为 false,则表示代码中有 bug。 NUnit 使用你指定的内联数据运行每个测试方法,并将结果记录为通过或失败测试。
许多单元测试框架都提供类似于自然语言的验证方法。 这些方法有助于使测试易于阅读,并帮助你将测试映射到应用程序的要求。
请考虑在本示例中设置的断言:
Assert.That(scores, Is.All.Matches<Score>(score => score.GameRegion == gameRegion));
你可能将此行读取为:
断言每个返回分数的游戏区域与所提供的游戏区域匹配。
以下是要遵循的过程:
- 从包含单元测试的 GitHub 存储库中提取分支。
- 在本地运行测试,以验证它们是否通过。
- 将任务添加到管道配置以运行测试并收集结果。
- 将分支推送到 GitHub 存储库。
- 观察 Azure Pipelines 项目自动生成应用程序并运行测试的情况。
从 GitHub 中提取分支
从 GitHub 提取 unit-tests 分支,签出或切换到该分支。
此分支包含了之前模块中使用的 Space Game 项目,还有一个便于开始操作的 Azure Pipelines 配置。
在 Visual Studio Code 中打开集成终端。
运行以下
git命令,从 Microsoft 存储库中提取名为unit-tests的分支并切换到该分支。git fetch upstream unit-tests git checkout -B unit-tests upstream/unit-tests通过此命令的格式,你可从 Microsoft GitHub 存储库获取起始代码(称作
upstream)。 稍后,将此分支推送到 GitHub 存储库(称作origin)。(可选)在 Visual Studio Code 中打开 azure-pipelines.yml 文件,熟悉初始配置。 该配置类似于在使用 Azure Pipelines 创建生成管道模块中创建的基本配置。 它只生成应用程序的发布配置。
在本地运行测试
在向管道提交任何测试之前,最好在本地运行所有测试。 你会在这里完成该操作。
在 Visual Studio Code 中打开集成终端。
运行
dotnet build以生成解决方案中的每个项目。dotnet build --configuration Release运行以下
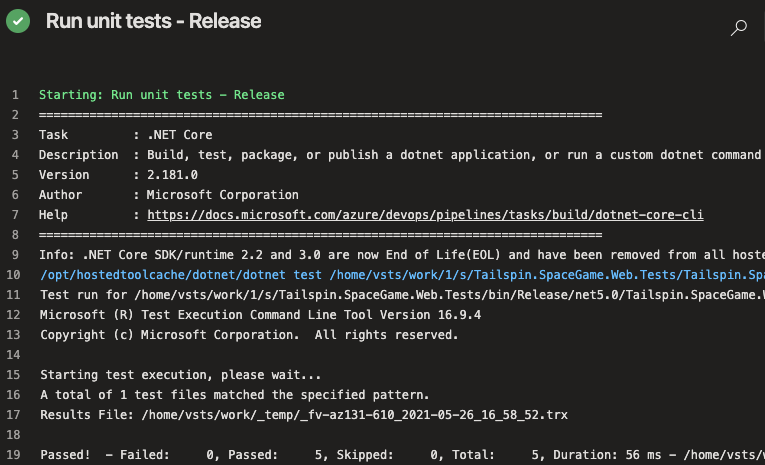
dotnet test命令来运行单元测试:dotnet test --configuration Release --no-build--no-build标志指定在运行项目之前不生成项目。 不需要生成项目,因为你已在上一步中执行了此操作。你应看到五个测试全都通过了。
Starting test execution, please wait...
A total of 1 test files matched the specified pattern.

Passed!  - Failed:     0, Passed:     5, Skipped:     0, Total:     5, Duration: 57 ms
在此示例中,测试运行时间不到一秒钟。
请注意,共有 5 个测试。 虽然我们只定义了一种测试方法
FetchOnlyRequestedGameRegion,但该测试运行五次,每个游戏地图运行一次,如TestCase内联数据中所指定的。再次运行测试。 这次,提供
--logger选项以向日志文件写入结果。dotnet test Tailspin.SpaceGame.Web.Tests --configuration Release --no-build --logger trx从输出中看到在 TestResults 目录中创建了 TRX 文件。
TRX 文件是包含测试运行的结果的 XML 文档。 这是一种常用的测试结果,因为 Visual Studio 和其他工具可帮助你直观呈现结果。
稍后,你将了解 Azure Pipelines 如何帮助你在测试结果通过管道时对其进行可视化和跟踪。
注意
TRX 文件不应包含在源代码管理中。 通过 .gitignore 文件,可以指定希望 Git 忽略的临时文件和其他文件。 项目的 .gitignore 文件已设置为忽略 TestResults 目录中的任何内容。
(可选)在 Visual Studio Code 中,打开 Tailspin.SpaceGame.Web.Tests 文件夹中的 DocumentDBRepository_GetItemsAsyncShould.cs 文件,并检查测试代码。 即使你对构建 .NET 应用不感兴趣,也可能会发现测试代码很有用,因为它类似于你可能在其他单元测试框架中看到的代码。
将任务添加到管道配置
在此,请配置生成管道来运行单元测试并收集结果。
在 Visual Studio Code 中,按如下所示修改 azure-pipelines.yml:
trigger:
- '*'

pool:
  vmImage: 'ubuntu-20.04'
  demands:
  - npm

variables:
  buildConfiguration: 'Release'
  wwwrootDir: 'Tailspin.SpaceGame.Web/wwwroot'
  dotnetSdkVersion: '6.x'

steps:
- task: UseDotNet@2
  displayName: 'Use .NET SDK $(dotnetSdkVersion)'
  inputs:
    version: '$(dotnetSdkVersion)'

- task: Npm@1
  displayName: 'Run npm install'
  inputs:
    verbose: false

- script: './node_modules/.bin/node-sass $(wwwrootDir) --output $(wwwrootDir)'
  displayName: 'Compile Sass assets'

- task: gulp@1
  displayName: 'Run gulp tasks'

- script: 'echo "$(Build.DefinitionName), $(Build.BuildId), $(Build.BuildNumber)" > buildinfo.txt'
  displayName: 'Write build info'
  workingDirectory: $(wwwrootDir)

- task: DotNetCoreCLI@2
  displayName: 'Restore project dependencies'
  inputs:
    command: 'restore'
    projects: '**/*.csproj'

- task: DotNetCoreCLI@2
  displayName: 'Build the project - $(buildConfiguration)'
  inputs:
    command: 'build'
    arguments: '--no-restore --configuration $(buildConfiguration)'
    projects: '**/*.csproj'

- task: DotNetCoreCLI@2
  displayName: 'Run unit tests - $(buildConfiguration)'
  inputs:
    command: 'test'
    arguments: '--no-build --configuration $(buildConfiguration)'
    publishTestResults: true
    projects: '**/*.Tests.csproj'

- task: DotNetCoreCLI@2
  displayName: 'Publish the project - $(buildConfiguration)'
  inputs:
    command: 'publish'
    projects: '**/*.csproj'
    publishWebProjects: false
    arguments: '--no-build --configuration $(buildConfiguration) --output $(Build.ArtifactStagingDirectory)/$(buildConfiguration)'
    zipAfterPublish: true

- task: PublishBuildArtifacts@1
  displayName: 'Publish Artifact: drop'
  condition: succeeded()
此版本引入了此
DotNetCoreCLI@2生成任务。- task: DotNetCoreCLI@2 displayName: 'Run unit tests - $(buildConfiguration)' inputs: command: 'test' arguments: '--no-build --configuration $(buildConfiguration)' publishTestResults: true projects: '**/*.Tests.csproj'此生成任务运行
dotnet test命令。请注意,此任务不指定手动运行测试时使用的
--logger trx参数。publishTestResults参数会为你添加该参数。 此参数通知管道将 TRX 文件生成到临时目录,你可通过内置变量$(Agent.TempDirectory)来访问它。 它还向管道发布任务结果。projects参数指定与“**/*.Tests.csproj”匹配的所有 C# 项目。“**”部分匹配所有目录,“*.Tests.csproj”部分匹配文件名以“.Tests.csproj”结尾的所有项目。 分支仅包含一个单元测试项目 Tailspin.SpaceGame.Web.Tests.csproj。 通过指定模式,可运行更多测试项目,而无需修改生成配置。
将分支推送到 GitHub
现在,需要将更改推送到 GitHub,并查看管道运行情况。 回顾一下,你目前身处 unit-tests 分支。
在集成终端中,将 azure pipelines.yml 添加到索引、提交更改,然后将分支推送到 GitHub。
git add azure-pipelines.yml
git commit -m "Run and publish unit tests"
git push origin unit-tests
观察 Azure Pipelines 运行测试
在这里,你会看到运行在管道中的测试,然后直观呈现 Microsoft Azure Test Plans 中的结果。 Azure Test Plans 提供了成功测试应用程序所需的全部工具。 你可创建并运行手动测试计划、生成自动测试,并收集来自利益干系人的反馈。
在 Azure Pipelines 中,跟踪生成的每个步骤。
你会看到“运行单元测试 - 发布”任务运行单元测试,就像你从命令行手动执行操作一样。
导航回到管道摘要。
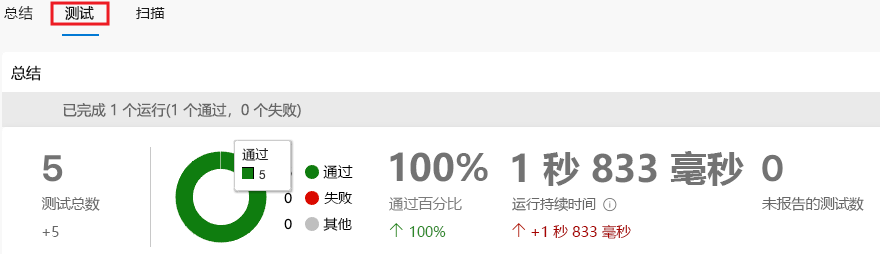
移动到“Tests”选项卡。
你会看到测试运行摘要。 全部五个测试都已通过。
在 Azure DevOps 中,选择“Test Plans”,然后选择“Runs”。
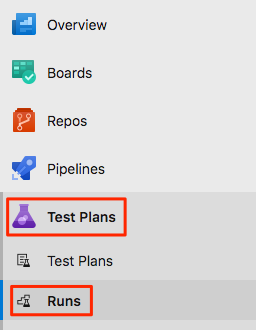
你会看到最新的测试运行,包括你刚刚运行的测试运行。
双击最新版本运行。
将会看到结果摘要。

在此示例中,所有五个测试都已通过。 如果任何测试失败,你可转到生成任务以获取更多详细信息。
你也可以下载 TRX 文件,以通过 Visual Studio 或其他可视化工具对其进行检查。
虽然你只增加了一个测试,但这依旧是一个良好的开端,它解决了眼前的问题。 现在,团队可以添加更多的测试,并在他们改进流程时运行这些测试。
将分支合并到 main
在现实中,如果你对结果感到满意,你可能会将 unit-tests 分支合并到 main 中,但为了简洁起见,我们现在将跳过此过程。