在本教程中,你熟悉使用 Visual Studio 开发应用程序时可以使用的许多工具、对话框和设计器。 创建“Hello, World”应用程序,设计用户界面,添加代码和调试错误。 同时,了解如何在 Visual Studio 集成开发环境中工作(IDE)。
- 配置 IDE
- 创建项目
- 设计用户界面
- 调试和测试应用程序
先决条件
- 如果没有 Visual Studio,请访问 Visual Studio 下载页面 来免费安装它。
- 确保已安装 .NET 桌面开发 工作负荷。 可以在 Visual Studio 安装程序中验证此配置。
- 可以在本教程中使用 .NET Framework 或 .NET Core。 .NET Core 是较新的、更现代的框架。 .NET Core 需要 Visual Studio 2019 版本 16.3 或更高版本。
什么是 Windows Presentation Foundation?
Windows Presentation Foundation(WPF)是一个用户界面(UI)框架,用于创建桌面客户端应用程序。 WPF 开发平台支持一组广泛的应用程序开发功能,包括应用程序模型、资源、控件、图形、布局、数据绑定、文档和安全性。
WPF 是 .NET 的一部分。 如果你以前使用 ASP.NET 或 Windows 窗体生成了 .NET 的应用程序,则编程体验应该很熟悉。 WPF 使用 可扩展应用程序标记语言(XAML)为应用程序编程提供声明性模型。 有关详细信息,请参阅 桌面指南(WPF .NET)。
配置 IDE
启动 Visual Studio 时,将打开启动窗口。 选择“继续但无需代码”以打开开发环境。 可以看到工具窗口、菜单和工具栏以及主窗口空间。 工具窗口停靠在应用程序窗口的两侧。 搜索框、菜单栏和标准工具栏位于顶部。 加载解决方案或项目时,编辑器和设计器将显示在应用程序窗口的中心空间中。 开发应用程序时,大部分时间都在此中心区域。
创建项目
在 Visual Studio 中创建应用程序时,首先创建项目和解决方案。 在本示例中,你将创建一个 Windows Presentation Foundation (WPF) 项目。
打开 Visual Studio。
在开始窗口中,选择 创建新项目。

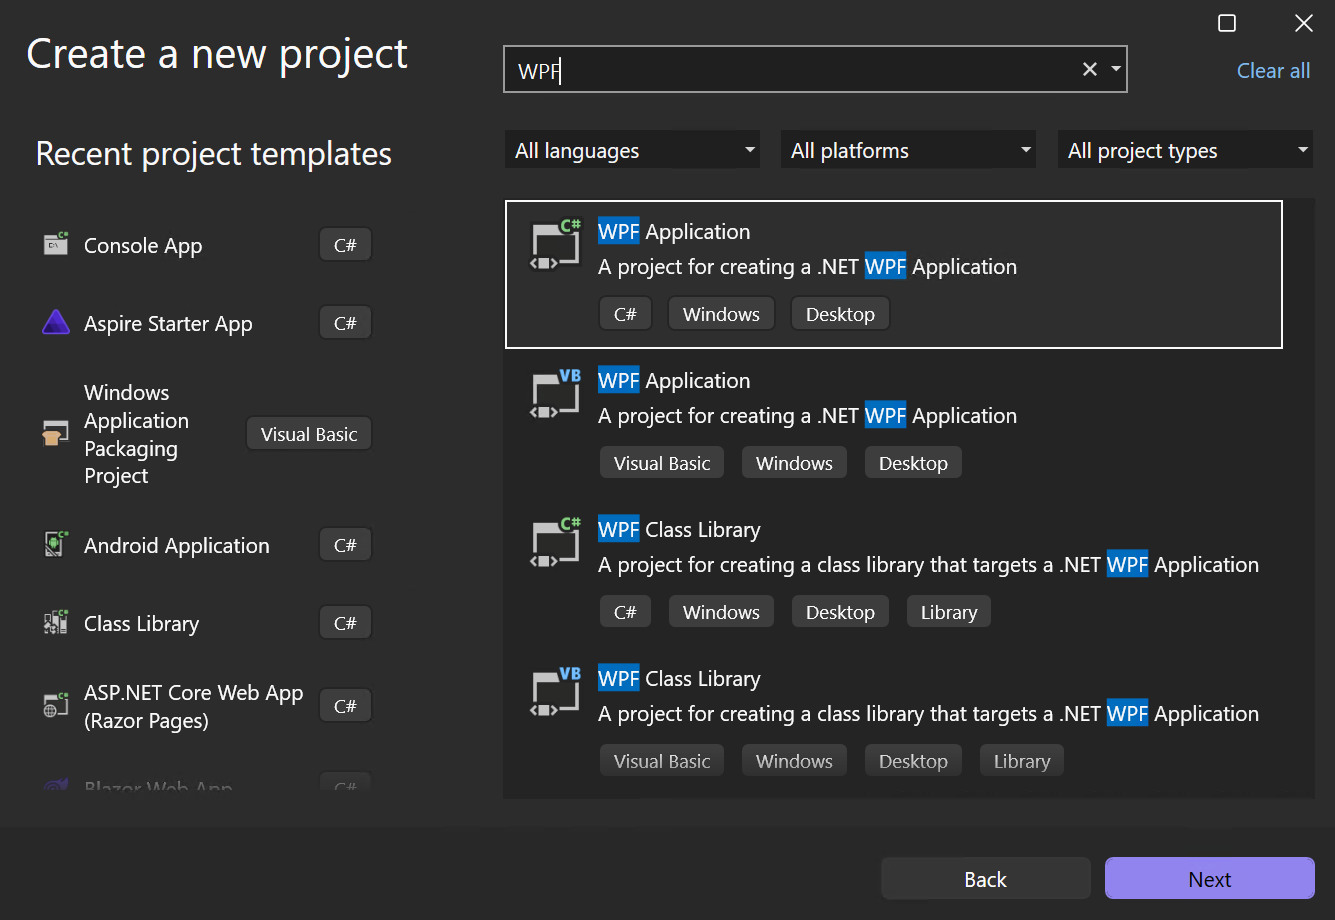
在“创建新项目”屏幕上,搜索“WPF”。 选择 WPF 应用程序,然后选择 下一步。
在下一个屏幕中,为项目命名,HelloWPFApp,然后选择“下一步”。

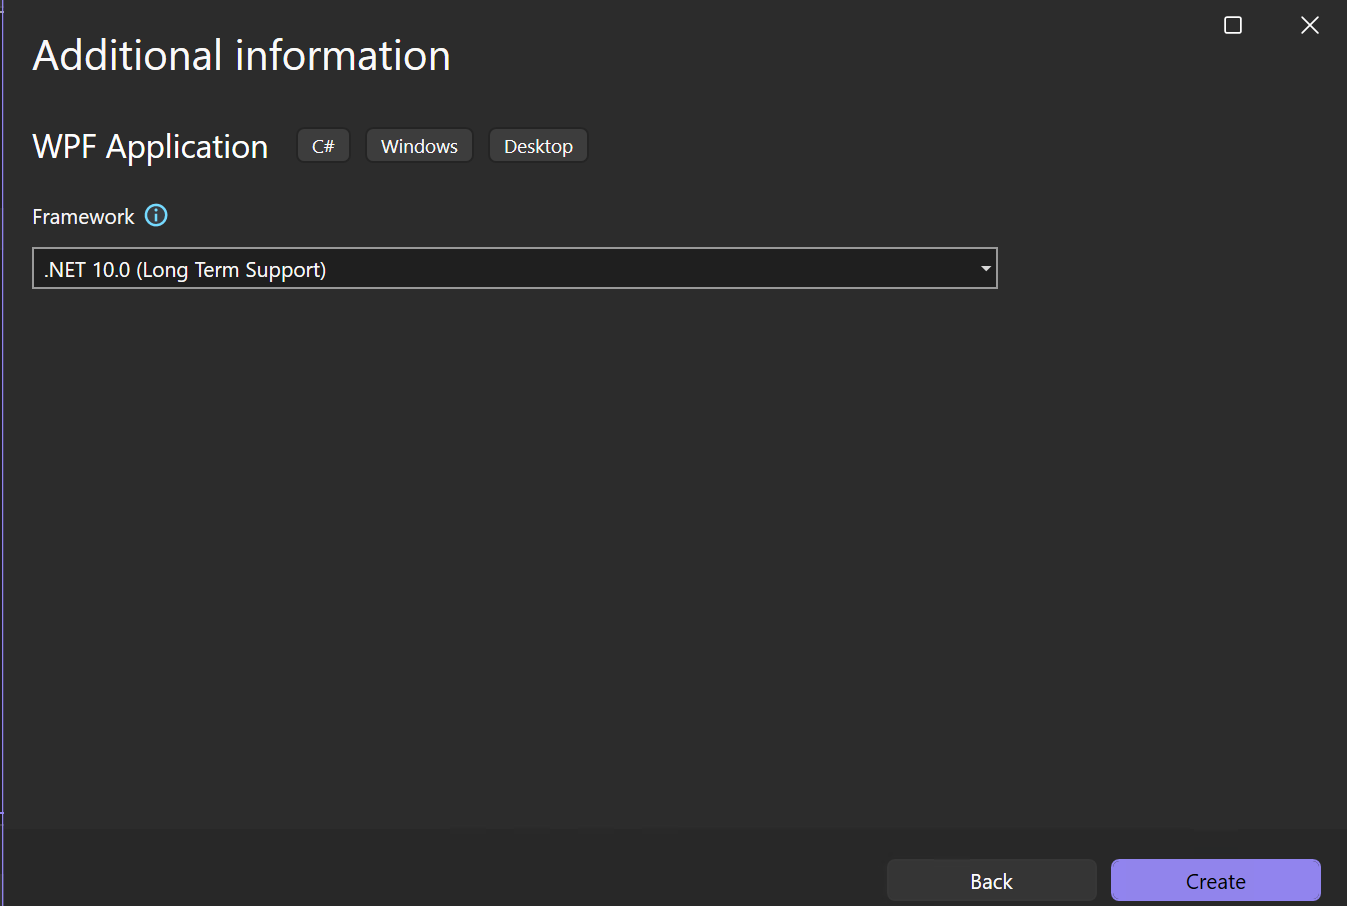
在 “其他信息 ”窗口中,验证是否已为目标框架选择 .NET 10.0 。 然后选择“创建”。


Visual Studio 创建 HelloWPFApp 项目和解决方案。
解决方案资源管理器 显示各种文件。 “WPF 设计器”在拆分视图中显示 的设计视图和 XAML 视图MainWindow.xaml。 可以滑动拆分器以显示任意一种视图的更多或更少。 可以选择仅查看视觉对象视图或仅查看 XAML 视图。

注意
有关可扩展应用程序标记语言(XAML)的详细信息,请参阅 WPF 的 XAML 概述。
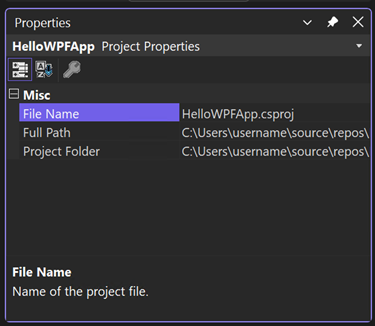
创建项目后,可以对其进行自定义。 为此,请从 视图 菜单中选择 属性窗口,或按 F4。 然后,可以显示和更改应用程序中项目项、控件和其他项的选项。
打开 Visual Studio。
在开始窗口中,选择 创建新项目。

在“创建新项目”屏幕上,搜索“WPF”。 选择 WPF 应用程序,然后选择 下一步。

在下一个屏幕中,为项目命名,HelloWPFApp,然后选择“下一步”。

在“其他信息”窗口中,确认是否已为目标框架选择了 .NET 8.0。 然后选择“创建”。


Visual Studio 创建 HelloWPFApp 项目和解决方案。
解决方案资源管理器 显示各种文件。 “WPF 设计器”在拆分视图中显示 的设计视图和 XAML 视图MainWindow.xaml。 可以滑动拆分器以显示任意一种视图的更多或更少。 可以选择仅查看视觉对象视图或仅查看 XAML 视图。

创建项目后,可以对其进行自定义。 为此,请从 视图 菜单中选择 属性窗口,或按 F4。 然后,可以显示和更改应用程序中项目项、控件和其他项的选项。

设计用户界面
如果设计器未打开,请选择 MainWindow.xaml,然后选择 Shift+F7 打开设计器。
在本教程中,将三种类型的控件添加到此应用程序:一个 TextBlock 控件、两个 RadioButton 控件和一个 Button 控件。
添加 TextBlock 控件
按照以下步骤添加 TextBlock。
选择 Ctrl+Q 以激活搜索框,然后键入 工具箱。 从结果列表中选择“查看”>“工具箱”。
在 工具箱中,展开 公共 WPF 控件 节点以查看 TextBlock 控件。

将 TextBlock 控件添加到设计图面。 选择“TextBlock”项并将其拖动到设计图面上的窗口。 把控件居中到窗口的顶部附近。 可以使用参考线将控件居中。
窗口应类似于下图:

XAML 标记应如以下示例所示:
<Grid>
    <TextBlock HorizontalAlignment="Left" Margin="387,60,0,0" TextWrapping="Wrap" Text="TextBlock" VerticalAlignment="Top"/>
</Grid>
选择 Ctrl+Q 以激活搜索框,然后键入 工具箱。 从结果列表中选择“查看”>“工具箱”。
在 工具箱中,展开 公共 WPF 控件 节点以查看 TextBlock 控件。

将 TextBlock 控件添加到设计图面。 选择“TextBlock”项并将其拖动到设计图面上的窗口。 把控件居中到窗口的顶部附近。 可以使用参考线将控件居中。
窗口应类似于下图:
XAML 标记应如以下示例所示:
<Grid>
    <TextBlock HorizontalAlignment="Left" Margin="387,60,0,0" TextWrapping="Wrap" Text="TextBlock" VerticalAlignment="Top"/>
</Grid>
自定义文本块中的文本
可以更改 TextBlock 显示的文本。
在 XAML 视图中,找到 TextBlock 的标记,并将 Text 属性从
TextBlock更改为Select a message option and then choose the Display button.XAML 标记应如以下示例所示:
<Grid>
    <TextBlock HorizontalAlignment="Left" Margin="387,60,0,0" TextWrapping="Wrap" Text="Select a message option and then choose the Display button." VerticalAlignment="Top"/>
</Grid>
再次将 TextBlock 居中,然后选择 CtrlS 或使用“文件”菜单项来保存更改+。
添加单选按钮
接下来,向窗体添加两个 RadioButton 控件。
在 工具箱中,找到 RadioButton 控件。

向设计图面添加两个 RadioButton 控件。 选择 RadioButton 对象,并将其拖动到设计图面上的窗口。 通过选择按钮并使用箭头键移动按钮。 排列这些按钮,以便按钮在 TextBlock 控件下并排显示。 可以使用准则来对齐控件。
窗口应如下所示:

在左侧 RadioButton 控件的 属性 窗口中,顶部将 Name 属性更改为
HelloButton。
在右侧 RadioButton 控件的 属性 窗口中,将 Name 属性更改为
GoodbyeButton,然后保存所做的更改。
在 工具箱中,找到 RadioButton 控件。

向设计图面添加两个 RadioButton 控件。 选择 RadioButton 对象,并将其拖动到设计图面上的窗口。 通过选择按钮并使用箭头键移动按钮。 排列这些按钮,以便按钮在 TextBlock 控件下并排显示。 可以使用准则来对齐控件。
窗口应如下所示:
在左侧 RadioButton 控件的 属性 窗口中,顶部将 Name 属性更改为
HelloButton。
在右侧 RadioButton 控件的 属性 窗口中,将 Name 属性更改为
GoodbyeButton,然后保存所做的更改。
添加每个单选按钮的显示文本
接下来,为每个 RadioButton 控件添加显示文本。 以下过程更新 RadioButton 控件的 Content 属性。
在 XAML 中将两个单选按钮 和
HelloButton的“内容”属性更新为GoodbyeButton和"Hello""Goodbye"。 XAML 标记现在应类似于以下示例:<Grid> <TextBlock HorizontalAlignment="Left" Margin="252,47,0,0" TextWrapping="Wrap" Text="Select a message option and then choose the Display button." VerticalAlignment="Top"/> <RadioButton x:Name="HelloButton" Content="Hello" HorizontalAlignment="Left" Margin="297,161,0,0" VerticalAlignment="Top"/> <RadioButton x:Name="GoodbyeButton" Content="Goodbye" HorizontalAlignment="Left" Margin="488,161,0,0" VerticalAlignment="Top"/> </Grid>
设置要默认选中的单选按钮
在这一步中,我们将 HelloButton 设置为默认选中,这样两个单选按钮中始终有一个处于选中状态。
在 XAML 视图中,找到 HelloButton 的标记。
添加 IsChecked 属性,并将其设置为 True。 具体而言,添加
IsChecked="True"。XAML 标记现在应类似于以下示例:
<Grid>
     <TextBlock HorizontalAlignment="Left" Margin="252,47,0,0" TextWrapping="Wrap" Text="Select a message option and then choose the Display button." VerticalAlignment="Top"/>
     <RadioButton x:Name="HelloButton" Content="Hello" IsChecked="True" HorizontalAlignment="Left" Margin="297,161,0,0" VerticalAlignment="Top"/>
     <RadioButton x:Name="GoodbyeButton" Content="Goodbye" HorizontalAlignment="Left" Margin="488,161,0,0" VerticalAlignment="Top"/>
</Grid>
添加按钮控件
最后添加的 UI 元素是一个 按钮 控件。
在 工具箱中,找到 按钮 控件。 然后通过将控件拖到设计视图的窗体中,将其添加到 RadioButton 控件下方的设计图面中。 这些参考线可以帮助你将控件居中。
在 XAML 视图中,将 Button 控件 内容 的值从
Content="Button"更改为Content="Display",然后保存更改。窗口应类似于以下屏幕截图:

XAML 标记现在应类似于以下示例:
<Grid>
     <TextBlock HorizontalAlignment="Left" Margin="252,47,0,0" TextWrapping="Wrap" Text="Select a message option and then choose the Display button." VerticalAlignment="Top"/>
     <RadioButton x:Name="HelloButton" Content="Hello" IsChecked="True" HorizontalAlignment="Left" Margin="297,161,0,0" VerticalAlignment="Top"/>
     <RadioButton x:Name="GoodbyeButton" Content="Goodbye" HorizontalAlignment="Left" Margin="488,161,0,0" VerticalAlignment="Top"/>
     <Button Content="Display" HorizontalAlignment="Left" Margin="377,270,0,0" VerticalAlignment="Top" Width="75"/>
</Grid>

将代码添加到显示按钮
运行此应用程序时,用户先选择一个单选按钮,然后选择 显示 按钮后,会弹出一个消息框。 此时会显示一个 Hello 消息框,另一个消息框将显示“再见”。 若要创建此行为,请将代码添加到 Button_Click中的 事件。
在设计图面上,双击“显示”按钮。
此时,MainWindow.xaml.cs 打开,光标位于 事件上
Button_Click。private void Button_Click(object sender, RoutedEventArgs e) { }双击 显示 按钮时,
Click="Button_Click"将添加到 XAML。XAML 标记现在应类似于以下示例:
<Grid>
     <TextBlock HorizontalAlignment="Left" Margin="252,47,0,0" TextWrapping="Wrap" Text="Select a message option and then choose the Display button." VerticalAlignment="Top"/>
     <RadioButton x:Name="HelloButton" Content="Hello" IsChecked="True" HorizontalAlignment="Left" Margin="297,161,0,0" VerticalAlignment="Top"/>
     <RadioButton x:Name="GoodbyeButton" Content="Goodbye" HorizontalAlignment="Left" Margin="488,161,0,0" VerticalAlignment="Top"/>
     <Button Content="Display" HorizontalAlignment="Left" Margin="377,270,0,0" VerticalAlignment="Top" Width="75" Click="Button_Click"/>
</Grid>
在
Button_Click大括号内,添加以下代码:if (HelloButton.IsChecked == true) { MessageBox.Show("Hello."); } else if (GoodbyeButton.IsChecked == true) { MessageBox.Show("Goodbye."); }保存应用程序。
调试和测试应用程序
接下来,调试应用程序以查找错误并测试这两个消息框是否正确显示。 以下说明介绍如何生成和启动调试器。 有关详细信息,请参阅 生成 WPF 应用程序(WPF),调试 WPF。
更改 MainWindow.xaml 的名称
为 MainWindow 指定更具体的名称。 在 解决方案资源管理器中,右键单击 MainWindow.xaml 并选择 重命名。 将文件重命名为 Greetings.xaml。 在此示例中,此更改创建一个错误,稍后用于演示调试。
查找和修复错误
在此步骤中,你将发现之前通过更改 MainWindow.xaml 文件的名称引起的错误。
开始调试并查找错误
通过选择 F5 或选择“调试”,然后选择“启动调试”,启动调试程序。
将出现“中断模式”窗口,“输出”窗口指示“发生 IOException: 找不到资源 mainwindow.xaml”。

依次选择“调试”“停止调试”,停止调试程序>。

已将 MainWindow.xaml 重命名为 Greetings.xaml,但代码仍引用 MainWindow.xaml 作为应用程序的启动 URI,因此项目无法启动。
通过选择 F5 或选择“调试”,然后选择“启动调试”,启动调试程序。
将出现“中断模式”窗口,“输出”窗口指示“发生 IOException: 找不到资源 mainwindow.xaml”。

依次选择“调试”“停止调试”,停止调试程序>。
已将 MainWindow.xaml 重命名为 Greetings.xaml,但代码仍引用 MainWindow.xaml 作为应用程序的启动 URI,因此项目无法启动。
将 Greetings.xaml 指定为启动 URI
在解决方案资源管理器 中,打开
App.xaml文件。将
StartupUri="MainWindow.xaml"更改为StartupUri="Greetings.xaml",并保存更改。
作为可选步骤,可以避免混淆更改应用程序窗口的标题以匹配此新名称。
在 解决方案资源管理器中,打开刚刚重命名的
Greetings.xaml文件。将 Window.Title 属性的值从
Title="MainWindow"更改为Title="Greetings",并保存更改。
再次启动调试器(按 F5)。 现在应会看到应用程序的 问候语 窗口。

若要停止调试,请关闭应用程序窗口
使用断点进行调试
可以通过添加一些断点在调试期间测试代码。 可以通过选择“调试”>“切换断点”、通过在编辑器中想要添加断点的代码行旁边的左边距中单击或按 F9 来添加断点。
添加断点
打开 Greetings.xaml.cs,然后选择以下行:
MessageBox.Show("Hello.")通过选择“调试”->“切换断点”,从菜单中添加断点。
编辑器窗口最左边距的代码行旁边将显示一个红色圆圈。
选择以下行:
MessageBox.Show("Goodbye.")。按 F9 键添加断点,然后选择 F5 开始调试。
在“Greetings”窗口中,选择“Hello”单选按钮,然后选择“显示”按钮。
行
MessageBox.Show("Hello.")将用黄色突出显示。 在 IDE 底部,“自动”、“局部变量”和“监视”窗口一起停靠在左侧。 “调用堆栈”、“断点”、“异常设置”、“命令”、“即时”和“输出”窗口一起停靠在右侧。
在菜单栏上,选择“调试”“跳出”>。
应用程序恢复执行,并显示一个消息框,其中包含“Hello”一词。
选择消息框上的“确定”将其关闭。
在“Greetings”窗口中,选择“Goodbye”单选按钮,然后选择“显示”按钮。
行
MessageBox.Show("Goodbye.")将用黄色突出显示。选择 F5 键以继续调试。 当消息框出现时,在消息框中选择 “确定” 来关闭它。
若要停止调试,请关闭应用程序窗口。
在菜单栏上,选择“调试”“禁用所有断点”>。

查看 UI 元素的表示形式
在正在运行的应用中,你会看到窗口顶部显示了一个小组件。 该小组件是一个运行时帮助程序,通过它可以快速访问一些有用的调试功能。 选择第一个按钮,转到实时可视化树。 你应该能看到一个窗口,其中有一个树状结构,包含页面的所有可视元素。 展开节点以查找添加的按钮。


生成应用程序的发布版本
验证一切是否正常工作后,可以准备应用程序的发布版本。
在主菜单上,选择 构建>清理解决方案,以删除在以前构建过程中创建的中间文件和输出文件。 此步骤不是必需的,但它会清理调试生成输出。
使用工具栏上的下拉列表控件,将 HelloWPFApp 的生成配置从 Debug 更改为 Release。 它当前显示“调试”。
选择“生成”“生成解决方案”来生成解决方案>。
祝贺你完成本教程! 可以在解决方案和项目目录(.exe)下找到生成的 。
相关内容
下一步
祝贺你完成本教程! 若要了解详细信息,请继续学习以下教程。