在 Visual Studio 中使用 C# 创建 Windows 窗体应用
在本教程中,你将创建一个具有基于 Windows 的用户界面 (UI) 的简单 C# 应用程序。
如果尚未安装 Visual Studio,请转到 Visual Studio 下载页免费安装。
注意
本教程中的部分屏幕截图使用深色主题。 如果没有深色主题但想要使用,请参阅个性化设置 Visual Studio IDE 和编辑器页面,了解具体方法。
如果尚未安装 Visual Studio,请转到 Visual Studio 2022 下载页免费安装。
创建项目
首先,创建 C# 应用程序项目。 项目类型随附了所需的全部模板文件,无需添加任何内容。
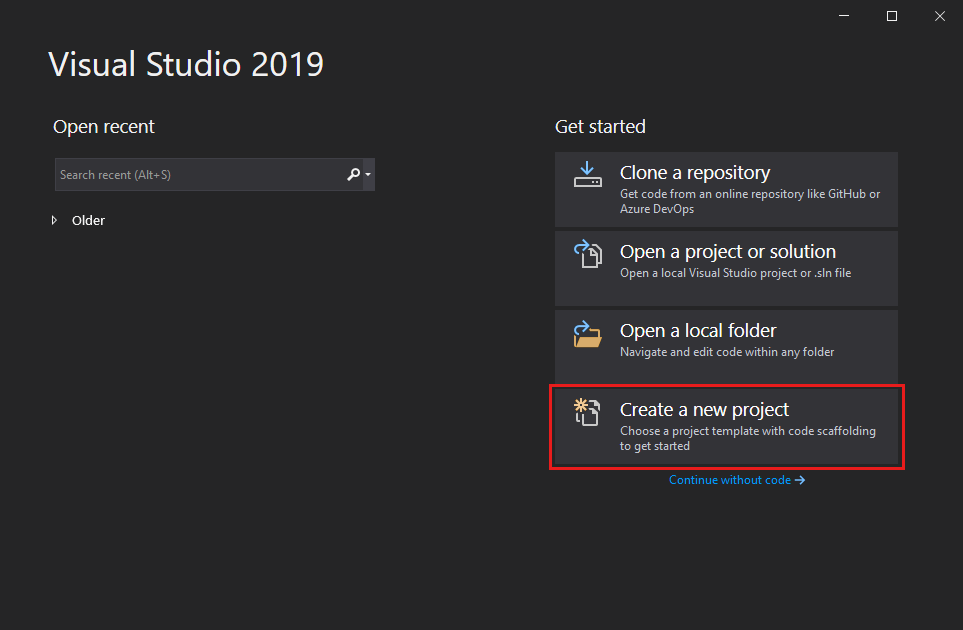
打开 Visual Studio。
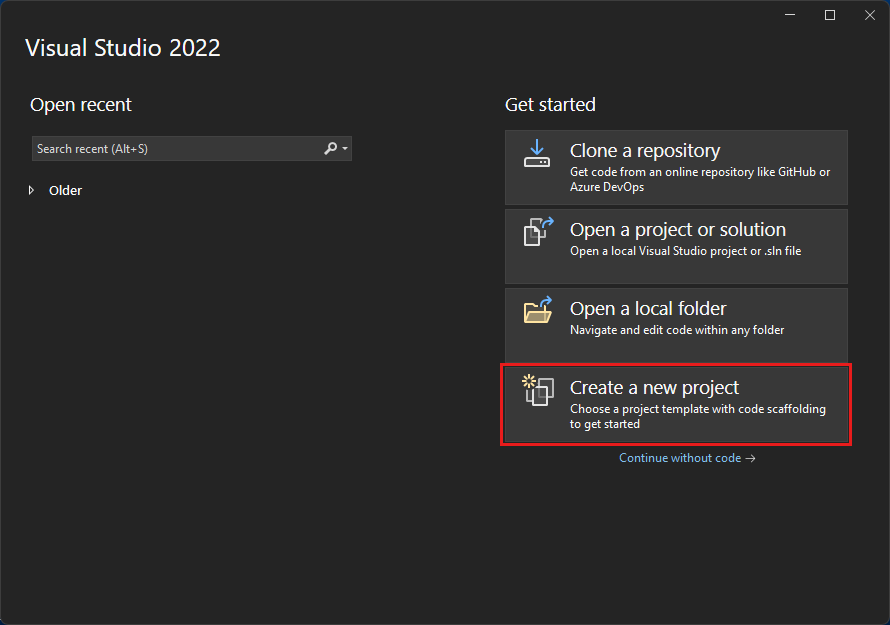
在“开始”窗口上,选择“创建新项目” 。
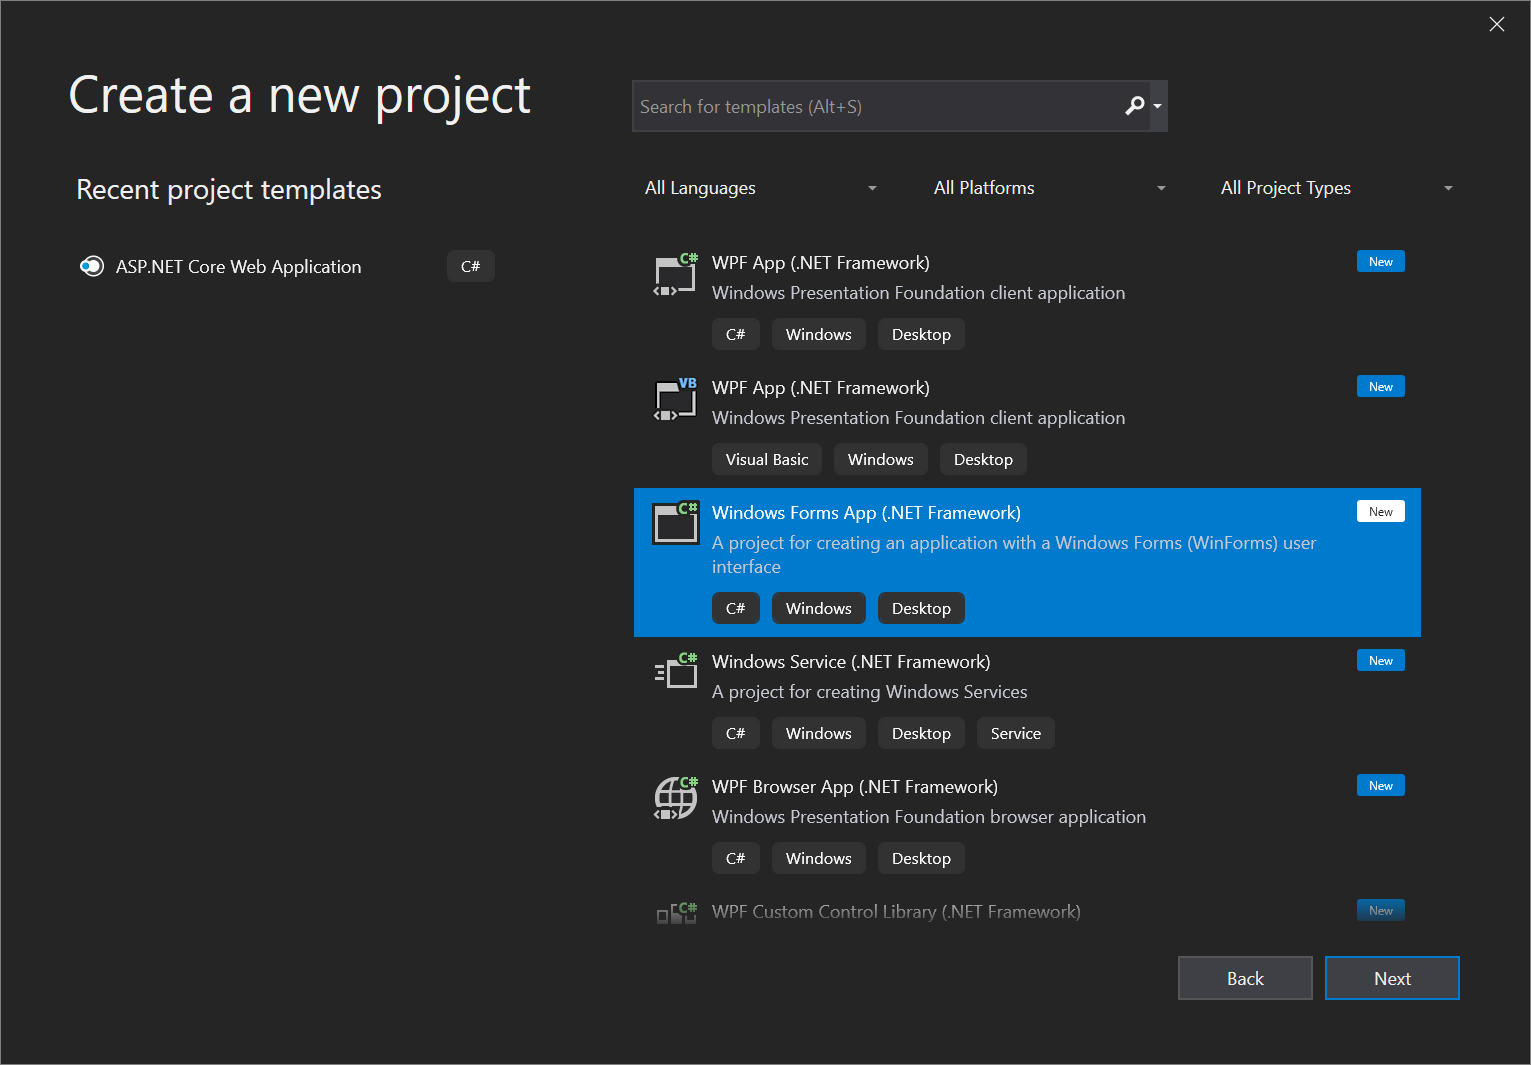
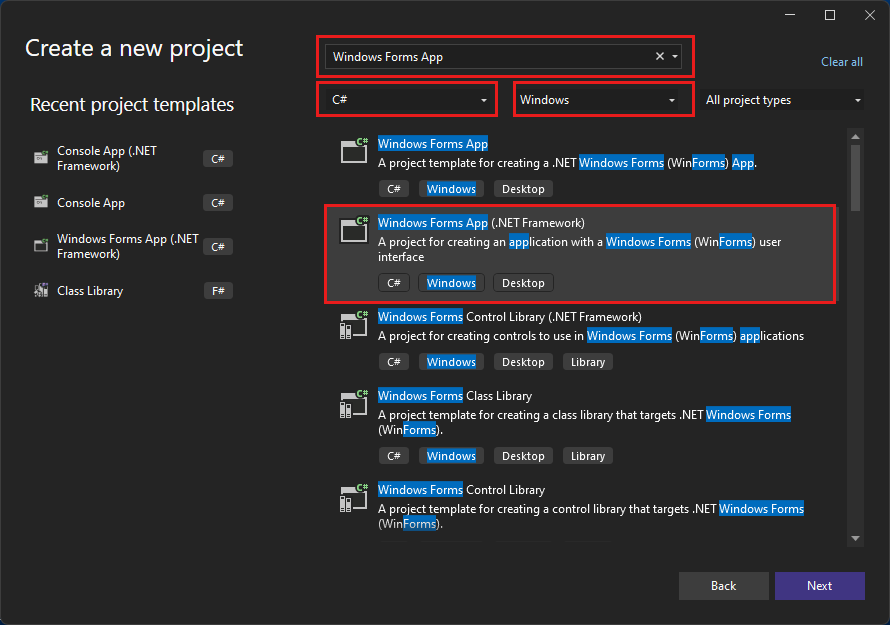
在“创建新项目” 窗口中,为 C# 选择“Windows 窗体应用(.NET Framework)” 模板。
(如果愿意,可以优化搜索以快速访问所需的模板。例如,在搜索框中输入或键入“Windows 窗体应用”。接下来,从“语言”列表中选择“C#”,然后从“平台”列表中选择“Windows”。)
注意
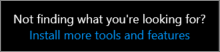
如果未看到“Windows 窗体应用(.NET Framework)” 模板,则可以通过“创建新项目” 窗口安装该模板。 在“找不到所需内容?”消息中,选择“安装更多工具和功能”链接 。
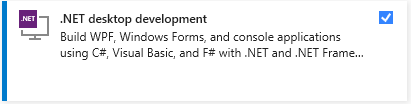
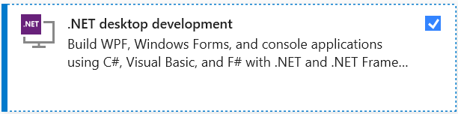
接下来,在 Visual Studio 安装程序中,选择“.NET 桌面开发”工作负载。
之后,在 Visual Studio 安装程序中选择“修改”按钮 。 系统可能会提示你保存所有内容;如果出现提示,请按照指示进行操作。 接下来,选择“继续”,以安装工作负载 。 然后,返回到“创建项目”过程中的步骤 2。
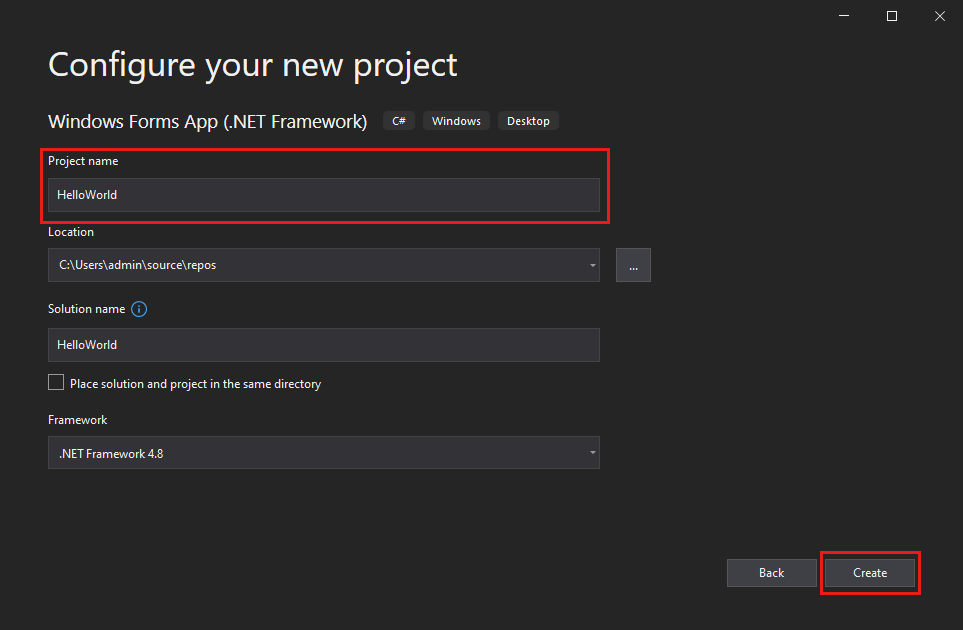
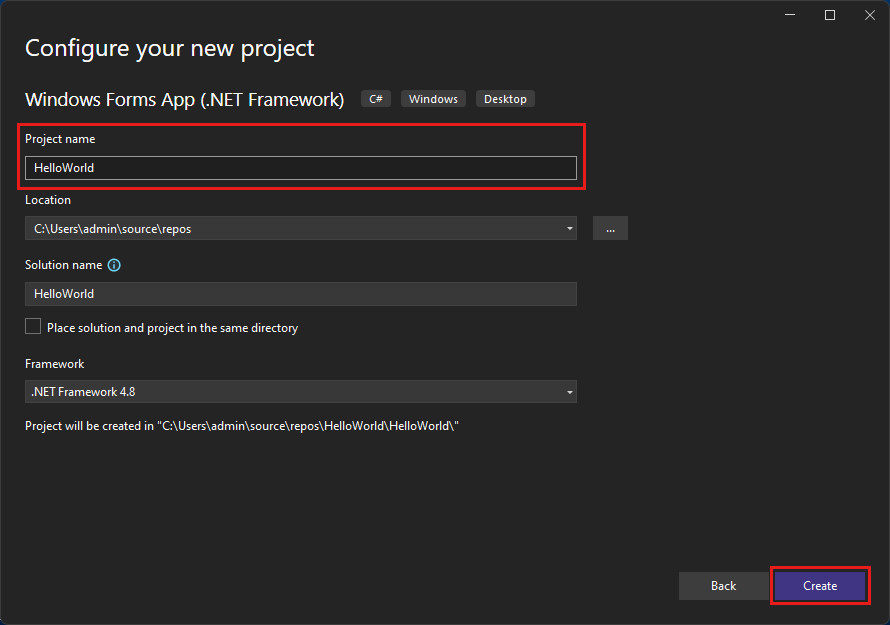
在“配置新项目”窗口中,在“项目名称”框中键入或输入“HelloWorld” 。 然后,选择“创建” 。
此时,Visual Studio 将打开新项目。
打开 Visual Studio。
在“开始”窗口中,选择“创建新项目”。
在“创建新项目”窗口中,为 C# 选择“Windows 窗体应用(.NET Framework)”模板 。
(如果愿意,可以优化搜索以快速访问所需的模板。例如,在搜索框中输入或键入“Windows 窗体应用”。接下来,从“语言”列表中选择“C#”,然后从“平台”列表中选择“Windows”。)
注意
如果未看到“Windows 窗体应用(.NET Framework)” 模板,则可以通过“创建新项目” 窗口安装该模板。 在“找不到所需内容?”消息中,选择“安装更多工具和功能”链接 。
接下来,在 Visual Studio 安装程序中,选择“.NET 桌面开发”工作负载。
之后,在 Visual Studio 安装程序中选择“修改”按钮。 系统可能会提示你保存所有内容;如果出现提示,请按照指示进行操作。 接下来,选择“继续”以安装工作负载。 然后,返回到“创建项目”过程中的步骤 2。
在“配置新项目”窗口中,在“项目名称”框中键入或输入“HelloWorld” 。 然后选择“创建”。
此时,Visual Studio 将打开新项目。
创建应用程序
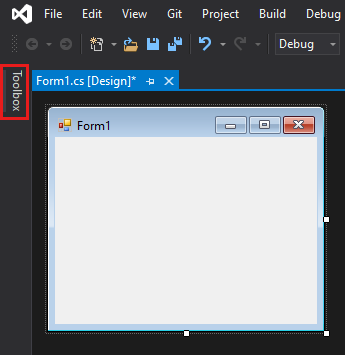
选择 C# 项目模板并为文件命名后,Visual Studio 会打开一个窗体。 窗体就是 Windows 用户界面。 通过向窗体添加控件创建“Hello World”应用程序,然后运行该应用程序。
向窗体添加按钮
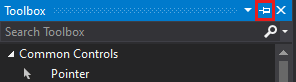
选择“工具箱”,打开“工具箱”弹出窗口。
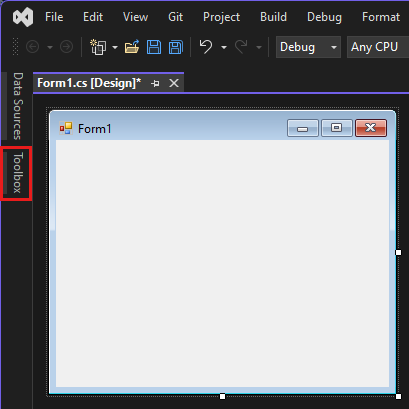
(如果没有看到“工具箱”浮出控件选项,可以从菜单栏中打开它。为此,请选择“查看”>“工具箱”。或者,按 Ctrl+Alt+X。)
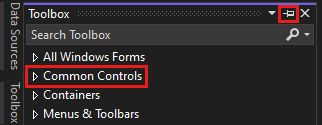
展开“常见控件”,然后选择“固定”图标以停靠“工具箱”窗口。
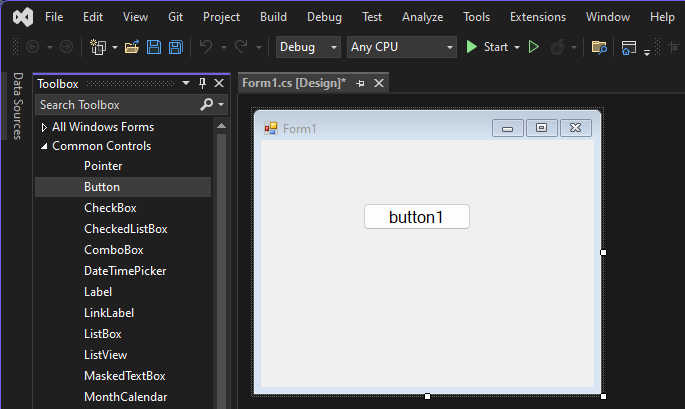
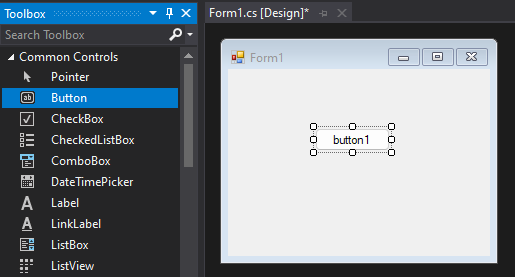
选择“按钮”控件,然后将其拖到窗体上。
在属性窗口中,找到“文本”,将名称从“Button1”更改为
Click this然后按 Enter 。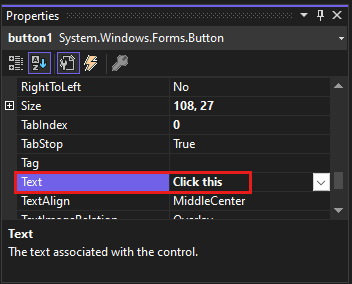
(如果没有看到“属性”窗口,可以从菜单栏打开它。为此,请选择“查看”>“属性窗口”。或者,按 F4。)
在属性窗口的“设计”部分,将名称从“Button1”更改为
btnClickThis,然后按 Enter 。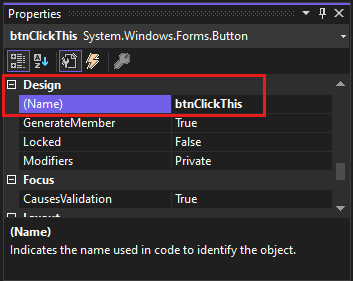
注意
如果按字母顺序排列了属性窗口列表,则 button1 会显示在 (DataBindings) 部分中 。
向窗体添加标签
添加创建操作的按钮控件后,我们来添加发送文本的标签控件。
从“工具箱”窗口选择“标签”控件,然后将其拖到窗体上,并放到“单击此处”按钮下方 。
在属性窗口的“设计”部分或“(DataBindings)”部分,将 label1 的名称更改为
lblHelloWorld,然后按 Enter 。
向窗体添加代码
在“Form1.cs [设计]”窗口中,双击“单击此处”按钮,打开“Form1.cs”窗口。
(或者,可在“解决方案资源管理器” 中展开“Form1.cs” ,然后选择“Form1” 。)
在“Form1.cs” 窗口中,在“private void” 行后,键入或输入
lblHelloWorld.Text = "Hello World!";,如以下屏幕截图所示: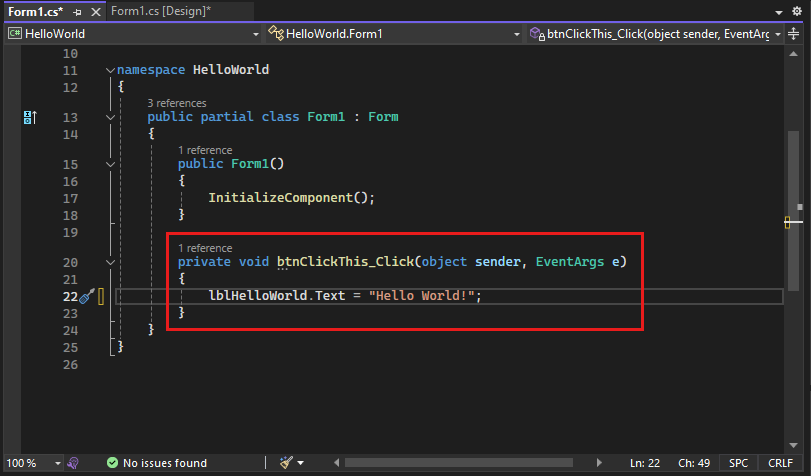
运行应用程序
选择“启动”按钮运行应用程序。

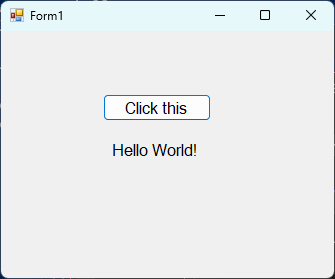
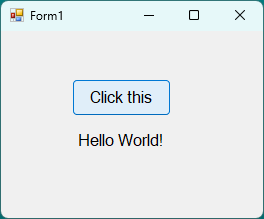
将出现以下几种情况。 在 Visual Studio IDE 中,“诊断工具”窗口打开,同时还会打开一个“输出”窗口 。 在 IDE 外部,会出现一个“Form1”对话框 。 其中包含“单击此处”按钮和显示“label1”的文本 。
选择“Form1”对话框中的“单击此处”按钮 。 请注意,“label1”文本会更改为“Hello World!” 。
关闭“Form1” 对话框以停止运行应用。
创建应用程序
选择 C# 项目模板并为文件命名后,Visual Studio 会打开一个窗体。 窗体就是 Windows 用户界面。 通过向窗体添加控件创建“Hello World”应用程序,然后运行该应用程序。
向窗体添加按钮
选择“工具箱”,打开“工具箱”弹出窗口 。
(如果没有看到“工具箱”浮出控件选项,可以从菜单栏中打开它。为此,请选择“查看”>“工具箱”。或者,按 Ctrl+Alt+X。)
选择“固定” 图标,固定“工具箱” 窗口。
选择“按钮” 控件,然后将其拖到窗体上。
在“属性” 窗口中,找到“文本” ,将名称从“Button1” 更改为
Click this然后按 Enter 。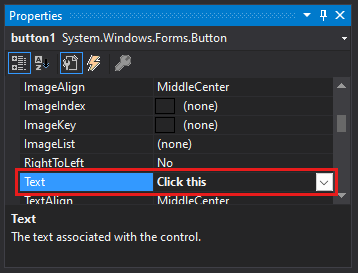
(如果没有看到“属性”窗口,可以从菜单栏打开它。为此,请选择“查看”>“属性窗口”。或者,按 F4。)
在“属性”窗口的“设计”部分,将名称从“Button1”更改为
btnClickThis,然后按 Enter 。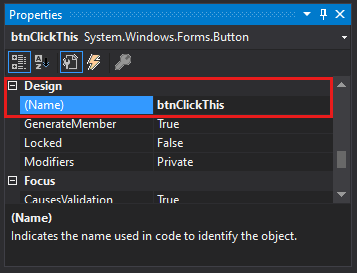
注意
如果按字母顺序排列了“属性” 窗口列表,则 Button1 会显示在 (DataBindings) 部分中。
向窗体添加标签
添加创建操作的按钮控件后,我们来添加发送文本的标签控件。
从“工具箱”窗口选择“标签”控件,然后将其拖到窗体上,并放到“单击此处”按钮下方 。
在“属性” 窗口的“设计” 部分或“(DataBindings)” 部分,将“Label1” 的名称更改为
lblHelloWorld,然后按 Enter 。
向窗体添加代码
在“Form1.cs [设计]”窗口中,双击“单击此处”按钮,打开“Form1.cs”窗口。
(或者,可以在“解决方案资源管理器”中展开“Form1.cs”,然后从“Form1.cs”上的右键菜单中选择“查看代码”(或按 F7)。)
在“Form1.cs” 窗口中,在“private void” 行后,键入或输入
lblHelloWorld.Text = "Hello World!";,如以下屏幕截图所示: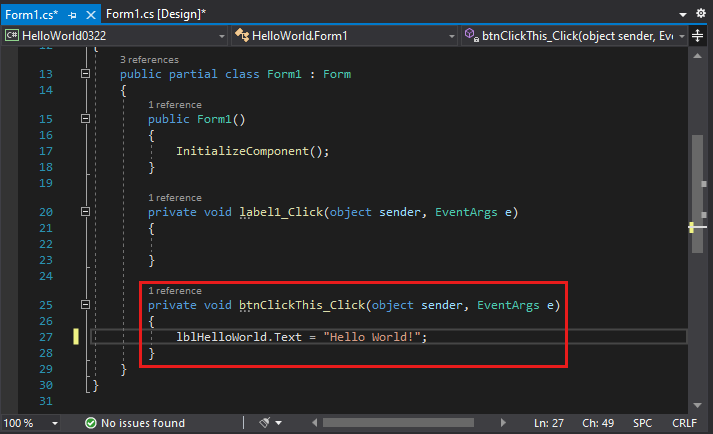
运行应用程序
选择“启动” 按钮运行应用程序。

将出现以下几种情况。 在 Visual Studio IDE 中,“诊断工具”窗口打开,同时还会打开一个“输出”窗口 。 在 IDE 外部,会出现一个“Form1”对话框 。 其中包含“单击此处”按钮和显示“Label1”的文本 。
选择“Form1” 对话框中的“单击此处” 按钮。 请注意,“Label1”文本会更改为“Hello World!” 。
关闭“Form1” 对话框以停止运行应用。
后续步骤
恭喜你完成本教程。 要更加深入地了解,请继续学习下面的教程:
请参阅
反馈
即将发布:在整个 2024 年,我们将逐步淘汰作为内容反馈机制的“GitHub 问题”,并将其取代为新的反馈系统。 有关详细信息,请参阅:https://aka.ms/ContentUserFeedback。
提交和查看相关反馈