创建规则以发送 AD FS 1.x 兼容声明
在使用 Active Directory 联合身份验证服务 (AD FS) 颁发由运行 AD FS 1.0 (Windows Server 2003 R2) 或 AD FS 1.1(Windows Server 2008 或 Windows Server 2008 R2)的联合服务器接收的声明的情况下,必须执行以下操作:
创建一个规则来发送格式为 UPN、电子邮件或公用名的名称 ID 声明类型。
发送的所有其他声明必须具有以下声明类型之一:
AD FS 1.x 电子邮件地址
AD FS 1.x UPN
公用名
组
以
https://schemas.xmlsoap.org/claims/开头的任何其他声明类型,如https://schemas.xmlsoap.org/claims/EmployeeID
根据组织的需求,使用以下任一过程创建与 AD FS 1.x 兼容的 NameID 声明:
使用“传递或筛选传入声明”规则模板创建此规则以颁发 AD FS 1.x 名称 ID 声明
使用“转换传入声明”规则模板创建此规则以颁发 AD FS 1.x 名称 ID 声明。 如果要将现有声明类型更改为可用于 AD FS 1.x 声明的新声明类型,则可使用此规则模板。
注意
要使此规则按预期工作,请确保你在其中创建此规则的信赖方信任或声明提供方信任已配置为使用 AD FS 1.0 和 1.1 配置文件。
在 Windows Server 2016 中的信赖方信任上使用“传递或筛选传入声明”规则模板创建规则以颁发 AD FS 1.x 名称 ID 声明
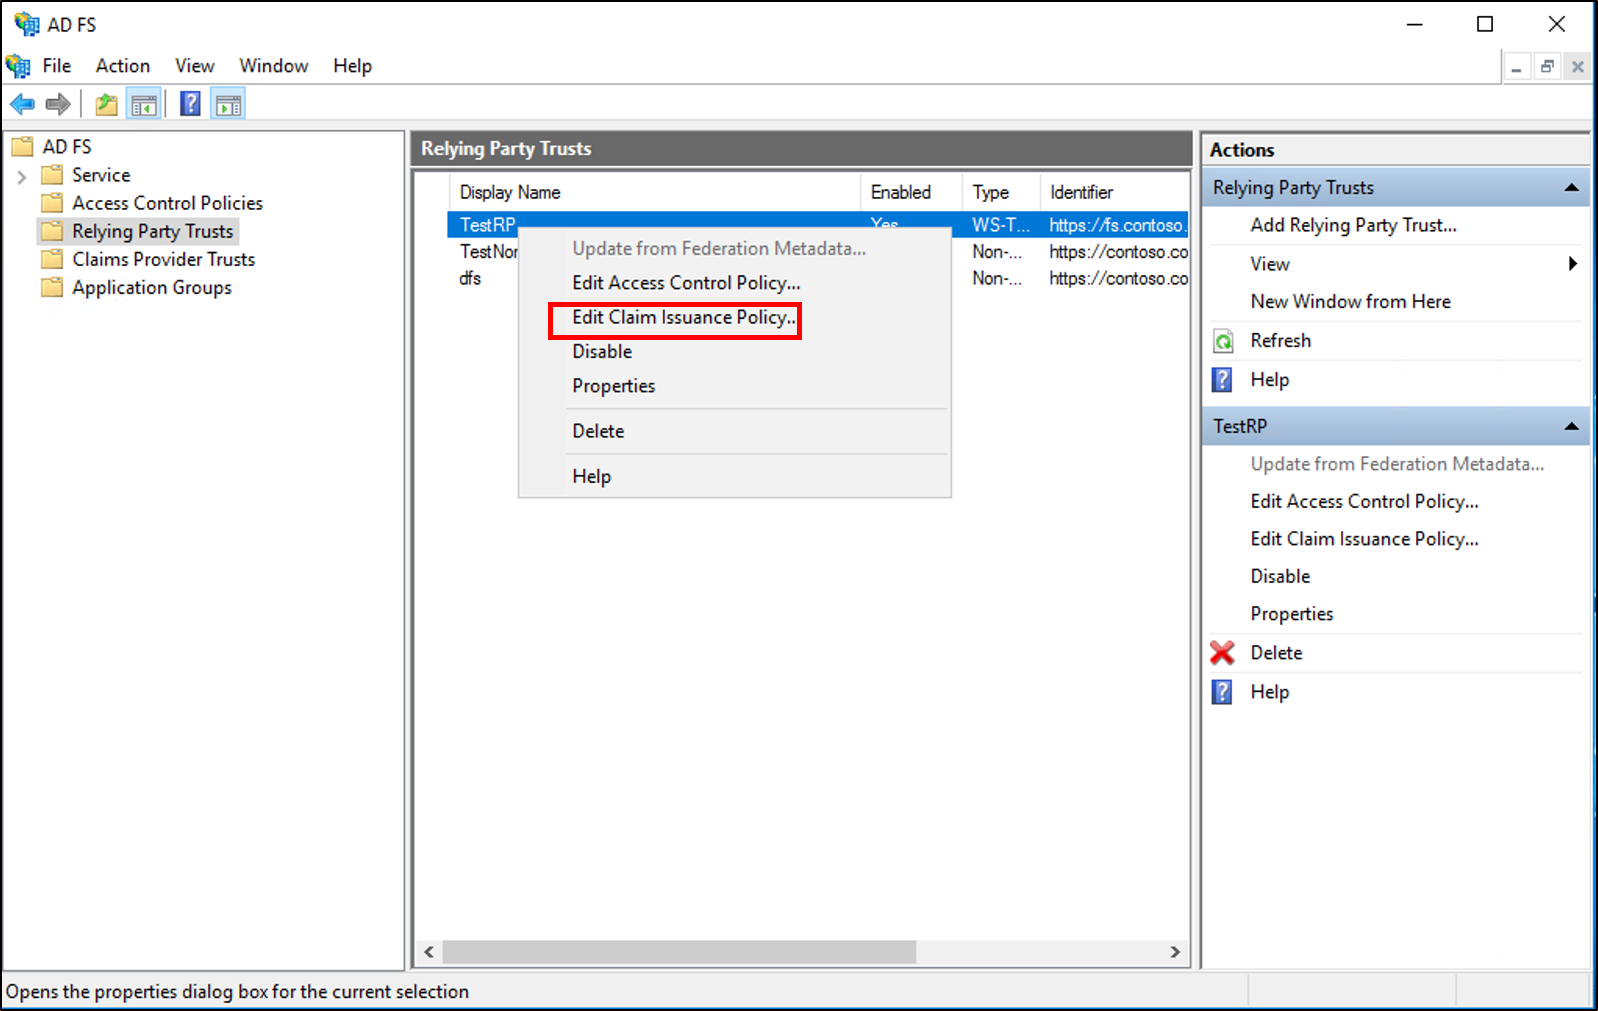
在服务器管理器中,单击“工具”,选择“AD FS 管理”。
在控制台树中的“AD FS”下,单击“信赖方信任”。

右键单击所选信任,然后单击“编辑声明颁发策略”。
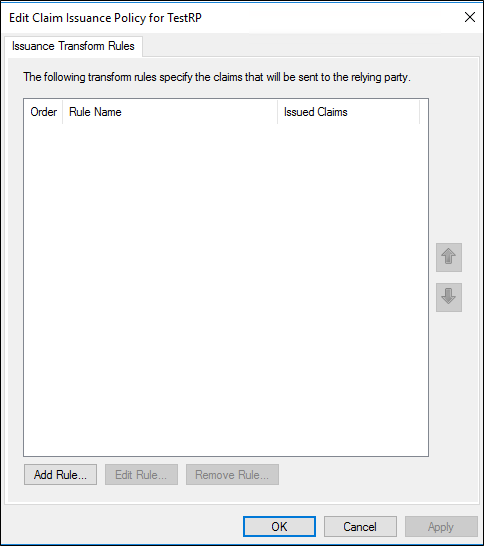
在“编辑声明颁发策略”对话框中的“颁发转换规则”下,单击“添加规则”以启动规则向导。
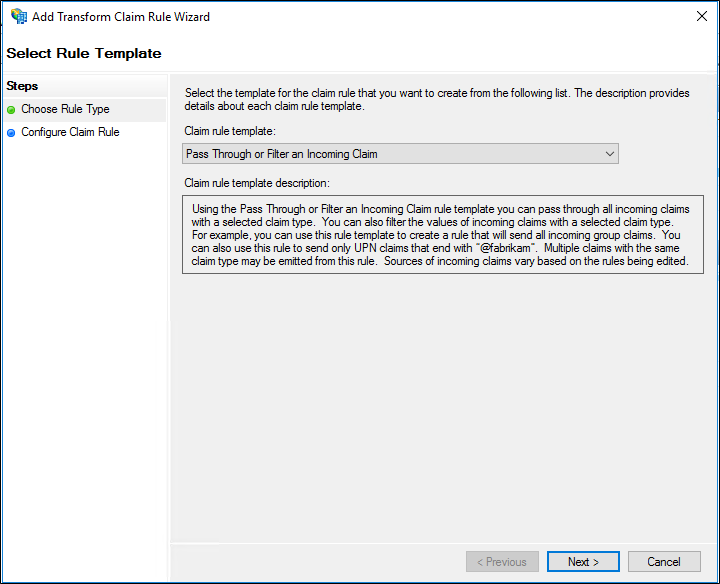
在“选择规则模板”页上的“声明规则模板”下,从列表中选择“传递或筛选传入声明”,然后单击“下一步”。
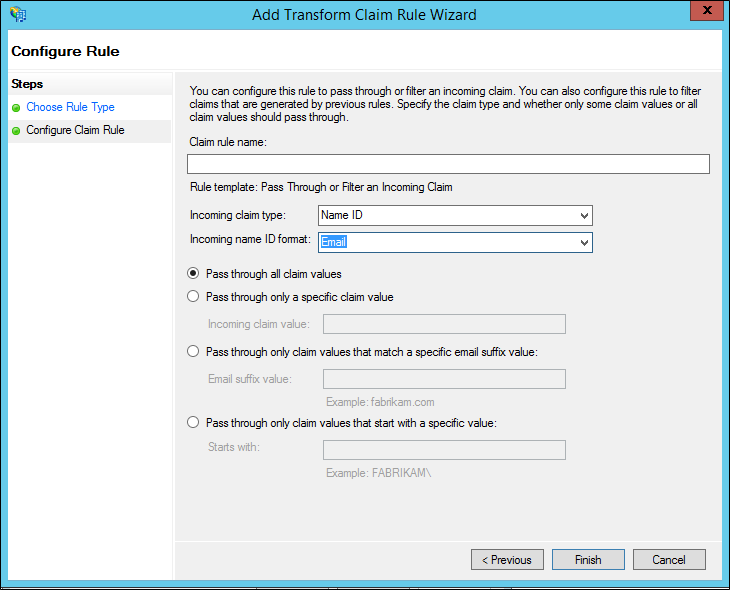
在“配置规则”页上,键入声明规则名称。
在“传入声明类型”中,在列表中选择“名称 ID”。
在“传入名称 ID 格式”中,从列表中选择以下与 AD FS 1.x 兼容的声明格式之一:
UPN
电子邮件
公用名
根据组织的需求,选择以下任一选项:
传递所有声明值
仅传递特定的声明值
仅传递与特定的电子邮件后缀值匹配的声明值
仅传递以特定值开头的声明值
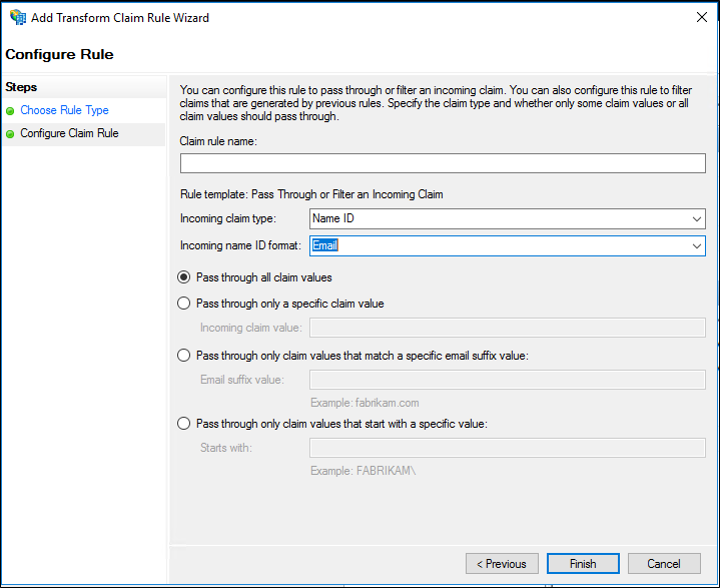
单击“完成”,然后单击“确定”保存规则。
在 Windows Server 2016 中的声明提供方信任上使用“传递或筛选传入声明”规则模板创建规则以颁发 AD FS 1.x 名称 ID 声明
在服务器管理器中,单击“工具”,选择“AD FS 管理”。
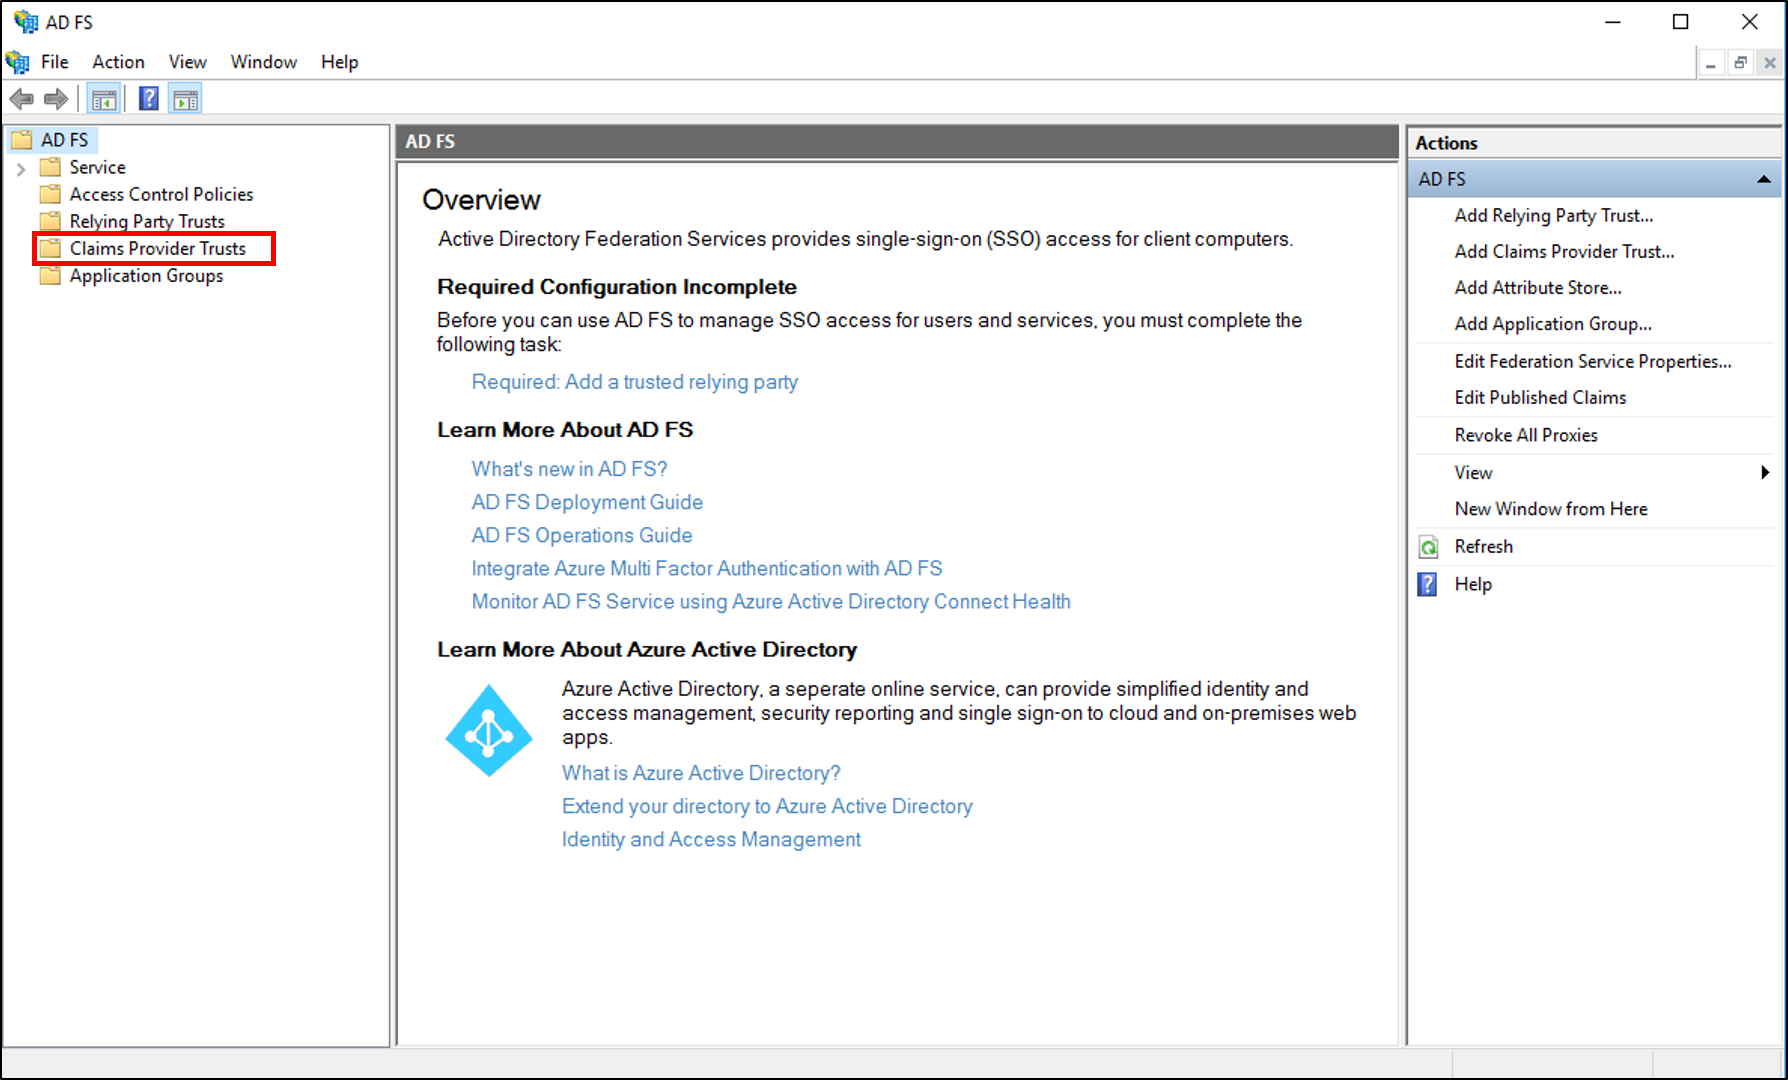
在控制台树中的“AD FS”下,单击“声明提供方信任”。
右键单击所选信任,然后单击“编辑声明规则”。
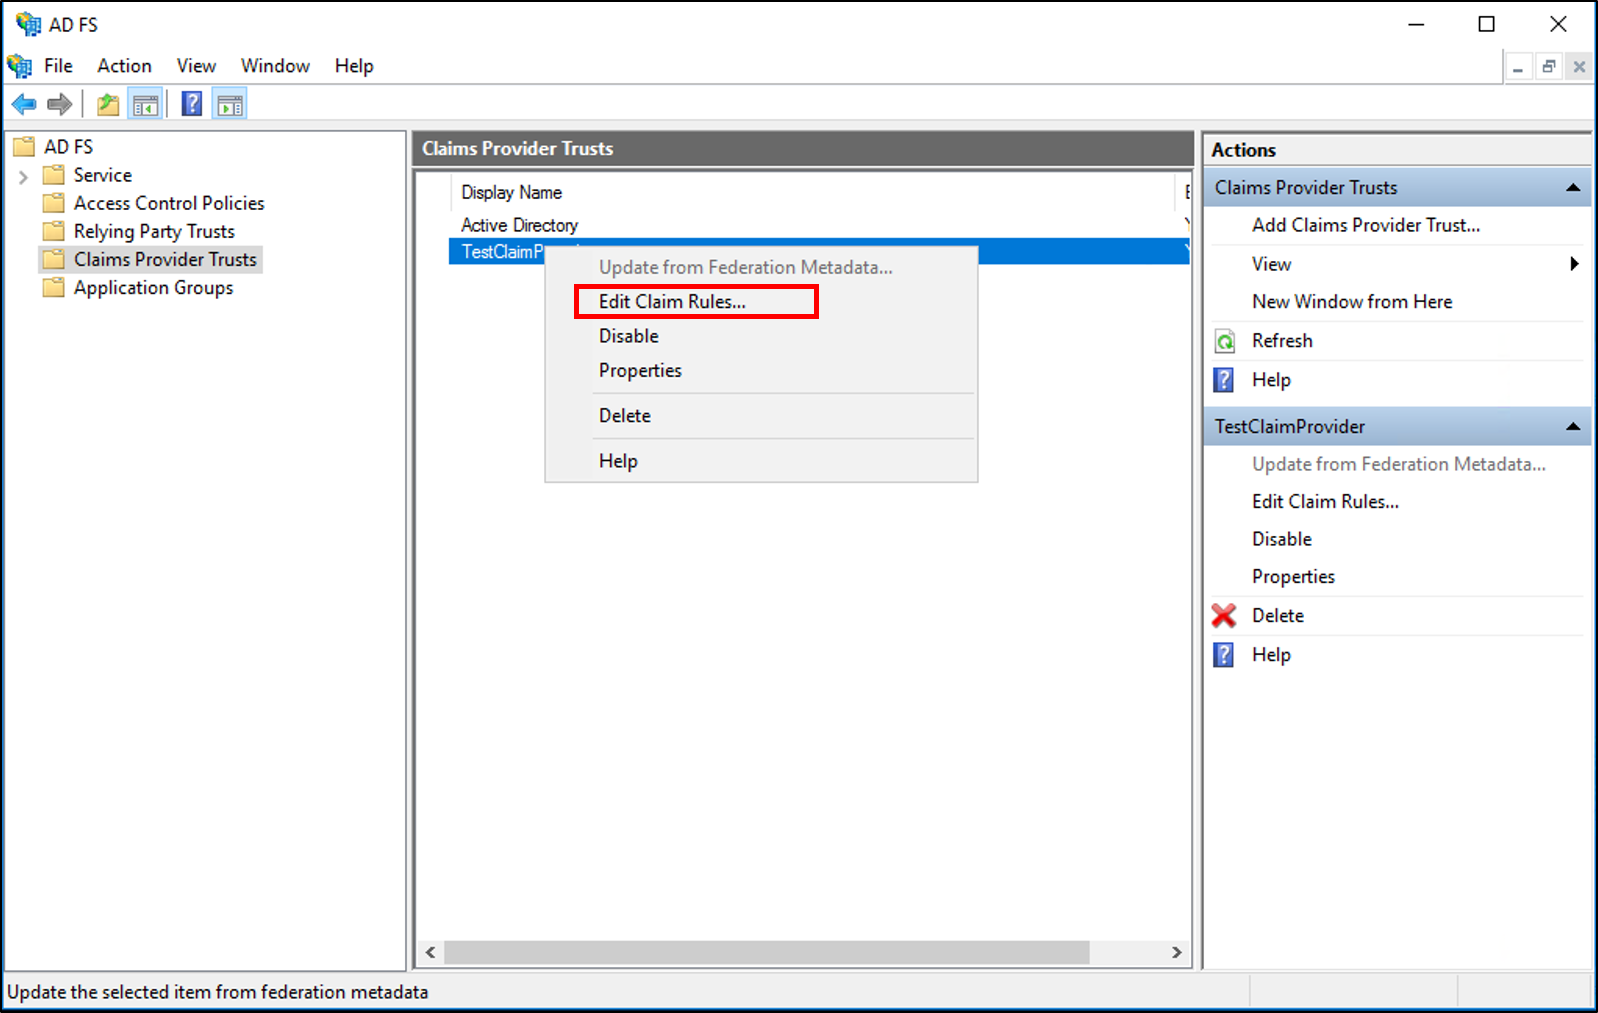
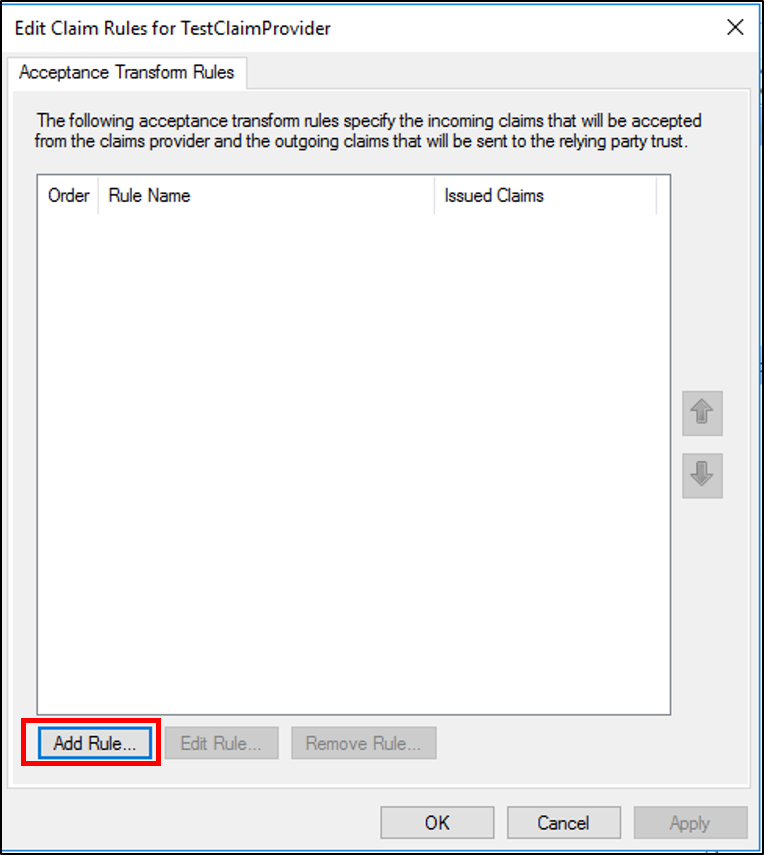
在“编辑声明规则”对话框中的“接受转换规则”下,单击“添加规则”以启动规则向导。
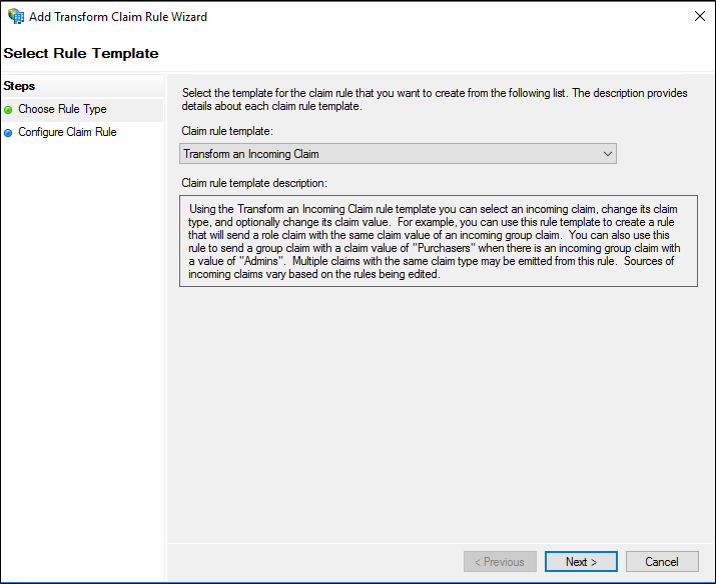
在“选择规则模板”页上的“声明规则模板”下,从列表中选择“传递或筛选传入声明”,然后单击“下一步”。
在“配置规则”页上,键入声明规则名称。
在“传入声明类型”中,在列表中选择“名称 ID”。
在“传入名称 ID 格式”中,从列表中选择以下与 AD FS 1.x 兼容的声明格式之一:
UPN
电子邮件
公用名
根据组织的需求,选择以下任一选项:
传递所有声明值
仅传递特定的声明值
仅传递与特定的电子邮件后缀值匹配的声明值
仅传递以特定值开头的声明值
单击“完成”,然后单击“确定”保存规则。
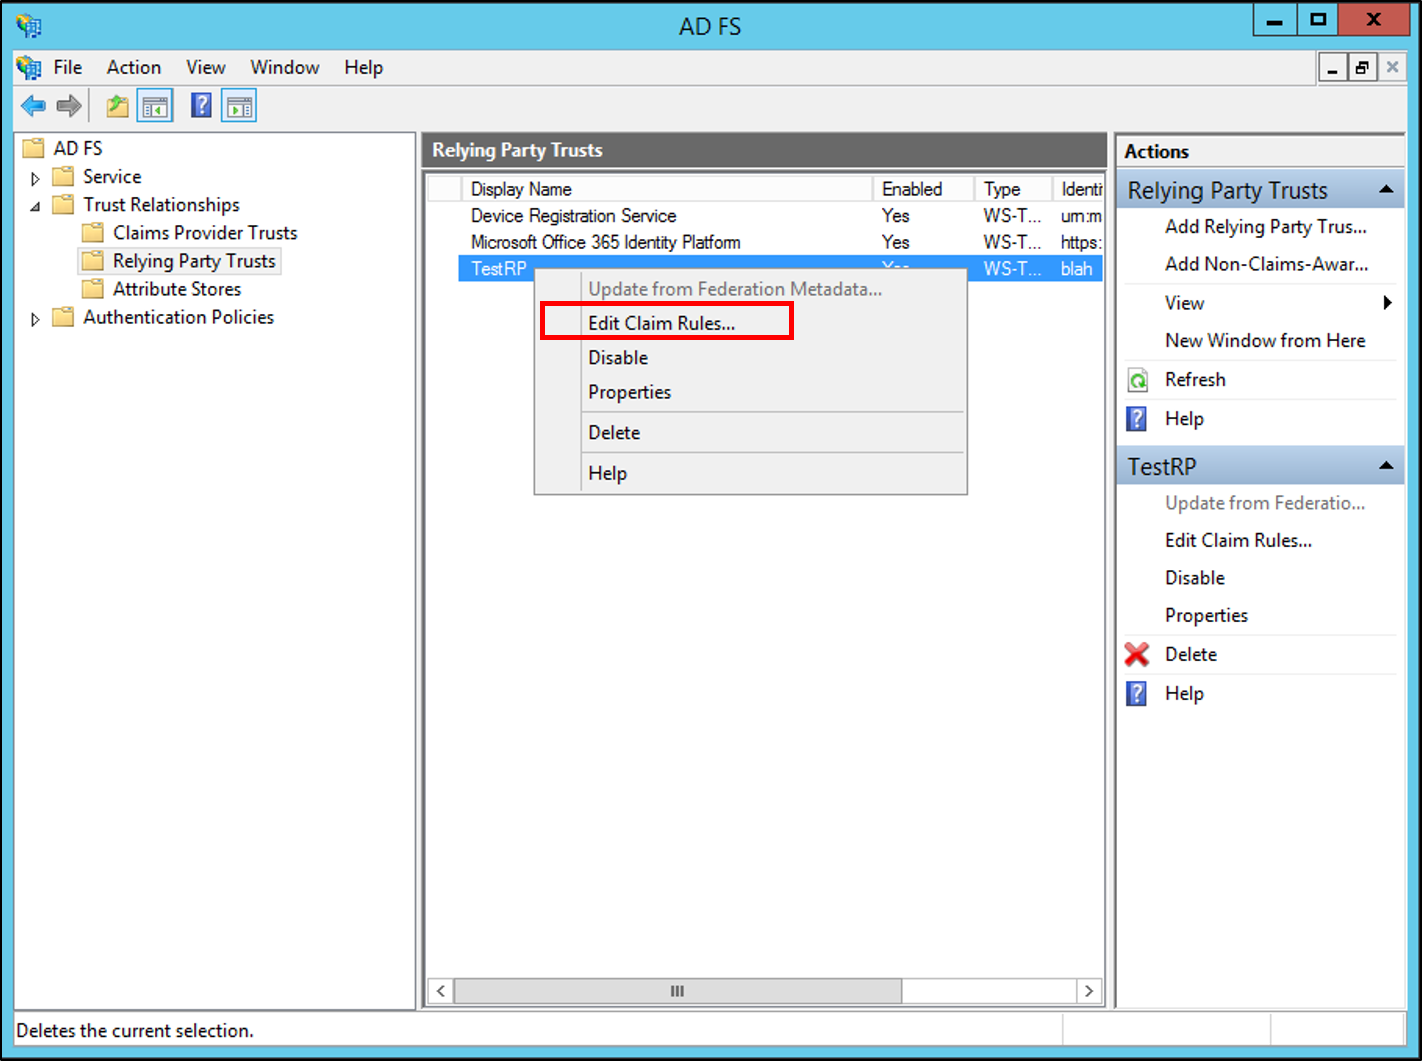
在 Windows Server 2016 中的信赖方信任上创建规则以转换传入声明
在服务器管理器中,单击“工具”,选择“AD FS 管理”。
在控制台树中的“AD FS”下,单击“信赖方信任”。
右键单击所选信任,然后单击“编辑声明颁发策略”。
在“编辑声明颁发策略”对话框中的“颁发转换规则”下,单击“添加规则”以启动规则向导。
在“选择规则模板”页上的“声明规则模板”下,从列表中选择“转换传入声明”,然后单击“下一步”。
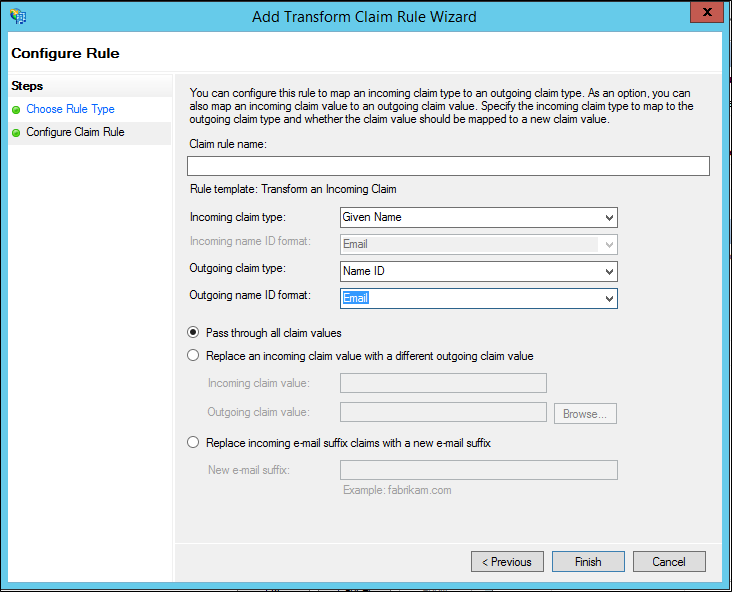
在“配置规则”页上,键入声明规则名称。
在“传入声明类型”中,在列表中选择要转换的传入声明的类型。
在“传出声明类型”中,在列表中选择“名称 ID”。
在“传出名称 ID 格式”中,从列表中选择以下与 AD FS 1.x 兼容的声明格式之一:
UPN
电子邮件
公用名
根据组织的需求,选择以下任一选项:
传递所有声明值
将传入声明值替换为不同的传出声明值
将传入电子邮件后缀声明替换为新的电子邮件后缀
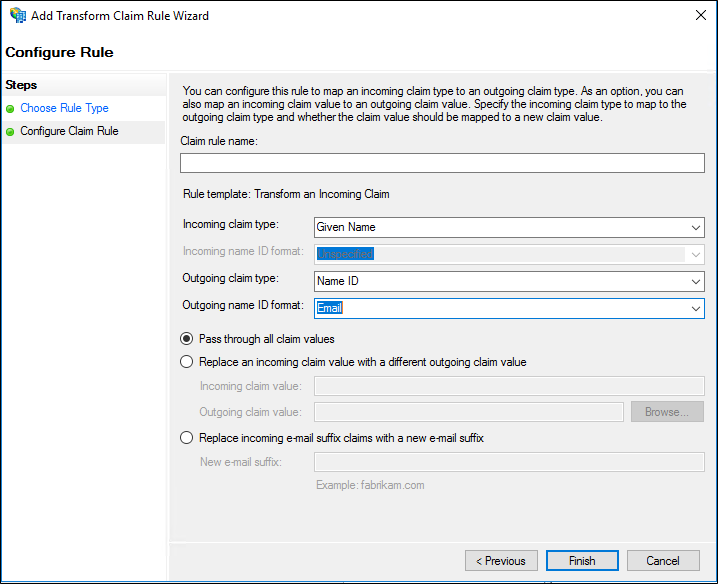
单击“完成”,然后单击“确定”保存规则。
在 Windows Server 2016 中的声明提供方信任上创建规则以转换传入声明
在服务器管理器中,单击“工具”,选择“AD FS 管理”。
在控制台树中的“AD FS”下,单击“声明提供方信任”。
右键单击所选信任,然后单击“编辑声明规则”。
在“编辑声明规则”对话框中的“接受转换规则”下,单击“添加规则”以启动规则向导。
在“选择规则模板”页上的“声明规则模板”下,从列表中选择“转换传入声明”,然后单击“下一步”。
在“配置规则”页上,键入声明规则名称。
在“传入声明类型”中,在列表中选择要转换的传入声明的类型。
在“传出声明类型”中,在列表中选择“名称 ID”。
在“传出名称 ID 格式”中,从列表中选择以下与 AD FS 1.x 兼容的声明格式之一:
UPN
电子邮件
公用名
根据组织的需求,选择以下任一选项:
传递所有声明值
将传入声明值替换为不同的传出声明值
将传入电子邮件后缀声明替换为新的电子邮件后缀
单击“完成”,然后单击“确定”保存规则。
在 Windows Server 2012 R2 上使用“传递或筛选传入声明”规则模板创建规则以颁发 AD FS 1.x 名称 ID 声明
在服务器管理器中单击“工具”,然后单击“AD FS 管理”。
在控制台树中的“AD FS\信任关系”下,单击“声明提供方信任”或“信赖方信任”,然后在列表中单击要在其中创建此规则的特定信任。
右键单击所选信任,然后单击“编辑声明规则”。
在“编辑声明规则”对话框中,选择以下选项卡之一,具体取决于要编辑的信任以及要在其中创建此规则的规则集,然后单击“添加规则”以启动与该规则集关联的规则向导:
接受转换规则
颁发转换规则
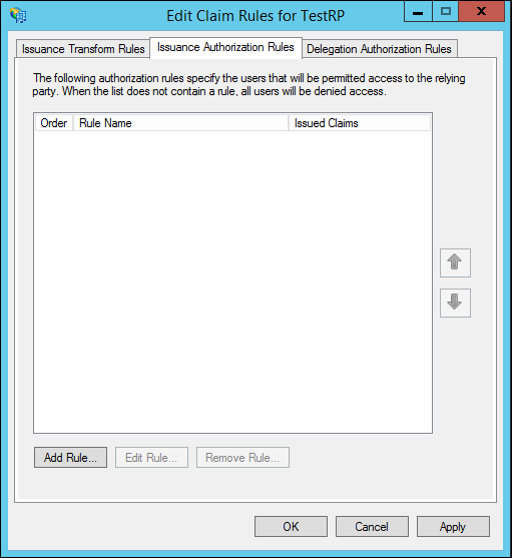
颁发授权规则
委派授权规则
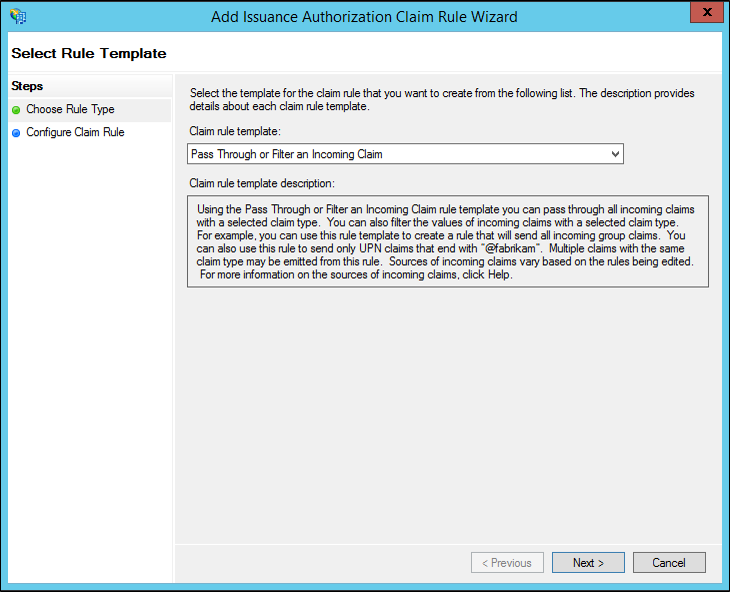
在“选择规则模板”页上的“声明规则模板”下,从列表中选择“传递或筛选传入声明”,然后单击“下一步”。
在“配置规则”页上,键入声明规则名称。
在“传入声明类型”中,在列表中选择“名称 ID”。
在“传入名称 ID 格式”中,从列表中选择以下与 AD FS 1.x 兼容的声明格式之一:
UPN
电子邮件
公用名
根据组织的需求,选择以下任一选项:
传递所有声明值
仅传递特定的声明值
仅传递与特定的电子邮件后缀值匹配的声明值
仅传递以特定值开头的声明值
单击“完成”,然后单击“确定”保存规则。
在 Windows Server 2012 R2 中使用“转换传入声明”规则模板创建规则以颁发 AD FS 1.x 名称 ID 声明
在服务器管理器中单击“工具”,然后单击“AD FS 管理”。
在控制台树中的“AD FS\信任关系”下,单击“声明提供方信任”或“信赖方信任”,然后在列表中单击要在其中创建此规则的特定信任。
右键单击所选信任,然后单击“编辑声明规则”。
在“编辑声明规则”对话框中,选择以下选项卡之一,具体取决于要编辑的信任以及要在其中创建此规则的规则集,然后单击“添加规则”以启动与该规则集关联的规则向导:
接受转换规则
颁发转换规则
颁发授权规则
委派授权规则
在“选择规则模板”页上的“声明规则模板”下,从列表中选择“转换传入声明”,然后单击“下一步”。

在“配置规则”页上,键入声明规则名称。
在“传入声明类型”中,在列表中选择要转换的传入声明的类型。
在“传出声明类型”中,在列表中选择“名称 ID”。
在“传出名称 ID 格式”中,从列表中选择以下与 AD FS 1.x 兼容的声明格式之一:
UPN
电子邮件
公用名
根据组织的需求,选择以下任一选项:
传递所有声明值
将传入声明值替换为不同的传出声明值
将传入电子邮件后缀声明替换为新的电子邮件后缀
单击“完成”,然后单击“确定”保存规则。
其他参考
反馈
即将发布:在整个 2024 年,我们将逐步淘汰作为内容反馈机制的“GitHub 问题”,并将其取代为新的反馈系统。 有关详细信息,请参阅:https://aka.ms/ContentUserFeedback。
提交和查看相关反馈